1. บทนำ
The Hioki CM3286 Clamp On Power Tester is a versatile instrument designed for precise measurement of electrical parameters. It is capable of measuring voltage, current, power, power factor, phase angle, reactive power, and frequency. Additionally, it can detect phase sequence on live lines within single-phase or three-phase circuits at any desired point. This manual provides essential information for the safe and effective operation, maintenance, and troubleshooting of your CM3286 device.
2. ข้อมูลด้านความปลอดภัย
คำเตือน: โปรดอ่านคำเตือนและคำแนะนำด้านความปลอดภัยทั้งหมดก่อนใช้ผลิตภัณฑ์นี้ การไม่ปฏิบัติตามคำเตือนและคำแนะนำอาจทำให้เกิดไฟฟ้าช็อต ไฟไหม้ หรือการบาดเจ็บร้ายแรงได้
- Always observe local and national safety codes.
- ห้ามใช้อุปกรณ์หากพบว่าชำรุดหรือทำงานผิดปกติ
- Ensure the device is rated for the voltage and current levels you intend to measure.
- Wear appropriate personal protective equipment (PPE), such as insulated gloves and eye protection.
- Avoid touching live conductors with bare hands or non-insulated tools.
- Do not operate the device in wet environments or explosive atmospheres.
- Keep fingers behind the tactile barrier on the instrument during measurements.
- Disconnect the device from the circuit before opening the battery compartment.
3. เนื้อหาบรรจุภัณฑ์
Verify that all items listed below are present and undamaged upon opening the package:
- ฮิโอกิ CM3286 Clamp On Power Tester Unit
- สายทดสอบ (สีแดงและสีดำ)
- กระเป๋าใส่อุปกรณ์
- แบตเตอรี่ AAA (x2)
- คู่มือการใช้งาน (เอกสารนี้)
4. คุณสมบัติและส่วนประกอบของผลิตภัณฑ์

Figure 4.1: Hioki CM3286 Clamp On Power Tester (Overall View)
This image displays the complete Hioki CM3286 Clamp On Power Tester, showcasing its ergonomic design, the large clamp jaw for current measurement, and the clear digital display. The function dial and various control buttons are visible on the front panel.
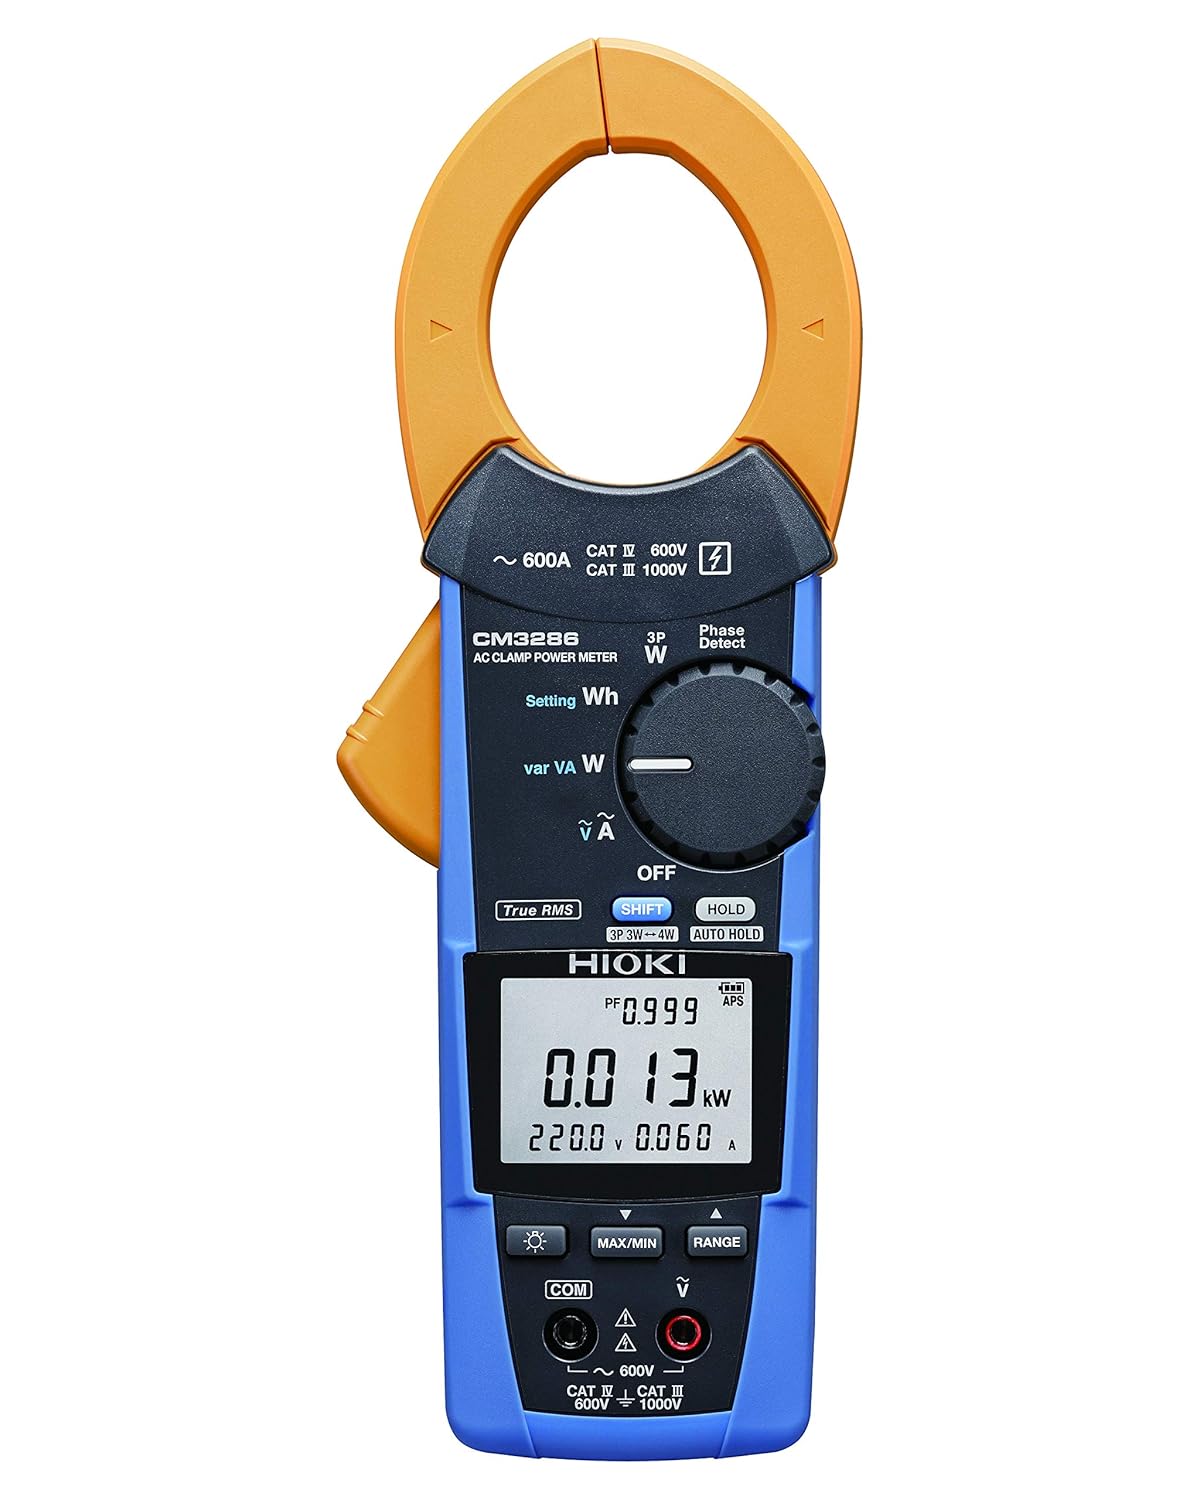
Figure 4.2: Hioki CM3286 Clamp On Power Tester (Front Panel Detail)
This image provides a closer look at the front panel of the Hioki CM3286, highlighting the digital display, the rotary function dial with various measurement settings (e.g., W, Wh, V, A), and the control buttons such as SHIFT, HOLD, MAX/MIN, and RANGE. The input terminals for voltage measurement are also visible at the bottom.
ส่วนประกอบหลัก:
- Clamp ขากรรไกร: ใช้สำหรับการวัดกระแสไฟฟ้า AC แบบไม่สัมผัส
- แป้นหมุนเลือกฟังก์ชัน: Selects the desired measurement mode (e.g., Voltage, Current, Power, Frequency).
- จอแสดงผล LCD: แสดงค่าการวัด หน่วย และตัวบ่งชี้
- ช่องเสียบอินพุต: สำหรับเชื่อมต่อสายทดสอบสำหรับวัดระดับเสียงtage and other measurements.
- ปุ่มถือ: หยุดการแสดงค่าปัจจุบันบนหน้าจอ
- ปุ่มสูงสุด/นาที: Records maximum and minimum readings.
- ปุ่มช่วง: Manually selects the measurement range.
- ปุ่ม SHIFT: Accesses secondary functions marked in blue on the dial.
5. การตั้งค่า
5.1. การติดตั้งแบตเตอรี่
- ตรวจสอบให้แน่ใจว่าอุปกรณ์ปิดอยู่
- หาฝาปิดช่องใส่แบตเตอรี่ที่ด้านหลังของตัวเครื่อง
- Use a screwdriver (if necessary) to open the cover.
- ใส่แบตเตอรี่ AAA สอง (2) ก้อน โดยสังเกตขั้วที่ถูกต้อง (+/-) ตามที่ระบุไว้ภายในช่องใส่แบตเตอรี่
- ปิดฝาช่องใส่แบตเตอรี่กลับเข้าที่และขันให้แน่น
5.2. เปิดเครื่องครั้งแรก
After battery installation, turn the function dial from "OFF" to any measurement setting to power on the device. The display should illuminate, indicating readiness for use.
6. คู่มือการใช้งาน
6.1. เปิด/ปิดเครื่อง
- To power on, rotate the function dial from the "OFF" position to the desired measurement function.
- To power off, rotate the function dial back to the "OFF" position.
6.2. การวัดกระแสไฟฟ้าสลับ (Cl)amp)
- Rotate the function dial to the "A" (Current) setting.
- เปิด clamp jaw by pressing the lever.
- Enclose only one conductor (live or neutral) within the clamp ขากรรไกร ตรวจสอบให้แน่ใจว่าขากรรไกรปิดสนิทแล้ว
- อ่านค่าปัจจุบันบนจอ LCD
6.3. ฉบับtagอี การวัด (V)
- Rotate the function dial to the "V" (Voltagง) การตั้งค่า
- Connect the red test lead to the "V" input terminal and the black test lead to the "COM" input terminal.
- Connect the test leads in parallel across the circuit or component to be measured.
- อ่านเล่มที่tagค่า e บนจอ LCD
6.4. Power Measurement (W, Wh, var, VA)
The CM3286 can measure various power parameters. Select the appropriate setting on the function dial (W for active power, Wh for energy, var for reactive power, VA for apparent power). Connect test leads for voltagอีและซีแอลamp the jaw around the current conductor as per the specific measurement method outlined in the full manual (not provided here, but implied by the device's capabilities).
6.5. การวัดความถี่ (เฮิร์ตซ์)
Select the "Hz" setting on the function dial. Connect test leads across the circuit where frequency is to be measured, similar to voltagอีการวัด
6.6. Phase Sequence Detection
The device features a "Phase Detect" function. Refer to the detailed instructions in the complete manual for proper connection and interpretation of phase sequence on single-phase or three-phase circuits.
6.7. Using Buttons (HOLD, MAX/MIN, RANGE, SHIFT)
- ถือ: กดเพื่อหยุดค่าที่แสดงบนหน้าจอ กดอีกครั้งเพื่อปล่อย
- สูงสุด/นาที: Press to enter Max/Min recording mode. The display will show the maximum or minimum value recorded since activation. Press again to cycle through Max, Min, and current readings.
- พิสัย: Press to switch between auto-ranging and manual ranging. In manual ranging, press repeatedly to cycle through available ranges.
- กะ: Press to access secondary functions indicated in blue text next to the primary function on the dial.
7. การบำรุงรักษา
7.1. การทำความสะอาด
เช็ดเครื่องเบาๆงamp cloth. Do not use abrasive cleaners or solvents. Ensure the device is completely dry before storage or next use.
7.2. การเปลี่ยนแบตเตอรี่
When the low battery indicator appears on the display, replace the batteries promptly to ensure accurate measurements. Follow the battery installation steps outlined in Section 5.1.
7.3. การจัดเก็บ
Store the device in its carrying case in a cool, dry place, away from direct sunlight and extreme temperatures. If storing for extended periods, remove the batteries to prevent leakage.
8 การแก้ไขปัญหา
| ปัญหา | สาเหตุที่เป็นไปได้ | สารละลาย |
|---|---|---|
| อุปกรณ์ไม่เปิดเครื่อง | แบตเตอรี่เสียหรือติดตั้งไม่ถูกต้อง | ตรวจสอบขั้วแบตเตอรี่ เปลี่ยนแบตเตอรี่ |
| No reading on display. | Incorrect function selected; open circuit; test leads not connected properly. | Select correct function; ensure circuit is complete; check test lead connections. |
| "OL" or "OVER" displayed. | Measurement exceeds selected range or device maximum. | Select a higher range (if manual ranging) or ensure measurement is within device limits. |
| การอ่านที่ไม่ถูกต้อง | Low battery; environmental interference; damaged test leads. | Replace batteries; move away from strong electromagnetic fields; inspect and replace test leads if damaged. |
9. ข้อมูลจำเพาะ
| พารามิเตอร์ | ค่า |
|---|---|
| หมายเลขรุ่น | CM3286 |
| ยี่ห้อ | ฮิโอกิ |
| ขนาดแพ็คเกจ | 9.92 x 2.76 x 2.05 นิ้ว |
| น้ำหนักสินค้า | 0.45 กิโลกรัม (15.87 ออนซ์) |
| แบตเตอรี่ | แบตเตอรี่ AAA จำนวน 2 ก้อน (รวมอยู่ด้วย) |
| แหล่งพลังงาน | ไฟฟ้าแบบมีสาย (Note: This refers to the type of power it measures, not its own power source. The device is battery-powered.) |
| ผู้ผลิต | ฮิโอกิ |
| วันที่พร้อมใช้งานครั้งแรก | วันที่ 20 สิงหาคม 2020 |
10. การรับประกันและการสนับสนุน
For detailed warranty information, please refer to the warranty card included with your product or visit the official Hioki website. Hioki provides comprehensive customer support for its products.
If you encounter any issues not covered in this manual or require technical assistance, please contact Hioki customer support through their official channels. Ensure you have your product model number (CM3286) and purchase details ready when contacting support.
หมายเหตุ: เงื่อนไขการรับประกันอาจแตกต่างกันไปในแต่ละภูมิภาค


