การแนะนำ
The BOYA BY-DMR7 is a broadcast-quality supercardioid condenser microphone designed for use with DSLR cameras and camcorders. It features an integrated flash recorder capable of capturing 24-bit/48 kHz WAV audio files directly to a MicroSDHC card (up to 32 GB, sold separately). This manual provides comprehensive instructions for setting up, operating, and maintaining your BY-DMR7 microphone to ensure optimal performance.

Image: The BOYA BY-DMR7 microphone with its foam windscreen, showcasing its compact design and integrated controls.
มีอะไรอยู่ในกล่อง
กรุณาตรวจสอบเนื้อหาในแพ็คเกจเพื่อให้แน่ใจว่ามีสินค้าครบทั้งหมด:
- BOYA BY-DMR7 Shotgun Microphone
- โฟมกระจกบังลม
- 3.5mm Gold-Plated Audio Cable
- คู่มือการใช้งาน (เอกสารนี้)

Image: All components included with the BY-DMR7: the microphone unit, the foam windscreen, and the coiled 3.5mm audio cable.
สินค้าเกินview
Familiarize yourself with the various parts and controls of the BY-DMR7 microphone:
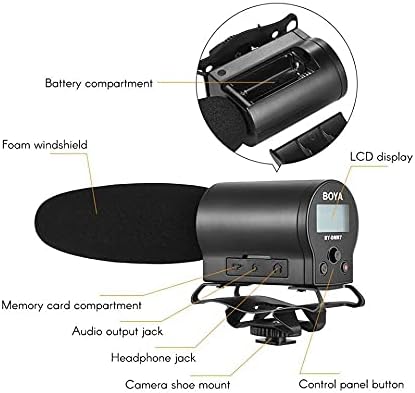
Image: Detailed diagram highlighting key components of the BY-DMR7, including the battery compartment, LCD display, control panel, and various input/output jacks.
- กระจกบังลมโฟม: Reduces wind noise and plosives.
- Microphone Barrel: Houses the supercardioid condenser microphone element.
- จอแสดงผล LCD: Shows recording status, battery level, and menu options.
- ปุ่มแผงควบคุม: For menu navigation, recording, and playback.
- แจ็คหูฟัง (3.5 มม.): สำหรับการตรวจสอบเสียงแบบเรียลไทม์
- Audio Output Jack (3.5mm): Connects to camera's audio input.
- Memory Card Compartment: For MicroSDHC card insertion.
- ช่องใส่แบตเตอรี่: ใช้แบตเตอรี่ AA 2 ก้อน
- Integrated Shockmount: Reduces handling noise.
- Camera Shoe Mount: Attaches to standard camera hot/cold shoe.
การตั้งค่า
1. การติดตั้งแบตเตอรี่
The BY-DMR7 requires two (2) AA batteries for operation.
- Locate the battery compartment on the side of the microphone unit.
- เลื่อนเปิดฝาครอบช่องใส่แบตเตอรี่
- ใส่แบตเตอรี่ AA สองก้อน โดยตรวจสอบให้แน่ใจว่าขั้ว (+/-) ถูกต้องตามที่ระบุภายในช่อง
- ปิดฝาช่องใส่แบตเตอรี่ให้แน่น
2. MicroSDHC Card Installation
A MicroSDHC card (up to 32 GB) is required for recording audio.
- Locate the memory card compartment.
- Gently insert a MicroSDHC card into the slot until it clicks into place. Ensure the card is oriented correctly.
- ในการถอด ให้ดันการ์ดเข้าไปเล็กน้อยจนกระทั่งการ์ดเด้งออกมา
3. การติดตั้งไมโครโฟน
The BY-DMR7 can be mounted on a camera's hot/cold shoe.
- Slide the camera shoe mount of the microphone onto your camera's hot/cold shoe.
- ขันล้อล็อคบนฐานยึดไมโครโฟนให้แน่นเพื่อยึดไมโครโฟนให้อยู่กับที่

Image: The BY-DMR7 microphone securely attached to a DSLR camera, ready for use.

Image: The BY-DMR7 microphone mounted on a different camera body, demonstrating its versatility.

Image: The BY-DMR7 microphone attached to a camcorder, illustrating its compatibility with various video recording devices.
4. การเชื่อมต่อกับกล้อง
Use the supplied 3.5mm audio cable to connect the microphone to your camera's audio input.
- เชื่อมต่อปลายด้านหนึ่งของสายสัญญาณเสียงขนาด 3.5 มม. เข้ากับ แจ็คเอาต์พุตเสียง on the BY-DMR7.
- เชื่อมต่อปลายอีกด้านของสายเคเบิลเข้ากับ อินพุตไมโครโฟน jack on your camera or camcorder.
5. Attaching Foam Windscreen
Slide the foam windscreen over the microphone barrel to reduce unwanted wind noise during outdoor recordings or plosives from close-up speech.
คำแนะนำการใช้งาน
1. การเปิด/ปิดเครื่อง
- To power on the device, press and hold the power button (usually part of the control panel) until the LCD display illuminates.
- หากต้องการปิดเครื่อง ให้กดปุ่มเปิด/ปิดค้างไว้อีกครั้งจนกว่าจอแสดงผลจะดับลง
2. การบันทึกเสียง
The BY-DMR7 features one-button recording for ease of use.
- Ensure a MicroSDHC card is inserted and batteries are charged.
- กดปุ่มเฉพาะ บันทึก button (often marked with a red dot or 'REC'). The recording indicator on the LCD will show that recording is active.
- หากต้องการหยุดบันทึก ให้กด บันทึก ปุ่มอีกครั้ง file will be saved automatically to the MicroSDHC card.
3. การตรวจสอบเสียง
Use the 3.5mm headphone output to monitor your audio in real-time.
- Connect a pair of headphones to the แจ็คหูฟัง บนไมโครโฟน
- Adjust the monitoring volume if available through the menu system.
4. Using the Low-Cut Filter
The low-cut filter helps reduce unwanted low-frequency noise such as rumble or air conditioning hum.
- Access the menu system via the control panel buttons.
- Navigate to the audio settings or filter options.
- Enable or disable the low-cut filter as needed for your recording environment.
5. การนำทางเมนูและการตั้งค่า
The LCD display and control panel buttons allow you to adjust various settings.
- Use the navigation buttons (e.g., up/down arrows, 'Menu', 'OK') to browse through options on the LCD.
- Common settings include input gain, headphone volume, low-cut filter, and file การจัดการ.
6. การเล่นและ File โอนย้าย
- การเล่นซ้ำ: Use the control panel buttons to navigate to recorded files and initiate playback directly on the device through the headphone jack.
- File โอน: To transfer recorded WAV files, remove the MicroSDHC card from the BY-DMR7 and insert it into a compatible card reader connected to a computer. The files can then be copied like any other data.
การซ่อมบำรุง
- การทำความสะอาด: ใช้ผ้าแห้งนุ่มเช็ดทำความสะอาดภายนอกไมโครโฟน ห้ามใช้น้ำยาทำความสะอาดหรือสารละลายใดๆ
- พื้นที่จัดเก็บ: When not in use for extended periods, remove the batteries to prevent leakage. Store the microphone in a cool, dry place, away from direct sunlight and extreme temperatures.
- กระจกบังลมโฟม: หากแผ่นโฟมกันลมสกปรก สามารถทำความสะอาดเบาๆ ด้วยสบู่และน้ำได้ ตรวจสอบให้แน่ใจว่าแห้งสนิทก่อนติดตั้งกลับเข้าไปใหม่
การแก้ไขปัญหา
| ปัญหา | สาเหตุที่เป็นไปได้ | สารละลาย |
|---|---|---|
| ไมโครโฟนไม่เปิดใช้งาน | แบตเตอรี่หมดหรือใส่ไม่ถูกต้อง | เปลี่ยนแบตเตอรี่ด้วยแบตเตอรี่ AA ใหม่ โดยตรวจสอบให้แน่ใจว่าใส่ขั้วถูกต้อง |
| ไม่มีการบันทึกเสียง | No MicroSDHC card inserted, card full, or card error. | Insert a MicroSDHC card, check available space, or try formatting the card (this will erase all data). |
| คุณภาพเสียงไม่ดี / มีเสียงรบกวนมากเกินไป | Wind noise, low-cut filter off, incorrect gain settings, or environmental noise. | Ensure foam windscreen is used. Enable low-cut filter. Adjust input gain. Record in a quieter environment. |
| No audio monitoring through headphones. | Headphones not connected properly, headphone volume too low, or faulty headphones. | Check headphone connection. Increase headphone volume. Test with another pair of headphones. |
| Microphone not recognized by camera. | Audio cable not connected properly, or camera audio input settings. | Ensure 3.5mm audio cable is securely connected to both microphone and camera. Check camera's audio input settings (e.g., external mic enabled). |
ข้อมูลจำเพาะ
| คุณสมบัติ | รายละเอียด |
|---|---|
| ปัจจัยรูปแบบไมโครโฟน | ปืนลูกซอง |
| รูปแบบขั้ว | ซูเปอร์คาร์ดิโออิด (ทิศทางเดียว) |
| ความไวเสียง | 45 เดซิเบล |
| อัตราส่วนสัญญาณต่อเสียงรบกวน | 78 เดซิเบล |
| ระดับเสียง | 110 เดซิเบล |
| รูปแบบการบันทึก | 24-bit/48 kHz WAV audio files |
| สื่อบันทึกข้อมูล | MicroSDHC card (up to 32 GB) |
| เอาท์พุตหูฟัง | แจ็คสเตอริโอ 3.5 มม. |
| เอาท์พุตเสียง | แจ็คขนาด 3.5 มม. |
| แหล่งพลังงาน | แบตเตอรี่ AA 2 ก้อน |
| ขนาดรายการ (ยาว x กว้าง x สูง) | 9.8 x 3.86 x 1.97 นิ้ว |
| น้ำหนักสินค้า | 5.3 ออนซ์ (ประมาณ 150 กรัม) |
| วัสดุ | Foam (windscreen) |
| อุปกรณ์ที่รองรับ | DSLR cameras, camcorders, MiniSDHC cards |
การรับประกันและการสนับสนุน
Information regarding product warranty and customer support is not provided within this manual. Please refer to the manufacturer's official website or contact your retailer for details on warranty coverage, technical support, and service options for your BOYA BY-DMR7 microphone.
หากต้องการความช่วยเหลือเพิ่มเติม คุณสามารถไปที่ ร้าน BOYA บน Amazon.


