1. บทนำ
This manual provides detailed instructions for the installation, operation, and maintenance of your Anlapus 8CH Full HD 720P HD-TVI Security Camera System. Please read this manual thoroughly before using the product to ensure proper setup and functionality. Keep this manual for future reference.
2. เนื้อหาบรรจุภัณฑ์
ตรวจสอบว่าสินค้าทั้งหมดที่ระบุไว้ด้านล่างนี้รวมอยู่ในแพ็คเกจของคุณแล้ว หากมีสินค้าใดสูญหายหรือเสียหาย โปรดติดต่อฝ่ายสนับสนุนลูกค้า

Image showing the contents included in the Anlapus 8CH Security Camera System package.
- 1 x 8CH DVR (Digital Video Recorder)
- 2 x HD-TVI Bullet Cameras
- 1 x USB Mouse
- 2 x 60ft BNC Cables (for camera connection)
- 1 x 1 to 4 Power Splitter Cable
- 2 x 12V Power Supplies (for DVR and cameras)
- ถุงใส่สกรูยึด 2 ถุง
- 1 x Quick Start Guide (Instruction Manual)
- สติกเกอร์เตือนภัย 2 ชิ้น
3. การตั้งค่า
3.1 DVR Connections
Before powering on the DVR, connect all necessary peripherals as described below.

Diagram illustrating the rear panel connections of the Anlapus 8CH DVR, including video input, monitor/TV, audio input, network, USB, and power supply ports.
- ช่องรับสัญญาณวิดีโอ (BNC): Connect the BNC cables from your cameras to these ports. The DVR supports up to 8 cameras.
- Monitor/TV (VGA/HDMI): Connect a monitor or TV using either the VGA or HDMI port for local viewการไอเอ็นจี
- ช่องต่อสัญญาณเสียงเข้า/ออก (RCA): Connect external audio devices if required.
- เครือข่าย (RJ45): Connect an Ethernet cable from your router to this port for remote access and network features.
- พอร์ต USB (USB 2.0): Connect the included USB mouse for system navigation. Additional USB ports can be used for USB backup devices.
- Power Supply (DC 12V): Connect the DVR power adapter to this port and then to a power outlet.
3.2 การติดตั้งกล้อง
The bullet cameras are designed for both indoor and outdoor use. Choose strategic locations that provide optimal coverage and are within reach of the provided BNC cables.

Image demonstrating various indoor and outdoor installation possibilities for the Anlapus bullet cameras, highlighting their suitability for different environments and conditions.
- เลือกสถานที่: Identify areas requiring surveillance, considering factors like viewing angle, lighting, and proximity to power outlets.
- การติดตั้ง: Use the provided mounting screws and anchors to securely attach the camera base to a wall or ceiling.
- ปรับมุม: Loosen the adjustment screws on the camera bracket to position the camera for the desired viewปรับมุม จากนั้นขันให้แน่นเพื่อยึดให้มั่นคง
- การเดินสายเคเบิล: Route the BNC cable from the camera to the DVR, ensuring cables are protected from damage and weather.
3.3 การเดินสายระบบ
Follow these steps to connect your entire security system:
- Connect each camera's BNC connector to a Video Input port on the DVR.
- Connect the camera power cables to the 1-to-4 power splitter, then connect the splitter to one of the 12V power supplies.
- Connect the second 12V power supply to the DVR's DC 12V input.
- Connect your monitor/TV to the DVR via HDMI or VGA.
- Connect the USB mouse to a USB port on the DVR.
- For remote access, connect an Ethernet cable from your router to the DVR's Network port.
- Plug both 12V power supplies into electrical outlets. The system will power on.
4. การใช้งานระบบ
4.1 Initial Setup and First-Time Wizard
Upon first power-on, the DVR will guide you through an initial setup wizard. This typically includes setting the language, date/time, creating an administrator password, and configuring network settings. Follow the on-screen prompts using the USB mouse.
4.2 Remote Access (Mobile App)
Access your security system remotely using the 365SECU mobile application.
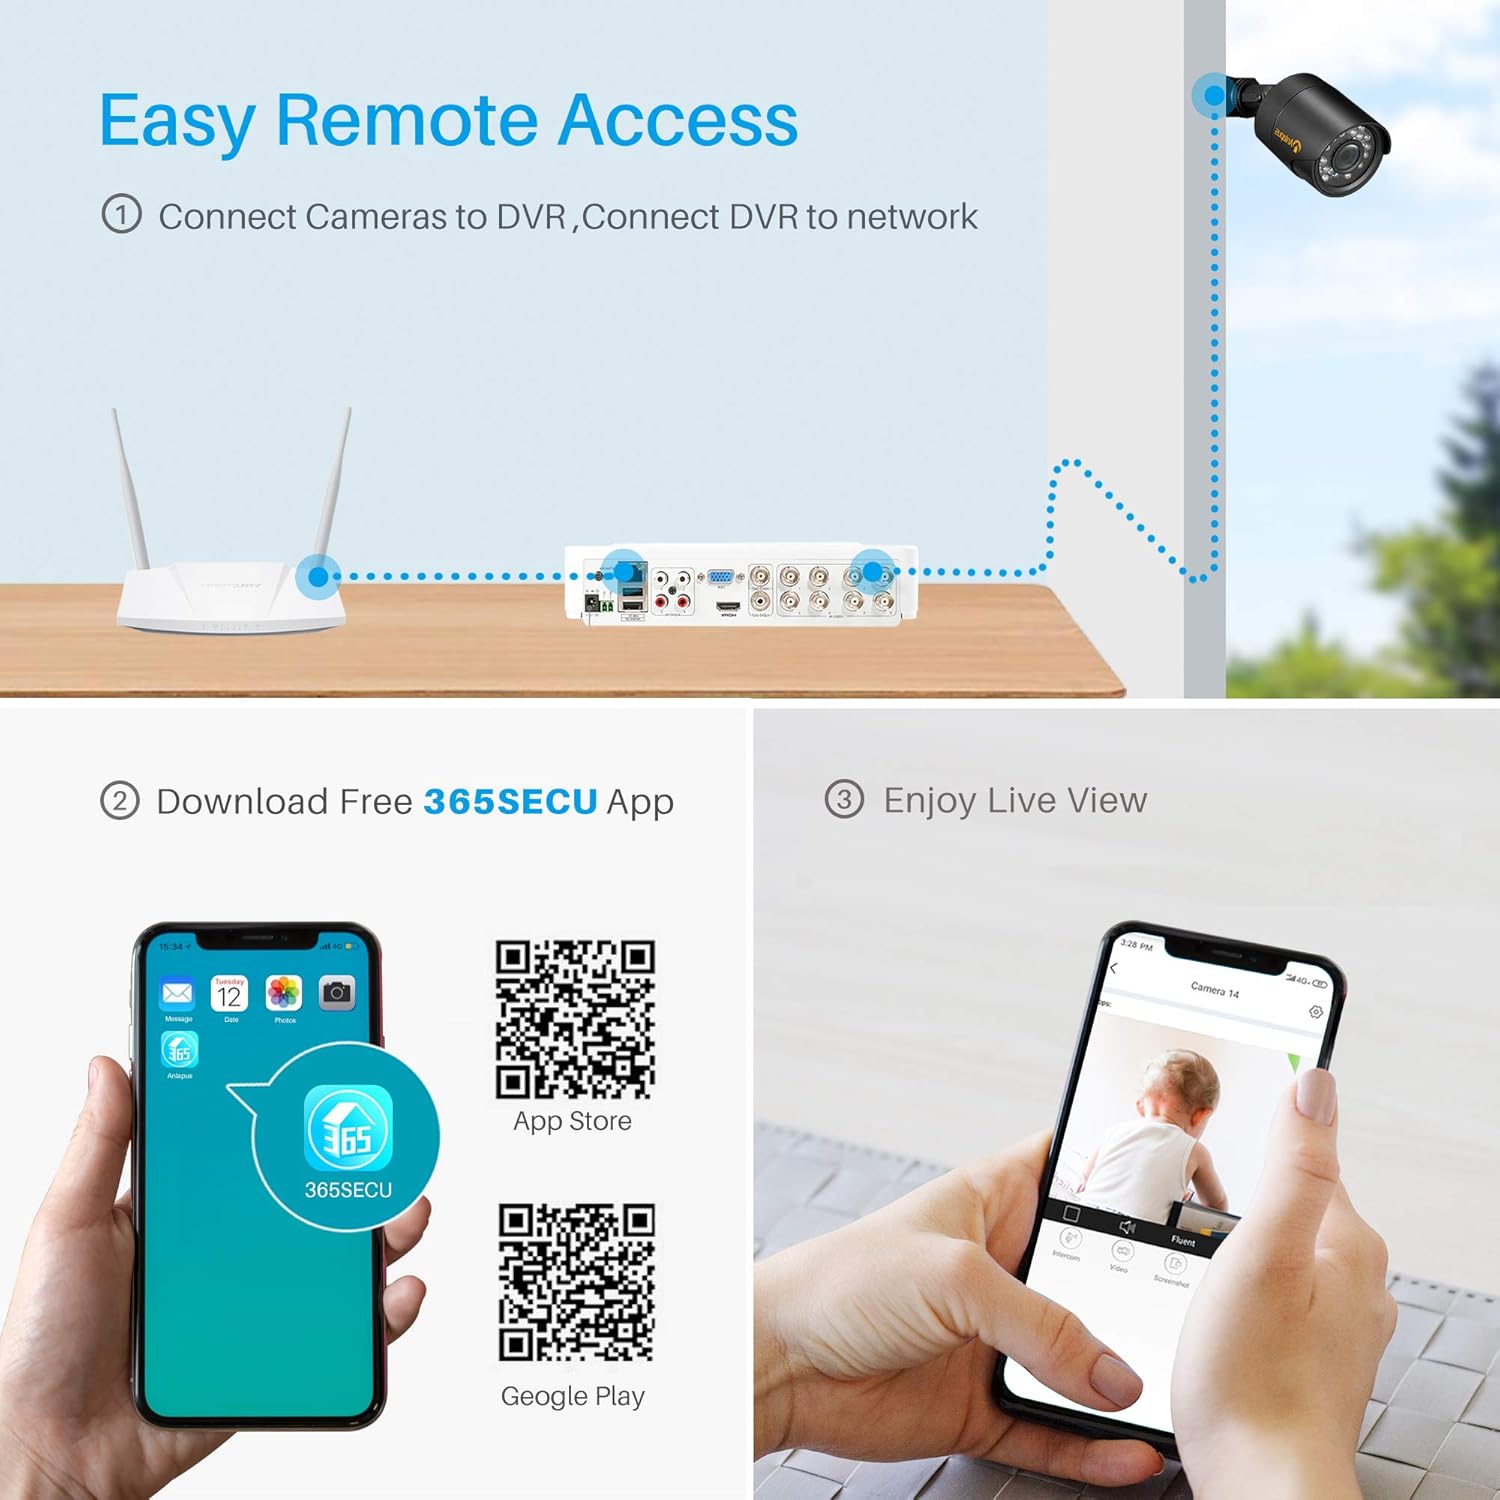
Diagram showing the process for remote access, including connecting cameras to DVR, DVR to network, downloading the 365SECU app, and viewอิงไลฟ์ฟูtagบนสมาร์ทโฟน
- ดาวน์โหลดแอป: ค้นหา "365SECU" in your smartphone's app store or scan the QR codes below.

Image displaying QR codes for downloading the 365SECU app from the App Store and Google Play, along with a smartphone screen showing the app interface.
- สำหรับ Android: ร้านค้า Google Play
- สำหรับ iOS: แอปสโตร์ของแอปเปิล
- ลงทะเบียน/เข้าสู่ระบบ: Create an account or log in to the 365SECU app.
- เพิ่มอุปกรณ์: Follow the in-app instructions to add your DVR. This usually involves scanning a QR code displayed on the DVR's monitor or manually entering the device ID.
- สด View: เมื่อเพิ่มแล้วคุณสามารถ view live camera feeds, access recorded footage, and configure settings directly from your smartphone.
4.3 Motion Detection & Email Alert
Configure your system to detect motion and send alerts.

Image illustrating the motion detection and email alert feature, showing a camera detecting an intruder and the alert being displayed on a smartphone.
- การตั้งค่าการเข้าถึง: Navigate to the DVR's main menu, then to 'Alarm' or 'Motion Detection' settings.
- เปิดใช้งานการตรวจจับการเคลื่อนไหว: Activate motion detection for desired cameras.
- Define Area: Customize the detection area to reduce false triggers.
- Configure Email Alert: Enter your email server details and recipient email addresses to receive instant alerts when motion is detected.
4.4 Smart Playback Function
Review บันทึกเสียงฟูtage efficiently with the smart playback feature.

Image demonstrating the smart playback function, showing a monitor displaying recorded video timeline and individual snapshots for quick review.
- การเข้าถึงการเล่น: From the DVR's main menu, select 'Playback'.
- เลือกวันที่/เวลา: Choose the date and time range for the footage you wish to review.
- ค้นหา: The system will display a timeline with recorded events. You can quickly navigate through the timeline or use event markers to find specific moments.
4.5 การมองเห็นตอนกลางคืน
The cameras are equipped with infrared (IR) LEDs for clear night vision, automatically activating in low-light conditions.

Comparison image showing the same outdoor scene during daytime (color) and nighttime (black and white with night vision active), illustrating the camera's night vision capability.
- การเปิดใช้งานอัตโนมัติ: The cameras automatically switch to black and white night vision mode when ambient light levels are insufficient.
- ระยะอินฟราเรด: Ensure no obstructions block the IR LEDs for optimal night vision performance.
4.6 3D Digital Noise Reduction (3D DNR)
The cameras feature 3D Digital Noise Reduction technology to enhance image clarity in challenging lighting conditions.

Comparison image showing video quality without and with 3D Digital Noise Reduction, highlighting the reduction of noise interference in weak signal images.
- คุณภาพของภาพดีขึ้น: 3D DNR reduces visual noise, especially in low-light environments, resulting in a cleaner and more detailed image.
- การจัดเก็บข้อมูลที่มีประสิทธิภาพ: By reducing noise, the system can compress video more efficiently, saving storage space.
5. การบำรุงรักษา
- เลนส์กล้อง: Regularly clean camera lenses with a soft, dry cloth to remove dust and smudges. Avoid abrasive cleaners.
- การเชื่อมต่อสายเคเบิล: Periodically check all BNC and power connections for tightness and signs of wear or corrosion.
- DVR Ventilation: Ensure the DVR is placed in a well-ventilated area to prevent overheating. Keep vents clear of dust.
- อัพเดตเฟิร์มแวร์: ตรวจสอบของผู้ผลิต webเข้าชมเว็บไซต์เพื่อตรวจสอบการอัปเดตเฟิร์มแวร์ที่มีให้สำหรับ DVR ของคุณ เพื่อให้มั่นใจได้ถึงประสิทธิภาพและความปลอดภัยสูงสุด
- สุขภาพฮาร์ดไดรฟ์: If a hard drive is installed, monitor its health through the DVR's system settings to prevent data loss.
6 การแก้ไขปัญหา
| ปัญหา | สาเหตุที่เป็นไปได้ | สารละลาย |
|---|---|---|
| ไม่มีภาพแสดงบนจอภาพ | Loose video cable; Incorrect input selected on monitor; DVR not powered on. | Check HDMI/VGA cable connections; Select correct input source on monitor; Ensure DVR power adapter is connected and power light is on. |
| ไม่มีภาพจากกล้อง | Loose BNC cable; Camera not powered; Damaged cable/camera. | Check BNC cable connection at both camera and DVR; Verify camera power supply connection; Test with a known working cable/camera if possible. |
| การเข้าถึงระยะไกลไม่ทำงาน | No network connection; Incorrect network settings; App not configured correctly. | Ensure Ethernet cable is connected to DVR and router; Check DVR network settings (DHCP enabled or static IP configured); Verify app device ID and network permissions. |
| การตรวจจับการเคลื่อนไหวไม่ทำงาน | Motion detection disabled; Sensitivity too low; Detection area not set. | Enable motion detection for the specific camera; Increase sensitivity; Define the detection area in DVR settings. |
| ไม่มีการบันทึก | No hard drive installed; Hard drive full; Recording schedule not set. | Install a compatible hard drive (not included); Format or replace hard drive; Configure recording schedule in DVR settings. |
7. ข้อมูลจำเพาะ
| คุณสมบัติ | รายละเอียด |
|---|---|
| ยี่ห้อ | อันลาปุส |
| หมายเลขรุ่น | 8KS-124W4-00-US |
| เทคโนโลยีการเชื่อมต่อ | มีสาย |
| ความละเอียดในการจับภาพวิดีโอ | 1080p, 720p |
| คุณสมบัติพิเศษ | Motion Sensor, Night Vision, Waterproof |
| จำนวนช่องสัญญาณ | 8 |
| ความจุของหน่วยความจำ | 2 TB (Hard Drive Not Included) |
| แหล่งพลังงาน | สายไฟ |
| Operating System (DVR) | Android (for mobile app compatibility) |
| อุปกรณ์ที่รองรับ | กล้องถ่ายรูป, คอมพิวเตอร์ส่วนบุคคล, สมาร์ทโฟน, แท็บเล็ต |
| เทคโนโลยีแสงน้อย | Night color (refers to general night vision capability) |
| โหมดการบันทึก | Motion detection, Continuous, Schedule |
| น้ำหนักสินค้า | 7.19 ปอนด์ |
| ขนาดแพ็คเกจ | 11.4 x 11.4 x 8.2 นิ้ว |
| ยูพีซี | 615068923699 |
8. การรับประกันและการสนับสนุน
Anlapus products typically come with a limited warranty. For specific warranty terms, technical support, or service inquiries, please refer to the warranty card included in your package or visit the official Anlapus webไซต์ โปรดเก็บใบเสร็จรับเงินไว้เป็นหลักฐานการซื้อสำหรับการเรียกร้องการรับประกัน


