1. บทนำ
The Korg AW-OTG is a clip-on guitar tuner designed for accurate and visible tuning. It incorporates advanced OLED display technology, providing a clear and smooth visual experience from various viewing angles. This tuner is engineered to offer high-precision tuning, making it a reliable tool for guitarists.
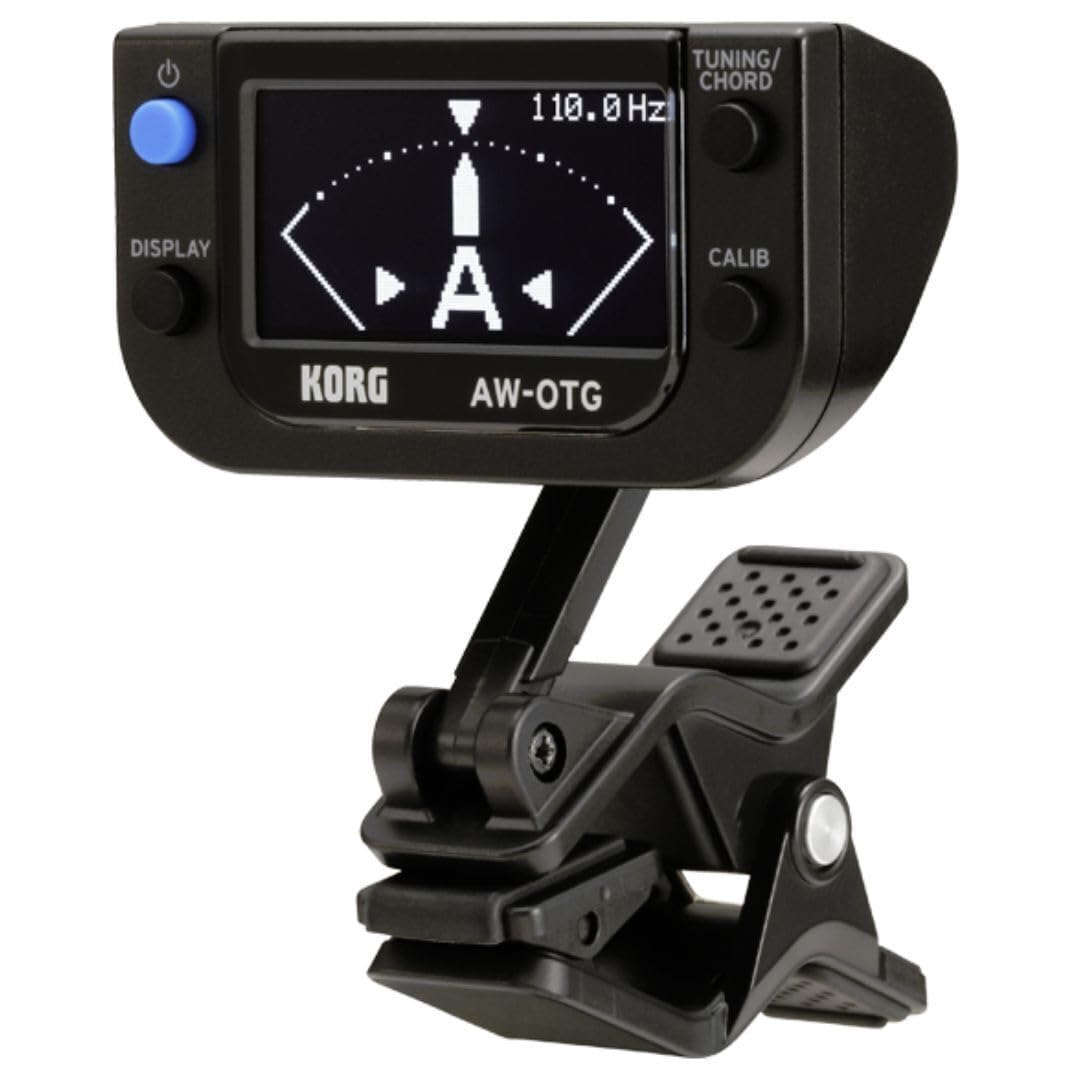
Figure 1: Korg AW-OTG Clip-On Guitar Tuner attached to a guitar headstock.
2. คุณสมบัติของผลิตภัณฑ์
- OLED Display Technology: Provides high visibility and clarity from any viewมุมอิง
- Guitar-Specific Functions: Includes an intuitive chord finder function.
- Ultra-High Precision Tuning: Achieves accuracy of ±0.1 cents.
- STROBE Feature: Optional mode for enhanced tuning accuracy.
- Alternative Tuning Animations: Offers various visual tuning displays.
- ฟังก์ชันการสอบเทียบ: Allows adjustment of the reference pitch.
- การสำรองข้อมูลหน่วยความจำ: Retains settings after power off.
- ปิดอัตโนมัติ: ช่วยประหยัดแบตเตอรี่โดยการปิดเครื่องอัตโนมัติหลังจากไม่มีการใช้งานเป็นระยะเวลาหนึ่ง
3. การตั้งค่า
3.1 การติดตั้งแบตเตอรี่
- Open the battery compartment cover located on the back of the tuner unit.
- ใส่แบตเตอรี่ AAA หนึ่งก้อน โดยตรวจสอบให้แน่ใจว่าขั้วบวก/ลบถูกต้องตามที่ระบุไว้ภายในช่องใส่แบตเตอรี่
- ปิดฝาช่องใส่แบตเตอรี่ให้แน่น

Figure 2: Battery compartment with AAA battery installed.
3.2 การติดตั้งจูนเนอร์
- Gently open the clip on the tuner.
- Attach the tuner securely to the headstock of your guitar. Ensure the clip makes firm contact with the instrument for optimal vibration detection.
- Adjust the angle of the display for comfortable viewing. The tuner features a flexible joint for easy positioning.

รูปที่ 3: ด้านข้าง view of the tuner clip.

Figure 4: Tuner attached to a guitar headstock.
4. การดำเนินการ
4.1 เปิด/ปิดเครื่อง
กดปุ่มค้างไว้ พลัง button (located on the top left of the unit) to turn the tuner on or off. The OLED display will illuminate upon activation.
4.2 การปรับแต่งพื้นฐาน
- Once powered on and attached to your instrument, pluck a single string.
- The display will show the detected note and a meter indicating pitch accuracy.
- Adjust the string's tension until the meter centers and the note name is stable, indicating accurate tuning.

Figure 5: Tuner display during operation.
4.3 Display Modes (TUNING/CHORD Button)
กดปุ่ม TUNING/CHORD button (top right) to cycle through different display modes, including standard tuning, strobe mode, and various animation options. The AW-OTG also features a chord finder function accessible through this button.
4.4 Calibration (CALIB Button)
กดปุ่ม คาลิบ button (bottom right) to adjust the reference pitch (A4). The default setting is 440 Hz. Refer to the on-screen instructions for specific calibration steps.
4.5 Memory Backup
The tuner automatically saves your last used settings, such as display mode and calibration, even after being powered off.
4.6 ปิดเครื่องอัตโนมัติ
To conserve battery life, the AW-OTG will automatically power off after a period of inactivity. This feature is enabled by default.
5. การบำรุงรักษา
5.1 การทำความสะอาด
Wipe the tuner's surface with a soft, dry cloth. Avoid using abrasive cleaners, solvents, or waxes, as these can damage the finish and display.
5.2 การเปลี่ยนแบตเตอรี่
When the display dims or the tuner becomes unresponsive, replace the AAA battery as described in Section 3.1. Always dispose of used batteries according to local regulations.
6 การแก้ไขปัญหา
| ปัญหา | สารละลาย |
|---|---|
| เครื่องรับสัญญาณไม่เปิดใช้งาน | Check if the battery is correctly installed with the proper polarity. Replace the battery if it is depleted. |
| Inaccurate or unstable tuning. | Ensure the tuner is securely clipped to the guitar headstock. Avoid noisy environments. Try recalibrating the tuner (Section 4.4). |
| จอภาพมืดหรือไม่สามารถอ่านได้ | Replace the battery. The OLED display may dim when battery power is low. |
7. ข้อมูลจำเพาะ
- หมายเลขรุ่น: AW-OTG
- ความแม่นยำในการปรับแต่ง: ±0.1 เซ็นต์
- ประเภทจอภาพ: โอแอลอีดี
- แหล่งจ่ายไฟ: แบตเตอรี่ AAA 1 ก้อน (รวมอยู่ด้วย)
- ขนาดสินค้า : 2.5 x 2 x 2.8 นิ้ว
- น้ำหนักสินค้า: 0.001 ออนซ์
- ผู้ผลิต: คอร์ก
- วันที่เข้าใช้งานครั้งแรก: 26 กรกฎาคม 2010
8. การรับประกันและการสนับสนุน
8.1 ข้อมูลการรับประกัน
Warranty terms and conditions for the Korg AW-OTG Clip-On Guitar Tuner are typically provided with the product packaging or can be found on the official Korg webไซต์ โปรดเก็บหลักฐานการซื้อไว้เพื่อใช้ในการเรียกร้องการรับประกัน
8.2 การสนับสนุนลูกค้า
For technical assistance, product inquiries, or support, please visit the official Korg website or contact Korg customer service directly. Contact information can usually be found in the product packaging or on the manufacturer's support pages.


