1. บทนำ
This manual provides comprehensive instructions for the HeiL PR781 Performance Studio Microphone system. The system comprises the HeiL PR781 dynamic cardioid microphone, an Auray SSM-BC10 Suspension Shockmount, and an Auray BAI-2X Two-Section Broadcast Arm. This integrated system is engineered for professional audio capture in various settings, including amateur radio, broadcasting, voiceovers, and podcasting, ensuring high-quality speech reproduction and effective isolation from mechanical noise.
คุณสมบัติหลัก:
- การตอบสนองความถี่: 50 เฮิรตซ์ ถึง 16,000 เฮิรตซ์
- อิมพีแดนซ์: Balanced 600 Ohms Out, 3-pin XLR
- รูปแบบขั้ว: cardioid
- ระดับขาออก: -55 เดซิเบล
- กะบังลม: Low-mass aluminum
- เสร็จ: Black Satin Epoxy

Figure 1.1: The complete HeiL PR781 microphone system, including the microphone, suspension shockmount, and two-section broadcast arm.
2. การตั้งค่า
Proper setup is crucial for optimal performance of your HeiL PR781 microphone system. Follow these steps carefully.
2.1 การแกะกล่องและการระบุชิ้นส่วน
นำส่วนประกอบทั้งหมดออกจากบรรจุภัณฑ์อย่างระมัดระวัง ตรวจสอบว่าคุณมีสิ่งของต่อไปนี้ครบถ้วน:
- HeiL PR781 Dynamic Microphone
- Auray SSM-BC10 Suspension Shockmount
- Auray BAI-2X Two-Section Broadcast Arm with integrated XLR cable

Figure 2.1: The HeiL PR781 Dynamic Microphone.

Figure 2.2: The Auray SSM-BC10 Suspension Shockmount.
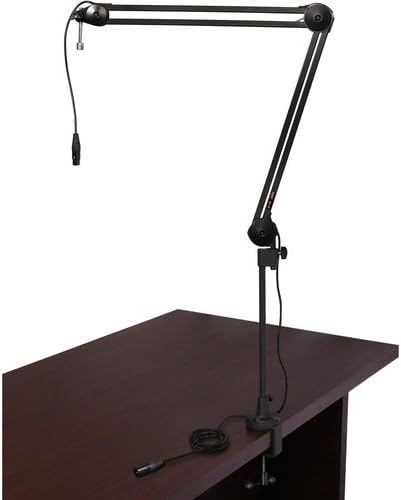
Figure 2.3: The Auray BAI-2X Two-Section Broadcast Arm.
2.2 Assembling the Microphone and Shockmount
- Gently insert the HeiL PR781 microphone into the Auray SSM-BC10 Suspension Shockmount. Ensure the microphone is securely seated within the shockmount's clips or cradle.
- Tighten any securing mechanisms on the shockmount to hold the microphone firmly in place without over-tightening.
2.3 Attaching the Broadcast Arm to a Desk
- Select a sturdy desk or table edge for mounting the broadcast arm.
- ติด C-clamp base of the Auray BAI-2X Broadcast Arm to the chosen surface.
- กระชับ C-clamp securely until the arm base is stable and does not wobble.
- Insert the broadcast arm into the base. Ensure it is fully seated and secured, typically with a set screw or locking mechanism.
2.4 Mounting the Microphone Assembly to the Broadcast Arm
- Screw the assembled microphone and shockmount onto the threaded stud at the end of the broadcast arm.
- Ensure the shockmount is oriented correctly, allowing the microphone's front address to face the sound source.
- Adjust the angle and position of the microphone using the arm's joints and pivot points.
2.5 Connecting the XLR Cable
- Connect the integrated XLR cable from the broadcast arm to the XLR input on the HeiL PR781 microphone.
- Connect the other end of the XLR cable to your audio interface, mixer, or amateur radio transceiver.
- Ensure all connections are firm and secure to prevent signal loss or interference.
3. คู่มือการใช้งาน
The HeiL PR781 is designed for clear voice reproduction. Follow these guidelines for optimal operation.
3.1 การวางตำแหน่งไมโครโฟน
- Position the microphone approximately 6 to 12 inches (15-30 cm) from your mouth.
- Speak directly into the front of the microphone (the end with the HeiL logo) for best results, utilizing its cardioid polar pattern to reject off-axis sounds.
- Adjust the broadcast arm to maintain a consistent distance and angle during use.
3.2 Gain and Audio Settings
- Adjust the input gain on your audio interface, mixer, or radio transceiver to achieve an appropriate signal level. Avoid clipping (distortion) by keeping peak levels below the maximum input.
- The PR781 is compatible with various amateur radio transceivers, including models from Kenwood, Yaesu, Ten Tec, and iCOM. Refer to your transceiver's manual for specific microphone input settings and equalization adjustments.
- Experiment with your device's equalizer settings to tailor the microphone's sound to your voice and desired audio characteristics. Many users find adjusting low and high frequencies beneficial for voice clarity.
4. การบำรุงรักษา
Regular maintenance helps ensure the longevity and performance of your microphone system.
4.1 การทำความสะอาด
- Use a soft, dry cloth to wipe down the microphone body, shockmount, and broadcast arm.
- สำหรับสิ่งสกปรกฝังแน่น ให้เช็ดออกเล็กน้อยamp สามารถใช้ผ้าชุบสบู่เหลวอ่อนๆ เช็ดทำความสะอาดได้ จากนั้นเช็ดตามด้วยผ้าแห้ง หลีกเลี่ยงสารเคมีรุนแรงหรือน้ำยาทำความสะอาดที่มีฤทธิ์กัดกร่อน
- Do not spray cleaning solutions directly onto the microphone grille or electronic components.
4.2 การดูแลรักษาส่วนประกอบ
- Periodically check all screws and connections on the broadcast arm and shockmount for tightness.
- Inspect the integrated XLR cable for any signs of wear or damage. Replace if necessary.
- Be aware that the plastic insert/collar in some broadcast arm table mounts may degrade over time. If the arm becomes wobbly, inspect this component for wear and consider replacement if it is the cause.
5 การแก้ไขปัญหา
If you encounter issues with your HeiL PR781 microphone system, refer to the following troubleshooting tips.
5.1 ไม่มีเอาต์พุตเสียง
- ตรวจสอบการเชื่อมต่อ: Ensure all XLR cables are securely connected at both the microphone and the audio input device.
- การเลือกอินพุต: Verify that the correct input channel is selected on your mixer, audio interface, or radio.
- การตั้งค่าเกน: Confirm that the input gain is not set to minimum or muted on your audio device.
- ความสมบูรณ์ของสายเคเบิล: หากเป็นไปได้ ให้ลองใช้สาย XLR เส้นอื่นเพื่อทดสอบดูว่าสายมีปัญหาหรือไม่
5.2 Poor Audio Quality (Distortion, Low Volume, Hum)
- การปรับค่าเกน: If audio is distorted, reduce the input gain. If volume is too low, increase the gain.
- การวางตำแหน่งไมโครโฟน: Ensure the microphone is positioned correctly and not too close or too far from the sound source.
- เสียงรบกวนจากสิ่งแวดล้อม: Check for sources of electrical interference (e.g., power cables, fluorescent lights) near the microphone or cables.
- ความเข้ากันได้ของสายเคเบิล: While the integrated XLR cable is standard, some older or specialized radio equipment may require specific wiring configurations. Consult your radio's manual if issues persist.
- Shockmount Effectiveness: Ensure the shockmount is properly installed and isolating the microphone from desk vibrations.
6. ข้อมูลจำเพาะ
| คุณสมบัติ | ข้อมูลจำเพาะ |
|---|---|
| ยี่ห้อ | HeiL |
| หมายเลขรุ่น | พีอาร์-781 |
| ปัจจัยรูปแบบไมโครโฟน | ตารางอาร์เรย์ |
| รูปแบบขั้ว | คาร์ดิออยด์ (ทิศทางเดียว) |
| การตอบสนองความถี่ | 50 เฮิรตซ์ ถึง 16,000 เฮิรตซ์ |
| อิมพีแดนซ์ | 600 โอห์ม |
| Output Level (Audio Sensitivity) | -55 dB (55 Decibels) |
| อัตราส่วนสัญญาณต่อเสียงรบกวน | 55 เดซิเบล |
| เทคโนโลยีการเชื่อมต่อ | เอ็กซ์แอลอาร์ |
| ประเภทขั้วต่อ | เอ็กซ์แอลอาร์ |
| อุปกรณ์ที่รองรับ | วิทยุ |
| วัสดุ | อลูมิเนียม |
| สี | สีดำ |
| ขนาดสินค้า (กว้าง x ยาว x สูง) | 7 x 6 x 3 นิ้ว |
| น้ำหนักสินค้า | 1 ปอนด์ (16 ออนซ์) |
| ส่วนประกอบที่รวมอยู่ | ไมโครโฟน |
7. ข้อมูลการรับประกัน
This product is covered by a manufacturer's warranty. For detailed information regarding warranty terms, conditions, and duration, please refer to the official HeiL Sound website or the warranty card included with your product packaging. Please retain your proof of purchase for any warranty claims.
8. การสนับสนุน
For technical assistance, troubleshooting beyond this manual, or customer service inquiries, please contact HeiL Sound directly. Their official website typically provides contact information, FAQs, and additional resources.
- ผู้ผลิต: บริษัท ไฮล์ ซาวด์ จำกัด
- Webเว็บไซต์: www.heilsound.com (โปรดตรวจสอบข้อมูลปัจจุบัน) URL)


