1. บทนำ
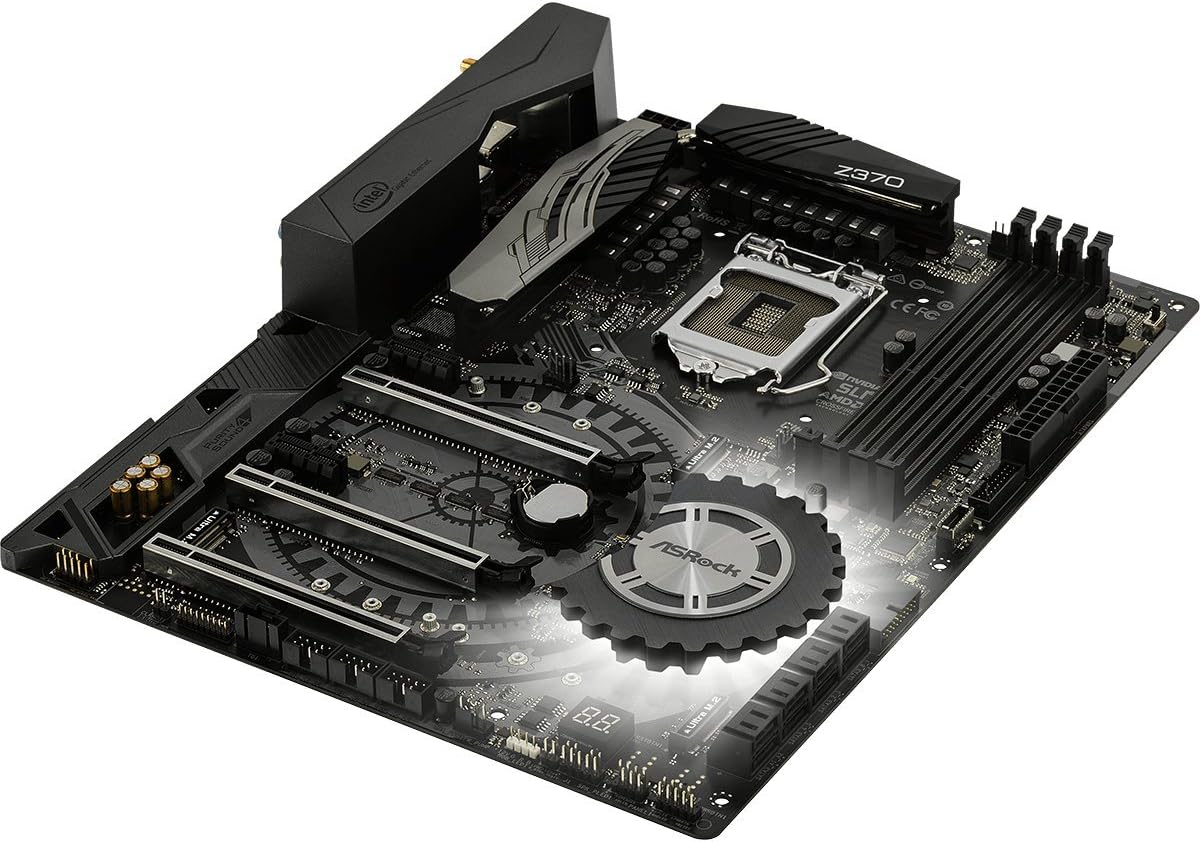
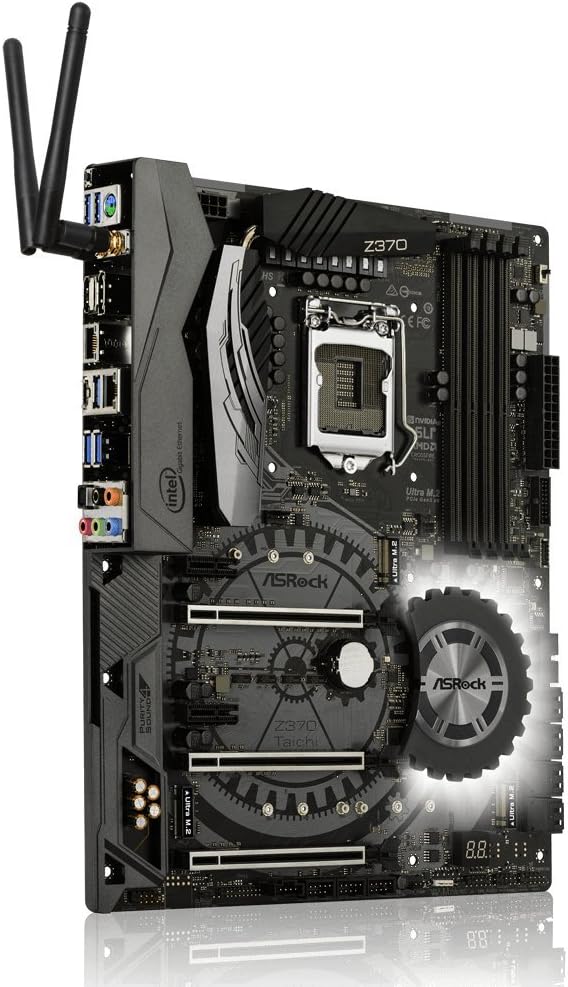
This manual provides detailed instructions for the installation, configuration, and operation of the ASRock Z370 TAICHI motherboard. This motherboard is designed to support 8th Generation Intel Core Processors (Socket 1151) and DDR4 memory, offering a robust platform for personal computing.
2. คำแนะนำด้านความปลอดภัย
Observe the following safety precautions during installation and operation to prevent damage to the motherboard or injury:
- Always disconnect the power cord from the wall outlet before handling any components.
- Wear an anti-static wrist strap or frequently touch a grounded object to discharge static electricity.
- จับที่ขอบของเมนบอร์ดเพื่อหลีกเลี่ยงการสัมผัสชิ้นส่วนที่บอบบาง
- ตรวจสอบให้แน่ใจว่ามีการระบายอากาศที่เหมาะสมภายในเคสคอมพิวเตอร์เพื่อป้องกันความร้อนสูงเกินไป
- เก็บเมนบอร์ดให้ห่างจากความชื้นและอุณหภูมิที่สูงหรือต่ำเกินไป
3. เนื้อหาบรรจุภัณฑ์
ตรวจสอบว่ามีรายการทั้งหมดอยู่ในแพ็คเกจ:
- ASRock Z370 TAICHI Motherboard
- SLI Bridge
- สาย SATA (ปริมาณอาจแตกต่างกัน)
- คู่มือการใช้งาน
- Support DVD Disk
- Wi-Fi Antenna (for integrated Intel 802.11ac WiFi)
4. เค้าโครงเมนบอร์ด
ทำความคุ้นเคยกับส่วนประกอบสำคัญและขั้วต่อบนเมนบอร์ดก่อนการติดตั้ง


5. คู่มือการติดตั้ง
Follow these steps for proper installation of components onto the motherboard.
5.1. การติดตั้งซีพียู
- Locate the LGA 1151 CPU socket.
- เปิดคันโยกซ็อกเก็ต CPU และยกแผ่นโหลดขึ้น
- Carefully align the CPU with the socket, ensuring the gold triangle on the CPU matches the triangle on the socket.
- วาง CPU ลงในซ็อกเก็ตอย่างเบามือโดยไม่ต้องออกแรง
- ปิดแผ่นโหลดและยึดด้วยคันโยก
- ติดตั้งตัวระบายความร้อน CPU ตามคำแนะนำของผู้ผลิต
5.2. การติดตั้ง RAM (DDR4)
- Identify the DDR4 DIMM slots. For dual-channel operation, refer to the motherboard manual for recommended slot pairing.
- เปิดคลิปที่ปลายทั้งสองด้านของช่อง DIMM
- จัดตำแหน่งรอยบากบนโมดูล DDR4 ให้ตรงกับร่องในช่องเสียบ DIMM
- กดปลายทั้งสองข้างของโมดูลหน่วยความจำให้แน่นจนกระทั่งคลิปล็อคเข้าที่
5.3. Storage Device Installation (SATA & M.2)
5.3.1. SATA Drives
- Connect SATA data cables to the SATA3 ports on the motherboard and to your SATA hard drives or SSDs.
- Connect SATA power cables from your power supply to the drives.
5.3.2. Ultra M.2 SSDs
- Locate the Ultra M.2 slots on the motherboard. The Z370 TAICHI features three Ultra M.2 slots (PCIe Gen3 x4 & SATA3).
- ถอดสกรูสแตนด์ออฟ M.2 ออก
- ใส่ M.2 SSD เข้าไปในช่องโดยทำมุม 30 องศา
- Gently push the M.2 SSD down and secure it with the standoff screw.
5.4. การติดตั้งการ์ด PCIe
- Identify the PCIe 3.0 x16 and x1 slots.
- ถอดฝาครอบช่องขยายที่สอดคล้องกันออกจากเคสคอมพิวเตอร์ของคุณ
- วางการ์ด PCIe ให้ตรงกับช่องเสียบ แล้วกดลงไปให้แน่นจนกว่าจะเข้าที่อย่างถูกต้อง
- ยึดการ์ดเข้ากับตัวเคสด้วยสกรู
5.5. การต่อสายไฟ
- เชื่อมต่อขั้วต่อไฟ ATX 24 พินจากพาวเวอร์ซัพพลายเข้ากับเมนบอร์ด
- Connect the 8-pin (or 4+4-pin) ATX 12V power connector to the motherboard.
5.6. การเชื่อมต่อแผงด้านหน้าและด้านหลัง (I/O)
- Connect the front panel headers (power switch, reset switch, HDD LED, power LED) to the corresponding pins on the motherboard. Refer to the motherboard manual for pin assignments.
- Connect USB 2.0, USB 3.1 Gen1, and USB 3.1 Gen2 Type-C front panel connectors if your case supports them.
- Connect audio cables from the front panel to the motherboard's audio header.
- Install the Wi-Fi antennas to the rear I/O panel connectors for Intel 802.11ac WiFi functionality.
- Connect peripherals (monitor, keyboard, mouse, network cable) to the rear I/O ports.
6. BIOS Setup and Software
After hardware installation, configure the system through the BIOS/UEFI and install necessary software.
6.1. Accessing the BIOS/UEFI
- เปิดเครื่องคอมพิวเตอร์ของคุณ
- ระหว่างกระบวนการบูต ให้กดปุ่มซ้ำๆ เดล or F2 ปุ่มสำหรับเข้าสู่ยูทิลิตี้การตั้งค่า BIOS/UEFI
6.2. Initial BIOS Configuration
- Set the correct system date and time.
- ตั้งค่าลำดับการบูตเพื่อจัดลำดับความสำคัญของสื่อการติดตั้งระบบปฏิบัติการของคุณ (ไดรฟ์ USB หรือ DVD)
- Review and adjust SATA mode (AHCI is generally recommended for SSDs).
- บันทึกการเปลี่ยนแปลงและออกจาก BIOS
6.3. การติดตั้งไดรเวอร์และซอฟต์แวร์
- After installing your operating system, install the necessary drivers from the provided support DVD or download the latest versions from the ASRock website. Key drivers include chipset, audio, LAN, Wi-Fi, and graphics drivers.
- Install ASRock utility software for features like RGB LED control and system monitoring.
6.4. การอัปเดต BIOS
Regularly check the ASRock website for BIOS updates. BIOS updates can improve system stability, compatibility, and performance. Refer to the ASRock website for specific instructions on how to update the BIOS, typically involving a utility or flashing from within the BIOS itself.
7 การแก้ไขปัญหา
หัวข้อนี้จะกล่าวถึงปัญหาทั่วไปที่คุณอาจพบเจอ
7.1. ไม่มีพลังงาน / ไม่สามารถบูตได้
- Ensure all power cables (24-pin ATX, 8-pin ATX 12V) are securely connected to the motherboard and power supply.
- Verify the power supply switch is in the "ON" position.
- ตรวจสอบการเชื่อมต่อสวิตช์ไฟแผงด้านหน้ากับเมนบอร์ด
- ลองบูตเครื่องโดยใช้ส่วนประกอบขั้นต่ำ (ซีพียู, แรม 1 ตัว, การ์ดจอ หากไม่มีการ์ดจอออนบอร์ด) เพื่อแยกแ1ยะปัญหา
7.2. ไม่มีการแสดงผล
- Confirm the monitor is connected to the correct graphics output (either dedicated GPU or motherboard's integrated graphics port).
- ถอดและเสียบการ์ดจอใหม่ และตรวจสอบให้แน่ใจว่าได้เสียบสายไฟเรียบร้อยแล้ว
- ทดสอบด้วยจอภาพหรือสายจอแสดงผลอื่น
7.3. ความไม่เสถียรของระบบ / การขัดข้อง
- Check CPU and RAM temperatures. Ensure CPU cooler is properly installed.
- Verify RAM modules are correctly seated and compatible. Run a memory diagnostic tool.
- If overclocking, revert to default BIOS settings to check for stability.
- ตรวจสอบให้แน่ใจว่าไดร์เวอร์ทั้งหมดได้รับการอัปเดตแล้ว
7.4. ไม่พบอุปกรณ์ต่อพ่วง
- ลองเสียบอุปกรณ์ต่อพ่วงเข้ากับพอร์ตอื่นดู
- ตรวจสอบตัวจัดการอุปกรณ์ในระบบปฏิบัติการของคุณเพื่อหาสาเหตุของปัญหาไดรเวอร์
- Ensure the peripheral is powered on and functioning correctly.
8. ข้อมูลจำเพาะ
Detailed technical specifications for the ASRock Z370 TAICHI motherboard.
| คุณสมบัติ | รายละเอียด |
|---|---|
| ยี่ห้อ | เอเอสร็อค |
| ชื่อรุ่น | ไทเก็ก |
| ซ็อคเก็ตซีพียู | แอลจีเอ 1151 |
| โปรเซสเซอร์ที่เข้ากันได้ | 8th Generation Intel Core Processors |
| ประเภทชิปเซ็ต | อินเทล Z370 |
| เทคโนโลยีหน่วยความจำ RAM | DDR4 |
| ความเร็วหน่วยความจำ | 2400 MHz (Supports DDR4 4333+(OC)) |
| ความจุหน่วยความจำสูงสุด | 64GB |
| สล็อต PCIe | 3 PCIe 3.0 x16, 2 PCIe 3.0 x1 |
| รองรับหลาย GPU | NVIDIA Quad SLI, AMD 3-Way CrossFireX |
| Graphics Output Options | HDMI, ดิสเพลย์พอร์ต |
| เสียง | 7.1 CH HD Audio (Realtek ALC1220 Audio Codec), Purity Sound 4 & DTS Connect |
| พอร์ต SATA | 8 SATA3 |
| สล็อต M.2 | 3 Ultra M.2 (PCIe Gen3 x4 & SATA3) |
| USB 3.1 Gen2 | 3 (1 Front Type-C, 1 Rear Type-C, 1 Rear Type-A) |
| USB 3.1 Gen1 | 8 (4 ด้านหน้า, 4 ด้านหลัง) |
| พอร์ต USB 2.0 | 3 |
| แลน | Dual Intel Gigabit LAN |
| การเชื่อมต่อแบบไร้สาย | Intel 802.11ac WiFi + BT 4.2 |
| คุณสมบัติพิเศษ | ASRock RGB LED, Hyper BCLK Engine II, Intel Optane Memory Ready |
| ขนาด (กxยxส) | 12.2 x 13.7 x 3.6 นิ้ว |
| น้ำหนักสินค้า | 3.3 ปอนด์ |
| วันที่พร้อมใช้งานครั้งแรก | 7 ตุลาคม 2017 |
9. ข้อมูลการรับประกัน
ASRock provides a limited warranty for its motherboards. The specific terms and duration of the warranty may vary by region and retailer. Please retain your proof of purchase for warranty claims. For detailed warranty information, refer to the official ASRock webไซต์หรือติดต่อผู้ค้าปลีกในพื้นที่ของคุณ
10. การสนับสนุนด้านเทคนิค
For further assistance, driver downloads, BIOS updates, or troubleshooting not covered in this manual, please visit the official ASRock support webเว็บไซต์:
ฝ่ายสนับสนุน ASRock Webเว็บไซต์
You can also find additional resources and FAQs on the ASRock product page for the Z370 TAICHI model.