1. บทนำ
ขอบคุณสำหรับการซื้อasing the Supersonic SC-20H DVD Player. This manual provides essential information for the proper installation, operation, and maintenance of your device. Please read this manual thoroughly before using the product and retain it for future reference.
2. ข้อมูลด้านความปลอดภัย
เพื่อให้มั่นใจถึงการทำงานที่ปลอดภัยและป้องกันความเสียหาย โปรดปฏิบัติตามข้อควรระวังต่อไปนี้:
- แหล่งพลังงาน: Connect the player only to a power supply within the specified range (110-240V, 50/60Hz).
- การระบายอากาศ : อย่าปิดกั้นช่องระบายอากาศ ควรมีพื้นที่รอบเครื่องเพียงพอเพื่อให้อากาศถ่ายเทได้สะดวก
- ความชื้น: อย่าให้เครื่องเล่นโดนฝน ความชื้น หรือของเหลวที่หยดหรือกระเด็น อย่าวางสิ่งของที่บรรจุของเหลว เช่น แจกัน ไว้บนเครื่องเล่น
- ความร้อน: ควรเก็บเครื่องเล่นให้ห่างจากแหล่งความร้อน เช่น เครื่องทำความร้อน ช่องระบายความร้อน เตา หรืออุปกรณ์อื่นๆ (รวมถึง) ampเครื่องให้ความร้อน) ที่ผลิตความร้อน
- การทำความสะอาด: ถอดปลั๊กเครื่องเล่นออกจากเต้ารับก่อนทำความสะอาด ใช้ผ้าแห้งในการทำความสะอาด
- การบริการ: อย่าพยายามให้บริการผลิตภัณฑ์นี้ด้วยตนเอง ส่งต่อการบริการทั้งหมดไปยังช่างบริการที่ผ่านการรับรอง
- คำเตือนของแคลิฟอร์เนียมาตรา 65: ผลิตภัณฑ์นี้ประกอบด้วยสารเคมีที่รัฐแคลิฟอร์เนียทราบว่าก่อให้เกิดมะเร็งและข้อบกพร่องทางการเกิดหรืออันตรายต่อการสืบพันธุ์อื่น ๆ
3. เนื้อหาบรรจุภัณฑ์
ตรวจสอบว่ามีรายการทั้งหมดอยู่ในแพ็คเกจ:
- Supersonic SC-20H DVD Player
- สายไฟจ่ายไฟ
- AV Cables (Composite)
- Full Function Remote Control (Batteries not included)
- คู่มือการใช้งาน (เอกสารนี้)
4. สินค้าหมดview
4.1 แผงด้านหน้า
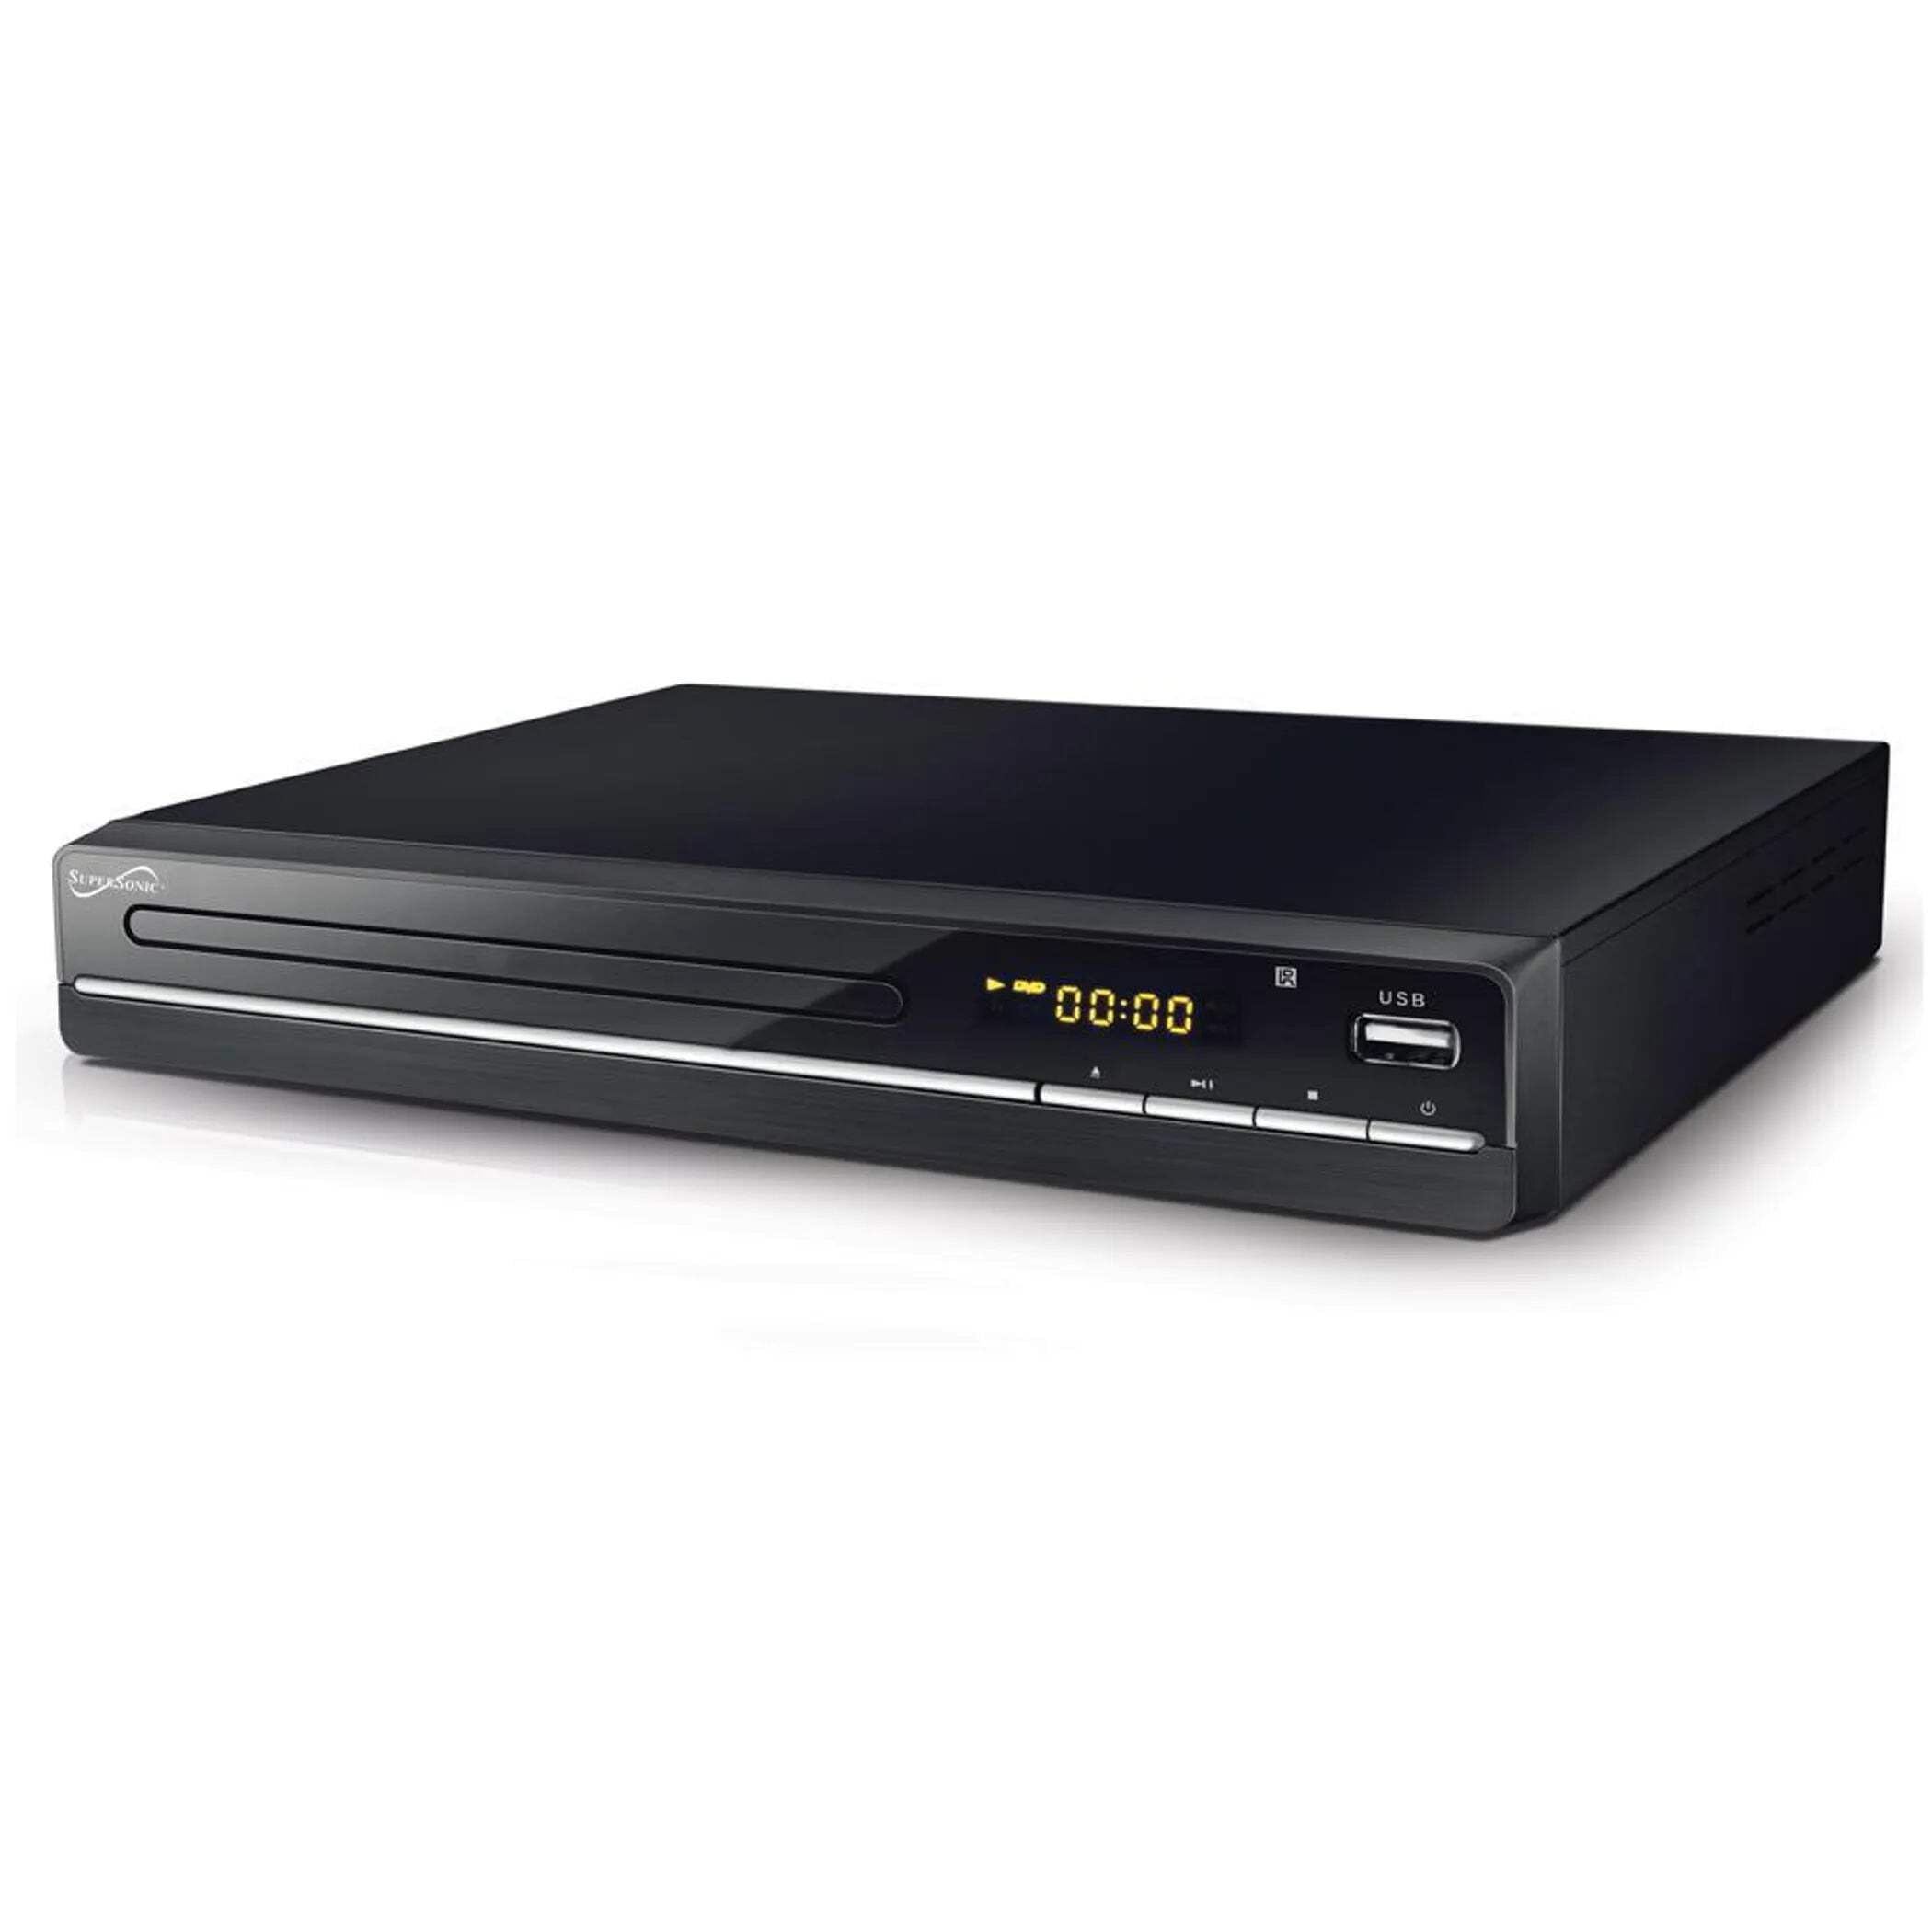
The image above displays the front panel of the SC-20H DVD Player. Key features include:
- ถาดใส่แผ่นดิสก์: For inserting DVDs, VCDs, CDs, and other compatible discs.
- หน้าจอแสดงผล: แสดงเวลาเล่น หมายเลขแทร็ก และข้อมูลการใช้งานอื่นๆ
- ปุ่มควบคุม: Includes Play/Pause, Stop, Previous, Next, and Power buttons for direct control.
- ช่องต่อ USB: Allows connection of USB flash drives for media playback.
- ช่องเสียบการ์ด SD: สำหรับการเสียบการ์ด SD เพื่อเล่นสื่อ files. (Note: The image primarily shows the USB port, but the product features indicate an SD input as well, typically located near the USB port or on the side).
4.2 แผงด้านหลัง
The rear panel of the DVD player contains all the necessary connection ports for audio and video output.
- เอาท์พุต HDMI: Connects to an HDMI-enabled TV or display for high-definition audio and video.
- Composite A/V Output (RCA): Yellow (Video), White (Left Audio), Red (Right Audio) jacks for standard definition connection to older TVs.
- Component YUV Output: Y (Luminance), Pb (Blue difference), Pr (Red difference) jacks for progressive scan video output, offering better quality than composite.
- กำลังไฟเข้า: For connecting the power supply cable.
5. การตั้งค่า
5.1 การเชื่อมต่อกับโทรทัศน์
เลือกวิธีการเชื่อมต่อวิธีใดวิธีหนึ่งต่อไปนี้:
- การเชื่อมต่อ HDMI (แนะนำ):
- Connect one end of an HDMI cable (not included) to the HDMI OUT port on the DVD player.
- ต่อปลายอีกด้านของสาย HDMI เข้ากับพอร์ต HDMI IN บนโทรทัศน์ของคุณ
- เลือกช่องต่อ HDMI ที่ตรงกับทีวีของคุณโดยใช้รีโมทคอนโทรล
- Composite A/V Connection:
- Connect the yellow RCA cable to the VIDEO OUT port on the DVD player and the VIDEO IN port on your TV.
- Connect the white RCA cable to the L AUDIO OUT port on the DVD player and the L AUDIO IN port on your TV.
- Connect the red RCA cable to the R AUDIO OUT port on the DVD player and the R AUDIO IN port on your TV.
- Select the corresponding A/V input on your TV.
- Component YUV Connection:
- Connect the Y, Pb, and Pr cables to the corresponding YUV OUT ports on the DVD player and YUV IN ports on your TV.
- For audio, use the white and red RCA cables to connect the L/R AUDIO OUT ports on the DVD player to the L/R AUDIO IN ports on your TV.
- Select the corresponding Component input on your TV.
5.2 การเชื่อมต่อสายไฟ
After connecting the audio/video cables, plug the power supply cable into the DVD player's power input and then into a wall outlet.
6. คู่มือการใช้งาน
6.1 การเล่นแผ่นพื้นฐาน
- เปิดเครื่อง: Press the Power button on the front panel or remote control.
- ใส่แผ่นดิสก์: Press the OPEN/CLOSE button to open the disc tray. Place a compatible disc (DVD, VCD, CD, KODAK CD, DVD±R/RW, CD-R, CD-RW) onto the tray with the label side facing up. Press OPEN/CLOSE again to close the tray.
- การเล่นซ้ำ: The player will typically begin playback automatically. If not, press the PLAY button.
- หยุดชั่วคราว/เล่นต่อ: Press the PAUSE button to temporarily stop playback. Press PLAY again to resume.
- หยุด: กดปุ่ม STOP เพื่อสิ้นสุดการเล่น
- Skip Tracks/Chapters: Use the PREVIOUS and NEXT buttons to navigate between tracks or chapters.
6.2 การเล่นสื่อ USB/SD
- แทรกสื่อ: ใส่แฟลชไดรฟ์ USB เข้าในพอร์ต USB หรือใส่การ์ด SD เข้าในช่องเสียบการ์ด SD
- เลือกแหล่งที่มา: Use the SOURCE or USB/SD button on the remote control to switch to the USB or SD input.
- ค้นหา Files: Use the navigation buttons (Up, Down, Left, Right) and OK button on the remote to browse through your media files (MP3, video formats).
- เล่น File: เลือกสิ่งที่คุณต้องการ file and press the PLAY button to begin playback.
6.3 System Settings (OSD Menu)
Access the On-Screen Display (OSD) menu to configure various settings:
- เมนูการเข้าถึง: Press the SETUP button on the remote control.
- การนำทาง: ใช้ปุ่มนำทางเพื่อเลื่อนดูตัวเลือกในเมนู
- การเลือก: กด OK เพื่อเลือกตัวเลือกหรือเข้าสู่เมนูย่อย
- ทางออก: Press SETUP again to exit the menu.
การตั้งค่าหลักประกอบด้วย:
- ภาษา: Set OSD menu language and subtitle language (supports multiple languages).
- อัตราส่วนภาพ: Choose between 4:3 (Standard) and 16:9 (Widescreen) for video output.
- การควบคุมโดยผู้ปกครอง: Set a password and rating level to restrict playback of certain content.
- การตั้งค่าเสียง: Adjust audio output modes (e.g., Surround).
7. การบำรุงรักษา
Proper maintenance ensures the longevity of your DVD player:
- การทำความสะอาดหน่วย: Wipe the exterior of the player with a soft, dry cloth. Do not use liquid cleaners or aerosol sprays.
- แผ่นทำความสะอาด: Use a soft, lint-free cloth to wipe discs from the center outwards. Do not use abrasive cleaners or solvents.
- การจัดการดิสก์: Always hold discs by their edges to avoid fingerprints and scratches. Store discs in their cases when not in use.
- การระบายอากาศ : ตรวจสอบให้แน่ใจว่าช่องระบายอากาศไม่มีฝุ่นและเศษขยะเพื่อป้องกันความร้อนสูงเกินไป
8 การแก้ไขปัญหา
หากคุณพบปัญหา โปรดดูปัญหาทั่วไปและวิธีแก้ไขต่อไปนี้:
| ปัญหา | สาเหตุที่เป็นไปได้ | สารละลาย |
|---|---|---|
| ไม่มีไฟฟ้า | สายไฟไม่ได้เชื่อมต่อ เต้ารับไฟฟ้าชำรุด | ตรวจสอบให้แน่ใจว่าเสียบสายไฟแน่นสนิทแล้ว ทดสอบปลั๊กไฟด้วยอุปกรณ์อื่น |
| ไม่มีรูปภาพ | Incorrect video connection; Wrong TV input selected | Check video cables (HDMI, Composite, Component) are correctly connected. Select the correct input source on your TV. |
| ไม่มีเสียง | Incorrect audio connection; TV/player volume too low; Mute activated | Check audio cables (HDMI, RCA) are correctly connected. Increase volume on TV and player. Deactivate mute function. |
| แผ่นไม่เล่น | Disc inserted incorrectly; Disc is dirty or scratched; Incompatible disc format | Ensure disc is inserted label-side up. Clean the disc. Check if the disc format is supported (DVD, VCD, CD, KODAK CD, DVD±R/RW, CD-R, CD-RW, MP3). |
| ไม่สามารถเล่นสื่อจาก USB/SD ได้ | Incorrect source selected; Incompatible file format; USB/SD device faulty | Select USB or SD source. Ensure media files are compatible. Try another USB/SD device. |
9. ข้อมูลจำเพาะ
Detailed technical specifications for the Supersonic SC-20H DVD Player:
- แบบอย่าง: SC-20H
- ยี่ห้อ: เหนือเสียง
- ความเข้ากันได้ของดิสก์: DVD, VCD, KODAK CD, DVD±R/RW, CD, CD-R, CD-RW, MP3
- เอาท์พุตวิดีโอ: HDMI, Composite A/V, Component YUV
- โหมดเอาต์พุตเสียง: ล้อมรอบ
- ปณิธาน: 1920x1080 (via HDMI)
- การเชื่อมต่อ: USB 2.0, SD Card Slot
- แหล่งจ่ายไฟ: 110-240 โวลต์, 50/60 เฮิรตซ์
- การใช้พลังงาน: 15วัตต์
- ขนาด (ยาว x กว้าง x สูง): 10.5 x 10 x 3.3 นิ้ว
- น้ำหนักสินค้า: 1.75 ปอนด์
- คุณสมบัติพิเศษ: Multi-language subtitles (up to 32 languages), PAL/NTSC compatible, Parental Lock, Aspect Ratio (4:3, 16:9)
10. การรับประกันและการสนับสนุน
สำหรับข้อมูลการรับประกันและการสนับสนุนทางเทคนิค โปรดดูเอกสารที่แนบมากับสินค้าที่ซื้อ หรือเยี่ยมชมเว็บไซต์อย่างเป็นทางการของ Supersonic webไซต์ เก็บหลักฐานการซื้อของคุณไว้เพื่อใช้ในกรณีเรียกร้องการรับประกัน


