1. บทนำ
This manual provides essential information for the proper installation, operation, and maintenance of your Aurora 20 Inch LED Marine Series Light Bar. This high-intensity LED light bar is designed for marine and off-road vehicle applications, offering robust performance and durability in challenging environments.
The light bar features 40 high-intensity 5W LED chips, delivering a total of 200 watts of power and 17,120 lumens of 6000K bright white light. Its combo flood and spot beam pattern provides both broad illumination and focused light. Constructed with an IP69-rated 6063 aluminum housing, 316 stainless steel screws, and a UV and scratch-resistant lens, it is built for longevity and resistance to harsh conditions.

ภาพที่ 1.1: ด้านหน้า view of the Aurora 20 Inch LED Marine Series Light Bar. This image displays the light bar's robust white housing and the array of LED lenses.
2. ข้อมูลด้านความปลอดภัย
- ถอดปลั๊กไฟก่อนการติดตั้งหรือบำรุงรักษาทุกครั้ง
- Ensure proper wiring and fusing to prevent electrical overload. Refer to vehicle/vessel electrical specifications.
- Do not look directly into the light when it is operating, as it can cause eye strain or damage.
- Mount the light bar securely to prevent detachment during operation or movement.
- Keep wiring away from hot or moving parts.
- This product operates on a 10-30V DC power supply. Verify your power source compatibility.
3. เนื้อหาบรรจุภัณฑ์
ตรวจสอบว่าส่วนประกอบทั้งหมดมีอยู่ก่อนเริ่มการติดตั้ง:
- Aurora 20 Inch LED Marine Series Light Bar (1 unit)
- ขายึด (แบบประกอบสำเร็จหรือแยกชิ้น)
- Wiring Harness (1 unit)
- Installation Hardware (screws, nuts, washers)

Image 3.1: Included wiring harness. This image shows the complete wiring harness with relay, switch, and waterproof connectors, essential for installation.
4. การตั้งค่าและการติดตั้ง
4.1 การติดตั้ง
- Identify a suitable mounting location on your vehicle or vessel. Ensure the surface is strong enough to support the light bar's weight and vibrations.
- The light bar features flexible mounting brackets that allow for 360° rotation. Adjust the brackets to achieve the desired angle and position.
- Mark the drilling points for the mounting hardware.
- Drill pilot holes if necessary and securely attach the light bar using the provided hardware.

Image 4.1: Illustration of the light bar's flexible mounting system. This image demonstrates the 360-degree rotational capability of the mounting brackets, allowing for versatile positioning.
4.2 การเดินสายไฟ
- Connect the light bar to the included wiring harness. The harness typically includes a relay, switch, and waterproof Deutsch connector.
- Ensure all connections are secure and waterproof, especially the Deutsch connector.
- Connect the positive (+) wire from the harness to a fused 10-30V DC power source. It is recommended to use a fuse appropriate for the light bar's 200W power consumption (approximately 16.7A at 12V, so a 20A or 25A fuse is advisable).
- Connect the negative (-) wire from the harness to a suitable ground point on your vehicle or vessel.
- Route the wiring safely, away from heat sources, sharp edges, and moving parts. Secure with cable ties.
ภาพที่ 4.2: รายละเอียด view of key components. This image highlights the waterproof Deutsch connector, the Military Aurora Patented breather for air balance, and the robust aluminum housing.
5. คู่มือการใช้งาน
Once installed and wired correctly, operate the light bar using the switch provided with the wiring harness. The light bar will emit a 6000K bright white light with a combo beam pattern, providing both a wide flood and a focused spot illumination.

Image 5.1: The light bar in operation. This image shows the light bar fully illuminated in a dark, wet setting, demonstrating its brightness and waterproof capabilities.
6. การบำรุงรักษา
- การทำความสะอาด: Periodically clean the lens with a soft cloth and mild soap and water. Avoid abrasive cleaners that could scratch the UV-resistant lens.
- การตรวจสอบ: Regularly check all mounting hardware and electrical connections for tightness and corrosion, especially in marine environments.
- ลมหายใจ: The light bar is equipped with a Military Aurora Patented breather designed to maintain waterproof integrity and air balance. No user maintenance is typically required for this component.
- ที่อยู่อาศัย: The 6063 aluminum housing and 316 stainless steel screws are designed for corrosion resistance. Rinse with fresh water after exposure to saltwater.
7 การแก้ไขปัญหา
- Light Bar Does Not Turn On:
- Check all electrical connections for proper contact.
- Verify the power source is supplying 10-30V DC.
- Inspect the fuse in the wiring harness. Replace if blown with a fuse of the correct ampเร่าร้อน
- Ensure the switch is functioning correctly.
- แสงสว่างไม่เพียงพอหรือกระพริบ:
- Check for loose connections or inadequate grounding.
- ตรวจสอบปริมาณtage at the light bar is within the 10-30V DC range. Low voltage can cause dimming.
- ความชื้นภายในเลนส์:
- While the light bar is IP69 rated, extreme temperature changes can sometimes cause condensation. This usually dissipates with use. If persistent, inspect the housing for damage or improper sealing.
8. ข้อมูลจำเพาะ
| คุณสมบัติ | ข้อมูลจำเพาะ |
|---|---|
| หมายเลขรุ่น | ALO-M-20-P4E4J |
| ขนาด (กว้าง x ยาว x สูง) | 21.5 x 3.5 x 3.2 นิ้ว (54.6 x 8.9 x 8.1 ซม.) |
| น้ำหนักสินค้า | 7.63 ปอนด์ (3.46 กก.) |
| วัดtage | 200 วัตต์ |
| ชิป LED | 40 pcs x 5W high intensity LEDs |
| ลูเมน | 17,120 ลูเมน |
| อุณหภูมิสี | 6000K (ขาวสว่าง) |
| รูปแบบลำแสง | Combo (Flood and Spot) |
| ปฏิบัติการฉบับที่tage | 10-30V ซี |
| ระดับการป้องกันน้ำและฝุ่น (IP) | IP69 (Dust Proof, Water Proof) |
| วัสดุที่ใช้ทำตัวเรือน | อลูมิเนียม 6063 |
| วัสดุเลนส์ | UV and Scratch-Resistant |
| วัสดุฮาร์ดแวร์ | สกรูสแตนเลส 316 |
| ส่วนประกอบที่รวมอยู่ | ชุดสายไฟ |

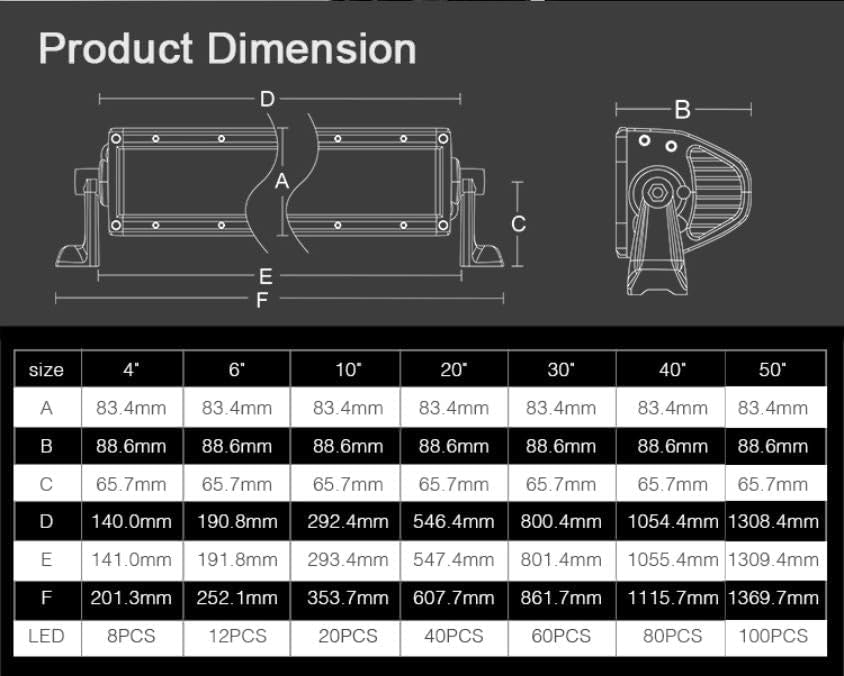
Image 8.1: Product dimension table. This table provides detailed measurements for various light bar sizes, including the 20-inch model.
9. การรับประกันและการสนับสนุน
For warranty information or technical support, please refer to the documentation provided at the time of purchase or contact Aurora customer service directly. Keep your purchase receipt as proof of purchase.


