1. บทนำ
This manual provides essential information for the installation, operation, and maintenance of your Western Digital 1TB 3.5" SATA HDD (Model WD10EZEX). This internal hard drive is designed for desktop PC and Mac systems, offering reliable storage and performance for various applications.

รูปที่ 1: ด้านบน view of the Western Digital 1TB 3.5" SATA Hard Drive.
2. ข้อมูลด้านความปลอดภัย
Observe the following safety guidelines to prevent damage to the drive or personal injury:
- ควรจับฮาร์ดไดรฟ์ที่ขอบเสมอ เพื่อหลีกเลี่ยงการสัมผัสแผงวงจรหรือขั้วต่อ
- Ensure proper grounding to prevent electrostatic discharge (ESD) when handling the drive. Use an anti-static wrist strap.
- Disconnect power from your computer before installing or removing the hard drive.
- ควรหลีกเลี่ยงการวางฮาร์ดไดรฟ์ไว้ในที่ที่มีอุณหภูมิสูง ความชื้นสูง หรือแสงแดดโดยตรง
- อย่าทำตกหรือทำให้ไดรฟ์ได้รับแรงกระแทก
3. เนื้อหาบรรจุภัณฑ์
แพ็คเกจของคุณควรมีรายการต่อไปนี้:
- Western Digital 1TB 3.5" SATA HDD (Model WD10EZEX)
Note: SATA data cables, power cables, and mounting screws are typically sold separately and are not included with this OEM drive.
4. การตั้งค่า
4.1. รายการตรวจสอบก่อนการติดตั้ง
- A desktop computer with an available 3.5-inch drive bay.
- A SATA data cable.
- An available SATA power connector from your power supply.
- Mounting screws (typically M3 or 6-32 UNC).
- ไขควงหัวแฉก.
- สายรัดข้อมือป้องกันไฟฟ้าสถิต (แนะนำให้ใช้)
4.2. การติดตั้งทางกายภาพ
- หมดแรง: ปิดคอมพิวเตอร์และถอดสายไฟออกจากเต้ารับที่ผนัง
- เปิดเคส: Remove the side panel(s) of your computer case to access the internal components.
- ค้นหาตำแหน่งไดรฟ์เบย์: ตรวจสอบหาช่องใส่ไดรฟ์ขนาด 3.5 นิ้วที่ว่างอยู่ บางเคสอาจต้องใช้ตัวยึดไดรฟ์เพิ่มเติม
- ติดตั้งไดรฟ์: Slide the hard drive into the drive bay or caddy. Secure it with mounting screws on both sides.
- เชื่อมต่อสายเคเบิล:
- Connect one end of the SATA data cable to the smaller port on the hard drive and the other end to an available SATA port on your motherboard.
- เชื่อมต่อสายไฟ SATA จากแหล่งจ่ายไฟเข้ากับพอร์ตขนาดใหญ่บนฮาร์ดไดรฟ์
- ปิดคดี: Replace the computer case side panel(s) and reconnect the power cord.

รูปที่ 2: ด้านล่าง view of the hard drive, showing the SATA data and power connectors.
4.3. Initial Software Setup (Windows/macOS)
After physical installation, the drive needs to be initialized and formatted by your operating system:
- เปิดเครื่อง: เปิดคอมพิวเตอร์ของคุณ
- Access Disk Management (Windows): Right-click on the Start button, select "Disk Management".
- เริ่มต้นดิสก์: Locate your new WD10EZEX drive (it may appear as "Unallocated Space"). Right-click on it and select "Initialize Disk". Choose MBR (Master Boot Record) for drives up to 2TB or GPT (GUID Partition Table) for drives larger than 2TB (though this 1TB drive can use either, GPT is more modern).
- สร้างวอลุ่มใหม่แบบง่าย: Right-click on the unallocated space, select "New Simple Volume". Follow the wizard to assign a drive letter and format the drive (NTFS for Windows).
- สำหรับ macOS: Open "Disk Utility", select the new drive, and use the "Erase" function to format it (e.g., APFS or Mac OS Extended).
For migrating an existing operating system to this new drive, Western Digital offers Acronis True Image Edition software for free download. This software enables you to copy all your data, including the operating system, to the new drive without reinstalling.
5. การใช้งานฮาร์ดไดรฟ์
Once installed and formatted, your WD10EZEX drive will function as a standard storage device. You can use it for:
- Storing documents, photos, videos, and other personal files.
- Installing applications and games.
- Creating backups of your primary drive.
The 7200 RPM rotational speed and SATA 6Gb/s interface ensure efficient data transfer and responsive performance for everyday computing tasks.
6. การบำรุงรักษา
To ensure the longevity and optimal performance of your hard drive, consider the following maintenance tips:
- การสำรองข้อมูลปกติ: Periodically back up important data to another storage device or cloud service.
- Disk Defragmentation (HDD only): For Windows users, run Disk Defragmenter occasionally to optimize file arrangement. SSDs do not require defragmentation.
- ติดตามสุขภาพ: Use disk utility software (e.g., CrystalDiskInfo, WD Drive Utilities) to monitor the drive's S.M.A.R.T. (Self-Monitoring, Analysis and Reporting Technology) status for early detection of potential issues.
- รักษาความเย็น: ตรวจสอบให้แน่ใจว่ามีการระบายอากาศที่เพียงพอภายในเคสคอมพิวเตอร์ของคุณเพื่อป้องกันความร้อนสูงเกินไป
- หลีกเลี่ยงการกระแทกทางกายภาพ: Hard drives are mechanical devices; avoid moving the computer while it is operating or subjecting it to sudden impacts.
7 การแก้ไขปัญหา
7.1. ไม่พบไดรฟ์
- ตรวจสอบการเชื่อมต่อสายเคเบิลข้อมูลและสายไฟ SATA ทั้งหมดเพื่อให้แน่ใจว่าแน่นหนาดีแล้ว
- Verify that the drive is properly seated in its bay.
- Check your computer's BIOS/UEFI settings to ensure the SATA port is enabled and the drive is recognized.
- Ensure the drive has been initialized and formatted in Disk Management (Windows) or Disk Utility (macOS).
7.2. ประสิทธิภาพช้า
- Ensure your SATA data cable is connected to a SATA 6Gb/s port on your motherboard for optimal speed.
- ตรวจสอบกระบวนการทำงานเบื้องหลังที่ใช้ทรัพยากรดิสก์อยู่
- Run disk defragmentation (Windows) if the drive is heavily fragmented.
- Verify the drive's health using S.M.A.R.T. monitoring tools.
7.3. เสียงผิดปกติ
- Clicking, grinding, or repetitive noises can indicate a failing drive. Back up your data immediately and consider replacing the drive.
- A slight hum or whirring sound is normal for mechanical hard drives.
8. ข้อมูลจำเพาะ
| คุณสมบัติ | คำอธิบาย |
|---|---|
| หมายเลขรุ่น | WD10EZEX |
| ความจุ | 1TB |
| อินเทอร์เฟซ | SATA 6 กิกะบิตต่อวินาที |
| ฟอร์มแฟกเตอร์ | 3.5 นิ้ว |
| ความเร็วในการหมุน | 7200 รอบต่อนาที |
| แคช | 64MB |
| ขนาด (กxยxส) | 5.69 x 3.92 x 0.89 นิ้ว |
| น้ำหนักสินค้า | 15.9 ออนซ์ |
| แพลตฟอร์มฮาร์ดแวร์ | PC |
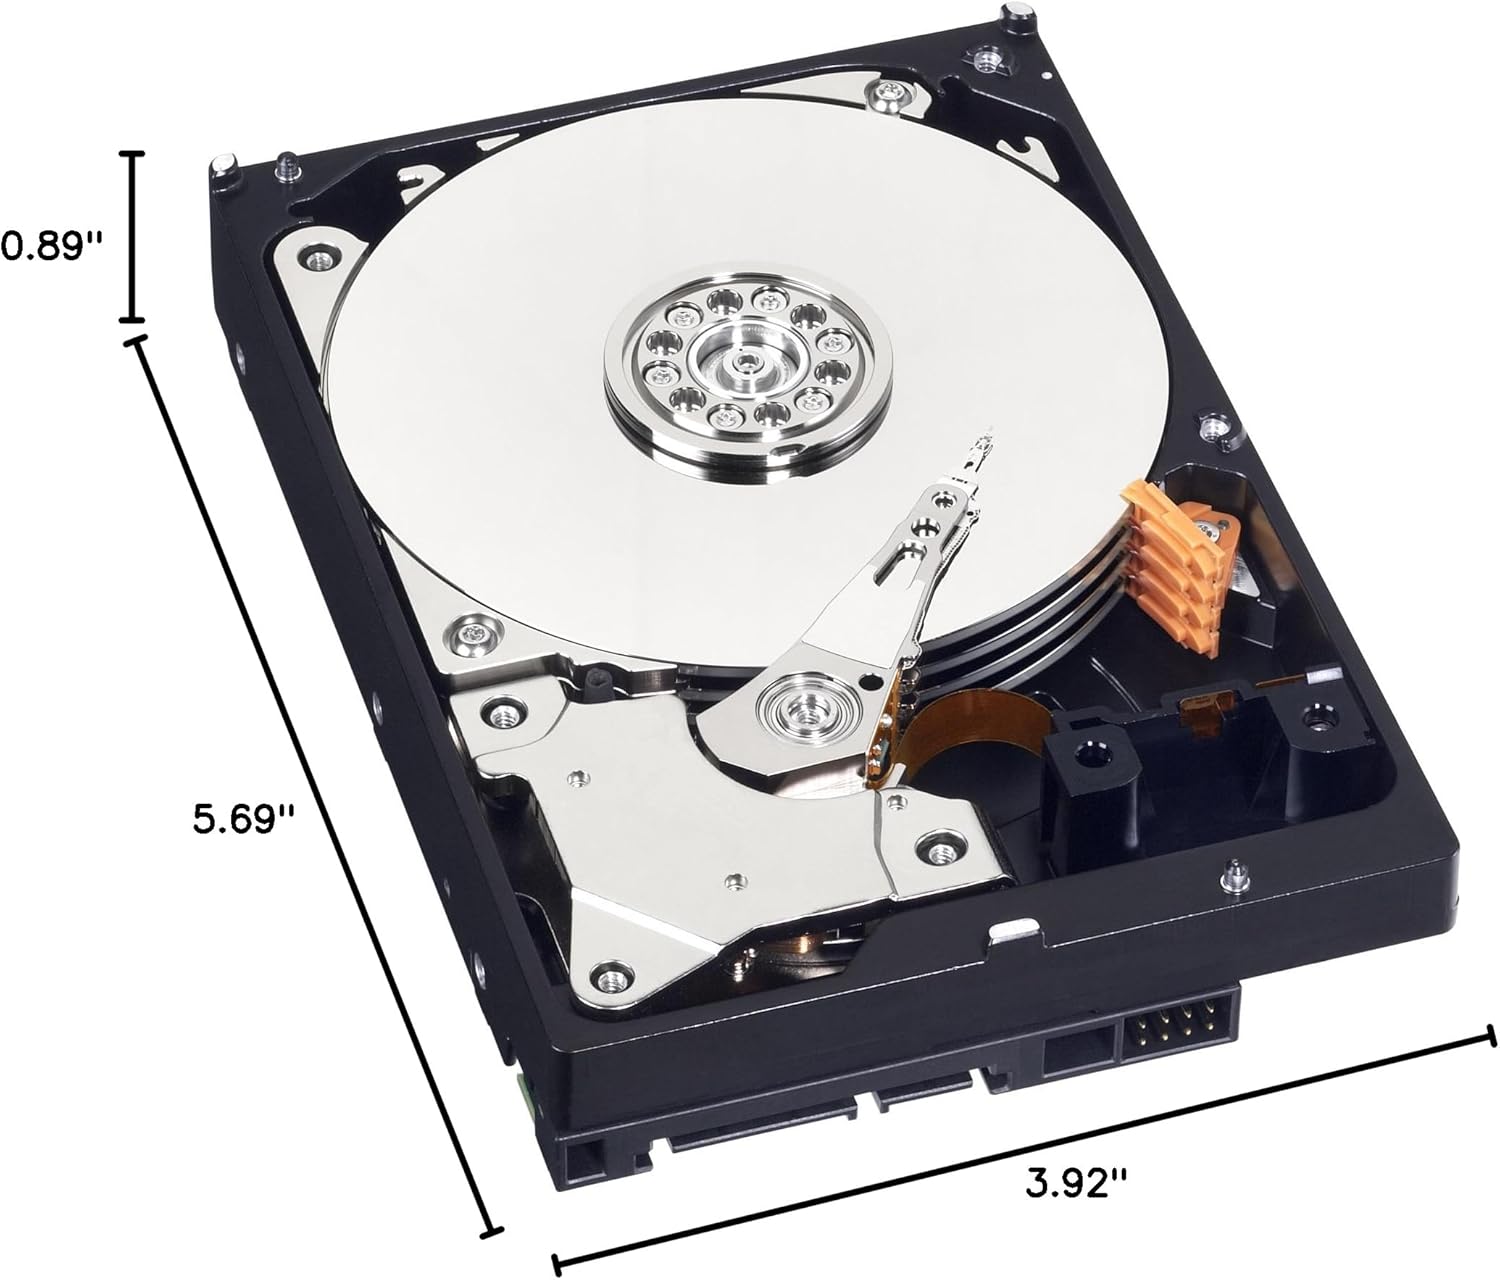
Figure 3: Dimensions of the Western Digital 1TB 3.5" SATA Hard Drive.
9. การรับประกันและการสนับสนุน
For warranty information and technical support, please refer to the official Western Digital webหรือติดต่อฝ่ายบริการลูกค้า เก็บหลักฐานการซื้อไว้เพื่อใช้ในการเคลมประกัน