1. บทนำ
The MASTECH MY70 is a reliable and versatile digital multimeter designed for basic electrical measurements. It is suitable for a wide range of applications, including workshop use, hobby projects, and general electrical testing. This manual provides essential information for the safe and effective operation, maintenance, and troubleshooting of your MY70 multimeter.
2. ข้อมูลด้านความปลอดภัย
Always observe the following safety precautions to prevent personal injury and damage to the multimeter or equipment under test.
- Read and understand all instructions in this manual before using the multimeter.
- ห้ามใช้ค่าป้อนเข้าเกินค่าสูงสุดสำหรับฟังก์ชันใดๆ
- ใช้ความระมัดระวังเมื่อทำงานกับ voltages สูงกว่า 30V AC RMS, 42V peak หรือ 60V DC ปริมาตรเหล่านี้tagอาจทำให้เกิดอันตรายจากการช็อตได้
- ควรตัดการเชื่อมต่อสายวัดทดสอบออกจากวงจรทุกครั้งก่อนเปลี่ยนฟังก์ชันหรือช่วงการวัด
- ตรวจสอบสายทดสอบว่ามีฉนวนชำรุดหรือมีโลหะเปลือยหรือไม่ก่อนใช้งานทุกครั้ง หากพบว่าชำรุดให้เปลี่ยนใหม่
- โปรดตรวจสอบให้แน่ใจว่าฝาปิดแบตเตอรี่ปิดสนิทก่อนใช้งาน
- ห้ามใช้งานมัลติมิเตอร์หากตัวเครื่องชำรุดหรือฝาครอบเปิดอยู่
- ปฏิบัติตามรหัสความปลอดภัยท้องถิ่นและระดับประเทศ
This device complies with IEC 61010, CE, and RoHS standards.
3. คุณสมบัติของผลิตภัณฑ์
The MASTECH MY70 Digital Multimeter offers a range of essential measurement capabilities:
- AC และ DC Voltagอีการวัด
- การวัดกระแสไฟฟ้า AC และ DC
- การวัดความต้านทาน
- การทดสอบ Diode
- Continuity Test with Buzzer
- การทดสอบทรานซิสเตอร์ hFE
- ฟังก์ชันเก็บข้อมูล
- ปิดเครื่องอัตโนมัติ
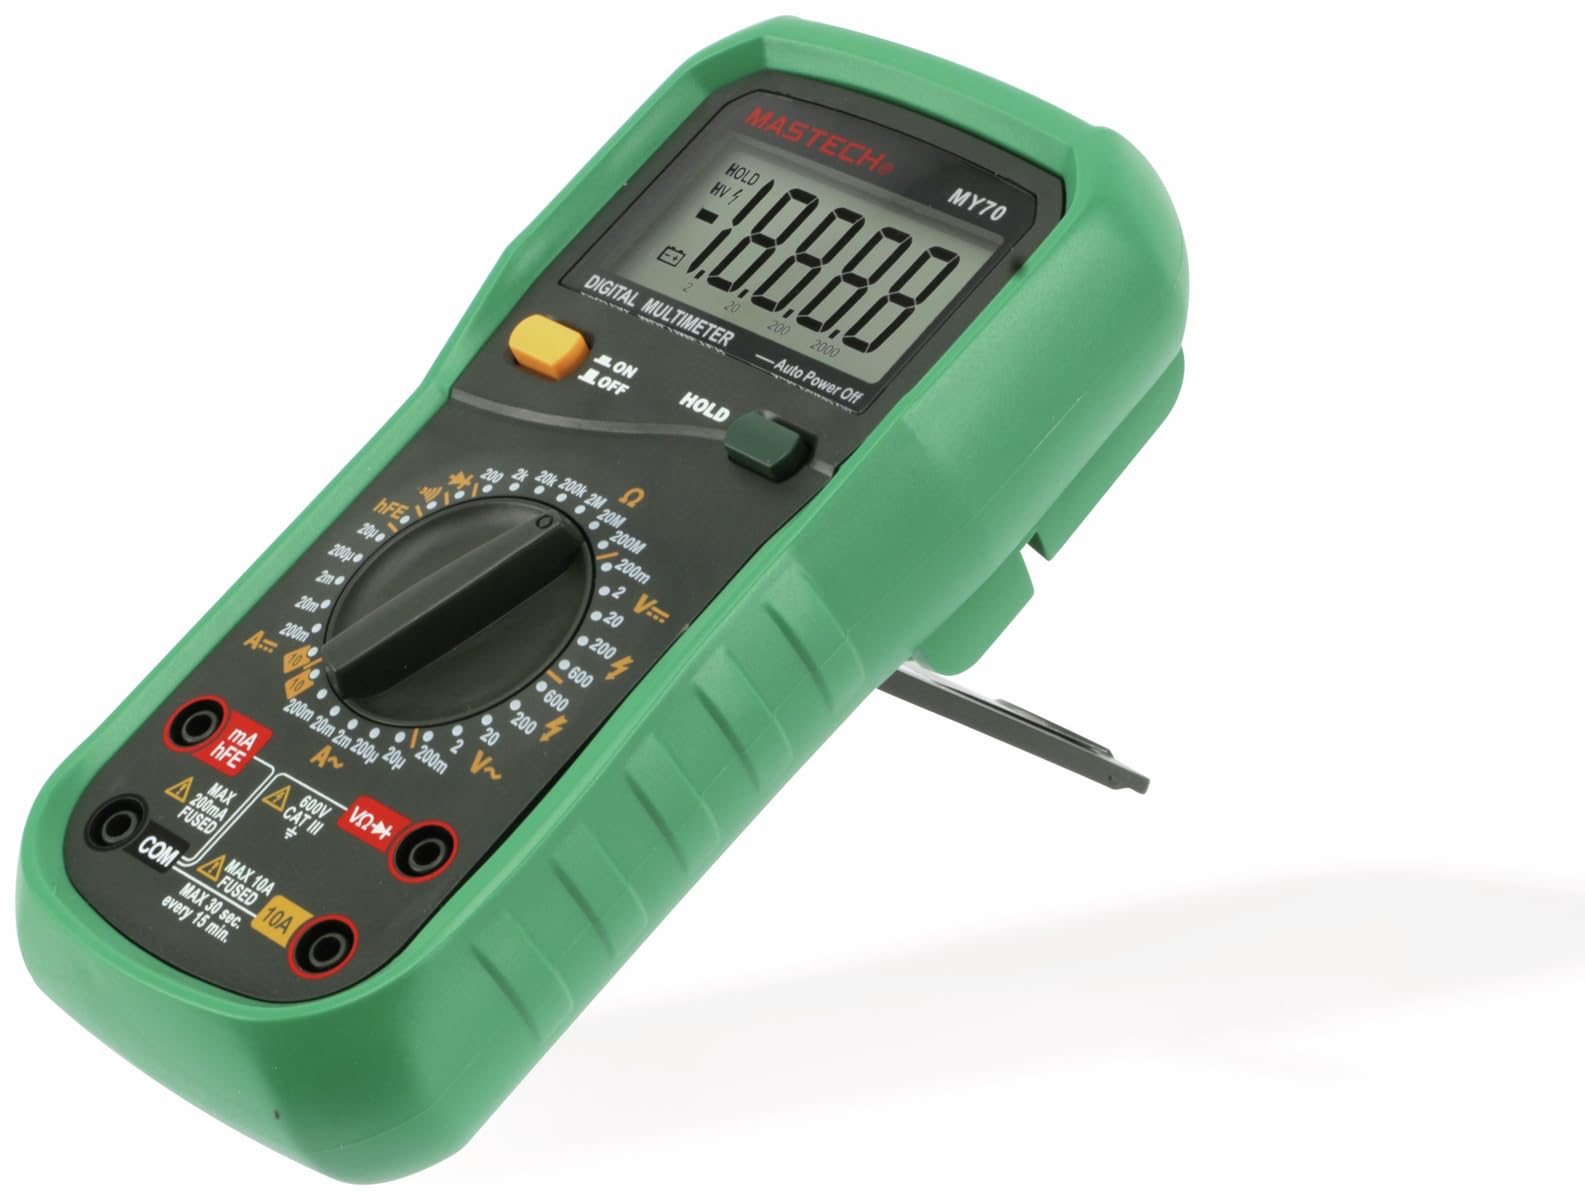
รูปที่ 3.1 : ด้านหน้า view of the MASTECH MY70 Digital Multimeter.
4. เนื้อหาบรรจุภัณฑ์
ตรวจสอบว่ามีรายการทั้งหมดอยู่ในแพ็คเกจของคุณ:
- MASTECH MY70 ดิจิตอลมัลติมิเตอร์
- สายทดสอบ (สีแดง 1 เส้น สีดำ 1 เส้น)
- แบตเตอรี่ 9 โวลต์ (ชนิด NEDA 1604 หรือ 6F22)
- Transistor Test Socket (hFE adapter)
- คู่มือการใช้งาน (เอกสารนี้)
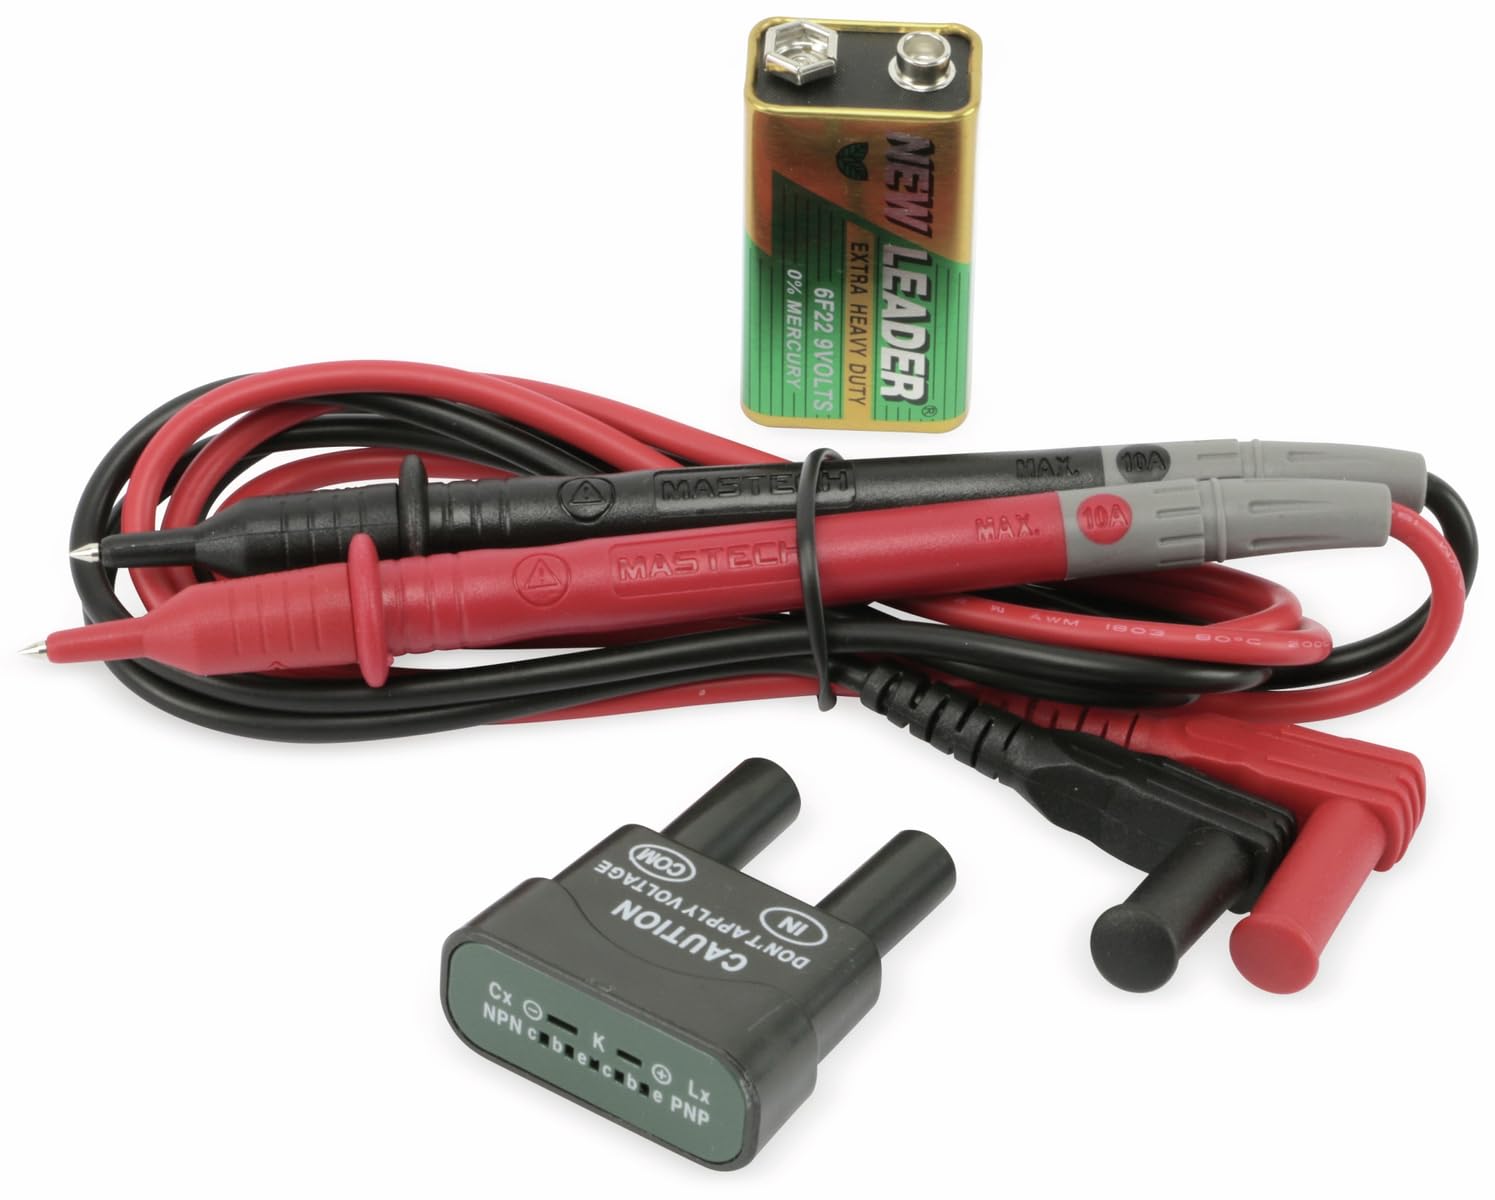
Figure 4.1: MASTECH MY70 Multimeter accessories.
5. การตั้งค่า
5.1 การติดตั้งแบตเตอรี่
- ตรวจสอบให้แน่ใจว่ามัลติมิเตอร์ปิดอยู่
- ค้นหาช่องใส่แบตเตอรี่ที่ด้านหลังของเครื่อง
- คลายสกรูยึดออก แล้วถอดฝาครอบแบตเตอรี่ออก
- ต่อแบตเตอรี่ 9V เข้ากับคลิปหนีบแบตเตอรี่ โดยสังเกตขั้วให้ถูกต้อง
- ใส่แบตเตอรี่ลงในช่องใส่แบตเตอรี่ แล้วปิดฝาให้สนิท โดยขันสกรูให้แน่น

รูปที่ 5.1: ด้านหลัง view พร้อมช่องใส่แบตเตอรี่
5.2 การเชื่อมต่อสายทดสอบ
For most measurements, connect the black test lead to the "COM" (common) jack and the red test lead to the "VΩmA" jack. For high current measurements (up to 10A), connect the red lead to the "10A" jack.
6. คู่มือการใช้งาน
To begin, turn the rotary switch to the desired function and range. Connect the test leads to the circuit or component under test.
6.1 DC ฉบับที่tage การวัด (V=)
- Set the rotary switch to the desired "V=" range (e.g., 20V, 200V).
- เชื่อมต่อสายวัดสีดำเข้ากับแจ็ค "COM" และสายวัดสีแดงเข้ากับแจ็ค "VΩmA"
- เชื่อมต่อสายทดสอบแบบขนานข้าม DC voltagแหล่งที่มาหรือส่วนประกอบ
- อ่านเล่มที่tagค่า e บนจอแสดงผล
6.2 AC โวลtage การวัด (V~)
- Set the rotary switch to the desired "V~" range (e.g., 200V, 600V).
- เชื่อมต่อสายวัดสีดำเข้ากับแจ็ค "COM" และสายวัดสีแดงเข้ากับแจ็ค "VΩmA"
- เชื่อมต่อสายทดสอบแบบขนานข้าม AC voltagแหล่งที่มาหรือส่วนประกอบ
- อ่านเล่มที่tagค่า e บนจอแสดงผล
6.3 การวัดกระแสไฟฟ้ากระแสตรง (A=)
คำเตือน: Always connect the multimeter in series with the circuit when measuring current. Never connect it in parallel across a voltagแหล่งที่มา
- Set the rotary switch to the desired "A=" range (e.g., 200µA, 10A).
- For currents up to 200mA, connect the red test lead to the "VΩmA" jack. For currents up to 10A, connect the red test lead to the "10A" jack. The black lead always connects to "COM".
- เปิดวงจรที่ต้องการวัดกระแสไฟฟ้า แล้วต่อมัลติมิเตอร์แบบอนุกรมเข้าไป
- อ่านค่าปัจจุบันบนจอแสดงผล
6.4 การวัดค่าความต้านทาน (โอห์ม)
คำเตือน: ตรวจสอบให้แน่ใจว่าวงจรไม่มีกระแสไฟฟ้าและตัวเก็บประจุทั้งหมดคายประจุหมดแล้วก่อนทำการวัดค่าความต้านทาน
- Set the rotary switch to the desired "Ω" range (e.g., 200Ω, 2MΩ).
- Connect the black test lead to "COM" and the red test lead to "VΩmA".
- ต่อสายวัดทดสอบเข้ากับชิ้นส่วนที่ต้องการวัดค่าความต้านทาน
- อ่านค่าความต้านทานบนจอแสดงผล
6.5 การทดสอบไดโอด (|)
- Set the rotary switch to the "|" position.
- Connect the black test lead to "COM" and the red test lead to "VΩmA".
- ต่อสายสีแดงเข้ากับขั้วบวกและสายสีดำเข้ากับขั้วลบของไดโอด แรงดันไฟฟ้าไปข้างหน้าtagค่าแรงดันตกคร่อม (โดยทั่วไปอยู่ที่ 0.5V ถึง 0.8V สำหรับไดโอดซิลิคอน) จะถูกแสดงขึ้น
- Reverse the leads. The display should show "OL" (Overload) for a good diode.
6.6 การทดสอบความต่อเนื่อง (-)
- Set the rotary switch to the "-" position.
- Connect the black test lead to "COM" and the red test lead to "VΩmA".
- เชื่อมต่อสายทดสอบข้ามวงจรหรือส่วนประกอบ
- ถ้าค่าความต้านทานต่ำกว่าประมาณ 50 โอห์ม เสียงกริ่งจะดังขึ้น ซึ่งแสดงว่ามีการเชื่อมต่อกัน
6.7 การทดสอบ hFE ของทรานซิสเตอร์
- ตั้งสวิตช์แบบหมุนไปที่ตำแหน่ง "hFE"
- Insert the transistor (NPN or PNP) into the appropriate sockets on the transistor test adapter.
- อ่านค่า hFE (อัตราขยายกระแสตรง) บนหน้าจอแสดงผล
6.8 ฟังก์ชั่นการเก็บข้อมูล
กดปุ่ม "HOLD" เพื่อหยุดการแสดงค่าปัจจุบันบนหน้าจอ กดอีกครั้งเพื่อยกเลิกการหยุดชั่วคราวและกลับมาแสดงค่าแบบเรียลไทม์
7. การบำรุงรักษา
7.1 การทำความสะอาด
เช็ดเคสด้วยโฆษณาamp cloth and a mild detergent. Do not use abrasives or solvents. Ensure the multimeter is completely dry before use.
7.2 การเปลี่ยนแบตเตอรี่
When the battery symbol appears on the display, the 9V battery needs to be replaced. Refer to Section 5.1 for battery installation instructions.
7.3 การเปลี่ยนฟิวส์
If the current measurement function fails, the fuse may need replacement. The MY70 uses two fuses: a 400mA/250V (F400mA/250V) fuse for the mA range and a 10A/250V (F10A/250V) fuse for the 10A range. To replace a fuse:
- ตรวจสอบให้แน่ใจว่ามัลติมิเตอร์ปิดอยู่และถอดสายทดสอบออกแล้ว
- ถอดฝาครอบแบตเตอรี่และแบตเตอรี่ออก
- Unscrew the additional screws holding the back case.
- Carefully separate the two halves of the case.
- Locate the blown fuse(s) and replace with fuses of the identical type and rating.
- Reassemble the case, ensuring all screws are tightened.
8 การแก้ไขปัญหา
| ปัญหา | สาเหตุที่เป็นไปได้ | สารละลาย |
|---|---|---|
| ไม่มีจอแสดงผลหรือจอแสดงผลมืด | แบตเตอรี่อ่อนหรือแบตเตอรี่หมด | เปลี่ยนแบตเตอรี่ 9V |
| แสดง "OL" (โอเวอร์โหลด) | Input value exceeds selected range or open circuit | Select a higher range or check for an open circuit. |
| การอ่านค่ากระแสไฟฟ้าไม่ถูกต้อง หรือไม่มีการอ่านค่ากระแสไฟฟ้า | Blown fuse or incorrect lead connection | Check and replace fuse if necessary. Ensure leads are connected in series and to the correct jacks. |
| Inaccurate resistance reading | Component still energized or parallel components affecting reading | Ensure circuit is de-energized. Isolate the component for accurate measurement. |
9. ข้อมูลจำเพาะ
| พารามิเตอร์ | ค่า |
|---|---|
| แบบอย่าง | MY70 |
| ผู้ผลิต | Mastech |
| แหล่งพลังงาน | 9V Battery (NEDA 1604 or 6F22) |
| ขนาด (กว้าง x ยาว x สูง) | 20.5 x 12.5 x 6 ซม. (ประมาณ 8.07 x 4.92 x 2.36 นิ้ว) |
| น้ำหนัก | Approx. 567 grams (1.25 lbs) |
| มาตรฐานความปลอดภัย | IEC 61010, CE, RoHS |
| อุณหภูมิในการทำงานสูงสุด | 60 องศาเซลเซียส (140 องศาฟาเรนไฮต์) |
| DC ฉบับที่tagอี เรนจ์ | 200mV, 2V, 20V, 200V, 600V |
| ฉบับ ACtagอี เรนจ์ | 200โวลต์, 600โวลต์ |
| ช่วงกระแสไฟตรง | 200µA, 2mA, 20mA, 200mA, 10A |
| ช่วงความต้านทาน | 200Ω, 2kΩ, 20kΩ, 200kΩ, 2MΩ, 20MΩ |
10. การรับประกันและการสนับสนุน
For warranty information and technical support, please refer to the official Mastech webหรือติดต่อตัวแทนจำหน่ายในพื้นที่ของคุณ เก็บใบเสร็จรับเงินไว้เป็นหลักฐานการซื้อสำหรับการเรียกร้องการรับประกัน
Manufacturer: Mastech
จำนวนรุ่น: MY70


