1. บทนำ
This manual provides detailed instructions for the installation, operation, and maintenance of your Avision FL-1501B document scanner. Please read this manual thoroughly before using the scanner to ensure proper and safe operation. Keep this manual for future reference.

Figure 1: Avision FL-1501B Document Scanner with its automatic document feeder (ADF) and output tray extended.
2. ข้อมูลด้านความปลอดภัย
Observe the following safety precautions to prevent damage to the scanner and ensure user safety:
- ใช้เฉพาะอะแดปเตอร์แปลงไฟที่ให้มาพร้อมกับเครื่องสแกนเท่านั้น
- อย่าให้สแกนเนอร์โดนน้ำหรือความชื้นมากเกินไป
- วางเครื่องสแกนบนพื้นผิวที่มั่นคงและเรียบเสมอกัน
- หลีกเลี่ยงการปิดกั้นช่องระบายอากาศ
- อย่าพยายามถอดประกอบหรือซ่อมแซมเครื่องสแกนด้วยตนเอง โปรดติดต่อช่างผู้ชำนาญการ
- ควรวางเครื่องสแกนให้ห่างจากแสงแดดโดยตรงและแหล่งความร้อน
3. เนื้อหาบรรจุภัณฑ์
ตรวจสอบว่ามีรายการทั้งหมดอยู่ในแพ็คเกจ:
- Avision FL-1501B Scanner Unit
- อะแดปเตอร์แปลงไฟ
- สาย USB
- คู่มือเริ่มต้นอย่างรวดเร็ว
- แผ่นซีดีซอฟต์แวร์ (หรือคำแนะนำในการดาวน์โหลด)
4. การตั้งค่า
4.1 การแกะและการจัดวาง
- นำเครื่องสแกนออกจากบรรจุภัณฑ์อย่างระมัดระวัง
- Remove all protective tapes and packing materials.
- วางเครื่องสแกนบนพื้นผิวเรียบและมั่นคง โดยมีพื้นที่เพียงพอสำหรับการป้อนเอกสารและการส่งออกเอกสาร

Figure 2: The Avision FL-1501B scanner in its closed position, suitable for storage or before extending trays.
4.2 การเชื่อมต่อเครื่องสแกนเนอร์
- Connect the power adapter to the scanner's power input port and then to an electrical outlet.
- Connect the USB cable to the scanner's USB port and then to an available USB port on your computer.
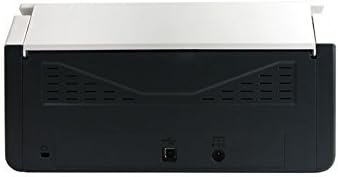
Figure 3: Rear panel of the scanner, illustrating the power input and USB connection ports.
4.3 การติดตั้งไดรเวอร์และซอฟต์แวร์
Before using the scanner, you must install the necessary drivers and scanning software on your computer.
- Insert the provided Software CD into your computer's optical drive, or download the latest drivers and software from the official Avision webเว็บไซต์.
- Follow the on-screen instructions to complete the installation process. It is recommended to install all bundled software for full functionality.
- รีสตาร์ทคอมพิวเตอร์ของคุณหากได้รับแจ้ง
5. การดำเนินการ
5.1 การโหลดเอกสาร
- Extend the input tray and output tray of the scanner.
- ปรับตัวกั้นกระดาษให้ตรงกับความกว้างของเอกสารของคุณ
- Place the documents face down, top edge first, into the automatic document feeder (ADF). Ensure the stack is neatly aligned. The scanner supports a maximum input sheet capacity of 100 sheets.

รูปที่ 4: โปรด้านข้างfile of the scanner, showing the fully extended input and output trays ready for document feeding.
5.2 การใช้แผงควบคุม
The scanner features a control panel for quick access to common scanning functions.

รูปที่ 5: รายละเอียด view of the scanner's control panel, featuring a digital display, function selection buttons, Cancel, Scan, and Power buttons.
- ปุ่มเปิด/ปิด: Press to turn the scanner on or off.
- Function Buttons (Up/Down Arrows): Use these to select different scanning profiles or functions displayed on the digital screen.
- ปุ่มสแกน: Initiates the scanning process based on the currently selected function.
- ปุ่มยกเลิก: หยุดการสแกนที่กำลังดำเนินการอยู่
5.3 การทำการสแกน
- ตรวจสอบให้แน่ใจว่าสแกนเนอร์เปิดอยู่และเชื่อมต่อกับคอมพิวเตอร์ของคุณ
- Load your documents into the ADF as described in section 5.1.
- Open the Avision scanning software on your computer (e.g., Button Manager, Capture Tool).
- Select your desired scanning settings (e.g., color mode, resolution, destination folder, single-sided/duplex).
- Click the "Scan" button in the software or press the สแกน button on the scanner's control panel to begin scanning.
- The scanned images will be processed and saved according to your software settings.
6. การบำรุงรักษา
6.1 การทำความสะอาดสแกนเนอร์
การทำความสะอาดเป็นประจำช่วยรักษาประสิทธิภาพการสแกนให้เหมาะสมที่สุด
- ปิดเครื่องสแกนและถอดสายไฟออกก่อนทำความสะอาด
- ใช้ผ้านุ่มไม่เป็นขุยค่อยๆ งampเช็ดทำความสะอาดภายนอกเครื่องสแกนด้วยน้ำหรือน้ำยาทำความสะอาดที่ไม่กัดกร่อน
- To clean the glass platen (if applicable) and rollers, open the scanner cover. Use a specialized scanner cleaning kit or a soft cloth with isopropyl alcohol.
- Allow all components to dry completely before reconnecting power.
การอัปเดตเฟิร์มแวร์ 6.2 รายการ
Periodically check the Avision website for firmware updates. Firmware updates can improve performance, add features, or resolve issues. Follow the instructions provided with the firmware update package carefully.
7 การแก้ไขปัญหา
หากคุณพบปัญหาเกี่ยวกับสแกนเนอร์ของคุณ โปรดดูปัญหาทั่วไปและวิธีแก้ไขต่อไปนี้:
| ปัญหา | สาเหตุที่เป็นไปได้ | สารละลาย |
|---|---|---|
| เครื่องสแกนเนอร์ไม่สามารถเปิดเครื่องได้ | สายไฟไม่ได้เชื่อมต่อ เต้าเสียบไฟฟ้าชำรุด | ตรวจสอบให้แน่ใจว่าสายไฟเชื่อมต่อแน่นดีแล้ว ลองใช้เต้ารับไฟฟ้าอื่น |
| Computer does not detect scanner. | สาย USB หลวม; ไดรเวอร์ไม่ได้ติดตั้งหรือเสียหาย | Check USB cable connection. Reinstall scanner drivers. Try a different USB port. |
| ภาพที่สแกนมานั้นเบลอหรือเป็นเส้นๆ | Scanner glass or rollers are dirty; document misfeed. | Clean the scanner's internal components (refer to Section 6.1). Ensure documents are loaded correctly. |
| เอกสารติดขัดใน ADF (กองทัพออสเตรเลีย) | Documents are wrinkled or stapled; paper guides not adjusted. | Straighten documents. Remove staples/clips. Adjust paper guides to fit document width. |
8. ข้อมูลจำเพาะ
| คุณสมบัติ | รายละเอียด |
|---|---|
| ยี่ห้อ | การแจ้งเตือน |
| แบบอย่าง | FL-1501B |
| ประเภทสแกนเนอร์ | เครื่องสแกนเอกสาร |
| ความละเอียดของสแกนเนอร์ | 600 จุดต่อนิ้ว |
| ความจุแผ่นอินพุตสูงสุด | 100 แผ่น |
| ประเภทสื่อ | กระดาษ |
| วัดtage | 24 วัตต์ |
| ขนาดสินค้า | 33 x 32.32 x 80.94 ซม. |
| น้ำหนักสินค้า | 5.67 กก. |
| วันที่พร้อมใช้งานครั้งแรก | 6 มิ.ย. 2016 |
9. การรับประกันและการสนับสนุน
9.1 ข้อมูลการรับประกัน
Avision products are manufactured to high-quality standards. This product is covered by a limited warranty against defects in materials and workmanship. The specific terms and duration of the warranty may vary by region. Please refer to the warranty card included with your product or visit the official Avision webเว็บไซต์สำหรับข้อมูลการรับประกันโดยละเอียด
9.2 การสนับสนุนด้านเทคนิค
For technical assistance, driver downloads, or further information, please visit the official Avision support website or contact your local Avision service center. Contact details can typically be found on the Avision webไซต์หรือในเอกสารผลิตภัณฑ์ของคุณ


