1. บทนำ
This user manual provides detailed instructions for the setup, operation, maintenance, and troubleshooting of your Telefunken MC1003N DAB+ Music System. Please read this manual thoroughly before using the device to ensure proper functionality and to maximize your listening experience. Keep this manual for future reference.
2. คำแนะนำด้านความปลอดภัยที่สำคัญ
- แหล่งพลังงาน: เชื่อมต่ออุปกรณ์เข้ากับเต้ารับไฟฟ้ากระแสสลับที่มีแรงดันไฟฟ้าตามที่กำหนดเท่านั้นtage.
- การระบายอากาศ : ตรวจสอบให้แน่ใจว่ามีการระบายอากาศที่เพียงพอ อย่าปิดกั้นช่องระบายอากาศ
- น้ำและความชื้น: อย่าวางเครื่องไว้ในที่ที่มีฝน ความชื้น หรือของเหลวหยด/กระเด็น อย่าวางสิ่งของที่บรรจุของเหลวไว้บนเครื่อง
- ความร้อน: เก็บเครื่องให้ห่างจากแหล่งความร้อน เช่น หม้อน้ำ เครื่องทำความร้อน เตา หรืออุปกรณ์อื่นๆ (รวมถึง ampเครื่องให้ความร้อน) ที่ผลิตความร้อน
- การทำความสะอาด: ถอดปลั๊กเครื่องออกจากเต้ารับไฟฟ้าก่อนทำความสะอาด ใช้ผ้านุ่มและแห้ง ห้ามใช้น้ำยาทำความสะอาดชนิดน้ำหรือสเปรย์ทำความสะอาด
- การบริการ: อย่าพยายามให้บริการผลิตภัณฑ์นี้ด้วยตนเอง ส่งต่อการบริการทั้งหมดไปยังช่างบริการที่ผ่านการรับรอง
3. เนื้อหาบรรจุภัณฑ์
ตรวจสอบว่ารายการทั้งหมดที่ระบุไว้ด้านล่างนี้รวมอยู่ในแพ็คเกจของคุณ:
- Telefunken MC1003N Compact Music System
- รีโมทคอนโทรล
- อะแดปเตอร์แปลงไฟ
- คู่มือการใช้งาน (เอกสารนี้)
4. สินค้าหมดview
Familiarize yourself with the various parts and controls of your Telefunken MC1003N music system.
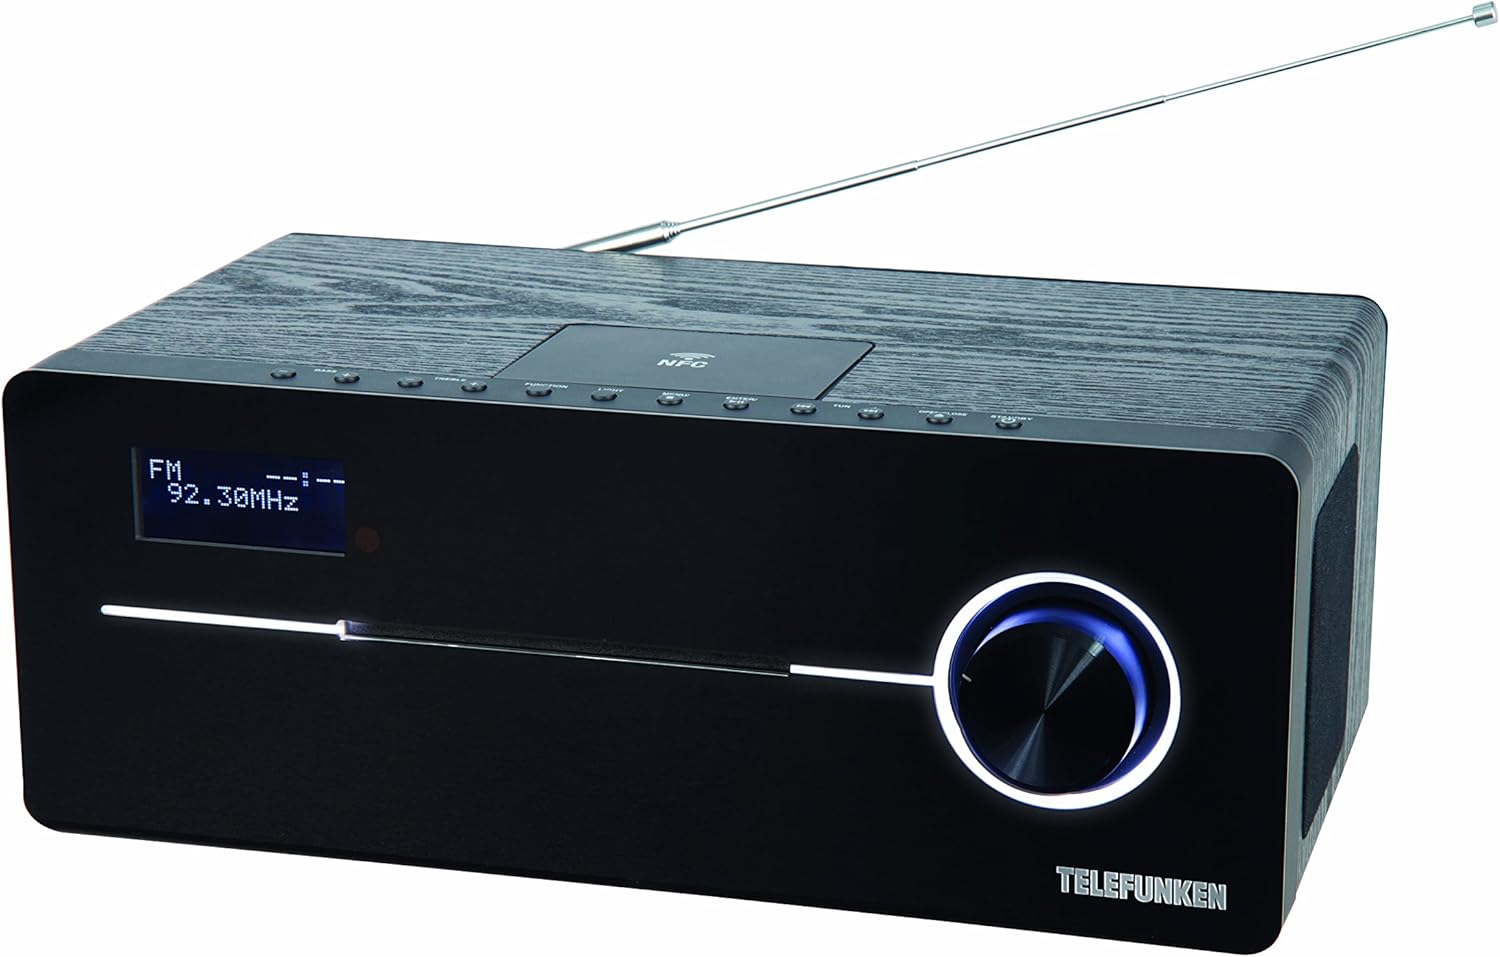
This image displays the Telefunken MC1003N compact music system. The front panel features a digital display showing 'FM 92.30MHz', a large illuminated control knob on the right, and a CD tray slot. The top panel includes several small control buttons and an NFC tag area. A telescopic antenna extends from the rear top of the unit.
4.1 แผงด้านหน้า
- จอแสดงผลดิจิตอล: Shows current mode, frequency, track information, and menu options.
- CD Tray Slot: สำหรับการใส่และนำแผ่นซีดีเพลงออก
- ปุ่มควบคุม: Multi-functional knob for volume adjustment, menu navigation, and selection.
4.2 แผงด้านบน
- ปุ่มเปิด/ปิด: เปิดหรือปิดเครื่อง
- ปุ่มฟังก์ชั่น: Switches between input modes (DAB+, FM, CD, Bluetooth, USB, AUX-in).
- ปุ่มไฟ: Controls display backlight or illumination.
- ปุ่มเมนู: เข้าถึงการตั้งค่าและตัวเลือกของระบบ
- Enter/Pair Button: Confirms selections or initiates Bluetooth pairing.
- TUN+/- Buttons: Tunes radio frequencies or navigates tracks/folders.
- ปุ่มเปิด/ปิด: Opens and closes the CD tray.
- เอ็นเอฟซี Tag พื้นที่: For quick pairing with NFC-enabled devices.
4.3 Rear Panel / Side Connections
- เสาอากาศยืดไสลด์: For DAB+ and FM radio reception.
- กำลังไฟเข้า: เชื่อมต่ออะแดปเตอร์ไฟ
- AUX-in (3.5mm): เชื่อมต่ออุปกรณ์เสียงภายนอก
- พอร์ต USB: Connects USB storage devices for MP3 playback.
- แจ็คหูฟัง (3.5 มม.): สำหรับการฟังส่วนตัว
5. การตั้งค่าเริ่มต้น
5.1 การจัดวาง
Place the music system on a stable, flat surface. Ensure there is sufficient space around the unit for proper ventilation. Avoid placing it near strong magnetic fields or direct sunlight.
5.2 การเชื่อมต่อเสาอากาศ
Extend the telescopic antenna fully for optimal DAB+ and FM radio reception. Adjust its position to improve signal strength if needed.
5.3 การเชื่อมต่อสายไฟ
Connect the supplied power adapter to the DC IN socket on the rear of the unit, then plug the adapter into a standard wall outlet.
6. คู่มือการใช้งาน
6.1 เปิด/ปิดเครื่อง
- กดปุ่ม พลังงาน/สแตนด์บาย button on the top panel or remote control to turn the unit on or off.
การเลือกโหมด 6.2
- กดปุ่ม การทำงาน button repeatedly to cycle through available modes: DAB+, FM, CD, Bluetooth, USB, AUX-in.
6.3 การใช้งานวิทยุ DAB+
6.3.1 การสแกนอัตโนมัติ
- ในโหมด DAB+ ให้กดปุ่ม เมนู button, then use the control knob or TUN+/- buttons to select 'Full Scan'. Press เข้า to start scanning for available DAB+ stations.
6.3.2 การปรับจูนด้วยตนเอง
- ใช้ TUN+/- buttons to manually browse through available DAB+ ensembles.
6.3.3 Storing and Recalling Presets
- To store a station, press and hold the พรีเซ็ต button (if available, or refer to manual for specific preset steps).
- ในการเรียกคืนสถานีที่จัดเก็บไว้ ให้กด พรีเซ็ต ปุ่มและการใช้งาน TUN+/- เพื่อเลือกหมายเลขที่ตั้งไว้ล่วงหน้าที่ต้องการ
การใช้งานวิทยุ FM 6.4
6.4.1 การสแกนอัตโนมัติ
- ในโหมด FM ให้กด . ค้างไว้ TUN+/- button for a few seconds to automatically scan for the next available station.
6.4.2 การปรับจูนด้วยตนเอง
- กดปุ่ม TUN+/- button briefly to adjust the frequency step by step.
6.4.3 Storing and Recalling Presets
- Similar to DAB+ presets, use the พรีเซ็ต function to store and recall your favorite FM stations. The system supports 30 station memories.
6.5 การเล่นแผ่นซีดี
6.5.1 การใส่แผ่นซีดี
- กดปุ่ม เปิด/ปิด ปุ่มเพื่อเปิดถาดซีดี
- Place a CD (CD/CD-R) with the label side up into the tray.
- กดปุ่ม เปิด/ปิด กดปุ่มอีกครั้งเพื่อปิดถาด การเล่นจะเริ่มโดยอัตโนมัติ
6.5.2 การควบคุมการเล่น
- Use the control knob or remote for Play/Pause, Skip Track, and Fast Forward/Rewind functions.
6.6 การจับคู่บลูทูธ
6.6.1 Activating Bluetooth
- เปลี่ยนอุปกรณ์เป็นโหมดบลูทูธโดยใช้ การทำงาน กดปุ่ม หน้าจอจะแสดง 'BT' หรือ 'Bluetooth' และระบุโหมดการจับคู่
6.6.2 การจับคู่กับอุปกรณ์
- บนสมาร์ทโฟนหรือแท็บเล็ตของคุณ ให้เปิดใช้งาน Bluetooth และค้นหาอุปกรณ์ที่มีอยู่
- Select 'Telefunken MC1003N' from the list.
- Once paired, you can stream audio from your device to the music system.
6.7 การจับคู่ NFC
6.7.1 Using NFC
- Ensure NFC is enabled on your compatible smartphone or tablet.
- Tap your device gently on the NFC tag area on the top panel of the music system.
- ยืนยันคำขอจับคู่บนอุปกรณ์ของคุณ
6.8 การเล่น USB
6.8.1 การเชื่อมต่ออุปกรณ์ USB
- เสียบอุปกรณ์จัดเก็บข้อมูล USB ที่มีไฟล์ MP3 fileลงในพอร์ต USB
- Switch the unit to USB mode using the การทำงาน ปุ่ม.
6.8.2 File การนำทาง
- Use the control knob or remote to navigate through folders and select MP3 tracks.
6.9 การเชื่อมต่อ AUX-in
6.9.1 การเชื่อมต่ออุปกรณ์เสียงภายนอก
- เชื่อมต่ออุปกรณ์เสียงภายนอก (เช่น เครื่องเล่น MP3) เข้ากับ ช่องรับสัญญาณเสียงเข้า เชื่อมต่อผ่านพอร์ตโดยใช้สายสัญญาณเสียงขนาด 3.5 มม.
- Switch the unit to AUX-in mode using the การทำงาน ปุ่ม.
- ควบคุมการเล่นจากอุปกรณ์ภายนอกของคุณ
6.10 การตั้งค่าเสียง
6.10.1 Equalizer Presets
- กดปุ่ม EQ button (if available, or navigate via เมนู) to cycle through sound modes: Flat, Classic, Pop, Rock, Jazz.
7. การบำรุงรักษา
7.1 การดูแลรักษาและทำความสะอาด
- ควรถอดปลั๊กเครื่องทุกครั้งก่อนทำความสะอาด
- ใช้ผ้าแห้งนุ่มและไม่เป็นขุยเช็ดพื้นผิวภายนอก
- ห้ามใช้สารทำความสะอาดที่มีฤทธิ์กัดกร่อน ขี้ผึ้ง หรือตัวทำละลาย เพราะอาจทำให้พื้นผิวเสียหายได้
- สำหรับเลนส์ซีดี ให้ใช้แผ่นทำความสะอาดเลนส์ซีดีโดยเฉพาะ
8 การแก้ไขปัญหา
If you encounter any issues with your Telefunken MC1003N, refer to the table below for common problems and solutions.
| ปัญหา | สารละลาย |
|---|---|
| ไม่มีไฟฟ้า | Check if the power adapter is securely connected to the unit and the wall outlet. Try a different outlet. |
| ไม่มีเสียง | Adjust the volume. Check if headphones are connected. Ensure the correct input mode is selected. |
| การรับสัญญาณวิทยุไม่ดี | Extend and adjust the telescopic antenna. Move the unit to a location with better signal. Perform a full scan for DAB+ stations. |
| การจับคู่บลูทูธล้มเหลว | Ensure the unit is in Bluetooth pairing mode. Make sure Bluetooth is enabled on your device and it's within range. Forget previous pairings on your device and try again. |
| ซีดีไม่เล่น | Ensure the CD is clean and inserted correctly (label side up). Check if the CD is scratched or damaged. Try a different CD. |
| ไม่รู้จัก USB | Ensure the USB device is formatted correctly (FAT32) and contains supported MP3 files. Try a different USB device. |
9. ข้อมูลจำเพาะทางเทคนิค
- แบบอย่าง: MC1003N
- ยี่ห้อ: เทเลฟังเคน
- กำลังขับ: 100 Watts (50 Watts per speaker)
- การเชื่อมต่อ: Bluetooth 3.0, NFC, USB, AUX-in (3.5mm), Headphone Jack (3.5mm)
- จูนเนอร์: Digital PLL-tuner (DAB+, FM)
- สถานีที่ตั้งไว้ล่วงหน้า: 30 (for FM/DAB+)
- ความเข้ากันได้ของซีดี: CD, CD-R
- รูปแบบเสียงที่รองรับ: MP3, CD-DA, DAB
- การควบคุมเสียง: Equalizer presets (Flat, Classic, Pop, Rock, Jazz)
- แหล่งพลังงาน: ไฟฟ้าพร้อมสายไฟ
- ขนาด (ยาว x กว้าง x สูง): 35.1 x 13.6 x 21.4 ซม.
- น้ำหนัก: 3.65 กก.
10. การรับประกันและการสนับสนุน
Your Telefunken MC1003N DAB+ Music System is covered by a manufacturer's warranty. Please refer to the warranty card included in your package for specific terms and conditions. For technical support, service, or warranty claims, please contact your retailer or the authorized Telefunken service center in your region.


