การแนะนำ
ขอบคุณสำหรับการซื้อasing the Insignia 10-inch Digital Photo Frame. This device allows you to display your favorite digital photos and videos in a high-quality format. This manual provides detailed instructions for setup, operation, maintenance, and troubleshooting to ensure you get the most out of your new digital photo frame.
เนื้อหาแพ็คเกจ
Before you begin, please check that all items are present in the package:
- Insignia 10-inch Digital Photo Frame
- อะแดปเตอร์แปลงไฟ
- รีโมทคอนโทรล
- คู่มือการใช้งาน (เอกสารนี้)
การตั้งค่า
1. การเชื่อมต่อพลังงาน
Connect the included power adapter to the DC IN 9V port on the back of the digital photo frame. Plug the other end of the adapter into a standard wall outlet. The frame will typically power on automatically or can be turned on using the power switch.
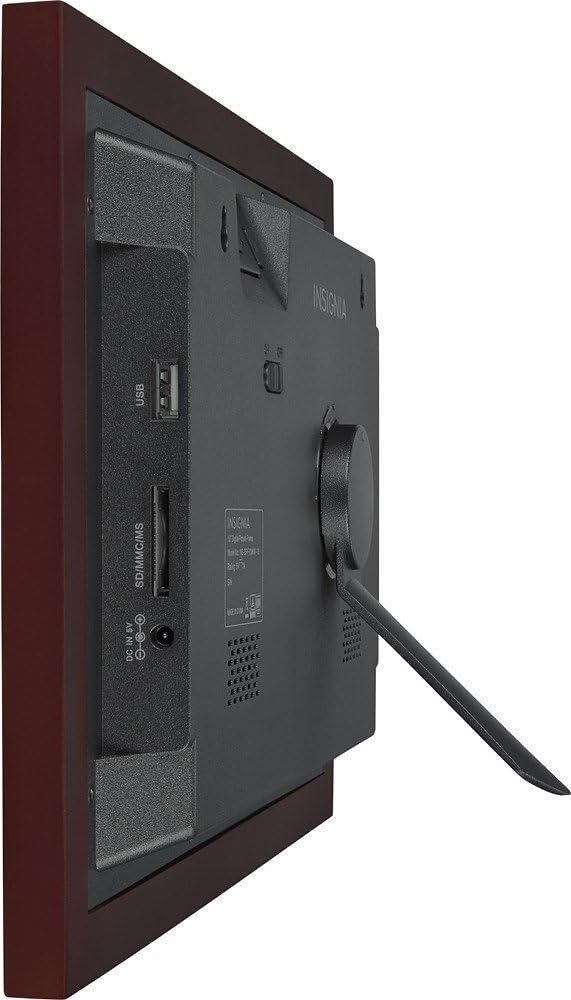
ภาพ: ด้านหลัง view of the digital photo frame, highlighting the USB port, SD/MMC/MS card slot, and DC IN 9V power input.
2. การเสียบการ์ดหน่วยความจำหรืออุปกรณ์ USB
The frame supports SD, MMC, and MS memory cards, as well as USB flash drives. Insert your memory card into the appropriate slot or your USB drive into the USB port on the side/back of the frame. Ensure the card or drive is inserted correctly. The frame will automatically detect the storage device.
3. การตั้งค่าเริ่มต้น
Upon first power-on, you may be prompted to set the language, time, and date. Use the navigation buttons on the frame or the remote control to make your selections and confirm.
Operating the Digital Photo Frame
1. การควบคุมมากกว่าview
Your digital photo frame can be operated using the buttons on the back of the frame or the included remote control.
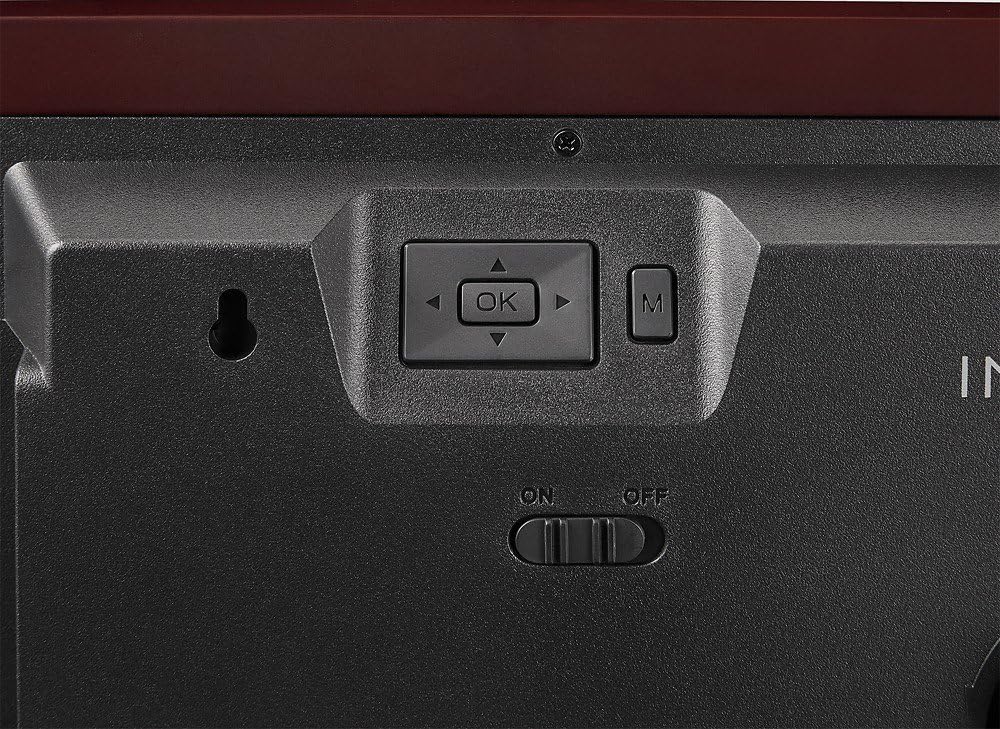
Image: Close-up of the control buttons located on the rear of the digital photo frame. These include directional arrows, an 'OK' button for selection, and an 'M' button for menu access, alongside the power switch.
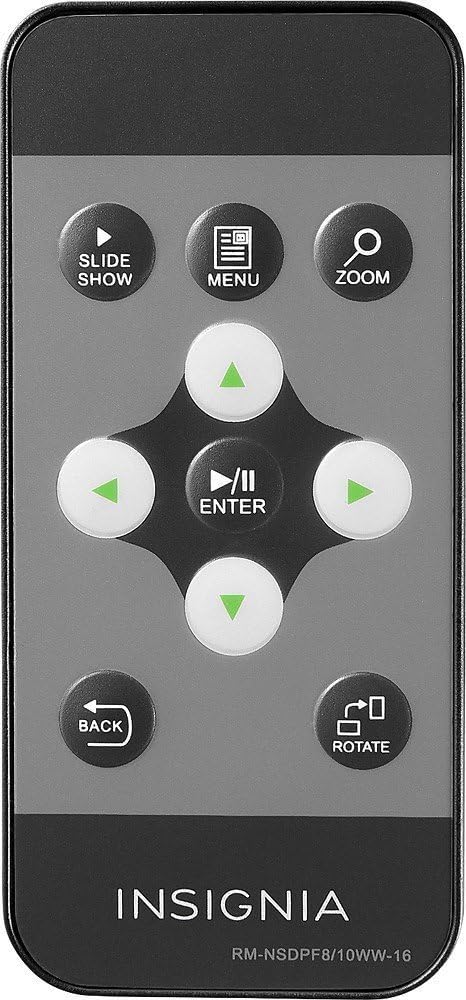
Image: The remote control for the digital photo frame, featuring dedicated buttons for slideshow, menu, zoom, directional navigation, enter, back, and image rotation functions.
2 การใช้งานเมนู
กดปุ่ม เมนู ปุ่มบนรีโมทหรือ M button on the frame to access the main menu. Use the directional arrows (▲ ▼ ◀ ▶) to navigate through options and press เข้า or OK เพื่อยืนยันการเลือกของคุณ กด กลับ เพื่อกลับไปยังหน้าจอก่อนหน้าหรือออกจากเมนู
3. Viewing รูปภาพและวิดีโอ
Once a memory card or USB drive is inserted, the frame will typically start a slideshow automatically. You can manually browse files by selecting the "Photo" or "Video" option from the main menu. Use the navigation buttons to select a file และกด เข้า or OK ถึง view มัน.
4. Slideshow Settings
From the main menu, navigate to "Settings" or "Slideshow Settings" to customize your slideshow. Options may include:
- โหมดการแสดงผล: Adjust how photos fit the screen (e.g., original, fit to screen, crop).
- ช่วงเวลา: ตั้งค่าระยะเวลาที่แต่ละภาพจะแสดงขึ้น
- ผลการเปลี่ยนผ่าน: เลือกรูปแบบการเปลี่ยนภาพระหว่างรูปภาพได้หลากหลายแบบ
- โหมดเล่นซ้ำ: Loop the slideshow continuously.
5. Clock and Calendar
Your frame may include a clock and calendar function. Access these features through the main menu. You can set the time and date in the settings menu.
การซ่อมบำรุง
ทำความสะอาดเฟรม
ในการทำความสะอาดหน้าจอ ให้เช็ดเบาๆ ด้วยผ้านุ่มที่ไม่เป็นขุย สำหรับรอยฝังแน่น ให้เช็ดเบาๆampen the cloth with water or a non-abrasive screen cleaner. Avoid using harsh chemicals or abrasive materials, as these can damage the screen and frame finish. Ensure the frame is powered off and unplugged before cleaning.
พื้นที่จัดเก็บ
When not in use for extended periods, store the digital photo frame in a cool, dry place, away from direct sunlight and extreme temperatures. It is recommended to keep the original packaging for storage.
การแก้ไขปัญหา
| ปัญหา | วิธีแก้ปัญหาที่เป็นไปได้ |
|---|---|
| เฟรมไม่สามารถเปิดเครื่องได้ |
|
| No photos or videos display. |
|
| รีโมทคอนโทรลไม่ทำงาน. |
|
| Images appear distorted or stretched. |
|
ข้อมูลจำเพาะ
| คุณสมบัติ | รายละเอียด |
|---|---|
| หมายเลขรุ่น | NS-DPF10WW-16 |
| ขนาดหน้าจอ | 10 นิ้ว |
| ปณิธาน | ความละเอียดระดับ WXGA |
| ขนาดสินค้า | 12.6 x 1.5 x 9 นิ้ว |
| น้ำหนักสินค้า | 2 ปอนด์ |
| เทคโนโลยีการเชื่อมต่อ | ยูเอสบี |
| รองรับการ์ดหน่วยความจำ | SD, MMC, MS (Memory Stick) |
| ผู้ผลิต | เครื่องหมาย |
การรับประกันและการสนับสนุน
สำหรับข้อมูลการรับประกัน โปรดดูบัตรรับประกันที่แนบมากับผลิตภัณฑ์ของคุณ หรือเยี่ยมชมเว็บไซต์อย่างเป็นทางการของ Insignia website. If you encounter issues not covered in this troubleshooting section, please contact Insignia customer support for assistance.
การสนับสนุนทางออนไลน์: www.insigniaproducts.com/support


