1. บทนำ
This manual provides essential information for the safe and effective operation of your OWON SDS6062 Digital Storage Oscilloscope. Please read this manual thoroughly before using the device to ensure proper setup, operation, and maintenance. The SDS6062 is a 2-channel oscilloscope featuring a 60 MHz bandwidth, 500 MS/s sample rate, and a 10M record length, designed for precise electrical signal analysis.
2. ข้อมูลด้านความปลอดภัย
Always observe the following safety precautions to prevent injury and avoid damage to the instrument or any connected products. Read these instructions carefully before operation.
- แหล่งพลังงาน: Use only the power adapter supplied with the instrument. Ensure the voltage ตรงกับแหล่งจ่ายไฟในพื้นที่ของคุณ
- การต่อลงดิน: The oscilloscope must be properly grounded to prevent electric shock.
- ความปลอดภัยของโพรบ: Do not connect the probe ground lead to a point where a voltage greater than 30V RMS or 42.4V peak is present.
- สิ่งแวดล้อม: Operate the device in a well-ventilated area, away from moisture, dust, and direct sunlight. Avoid operating in explosive atmospheres.
- การซ่อมบำรุง: แนะนำให้ติดต่อช่างผู้ชำนาญเพื่อขอรับบริการทั้งหมด อย่าพยายามซ่อมแซมเครื่องด้วยตนเอง
3. เนื้อหาบรรจุภัณฑ์
Verify that all items listed below are present in your package. If any items are missing or damaged, contact your supplier.
- OWON SDS6062 Digital Storage Oscilloscope Unit
- หัววัดออสซิลโลสโคป 2 ชิ้น
- 1 x สายไฟ
- 1 x Probe Adjust Pen
- สายข้อมูล 1 x USB
- 1 x ซีดีซอฟต์แวร์
- 1 x คู่มือผู้ใช้ (เอกสารฉบับนี้)
4. สินค้าหมดview
The OWON SDS6062 is a compact and powerful digital storage oscilloscope. It features an 8-inch (800x600) color TFT-LCD screen for clear waveform display and an intuitive control panel for easy operation. Key features include its 60 MHz bandwidth, 500 MS/s real-time sample rate, and 10M record length, making it suitable for a wide range of applications.
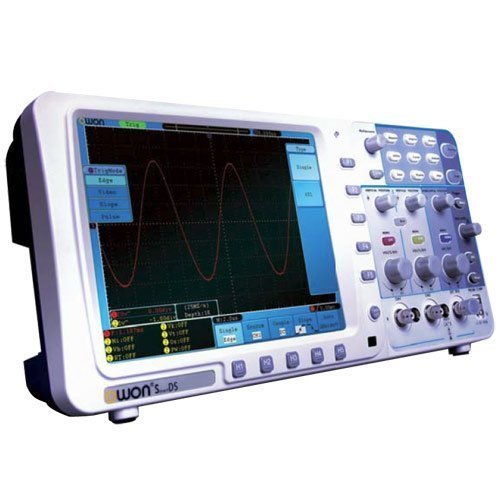
รูปที่ 4.1 : ด้านหน้า view of the OWON SDS6062 Digital Storage Oscilloscope, showing the display, control knobs, and function buttons.
4.1 แผงควบคุมด้านหน้า
The front panel includes the main display, vertical controls (VOLTS/DIV, position), horizontal controls (SEC/DIV, position), trigger controls, and various function buttons for menu navigation, measurement, and utility settings.
4.2 การเชื่อมต่อแผงด้านหลัง
The rear panel provides connectivity options including the power input, USB host and device ports, LAN port for network connectivity, and a VGA port for external display output.
5. การตั้งค่า
Follow these steps to set up your OWON SDS6062 oscilloscope for initial use.
5.1 การต่อสายไฟ
- Ensure the oscilloscope is turned off.
- Connect the supplied power cord to the power input on the rear panel of the oscilloscope.
- เสียบปลายอีกด้านของสายไฟเข้ากับเต้ารับไฟฟ้ากระแสสลับที่มีสายดิน
5.2 การเชื่อมต่อโพรบ
- Align the BNC connector of the probe with the CH1 or CH2 input on the front panel.
- Push and twist the connector clockwise until it locks into place.
- Attach the probe ground clip to the ground terminal of the circuit under test.
- Set the probe attenuation switch (e.g., 1X or 10X) to match the setting on the oscilloscope's input channel menu.
5.3 การเปิดเครื่องครั้งแรก
- กดปุ่มเปิดปิดที่แผงด้านหน้า
- The oscilloscope will perform a self-test and display the startup screen.
- After startup, it is recommended to perform a probe compensation adjustment (refer to Section 7.3).
6. การใช้งานออสซิลโลสโคป
This section covers basic operation and common functions of the SDS6062.
6.1 การวัดพื้นฐาน
To display a signal:
- เชื่อมต่อแหล่งสัญญาณเข้ากับ CH1 หรือ CH2 โดยใช้โพรบ
- กดปุ่ม ตั้งค่าอัตโนมัติ กดปุ่มนี้ ออสซิลโลสโคปจะปรับการตั้งค่าแนวตั้ง แนวนอน และทริกเกอร์โดยอัตโนมัติ เพื่อแสดงรูปคลื่นที่เสถียร
- ปรับแต่ง โวลต์/DIV knob to change the vertical scale (voltage ต่อส่วน).
- ปรับแต่ง ก.ล.ต./กรมสรรพากร knob to change the horizontal scale (time per division).
- Use the vertical and horizontal ตำแหน่ง knobs to move the waveform on the screen.
6.2 ระบบทริกเกอร์
ระบบทริกเกอร์ช่วยรักษาเสถียรภาพของรูปคลื่นที่เกิดขึ้นซ้ำๆ และบันทึกเหตุการณ์แบบยิงครั้งเดียว
- ระดับทริกเกอร์: ใช้ ระดับการกระตุ้น ปุ่มหมุนสำหรับปรับระดับเสียงtagระดับ e ที่ทำให้เกิดการกระตุ้น
- โหมดทริกเกอร์: Access the trigger menu to select modes like Edge, Pulse, Video, or Slope.
- แหล่งที่มาของทริกเกอร์: Select the input channel (CH1, CH2, EXT, AC Line) that will be used for triggering.
6.3 ฟังก์ชันการวัด
The SDS6062 offers various automatic measurement functions.
- กดปุ่ม วัด button to display the measurement menu.
- Select desired measurements such as Vpp, Vmax, Vmin, Freq, Period, Rise Time, etc.
6.4 Connectivity (LAN and VGA)
- LAN: Connect an Ethernet cable to the LAN port on the rear panel to connect the oscilloscope to a network. This allows for remote control and data transfer using compatible software.
- VGA: Use the VGA port to connect an external monitor or projector for larger display of waveforms, useful for presentations or collaborative work.
7. การบำรุงรักษา
การบำรุงรักษาอย่างถูกต้องจะช่วยให้เครื่องออสซิลโลสโคปของคุณมีอายุการใช้งานยาวนานและมีความแม่นยำ
7.1 การทำความสะอาด
ทำความสะอาดเครื่องดนตรีเป็นประจำด้วยผ้าเนื้อนุ่มและแห้งamp ผ้า. ห้ามใช้สารทำความสะอาดที่มีฤทธิ์กัดกร่อนหรือตัวทำละลายที่อาจทำให้ผ้าเสียหายasinหรือหน้าจอ โปรดตรวจสอบให้แน่ใจว่าอุปกรณ์ปิดเครื่องและถอดปลั๊กออกก่อนทำความสะอาด
7.2 พื้นที่จัดเก็บ
When not in use, store the oscilloscope in a dry, dust-free environment, away from extreme temperatures and direct sunlight. Use the original packaging or a suitable carrying case for protection during transport.
7.3 การปรับค่าชดเชยหัววัด
Probe compensation should be adjusted to match the oscilloscope's input characteristics. This ensures accurate measurements.
- Connect the probe to CH1 and attach the probe tip to the probe compensation output (usually a square wave test point on the front panel).
- Attach the probe ground clip to the ground terminal.
- กด ตั้งค่าอัตโนมัติ.
- Use the supplied probe adjust pen to turn the trimmer screw on the probe until the square wave displayed on the screen has flat top and bottom edges (no overshoot or undershoot).
8 การแก้ไขปัญหา
หัวข้อนี้ให้แนวทางแก้ไขปัญหาทั่วไปที่คุณอาจพบเจอ
- ไม่มีจอแสดงผล: Check power connection, ensure the power button is pressed. Adjust screen brightness if necessary.
- No Waveform: Verify probe connection to the input channel and the circuit under test. Ensure the signal source is active. Press ตั้งค่าอัตโนมัติ. Check vertical and horizontal scale settings.
- รูปคลื่นไม่เสถียร: Adjust the trigger level. Check trigger mode and source settings. Ensure the signal is within the oscilloscope's bandwidth.
- การวัดที่ไม่ถูกต้อง: Perform probe compensation adjustment (Section 7.3). Ensure probe attenuation settings match the oscilloscope.
- อุปกรณ์ไม่ตอบสนอง: Try restarting the oscilloscope. If the issue persists, contact technical support.
9. ข้อมูลจำเพาะ
Technical specifications for the OWON SDS6062 Digital Storage Oscilloscope.
| พารามิเตอร์ | ข้อมูลจำเพาะ |
|---|---|
| หมายเลขรุ่น | SDS6062 |
| แบนด์วิธ | 60 เมกะเฮิรตซ์ |
| ช่องทางการ | 2 + 1 (External Trigger) |
| Sample Rate (Real-time) | 500 มิลลิวินาที/วินาที |
| ความยาวบันทึก | 10 ล้านคะแนน |
| แสดง | 8-inch Color TFT-LCD (800x600) |
| อินเทอร์เฟซ | USB Host, USB Device, LAN, VGA |
| AutoScale Function | ใช่ |
| ผู้ผลิต | โอวอน |
10. การรับประกันและการสนับสนุน
OWON products are designed for reliability and performance. For warranty information, please refer to the warranty card included with your product or visit the official OWON website. For technical support, troubleshooting assistance, or service inquiries, please contact your local OWON distributor or the OWON customer service department. Keep your purchase receipt as proof of purchase for warranty claims.


