การแนะนำ
This manual provides detailed instructions for the installation, operation, and maintenance of your new Delta Essa Chrome Kitchen Faucet. Please read all instructions carefully before beginning installation to ensure proper function and to prevent injury or damage.
ข้อมูลด้านความปลอดภัย
- Always turn off the main water supply before beginning any work on the faucet.
- สวมแว่นตานิรภัยระหว่างการติดตั้ง
- หากคุณไม่แน่ใจเกี่ยวกับขั้นตอนใด ๆ โปรดปรึกษาช่างประปาที่มีคุณสมบัติเหมาะสม
- Ensure all connections are tight to prevent leaks, but do not overtighten.
- เก็บชิ้นส่วนเล็ก ๆ ให้ห่างจากมือเด็ก
เนื้อหาแพ็คเกจ
ตรวจสอบว่าส่วนประกอบทั้งหมดมีอยู่ก่อนเริ่มการติดตั้ง

Image: Delta Essa Chrome Kitchen Faucet as packaged, showing main components.
- Delta Essa Kitchen Faucet Assembly
- แผ่นปิดดาดฟ้าเสริม
- Mounting Hardware (washer, mounting nut, screws)
- Supply Lines (integrated)
- ท่อเครื่องพ่น
- Sprayer Weight
- ปะเก็นโฟม
- Blue Clip
ข้อมูลจำเพาะ

Image: Diagram illustrating the dimensions of the Delta Essa faucet and installation hole requirements.
| คุณสมบัติ | รายละเอียด |
|---|---|
| ยี่ห้อ | เดลต้า |
| ชื่อรุ่น | Essa® |
| หมายเลขรุ่น | พ.ศ.9113-พ.ศ |
| ประเภทการเสร็จสิ้น | โครม |
| วัสดุ | โลหะ |
| จำนวนที่จับ | 1 |
| ประเภทการติดตั้ง | เด็คเมาท์ |
| จำนวนหลุม | 1 (or 3-hole with included deck plate) |
| คุณสมบัติพิเศษ | ดึงลง Sprayer |
| อัตราการไหลสูงสุด | 1.8 แกลลอนต่อนาที |
| พวยความสูง | 15.75 นิ้ว |
| พวยถึง | 9.25 นิ้ว |
| ความยาวท่อ | 60 นิ้ว |
| น้ำหนักสินค้า | 6.56 ปอนด์ |
| ขนาดสินค้า | ลึก 9.38 นิ้ว x กว้าง 11 นิ้ว x สูง 15.75 นิ้ว |
การติดตั้งและการตั้งค่า
Follow these steps for a successful installation. Refer to the provided videos for visual guidance.
เครื่องมือที่จำเป็น
- ไขควงฟิลลิป
- ประแจปรับ
- แว่นตานิรภัย
- ไฟฉาย
- ผ้าขนหนู
- Pot or Bucket
- Silicone sealant (optional, for uneven surfaces)
ขั้นตอนก่อนการติดตั้ง
- ปิดแหล่งจ่ายน้ำหลักของอ่างล้างจานในครัวของคุณ
- Clear the area under the sink and place a towel and bucket to catch any residual water.
- Remove your old faucet (if applicable).
การติดตั้ง Faucet
- Prepare the foam gasket: Separate the outer ring from the inner part. Peel off the backing to expose the sticky side.
- Feed the supply lines through the foam gasket, sticky side up. Seat the gasket flush on the bottom of the faucet.
- Feed the supply lines and sprayer hose down through the mounting hole in your sink. Position the faucet on the sink surface, ensuring the Delta logo is centered.
- From underneath the sink, slide the washer and mounting nut onto the sprayer hose and supply lines, pushing them up to the bottom of the faucet shank. Hand-tighten the mounting nut, ensuring hoses are not pinched.
- Use a Phillips screwdriver to tighten the mounting screws on the mounting nut. Tighten one screw, then the other, then re-check the first screw for tightness.
- If your sink surface is uneven, apply silicone sealant to the gasket before mounting for a watertight seal.
Video: Detailed installation guide for a single handle faucet, covering mounting and connections.
Video: Demonstrates how to mount the Delta faucet, including securing it to the sink.
Video: Important tip on avoiding a common installation error regarding handle placement.
Connecting Supply Lines
- Identify the hot (red) and cold (blue) supply lines from the faucet. Connect the blue line to the cold water supply valve (typically on the right) and the red line to the hot water supply valve (typically on the left). Hand-tighten the nuts.
- Use an adjustable wrench to give each nut one additional 360-degree revolution to ensure a secure connection. Do not overtighten.
- Manage excess tubing by looping it, ensuring the loop is at least 8 inches across to prevent kinks. Alternatively, use a spiral pattern.
Flushing Supply Lines
- Ensure the faucet handle is in the OFF position.
- Slowly turn on both the hot and cold water supply valves underneath the sink.
- Position a bucket under the sprayer hose outlet tube (the small tube where water will exit).
- Move the faucet handle to the full mix position and allow water to flush for approximately 30 seconds to clear any debris.
- Check all connections for leaks. Tighten any leaking connections.
Connecting Sprayer Hose & Weight
- Ensure the sprayer hose is free and clear of other supply lines to allow for smooth movement.
- Feed the sprayer hose through the sprayer weight.
- Push the end of the sprayer hose onto the outlet tube until it clicks into place. Secure it with the blue clip.
- Give the hose a gentle tug to ensure the connection is secure.
คำแนะนำการใช้งาน

Image: The Delta Essa faucet in action, with the pull-down sprayer being used to rinse vegetables in a kitchen sink.
การควบคุมการไหลของน้ำและการควบคุมอุณหภูมิ
The single handle controls both water flow and temperature. Move the handle left for hot water, right for cold water, and up/down to adjust flow.
Pull-Down Sprayer
The Essa faucet features a pull-down sprayer for extended reach. Simply pull the spray wand from the spout. MagnaTite® Docking uses a powerful integrated magnet to ensure the spray wand snaps securely into place when not in use.

Image: Close-up of the Delta Essa faucet demonstrating the MagnaTite® Docking system, where the spray wand is magnetically secured.
โหมดสเปรย์
Toggle between stream and spray modes using the button on the spray wand.

ภาพ: สอง views of the Delta Essa faucet, one showing water in spray mode and the other in stream mode.
Video: Product demonstration highlighting the features and spray modes of the Delta Essa faucet.
การซ่อมบำรุง
Cleaning the Faucet Finish
ทำความสะอาดพื้นผิวโครเมียมด้วยผ้าเนื้อนุ่มและแห้งamp ใช้ผ้าเช็ดทำความสะอาด หลีกเลี่ยงการใช้สารทำความสะอาดที่มีฤทธิ์กัดกร่อน สารเคมีรุนแรง หรือแผ่นขัดถู เพราะอาจทำให้พื้นผิวเสียหายได้
รูสเปรย์ Touch-Clean®
The Touch-Clean® spray holes allow you to easily wipe away calcium and lime build-up with the touch of a finger, maintaining optimal spray performance.

Image: Close-up of the spray head showing the flexible rubber Touch-Clean® spray holes, designed for easy cleaning of mineral buildup.
การแก้ไขปัญหา
Weak Water Stream
- Check for kinks in the supply lines or sprayer hose.
- Clean the aerator: Mineral deposits can restrict water flow. Gently unscrew the aerator from the spray head and rinse away any debris. Reinstall securely.
รอยรั่วที่จุดเชื่อมต่อ
- Ensure all supply line connections are hand-tightened, then given one additional wrench turn.
- Check the mounting nut underneath the sink for tightness.
- Verify the foam gasket is properly seated and, if necessary, apply silicone sealant for a better seal.
Sprayer Wand Does Not Dock Properly
- Ensure the sprayer weight is correctly installed on the hose underneath the sink, allowing for proper retraction.
- Check for any obstructions preventing the MagnaTite® magnet from engaging.
ข้อมูลการรับประกัน
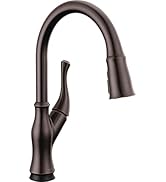
Image: Icon representing the Lifetime Limited Warranty.
Delta faucets are backed by a Lifetime Limited Warranty, ensuring leak-free operation and finish durability for the life of the product. Refer to the official Delta Faucet webเว็บไซต์สำหรับรายละเอียดการรับประกันทั้งหมด
การสนับสนุนลูกค้า

Image: A Delta Faucet customer service representative smiling, indicating support availability.
For further assistance or questions, please contact Delta Faucet Company customer service at 1-800-345-เดลต้า (3358) หรือเยี่ยมชมอย่างเป็นทางการของพวกเขา webเว็บไซต์.


