1. บทนำ
This manual provides detailed instructions for the safe and effective use of your PerfectPrime IR0002 Infrared Thermal Imager. Please read this manual thoroughly before operating the device and retain it for future reference.
The PerfectPrime IR0002 is an advanced infrared thermal imager and visible light camera designed for various applications, offering an IR resolution of 3600 pixels and a temperature range from -20°C to 300°C (-4°F to 572°F). Its 6 Hz refresh rate ensures responsive thermal imaging.
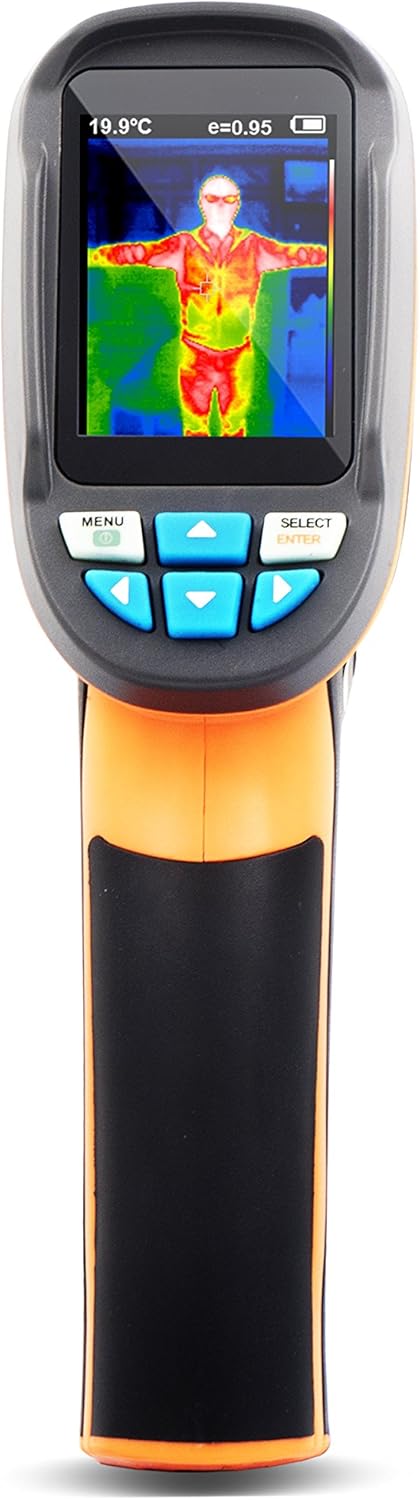
รูปที่ 1 : ด้านหน้า view of the PerfectPrime IR0002 Thermal Imager.
2. ข้อควรระวังเพื่อความปลอดภัย
To ensure safe operation and prolong the life of your device, observe the following precautions:
- Do not point the imager directly at high-intensity light sources (e.g., the sun, lasers) as this may damage the infrared sensor.
- หลีกเลี่ยงการสัมผัสอุปกรณ์ในอุณหภูมิที่สูงหรือความชื้นสูงหรือสภาพแวดล้อมที่มีฤทธิ์กัดกร่อน
- Use only the specified battery type: 4 x AA Alkaline 1.5V batteries. Do not use 1.2V rechargeable batteries.
- เก็บอุปกรณ์ให้ห่างจากสนามแม่เหล็กไฟฟ้าที่มีความแรง
- อย่าพยายามถอดประกอบหรือดัดแปลงอุปกรณ์ แนะนำให้ส่งช่างผู้ชำนาญเข้ารับบริการทั้งหมด
- ทำความสะอาดอุปกรณ์ด้วยผ้านุ่มและแห้ง ห้ามใช้น้ำยาทำความสะอาดหรือสารละลายที่มีฤทธิ์กัดกร่อน
3. Product Description and Structure
The PerfectPrime IR0002 integrates an infrared thermal imager and a visible light camera. This combination allows for clear display of temperature distribution and easier identification of target areas.

Figure 2: Structure of the Product and Basic Functions.
การระบุส่วนประกอบ:
- หน้าจอสีความละเอียดสูงแบบ TFT
- Start-up/menu key
- ฝาครอบแบตเตอรี่
- Select/enter key
- Small SD card slot
- เซ็นเซอร์รับภาพอินฟราเรด
- กล้องแสงที่มองเห็นได้
- ไฟ LED
- Image capturing key
- Interface for the installation of tripod
4. การตั้งค่า
การติดตั้งแบตเตอรี่:
การติดตั้งหรือเปลี่ยนแบตเตอรี่:
- Open the battery cover (3) located on the handle.
- Insert 4 x AA Alkaline 1.5V batteries, ensuring correct polarity. Do not use 1.2V rechargeable batteries.
- Slide the battery cover back to its accurate position until it clicks securely.

Figure 3: Battery cover installation method.
5. คู่มือการใช้งาน
5.1 Basic Functions:
- Press the "start-up" key (2) for 5 seconds to turn on the instrument.
- Press the "menu" key (2) for 1 second to enter the mode of setting of basic functions. There are only five options on the display screen.
- Press "up" or "down" key to scan the menu and select the yellow option box.
- Press "select" key (4) and "menu" option to edit the value.
- Press "up" or "down" to edit the value. After adjustment, confirm the new value and press "menu" key to exit the edit mode.
5.2 คำอธิบายเมนู:
The device menu provides various settings and functions:
- การตั้งเวลา: ปรับนาฬิกาภายในของอุปกรณ์
- Save image: Store captured thermal images.
- Background light setting: ปรับความสว่างของจอแสดงผล
- การตั้งค่าหน่วยอุณหภูมิ: สลับระหว่างเซลเซียส (°C) และฟาเรนไฮต์ (°F)
- การตั้งค่าอุณหภูมิพื้นหลัง: Calibrate the background temperature for accurate readings.
- Capacity of memory card: View remaining storage on the Micro SD card.
- Color palette setting: Choose different color schemes for thermal images.
- การตั้งค่าการแผ่รังสี: Adjust the emissivity value for different materials.
5.3 การวัด:
The measured temperature of the center of the pixel is displayed in the upper left corner of the display screen. The setting of the radiation coefficient is also displayed in the upper right corner of the display screen. Move the product until the hot spot or cold spot coincides with the center of the pixel. Direct the product to the object whose temperature is higher or lower than the surrounding temperature to get the optimum measured results.
5.4 Focal Distance:
This product is a fixed-focal thermal imaging camera. The applicable distance is 50cm (20in).
5.5 Elimination of Noise:
Start up the instrument and then put the head of the sensor close to the worktop. Press the "up" key for 5 seconds to eliminate noise.
5.6 LED Light:
Press the "image capturing" key (9) for 5 seconds to turn on the LED light to cooperate with the working of the visible camera.

Figure 4: Advanced Operating Functions.
5.7 จานสี:
The "Color palette" menu allows changing the fake color of the infrared image displayed on the screen or captured. A series of color palettes is available for usage. Some color palettes are more applicable to specific areas, so they are set as required options. Gray-scale color palette provides balanced linear color, so it can help to fully reveal details. High-contrast color palette can emphasize the displayed color. This color palette is applicable to the hot-cold contrast situation. It is used to improve the color contrast of high-temperature and low-temperature. Iron red and rainbow color palettes provide a mixed high-contrast gray-scale color palette.
5.8 Temperature of Reflective Background:
The background temperature can be set between 0°C and +36°C. Set the temperature compensation for reflective background in the option of background. Over-hot or over-cold objects may influence the object and the surface temperature and measurement accuracy of the measured object. When the radiation coefficient of the surface of the measured object is low, this phenomenon is obvious. Under many situations, adjust the temperature of the reflective background to get the optimum measured result.
5.9 Marking of Spot Temperature:
Turn on or off the marking of spot temperature. If turned on, the marking of spot temperature indicates that the hot spot or cold spot in the screen needs additional appraisal. If turned off, it indicates that the user can focus on the measured pixel per time.
5.10 Unit of Temperature:
The product displays the temperature in unit of °C or °F.
5.11 Image Mixing:
Use the aligned visible image and infrared image. The mixed image makes the understanding of the infrared image easier. The product can capture the visible image of the infrared image to accurately display the temperature distribution of the target area. It helps to share with others. If this mixing function is used, press "left" or "right" key to adjust the mixed image from 0% to 100%.
5.12 Image Capture and Storage:
This product can be stored for up to 25,000 images on the micro SD card. Press the image capturing button (9) and the symbol of "store photos yes no" will display. Press "MENU" key to store the image; press "SELECT" to delete the captured image. If "NO SD" is displayed at the lower left corner of the screen, it indicates the SD card is not installed. If "FULL" is displayed at the lower left corner of the screen, it indicates that the SD card is full.
5.13 Checking Internal Storage:
- Press "menu" to enter into the mode of "menu".
- Select the image storage module using the arrow keys.
- Press the "SELECT" button to choose the picture you want to view.
- กดปุ่มลูกศรเพื่อ view รูปภาพอื่น ๆ
- Press the above key on the screen will display "Delete photo yes no", then press the MENU key to delete the picture. Press "SELECT" to cancel.
- Press the "MENU" button to exit Review.
5.14 Notes on Radiation Coefficient:
All objects have radiated infrared energy. The radiated quantity of infrared energy is based on the actual temperature and radiation coefficient of the surface. Our instrument can sense the infrared energy on the surface of the object and estimate the temperature based on the sensed value of infrared energy. Many objects (e.g., coated metal, wood, water, skin, and texture) can radiate energy, so it is easy to get the accurate measured value. As to the surface which is easy to radiate energy (high radiation coefficient), the radiation coefficient is greater than 90% (0.90). This simple method is not applicable to the glossy surface or coated metal because their radiation coefficient is less than 60% (0.60). These materials are not easy to radiate energy so they are classified as low radiation coefficient materials. To accurately measure the low radiation coefficient materials, calibrate the radiation coefficient. Adjustment of radiation coefficient is to make the product more accurately calculate the estimated value of actual temperature.

Figure 5: Image Mixing and Storage Functions.
5.15 Emissivity:
For the emissivity within the step length of 0.01, it can be adjusted from 0.10 to 1.00. Set the default value to 0.95. The accurate value of emissivity is very important to the accurate measurement of temperature. The surface emissivity has great impact on the measured temperature of our product. To know the emissivity of the measured surface helps to get more accurate results of temperature but this is not always true.
5.16 Emissivity of Normal Materials:
| วัสดุ | รังสีความร้อน | วัสดุ | รังสีความร้อน |
|---|---|---|---|
| ยางมะตอย | 0.90–0.98 | ผ้าดำ | 0.98 |
| คอนกรีต | 0.94 | ผิวหนังของมนุษย์ | 0.98 |
| ปูนซีเมนต์ | 0.96 | ฟอง | 0.75–0.80 |
| ทราย | 0.90 | ฝุ่นถ่าน | 0.96 |
| ดิน | 0.92–0.96 | สี | 0.80–0.95 |
| น้ำ | 0.92–0.96 | Matt paint | 0.97 |
| น้ำแข็ง | 0.96–0.98 | ยางดำ | 0.94 |
| หิมะ | 0.83 | พลาสติก | 0.85–0.95 |
| กระจก | 0.90–0.95 | ไม้ | 0.90 |
| เซรามิค | 0.90–0.94 | กระดาษ | 0.70–0.94 |
| หินอ่อน | 0.94 | โครเมียมออกไซด์ | 0.81 |
| ยิปซั่ม | 0.80–0.90 | ทองแดงออกไซด์ | 0.78 |
| ปูน | 0.89–0.91 | เฟอร์ริกออกไซด์ | 0.78–0.82 |
| อิฐ | 0.93–0.96 | พื้นผิว | 0.90 |
Figure 6: Emissivity values for common materials.
6. การบำรุงรักษา
To maintain your PerfectPrime IR0002 in optimal condition:
- Use a wet cloth or liquid soap to clean the shell of the device.
- Do not use abrasive compounds or isopropyl alcohol to clean the shell or lens.
- เก็บอุปกรณ์ไว้ในที่แห้งและเย็นเมื่อไม่ใช้งาน
- ถอดแบตเตอรี่ออกหากจะไม่ได้ใช้งานอุปกรณ์เป็นเวลานานเพื่อป้องกันการรั่วไหล
7 การแก้ไขปัญหา
If you encounter issues with your PerfectPrime IR0002, consider the following common solutions:
- อุปกรณ์ไม่เปิด: Ensure batteries are correctly installed and fully charged. Replace with new alkaline batteries if necessary.
- การอ่านอุณหภูมิที่ไม่แม่นยำ: Check the emissivity setting for the material being measured. Ensure the background temperature compensation is correctly set. Avoid measuring highly reflective surfaces without proper emissivity adjustment.
- Image quality issues: Ensure the lens is clean and free from dust or smudges. Check the image mixing percentage if the visible and IR images appear distorted.
- ไม่สามารถบันทึกภาพได้: Verify that a Micro SD card is inserted and that it is not full. If "NO SD" or "FULL" is displayed, address the SD card status.
- อุปกรณ์ไม่ตอบสนอง: Try removing and reinserting the batteries to perform a hard reset.
If problems persist, contact PerfectPrime customer support for assistance.
8. ข้อมูลจำเพาะ
| คุณสมบัติ | รายละเอียด |
|---|---|
| IR Image Resolution | 60 x 60 พิกเซล (3600 พิกเซล) |
| Visible Image Resolution | ล้านพิกเซล 0.3 |
| หน้าจอแสดงผล | 2.4" Full angle HD |
| ช่วงอุณหภูมิ | -20°C ถึง 300°C (-4°F ถึง 572°F) |
| ความไวต่อความร้อน | 0.15 องศาเซลเซียส |
| ความแม่นยำของอุณหภูมิ | +/- 2% or +/- 2°C |
| อัตราการรีเฟรช | 6 เฮิรตซ์ |
| หน่วยความจำเก็บ | Micro SD Card (4GB included for image storage) |
| แหล่งพลังงาน | 4 x AA Alkaline 1.5V batteries (not included) |
| ดีที่สุด Viewอิงระยะทาง | 1.6 ฟุตถึง 16 ฟุต |
| น้ำหนักสินค้า | 8 ออนซ์ |
| ขนาดแพ็คเกจ | 10.1 x 6.3 x 3.8 นิ้ว |
| การรับรอง | ซีอี, โรเอชเอส |
| คุณสมบัติพิเศษ | ไม่ต้องสัมผัส |
9. การรับประกันและการสนับสนุน
PerfectPrime products are designed for reliability and performance. For warranty information, product registration, or technical support, please visit the official PerfectPrime webหรือติดต่อฝ่ายบริการลูกค้าโดยตรง โปรดเก็บใบเสร็จรับเงินไว้เป็นหลักฐานการซื้อสำหรับการเรียกร้องการรับประกัน
For further assistance, please refer to the contact information provided with your product packaging or on the PerfectPrime webเว็บไซต์.


