1. บทนำ
This manual provides essential information for the safe and efficient use of your Hitachi CP-EX251N XGA 3LCD Projector. Please read this manual thoroughly before operating the projector and keep it for future reference. The CP-EX251N is designed for clear, bright projections with 2700 lumens brightness and XGA (1024x768) native resolution, featuring 3LCD technology and a long-life lamp.
2. ข้อมูลด้านความปลอดภัย
โปรดปฏิบัติตามข้อควรระวังด้านความปลอดภัยต่อไปนี้เพื่อป้องกันอัคคีภัย ไฟฟ้าช็อต หรือการบาดเจ็บ
- แหล่งพลังงาน: Use only the power supply specified for this unit. Ensure the power cord is securely plugged into an outlet.
- การระบายอากาศ : อย่าปิดกั้นช่องระบายอากาศ ตรวจสอบให้แน่ใจว่ามีพื้นที่ว่างรอบโปรเจ็กเตอร์เพียงพอเพื่อให้มีการไหลเวียนของอากาศที่ดี ป้องกันความร้อนสูงเกินไป
- ความร้อน: โปรเจ็กเตอร์ lamp becomes very hot during operation. Allow the projector to cool down before handling or performing maintenance.
- Lamp: อย่ามองตรงเข้าไปในเลนส์โปรเจ็กเตอร์เมื่อลamp ควรเปิดใช้งานไว้ เนื่องจากแสงจ้าอาจเป็นอันตรายต่อดวงตาของคุณ
- ความชื้น: อย่าให้โปรเจ็กเตอร์โดนฝนหรือความชื้นเพื่อป้องกันไฟไหม้หรือไฟฟ้าช็อต
- การบริการ: ควรส่งโปรเจคเตอร์ให้ช่างผู้ชำนาญการเป็นผู้ดำเนินการซ่อมบำรุง ห้ามพยายามเปิดหรือซ่อมโปรเจคเตอร์ด้วยตนเอง
3. เนื้อหาบรรจุภัณฑ์
ตรวจสอบว่ามีรายการทั้งหมดอยู่ในแพ็คเกจ:
- Hitachi CP-EX251N Projector
- สายไฟ
- รีโมทคอนโทรลพร้อมแบตเตอรี่
- สายเคเบิล VGA
- คู่มือการใช้งาน (เอกสารนี้)
4. สินค้าหมดview

รูปที่ 4.1: มุม view of the Hitachi CP-EX251N Projector, showing the lens, control panel, and ventilation.
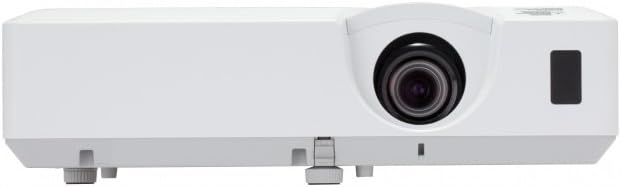
รูปที่ 4.2 : ด้านหน้า view of the Hitachi CP-EX251N Projector, highlighting the projection lens and front IR receiver.
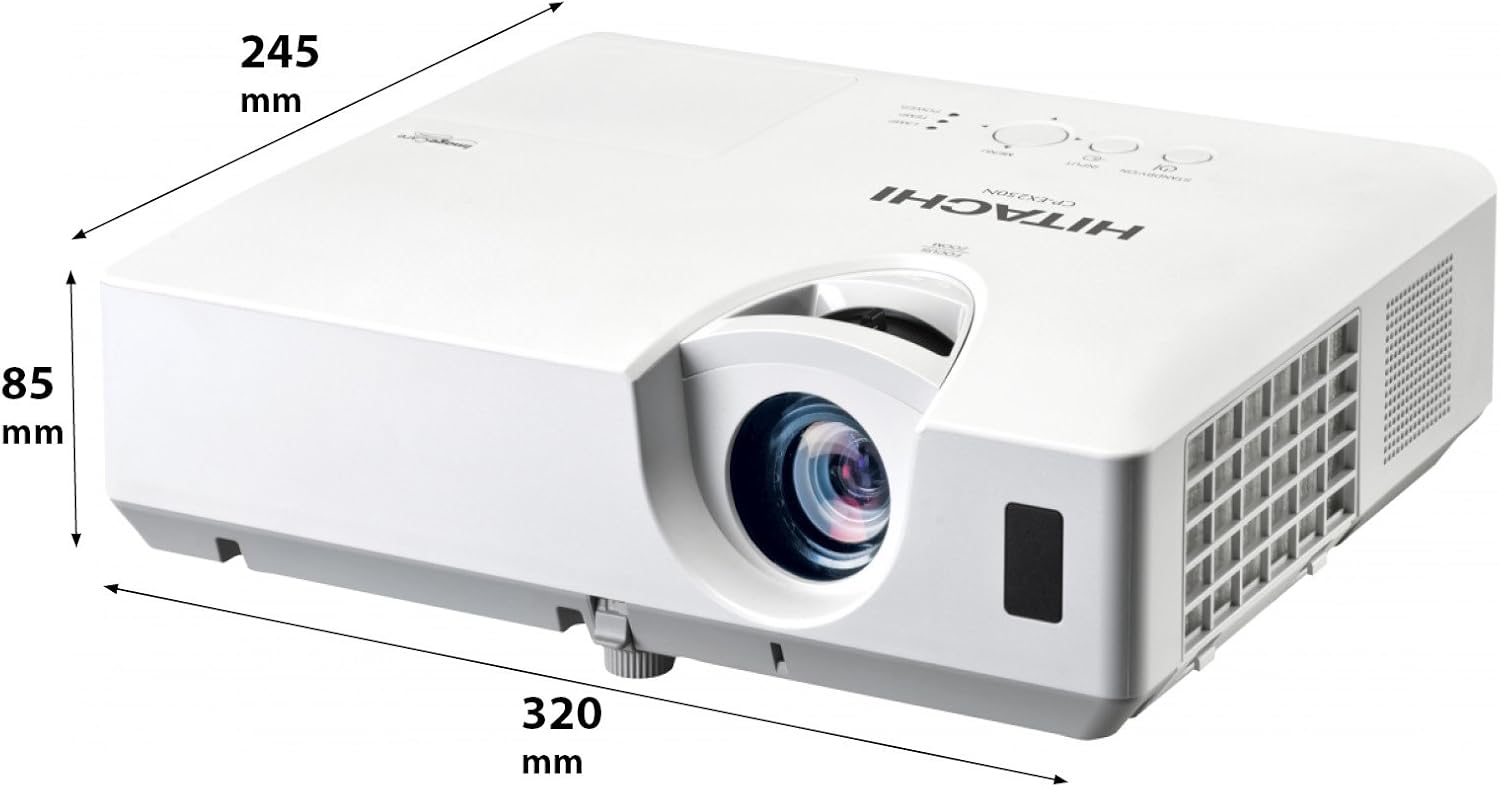
รูปที่ 4.3: มุม view of the projector illustrating its approximate dimensions (320mm length, 245mm width, 85mm height).
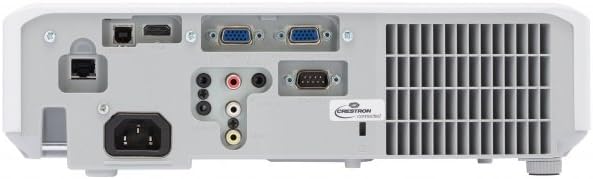
Figure 4.4: Rear panel of the projector, showing various input and output ports including HDMI, VGA, Composite, RS232C, and RJ45.
5. การตั้งค่า
5.1 การจัดวาง
Position the projector on a stable, flat surface or mount it securely. Ensure the projector is at an appropriate distance from the screen to achieve the desired image size. Maintain clear space around the projector for ventilation.
5.2 การต่อสายไฟ
- เสียบสายไฟเข้ากับช่องเสียบไฟ AC ของโปรเจ็กเตอร์
- เสียบปลายอีกด้านของสายไฟเข้ากับเต้ารับไฟฟ้าที่มีสายดิน
5.3 การเชื่อมต่อแหล่งอินพุต
The CP-EX251N offers multiple connectivity options:
- ช่องต่อ HDMI: Connect an HDMI cable from your source device (e.g., laptop, Blu-ray player) to the projector's HDMI port.
- VGA: Connect a VGA cable from your computer to one of the projector's VGA ports (VGA1 or VGA2).
- วิดีโอคอมโพสิต: Use an RCA composite video cable to connect devices like DVD players to the composite video input.
- เสียง: Connect audio cables to the corresponding audio input jacks if using analog video sources.
- ควบคุม: For remote control and monitoring, connect an RS232C serial cable or an RJ45 Ethernet cable to a control system.
5.4 การเปิดเครื่องครั้งแรกและการปรับภาพ
- Press the Power button on the projector or remote control. The power indicator will light up.
- ปรับแต่ง วงแหวนโฟกัส on the lens until the image is sharp.
- ปรับแต่ง วงแหวนซูม on the lens to achieve the desired image size.
- ถ้าภาพมีลักษณะเป็นรูปสี่เหลี่ยมคางหมู ให้ใช้ Keystone Correction function (usually found in the projector menu or via dedicated buttons on the remote) to square the image.
6. ปฏิบัติการ
6.1 เปิด/ปิดเครื่อง
- การเปิดเครื่อง: กดปุ่มเปิดปิดหนึ่งครั้ง
- วิธีปิดเครื่อง: Press the Power button twice. The projector will enter a cooling cycle before shutting down completely. Do not unplug the projector during the cooling cycle.
6.2 การเลือกอินพุต
Press the 'Input' or 'Source' button on the remote control or projector control panel to cycle through available input sources (HDMI, VGA1, VGA2, Composite).
6.3 การนำทางเมนู
Use the 'Menu' button to access the on-screen display (OSD) menu. Navigate using the arrow buttons and confirm selections with the 'Enter' button. The menu allows adjustment of picture settings, audio, display options, and system settings.
6.4 การปรับแต่งภาพ
Within the OSD menu, you can adjust:
- ความสว่าง: Adjust the overall lightness or darkness of the image.
- ตัดกัน: Adjust the difference between the light and dark areas of the image.
- โหมดสี: Select from various preset modes (e.g., Standard, Dynamic, Cinema, sRGB) or customize settings.
- อัตราส่วนภาพ: Change the display ratio (e.g., 4:3, 16:9).
6.5 โหมด Eco
Activate Eco Mode to reduce lamp brightness, conserve energy, and extend lamp life up to 10,000 hours. This setting can be found in the projector's OSD menu.
7. การบำรุงรักษา
7.1 การทำความสะอาดเลนส์
เช็ดเลนส์โปรเจ็กเตอร์เบาๆ ด้วยผ้าเนื้อนุ่มปราศจากขนที่ออกแบบมาสำหรับพื้นผิวเลนส์โดยเฉพาะ ห้ามใช้สารทำความสะอาดที่มีฤทธิ์กัดกร่อนหรือออกแรงมากเกินไป
7.2 การทำความสะอาดแผ่นกรองอากาศ
Regularly clean the air filter to maintain optimal performance and prevent overheating. Refer to the projector's OSD menu for filter usage time. Remove the filter cover and gently clean the filter with a soft brush or vacuum cleaner. Replace the filter if it is damaged or excessively dirty.
7.3 ลิตรamp การทดแทน
โปรเจ็กเตอร์ lamp has a long lifespan, but will eventually require replacement. When the lamp indicator lights up or the image becomes dim, replace the lamp. Always use a genuine Hitachi replacement lamp. Allow the projector to cool completely before attempting lamp replacement. Consult the full service manual for detailed lamp คำแนะนำในการเปลี่ยน
7.4 พื้นที่จัดเก็บ
When storing the projector for an extended period, ensure it is powered off and cooled down. Store it in a cool, dry place, away from direct sunlight and extreme temperatures.
8 การแก้ไขปัญหา
| ปัญหา | สาเหตุที่เป็นไปได้ | สารละลาย |
|---|---|---|
| ไม่มีไฟฟ้า | Power cord disconnected; Power outlet faulty; Projector in standby mode. | ตรวจสอบการเสียบสายไฟ; ลองเสียบเข้ากับเต้ารับอื่น; กดปุ่มเปิด/ปิด |
| ไม่มีภาพแสดง | Input source not selected; Cable not connected properly; Source device not outputting signal. | Select correct input source; Reconnect video cable; Check source device settings. |
| ภาพบิดเบี้ยวหรือเบลอ | Focus/Zoom not adjusted; Keystone not corrected; Projector not perpendicular to screen. | Adjust Focus and Zoom rings; Use Keystone correction; Reposition projector. |
| ไม่มีเสียง | Audio cable not connected; Volume too low; Mute function active. | Connect audio cable (if applicable); Increase volume; Deactivate mute. |
| รีโมตคอนโทรลไม่ทำงาน | Batteries depleted; Obstruction between remote and projector; Remote sensor blocked. | Replace batteries; Remove obstructions; Ensure clear line of sight to IR sensor. |
9. ข้อมูลจำเพาะ
| คุณสมบัติ | ข้อมูลจำเพาะ |
|---|---|
| หมายเลขรุ่น | ซีพี-EX251N |
| เทคโนโลยีการแสดงผล | 3LCD |
| ความสว่าง | 2700 ลูเมน |
| ความละเอียดดั้งเดิม | XGA (1024 x 768) |
| Lamp ชีวิต | Up to 10,000 hours (in Eco Mode) |
| การเชื่อมต่อ | HDMI x 1, VGA x 2, Component (Shared) x 2, Composite x 1, RS232C, RJ45 |
| เอาท์พุตเสียง | ลำโพง 16W |
| น้ำหนักสินค้า | 6.83 ปอนด์ (ประมาณ 3.1 กก.) |
| ขนาดสินค้า | 6 x 12 x 14 นิ้ว (ประมาณ 15.2 x 30.5 x 35.6 ซม.) |
| การใช้ที่แนะนำ | ธุรกิจ, การศึกษา, เกม, โฮมเธียเตอร์ |
| คุณสมบัติพิเศษ | พกพาได้ |
10. การรับประกันและการสนับสนุน
For warranty information, please refer to the warranty card included with your product or visit the official Hitachi website. For technical support, service, or inquiries about replacement parts, please contact Hitachi customer service through their official channels.
การสนับสนุนทางออนไลน์: www.hitachi.com/support (อดีตampโปรดดูเอกสารผลิตภัณฑ์จริงเพื่อความถูกต้อง URL)