1. บทนำ
This manual provides essential instructions for the safe and efficient operation of your SINGER Start 1306 Sewing Machine. Please read it thoroughly before using the machine to ensure proper setup, usage, and maintenance. The SINGER Start 1306 is designed for home sewing projects, featuring 6 built-in stitches, easy threading, and a 4-step buttonhole function.

ภาพที่ 1.1: ด้านหน้า view of the SINGER Start 1306 Sewing Machine.
2. ข้อมูลด้านความปลอดภัย
ปฏิบัติตามข้อควรระวังด้านความปลอดภัยขั้นพื้นฐานเสมอเมื่อใช้เครื่องใช้ไฟฟ้า เพื่อลดความเสี่ยงต่อการเกิดไฟไหม้ ไฟฟ้าช็อต หรือการบาดเจ็บ
- อ่านคำแนะนำทั้งหมดก่อนใช้เครื่อง
- ควรวางเครื่องให้ห่างจากน้ำหรือพื้นผิวที่เปียก
- ถอดปลั๊กเครื่องออกจากเต้ารับไฟฟ้าเมื่อไม่ใช้งาน เมื่อทำการซ่อมบำรุง หรือเมื่อเปลี่ยนอุปกรณ์เสริม
- ห้ามใช้งานเครื่องหากสายไฟหรือปลั๊กชำรุด หากเครื่องทำงานผิดปกติ หรือหากเครื่องตกหล่นหรือได้รับความเสียหาย
- วางนิ้วให้ห่างจากชิ้นส่วนที่เคลื่อนไหวทั้งหมด ต้องใช้ความระมัดระวังเป็นพิเศษรอบ ๆ เข็มจักรเย็บผ้า
- ใช้เฉพาะอุปกรณ์เสริมที่ผู้ผลิตแนะนำเท่านั้น
- ห้ามทำตกหรือเสียบวัตถุใดๆ ลงในช่องเปิดใดๆ
3. การตั้งค่า
3.1 การแกะกล่องและเนื้อหา
Carefully remove the machine from its packaging. Retain all packaging materials for future transport or storage. Verify that all included components are present:
- All-Purpose Foot
- ขาซิป
- ตีนผีรังดุม
- จานดาร์นิ่ง
- แพ็คเข็ม
- ลูกกระสวย
- Spool Pin Felts
- Needle Plate Screwdriver
- Seam Ripper / Lint Brush
- Vinyl Dust Cover
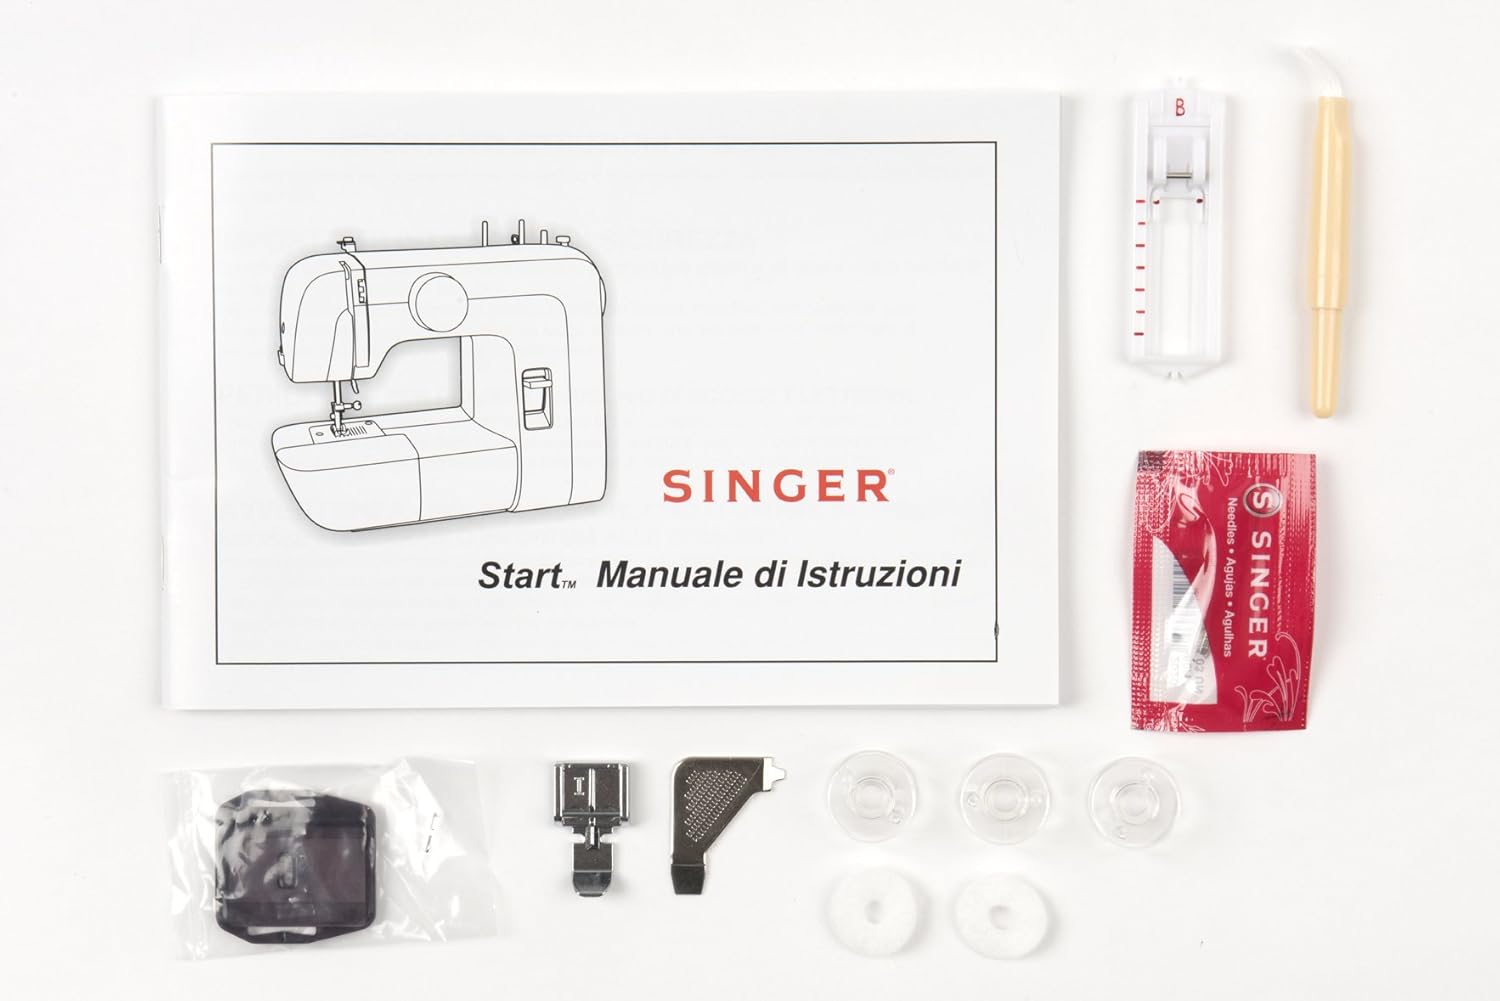
Image 3.1: Included accessories and instruction manual.
3.2 การเชื่อมต่อสายไฟ
Connect the power cord to the machine's power input socket and then plug it into a suitable electrical outlet (220V). Ensure the machine is switched off before connecting to power.

ภาพที่ 3.2: ด้านหลัง view showing power input and foot pedal connection.
3.3 การร้อยด้ายเครื่องจักร
การร้อยด้ายที่ถูกต้องมีความสำคัญอย่างยิ่งต่อการเย็บที่ได้รูปทรงสวยงาม
3.3.1 การม้วนกระสวย
- วางหลอดด้ายไว้บนแกนยึดหลอดด้าย
- สอดด้ายผ่านตัวนำด้ายด้านบน
- Wrap the thread clockwise around the bobbin winding tension disc.
- Insert the thread through the small hole in the bobbin from the inside out.
- Place the bobbin onto the bobbin winder spindle and push the spindle to the right.
- Hold the thread end and press the foot pedal. Wind a few turns, then trim the excess thread.
- Continue winding until the bobbin is full. The winder will stop automatically.
- Push the bobbin winder spindle to the left and remove the bobbin.
3.3.2 การใส่กระสวย
- เปิดฝาครอบกระสวย
- ใส่กระสวยที่พันด้ายแล้วเข้าไปในกล่องกระสวย โดยให้ด้ายคลายตัวทวนเข็มนาฬิกา
- Guide the thread into the tension spring slot and pull it firmly until it snaps into place.
- ปิดฝาครอบกระสวย
3.3.3 เกลียวบน
- หมุนวงล้อปรับเข็มขึ้นไปที่ตำแหน่งสูงสุด
- ยกตีนผีขึ้น
- วางหลอดด้ายไว้บนแกนยึดหลอดด้าย
- สอดด้ายผ่านตัวนำด้ายด้านบน
- Bring the thread down through the right channel, then up through the left channel, ensuring it passes through the take-up lever.
- ร้อยเข็มจากด้านหน้าไปด้านหลัง

Image 3.3: Illustration of the upper threading path.
3.4 การติดตั้งเข็ม
To install or replace a needle:
- หมุนวงล้อจักรเพื่อยกเข็มขึ้นไปยังตำแหน่งสูงสุด
- คลายเข็ม clamp สกรู
- ถอดเข็มเก่าออก
- Insert the new needle with the flat side facing the back of the machine. Push it up as far as it will go.
- ขันเข็มให้แน่นamp ขันสกรูให้แน่น

Image 3.4: Close-up of the needle and presser foot area.
4. คู่มือการใช้งาน
4.1 การเลือกเย็บ
The SINGER Start 1306 offers 6 built-in stitch patterns. Turn the stitch selector dial to choose your desired stitch. The available stitches include 4 basic, 1 decorative, and 1 buttonhole stitch.

Image 4.1: Stitch selector dial with various stitch patterns.
4.2 พื้นฐานการเย็บผ้า
4.2.1 Starting a Seam
- วางผ้าไว้ใต้ตีนผี โดยจัดขอบผ้าให้ตรงกับเส้นนำตะเข็บบนแผ่นรองเข็ม
- ลดระดับตีนผีลง
- Turn the handwheel to lower the needle into the fabric at the starting point.
- Press the foot pedal gently to begin sewing.
4.2.2 Finishing a Seam
- Sew to the end of your seam.
- Press the reverse stitch lever to sew a few stitches backward to secure the seam.
- ยกเข็มไปที่ตำแหน่งสูงสุด
- ยกตีนผีขึ้น
- Pull the fabric away from the machine, then cut the threads using the thread cutter on the machine.
4.3 4-Step Buttonhole Function
The machine features a 4-step buttonhole function for creating buttonholes. Refer to the markings on the stitch selector dial for each step (1, 2, 3, 4). Use the buttonhole foot for best results.
4.4 Zipper Insertion
Attach the zipper foot to the machine. This foot allows you to sew close to the zipper teeth, ensuring a neat finish. Follow standard zipper insertion techniques, adjusting the needle position as needed.
4.5 Free Arm Usage
The removable free arm provides access to difficult-to-reach areas such as collars, sleeves, cuffs, and pant hems. To use, slide off the accessory storage compartment to expose the free arm.
5. การบำรุงรักษา
5.1 การทำความสะอาด
Regular cleaning helps maintain machine performance. Always unplug the machine before cleaning.
- การกำจัดขุยผ้า: Use the provided lint brush to remove lint and dust from the bobbin area and feed dogs.
- การทำความสะอาดภายนอก: เช็ดพื้นผิวภายนอกด้วยผ้าแห้งนุ่มๆ ห้ามใช้สารเคมีรุนแรงหรือน้ำยาทำความสะอาดที่มีฤทธิ์กัดกร่อน
5.2 การเปลี่ยนเข็ม
Replace needles regularly, especially when sewing different fabric types or if the needle becomes bent or dull. A damaged needle can cause skipped stitches or fabric damage. Refer to section 3.4 for needle installation instructions.
6 การแก้ไขปัญหา
ส่วนนี้จะกล่าวถึงปัญหาทั่วไปที่คุณอาจพบ สำหรับปัญหาที่ไม่ได้ระบุไว้ในที่นี้ โปรดติดต่อฝ่ายสนับสนุนลูกค้า
| ปัญหา | สาเหตุที่เป็นไปได้ | สารละลาย |
|---|---|---|
| ข้ามตะเข็บ | เข็มไม่ถูกต้อง เข็มงอ การร้อยด้ายไม่ถูกวิธี | เปลี่ยนเข็ม ร้อยด้ายใหม่ ตรวจสอบให้แน่ใจว่าใช้เข็มชนิดที่ถูกต้องสำหรับเนื้อผ้า |
| ด้ายแตก | การร้อยด้ายไม่ถูกต้อง แรงดึงด้ายแน่นเกินไป เข็มชำรุด หรือใช้ด้ายคุณภาพต่ำ | Re-thread, adjust tension, replace needle, use good quality thread. |
| Bobbin Thread Jamming | Improperly wound bobbin, incorrect bobbin insertion, lint in bobbin case. | Re-wind bobbin, re-insert bobbin correctly, clean bobbin area. |
| เครื่องไม่สตาร์ท | Power cord not connected, machine switched off, foot pedal not connected. | Check power connections, ensure switch is ON, connect foot pedal. |
7. ข้อมูลจำเพาะ
| คุณสมบัติ | รายละเอียด |
|---|---|
| ยี่ห้อ | SINGER |
| หมายเลขรุ่น | เริ่มต้น 1306 |
| น้ำหนักสินค้า | 4.3 กก. |
| ขนาดสินค้า (กxยxส) | 35 x 18 x 29 ซม. |
| เล่มที่tage | 220โวลต์ |
| วัดtage | 70 วัตต์ |
| ตะเข็บในตัว | 6 (4 basic, 1 decorative, 1 buttonhole) |
| ประเภทรังดุม | 4-step automatic |
| วัสดุกรอบ | โลหะสำหรับงานหนัก |
| ส่วนประกอบที่รวมอยู่ | All Purpose Foot, Zipper Foot, Buttonhole Foot, Darning Plate, Pack of Needles, Bobbins, Spool Pin Felts, Needle Plate Screwdriver, Seam Ripper / Lint Brush, Vinyl Dust Cover |

Image 7.1: Product dimensions of the SINGER Start 1306 Sewing Machine.
8. การรับประกันและการสนับสนุน
Your SINGER Start 1306 Sewing Machine comes with a manufacturer's warranty. Please refer to the warranty card included with your product for specific terms, conditions, and duration. For technical assistance, service, or to inquire about replacement parts, please contact SINGER customer support through their official webไซต์หรือข้อมูลการติดต่อที่ระบุไว้ในเอกสารการรับประกันของคุณ