การแนะนำ
This manual provides comprehensive instructions for the setup, operation, maintenance, and troubleshooting of your iodd 2541 USB 3.0 External Encrypted Hard Drive Enclosure. The iodd 2541 is designed to function as a versatile external storage device, offering features such as virtual DVD/Blu-ray ROM emulation, virtual hard disk (VHD) support, and advanced encryption capabilities.

รูปที่ 1 : ด้านหน้า view of the iodd 2541 device, showing the display and numeric keypad.
การติดตั้งและการตั้งค่า
1. Installing a 2.5-inch HDD/SSD
The iodd 2541 supports 2.5-inch SATA3/2 HDDs or SSDs with a maximum thickness of 9.5mm. To install your drive:
- Carefully slide open the enclosure cover.
- Connect your 2.5-inch HDD or SSD to the internal SATA connector.
- Gently slide the drive into place within the enclosure.
- Close the enclosure cover securely.

Figure 2: The iodd 2541 with a USB 3.0 cable connected, ready for use after drive installation.
2. Initial Connection and Formatting
Connect the iodd 2541 to your computer using the provided USB 3.0 cable. For optimal performance, use a USB 3.0 port. The device will be recognized as an external drive.
The iodd 2541 is shipped with NTFS firmware. If you need to use FAT32 or exFAT, you can update the firmware from iodd.kr. Ensure the first partition is a Healthy and Primary partition for proper functionality.
To manage partitions in Windows:
- Open Disk Management (Start > Run > diskmgmt.msc).
- Right-click on the left panel of the iodd disk.
- Check the partition types. iodd supports only MBR.
- Create a new volume (e.g., F:) and ensure it's formatted correctly.
3. Creating a Virtual USB Thumb Drive (VHD Tool & Rufus)
The iodd 2541 can emulate a bootable USB thumb drive using VHD files (Virtual Hard Disk) renamed as .RMD. This is particularly useful for booting systems that do not support USB-DVD-ROM booting, for creating USB installation media from bootable ISOs (Windows, Linux, UEFI), or for running low-level utilities.
To follow this guide, you will need:
- iodd 2531 or iodd 2541 with HDD or SSD.
- Firmware version 1554, 1555, 1564 or later (iodd 2531 - 1555 or later).
- A Bootable ISO file.
- Windows XP หรือสูงกว่า
- VHD_Tool++ (free for iodd users).
- Rufus tool (freeware).
Download VHD_Tool++ utility software from the iodd Official Site download page or FTP: iodd.kr/wordpress/support/download/ or ftp://sps.iodd.co.kr/.

Figure 3: Detailed guide for creating a virtual USB thumb drive using VHD Tool and Rufus.
After creating the VHD file, open the root folder of the first partition in your iodd disk and create a new folder named _ISO. Copy all supported ISO, VHD, RMD, and IMA files into this folder. Safely remove and reconnect the iodd 2541 for the changes to take effect.
4. Setting Up Encryption (AES 256-XTS)
The iodd 2541 features AES 256-XTS encryption for enhanced data security. You can choose to use an encrypted or normal disk.

Figure 4: The device display showing options to set or reset encryption.
To set up encryption, navigate through the device's menu using the keypad. Select "Set Encryption" and follow the on-screen prompts to set your PIN. The device will prompt for your PIN upon connection if encryption is enabled.
การดำเนินการ
1. Display Description and Key Functions
The iodd 2541 features a clear display and a numeric keypad for navigation and control. Understanding the display icons and key functions is essential for operation.

รูปที่ 5: เกินview of the iodd 2541 display icons and keypad functions.
Key Functions Summary:
- 2, 4, 6, 8 (Up, Left, Right, Down): Navigation or CD/ISO file ขนถ่าย
- 5: Load or unload CD (ISO file) & VHD.
- เมนู: Enter menu or exit.
- 0: Disable Write-Protect temporarily.
- เข้า: Load or unload CD/ISO file & VHD with quick save.
- 3: Reboot iodd (USB reconnect).
- 7: Unload All VHD files.
- 9: Delete last character (backspace key) during PIN input.
2. โหมดการทำงาน
The iodd 2541 supports several operating modes:
- HDD Mode: Functions as a standard external hard drive.
- ODD Mode (Virtual DVD/Blu-ray ROM): Emulates an optical disc drive, allowing you to boot from ISO files.
- โหมดคู่: Allows simultaneous access to both the HDD and ODD functionalities.

Figure 6: Selecting between Dual Mode and HDD Mode on the device display.
To switch between modes, use the navigation keys to select the desired mode from the menu.
3. Write Protection
The iodd 2541 includes a write protection feature to prevent accidental data modification or virus infection. When enabled, data cannot be written to the drive.
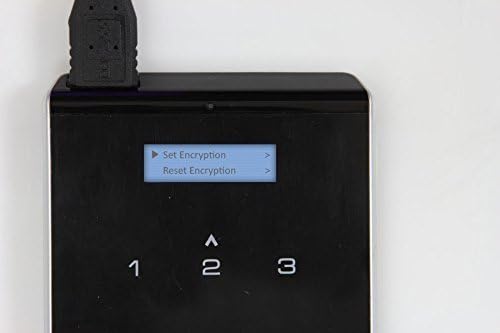
Figure 7: The device display showing options for Write Protect.
You can temporarily disable write protection by pressing '0' on the keypad. Ensure write protection is turned off if you intend to write data to the drive, such as during firmware updates for certain devices.
การซ่อมบำรุง
1. การถอดอุปกรณ์อย่างปลอดภัย
Always use the "Safely Remove Hardware" option in your operating system before disconnecting the iodd 2541 to prevent data corruption.
2. การอัปเดตเฟิร์มแวร์
Periodically check the official iodd webงาน (iodd.kr) for firmware updates. Firmware updates can improve performance, add new features, or resolve issues. Follow the instructions provided with the firmware download carefully.
3. การทำความสะอาด
Wipe the exterior of the device with a soft, dry cloth. Avoid using liquid cleaners or abrasive materials. If the touch buttons become less responsive, ensure the screen protector (if applied) is clean and properly seated.
การแก้ไขปัญหา
- ไม่รู้จักอุปกรณ์:
- Ensure the USB cable is securely connected to both the iodd 2541 and the computer.
- ลองใช้พอร์ต USB หรือสายเคเบิลอื่น
- Verify that the internal HDD/SSD is properly seated within the enclosure.
- Check Disk Management in your operating system to see if the drive is detected but unformatted or unallocated.
- Booting Issues from ISO/VHD:
- Ensure the ISO/VHD file ถูกวางไว้ใน _ISO folder in the root directory of the iodd 2541.
- Verify that the iodd 2541 is set to ODD Mode or Dual Mode.
- Confirm that the ISO/VHD file is not corrupted and is a bootable image.
- Some systems may require specific BIOS/UEFI settings for booting from external USB devices.
- Ensure write protection is disabled if the booting process requires writing to the virtual drive.
- Touch Buttons Unresponsive:
- Apply the included screen protector material. This can improve touch sensitivity.
- Ensure your fingers are clean and dry when interacting with the keypad.
- ประสิทธิภาพการทำงานช้า:
- ตรวจสอบให้แน่ใจว่าคุณเชื่อมต่อกับพอร์ต USB 3.0 เพื่อความเร็วที่เหมาะสมที่สุด
- The performance will also depend on the speed of the installed HDD/SSD. Using an SSD will generally yield faster results than an HDD.
- Encryption PIN Issues:
- If you forget your PIN, you may need to reset encryption, which will erase encrypted data. Refer to the "Reset Encryption" option in the device menu.
For more detailed troubleshooting or specific scenarios, it is recommended to consult the official iodd support resources or community forums.
ข้อมูลจำเพาะ
| คุณสมบัติ | รายละเอียด |
|---|---|
| หมายเลขรุ่น | IODD-2541 |
| ขนาดสินค้า | 5.75 x 3.19 x 0.55 นิ้ว |
| น้ำหนักสินค้า | 3.21 ออนซ์ (91 กรัม) |
| ไดรฟ์ที่รองรับ | 2.5-inch SATA3/2 HDD/SSD (max 9.5mm thickness) |
| Virtual Drive | Bootable ISO/VHD Emulation |
| การเข้ารหัส | AES 256-XTS (Max up to 8 digits) |
| อินเทอร์เฟซการควบคุม | Capacitive Touch 12 keys |
| อินเทอร์เฟซภายนอก | USB 3.0 Micro B Type |
| วัสดุ | Metal, PC, Aluminium |
| สี | สีดำ |
| ผู้ผลิต | IODD co,.Ltd. |
| วันที่พร้อมใช้งานครั้งแรก | 9 กุมภาพันธ์ 2015 |

Figure 8: The iodd 2541 package contents, including the device, protective case, USB cable, screwdriver, and screen protector.
ข้อมูลการรับประกัน
Specific warranty details for the iodd 2541 are not provided in this manual. For information regarding product warranty, please refer to the warranty card included with your purchase or visit the official iodd webเว็บไซต์สำหรับข้อกำหนดและเงื่อนไขการรับประกันล่าสุด
การสนับสนุนและการติดต่อ
For further assistance, technical support, or to download the latest drivers and firmware, please visit the official iodd webเว็บไซต์:
You can also visit the iodd Store on Amazon for product information and related accessories: iodd Store.


