1. บทนำ
The LAUNCH X431 PRO3 (V+) V5.0 is an advanced all-in-one bidirectional diagnostic scan tool designed for comprehensive vehicle analysis. This device features a 10.1-inch touch screen and runs on Android 10.0, offering a stable and efficient platform for automotive technicians. It supports a wide range of diagnostic functions, including topology mapping, ECU coding, active tests, and over 55 special service functions, covering more than 200 vehicle brands.
This manual provides detailed instructions to help you effectively use your LAUNCH X431 PRO3 (V+) V5.0 scanner, ensuring accurate diagnostics and efficient vehicle maintenance.
2. อะไรอยู่ในกล่อง
The LAUNCH X431 PRO3 (V+) V5.0 Complete Kit includes the following components:
- LAUNCH X431 PRO3 (V+) V5.0 Display tablet
- ขั้วต่อวินิจฉัย DBSCAR VII
- ดับเบิ้ล clamp สายไฟ
- สายจุดบุหรี่
- British standard conversion head
- European gauge conversion head
- Power adapter, 5V/5A, wire length 1.2m, with American standard conversion head
- HD15F to OBDII 16 male integrated test connector
- HDB15F to HDB15F test main line (with DC)
- Universal PIN envelope
- คู่มือการใช้งาน
- คู่มือเริ่มต้นอย่างรวดเร็ว
- Cloud clinic car custom type A to type C USB data cable
- Clipper fuse 5*20mm (4pcs)
- Lighter fuse 630mm (2pcs)
- ซองใส่รหัสผ่าน
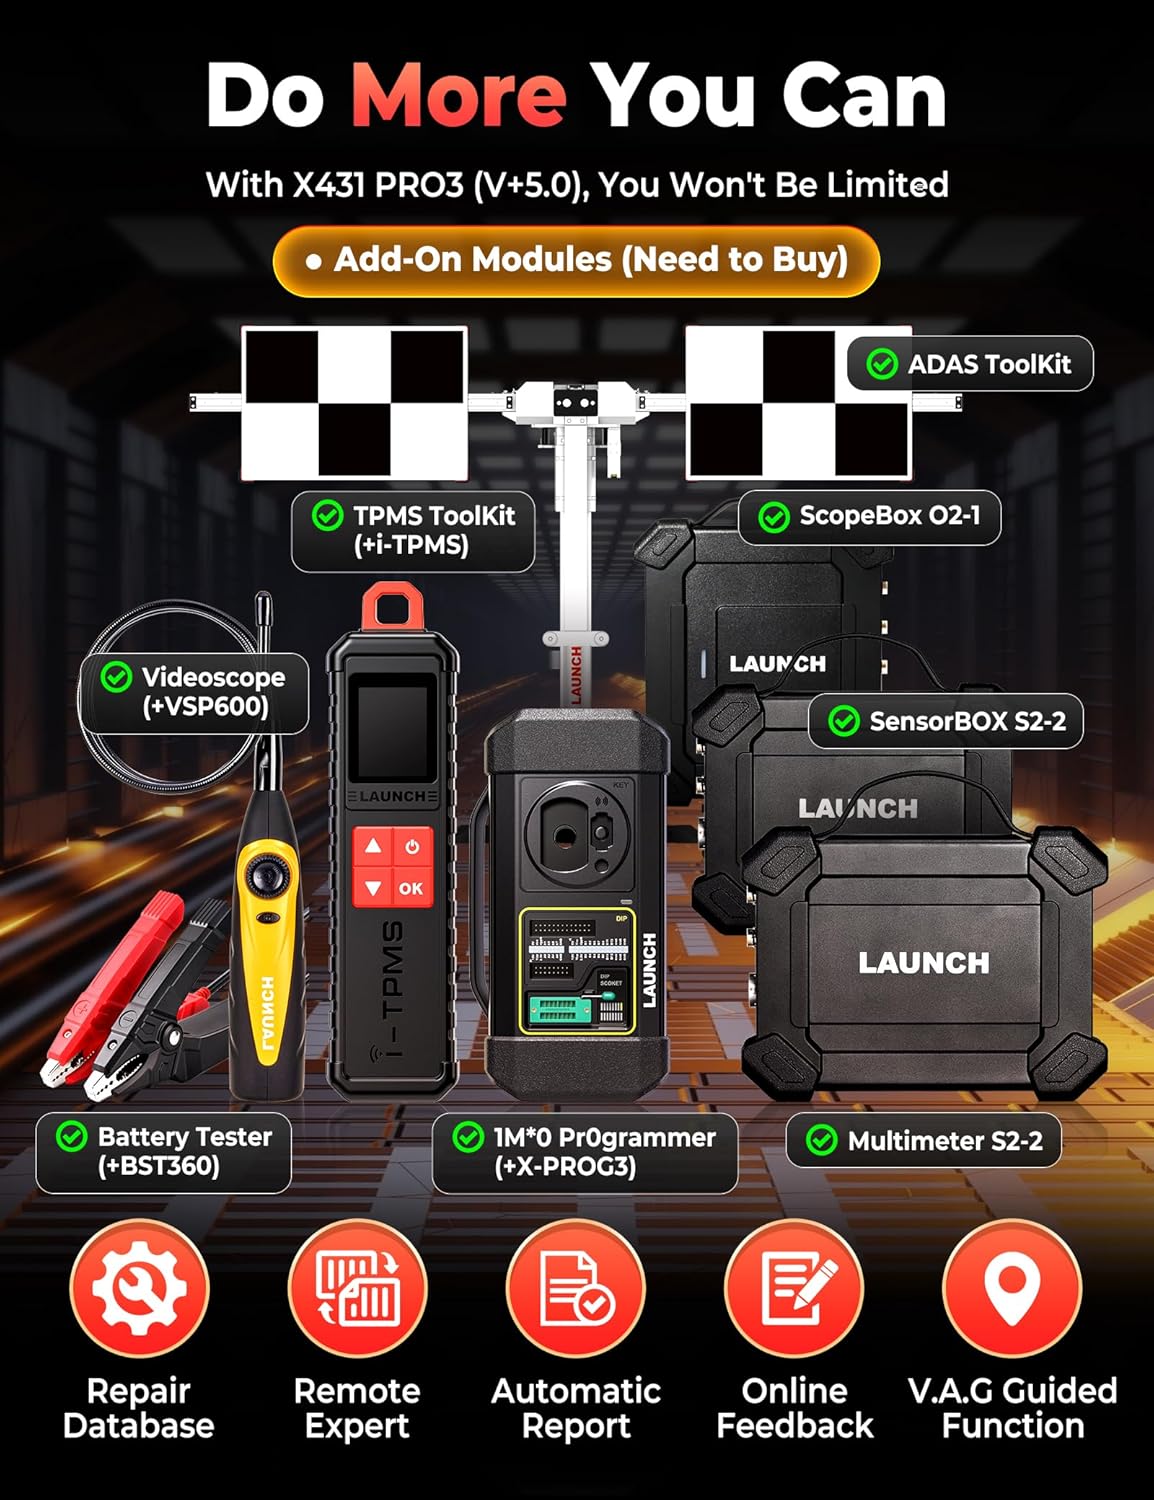
Image: All components included in the LAUNCH X431 PRO3 (V+) V5.0 Complete Kit, neatly organized in its carrying case.
3. การตั้งค่า
3.1 การเปิดเครื่องครั้งแรก
To power on the device, press and hold the power button located on the side of the tablet until the LAUNCH logo appears on the screen. The device runs on an Android operating system and will boot up to the home screen.
3.2 การเชื่อมต่อกับ Wi-Fi
For software updates and online functions, connect your device to a Wi-Fi network:
- จากหน้าจอหลัก ให้แตะไอคอน 'การตั้งค่า'
- Select 'WLAN' (Wireless Local Area Network) or 'Wi-Fi'.
- เปิดใช้งาน Wi-Fi และเลือกเครือข่ายที่คุณต้องการจากรายการ
- ป้อนรหัสผ่านหากได้รับแจ้งและแตะ 'เชื่อมต่อ'
3.3 การอัปเดตซอฟต์แวร์
Regular software updates ensure compatibility with the latest vehicle models and diagnostic protocols. After connecting to Wi-Fi:
- Tap the LAUNCH application icon on the home screen.
- Navigate to the 'Update' section within the application.
- Log in using your registered serial number and password.
- Select the available updates and initiate the download and installation process. This may require several runs to install all updates.
3.4 การเปิดใช้งาน VCI
To activate your VCI (Vehicle Communication Interface) device:
- Locate the paper with the 12-digit serial number and 8-digit activation code provided in your kit.
- Enter the serial number and activation code into the designated fields within the LAUNCH application.
- Tap 'Activate' to complete the VCI activation.
3.5 SD Card Installation (Memory Upgrade)
To expand the device's storage capacity, you can install a microSD card (up to 128GB supported). The device's internal storage is approximately 16GB, with a significant portion used by the Android OS.
- Power off the tablet completely.
- Carefully remove the rubber protective casing from the tablet. This casing is held in place by small keys and can be gently pried off, starting from a corner.
- Once the rubber casing is removed, locate the small screws on the back of the tablet. Use a Phillips head screwdriver to remove all screws.
- Gently separate the hard plastic back cover from the tablet.
- ค้นหาช่องเสียบการ์ด microSD ที่ด้านข้างของแท็บเล็ต
- Insert the microSD card into the slot until it clicks into place.
- Reassemble the tablet by reattaching the back cover and the rubber casing.
- Power on the tablet. You will receive a notification that a new SD card has been detected.
- Tap the notification and choose to 'Use as internal storage' if you want to store apps and photos directly on the card, or 'Use as portable storage' for moving files between devices. Note: Using as internal storage requires formatting the card, which prevents it from working with other devices without reformatting.
Video: Step-by-step guide on how to upgrade the internal memory of the LAUNCH X431 V+ by installing a microSD card.
4. คู่มือการใช้งาน
4.1 Intelligent Diagnostics Workflow
The LAUNCH X431 PRO3 (V+) V5.0 offers a streamlined 4-step diagnostic process:
- Access (AutoVIN Instant ID): Plug the scanner into the OBD port. The device automatically reads the VIN, identifying the vehicle model, year, installed ECUs, powertrain type, and bus protocol (CAN, CAN-FD, or DoIP).
- Locate (One-Touch Full System Scan + Topology Map): Tap 'Scan' to perform a parallel scan of all accessible ECUs (e.g., CEM, ECM, TCM, SRS, ABS, TPMS). A color-coded fault list appears, with critical items at the top. The 'Topology Map' provides a live network diagram showing ECU connections and communication paths, helping to trace faults to specific components.
- Analyze (Freeze Frame + Live Data + Active Tests):
- Freeze-Frame Snapshots: Captures engine speed, battery voltage, coolant temp, and other values at the moment a DTC is set.
- ข้อมูลแบบเรียลไทม์: Monitors over 500 parameters in real-time with graphs and user-defined alarms.
- Active Tests: Commands actuators (e.g., injectors, ABS pumps) to verify mechanical response.
- Report & Fix (Automatic Report + Clear DTCs): A diagnostic PDF report is automatically generated, summarizing DTCs, freeze-frame details, and recommended parts/labor tips. After repairs, clear codes with a single tap and re-scan to confirm parameters are within range and turn off warning lights.

Image: Visual representation of the 4-step intelligent diagnostics workflow, including AutoVIN, Topology Mapping, DTC reading, and repair/clear faults.
4.2 การแมปโทโพโลยี
Topology Mapping provides a visual representation of a vehicle's electronic control system, allowing you to understand how ECUs are connected and how data flows between them. This feature helps in rapid fault isolation:
- Pinpoint Problems: Visually traces faults to exact spots like damaged wires or sensor glitches when an ECU is not communicating properly.
- การแก้ไขปัญหาง่ายๆ: Offers a clear picture of the communication network, auto-checking over 30 systems in minutes.
- Color-coded Labels: Lines indicate active (green), faulty (red), or weak (dashed) connections, making issues easy to spot.

Image: The Topology Mapping screen showing a diagram tree of vehicle modules and their connections, with color-coded fault indicators.
4.3 การเขียนโค้ด ECU
ECU coding involves changing software parameters within a vehicle's Electronic Control Unit (ECU) to customize vehicle behavior without hardware changes. The LAUNCH X431 PRO3 (V+) V5.0 supports both online and offline coding:
- Make Adaptation: Enables single hardware modules to support multiple vehicle configurations (e.g., adjusting headlight logic).
- ฟังก์ชั่นที่ซ่อนอยู่ของแปรง: Uncovers preset functions hidden by the manufacturer (e.g., disabling seatbelt warnings, changing dashboard brightness).
- การปฏิบัติตามกฎข้อบังคับ: Levels up emission standards or enables region-specific features.
- ECU Fault Resolution: Resets error codes triggered by part replacements (e.g., SAS recalibration).
การเขียนโค้ด ECU แบบออนไลน์และออฟไลน์:
- การเขียนโค้ดออนไลน์: Cloud server saves data, sends automatic instructions, and requires simple 'Yes'/'No' selections.
- Offline Coding (Variant Coding): Allows manual coding steps for more customization and detailed process control.
ECU Coding Backup/Recovery: You can copy existing codes from a control module, save them as a file, and restore them if needed.
Programmable Module Installation (PMI): This routine allows you to copy the 'personality' of an old module onto a new one, automating the process of reading data, downloading calibration files, flashing, and running self-tests.

Image: The ECU Coding interface showing options for online and offline coding, along with examples of customizable features like automatic mirror closing and seatbelt warning deactivation.
4.4 Active Tests (Bi-directional Control)
Active Tests allow you to fully control vehicle systems and components by sending commands to check their input and output. This helps pinpoint faults quickly:
- การดำเนินการ: In the system diagnostics interface, choose 'Action Test', select the desired test, and follow prompts. The scanner sends commands to the ECU to operate actuators and displays results.
- พื้นที่ครอบคลุม: Covers most system-related actuators, including fans, lights, horn, doors, windows, brakes, throttle, A/C, clutches, mirrors, cameras, pumps, and valves.
- ประโยชน์: Reduces diagnostic time by 50% and lowers misdiagnosis rates by 10% by allowing direct component testing.
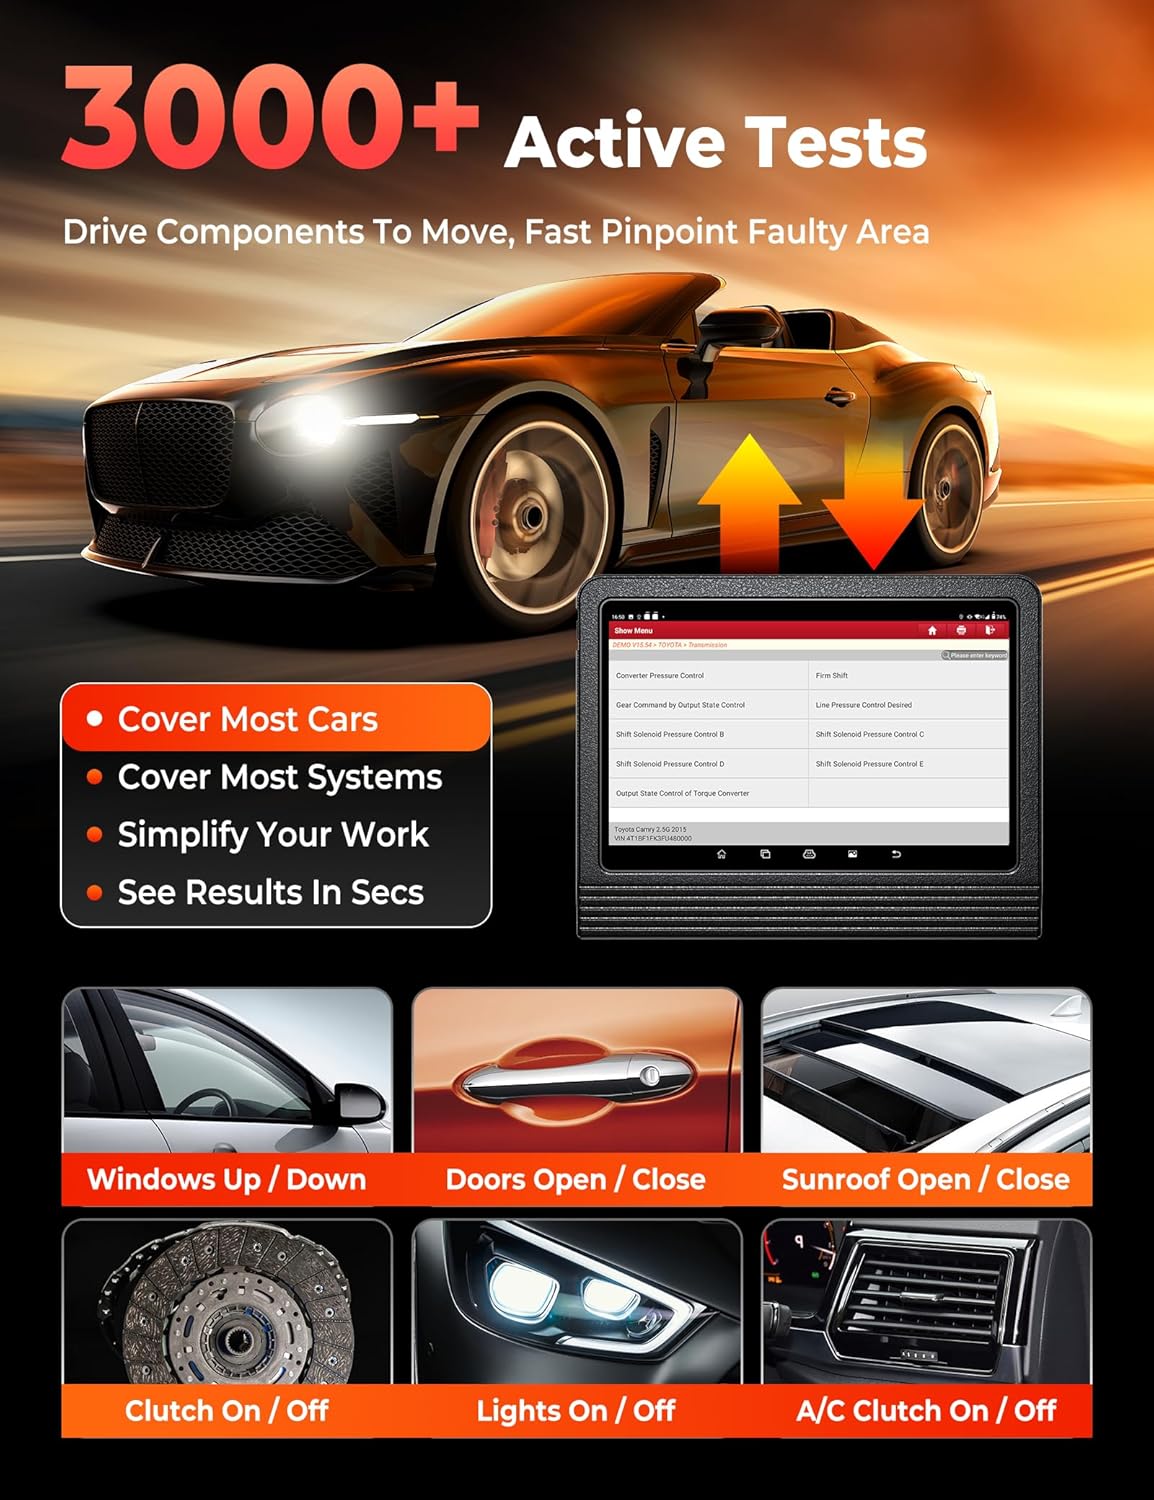
Image: The Active Tests interface demonstrating how commands are sent to the ECU to activate components like windows, doors, and lights, with visual feedback on activation status.
4.5 ฟังก์ชันพิเศษ (บริการรีเซ็ตมากกว่า 55 รายการ)
The scanner provides over 55 frequently used reset services, accessible through an independent 'Special Function Module'. This streamlines routine jobs and improves efficiency:
- Exampเลส: Oil Reset, BMS, ABS Bleed, TPMS (indirect), Airbag Reset, Injector Coding, SAS Calibration, Suspension Calibration, Throttle Adaptation, Sunroof Initialization, Seats Calibration, Language Change, Headlight Matching, A/F Setting, WIN DR Roof, CHG Tire Size, Cylinder, Turbocharging, Limit, Trans Adaptation, Neutral Gear Position Learning, Torque Sensor Adjustment, Signal Check, Yaw Rate Sensor (YRS) Learn, Clutch Pedal Position Learn, Cylinder Power Balance, Component Matching, Stop/Start Reset, Transport Mode, Auto-Door Lock.
- Accessing More Services: Beyond the initial 55+ hot services, you can access over 100 additional services by selecting your vehicle's diagnostic software, navigating through the system, and tapping on the module's service function menu.

Image: A display of various 'Hot Maintenance Service' icons, including Oil Reset, ABS Bleed, E-P-B, SAS, SRS, TPMS, Clutch, Coolant, Seats, and Headlamp, indicating over 100 additional functions.
4.6 V.A.G Guided Function
Tailored for Volkswagen, Audi, Skoda, and Seat vehicles, this feature automates critical diagnostics by providing plain-English tips and guiding you through procedures, eliminating the need for manual input of channel-IDs and login codes.
4.7 ผู้เชี่ยวชาญระยะไกล
The Remote Expert feature allows you to connect with professional technicians remotely for immediate guidance and assistance with complex vehicle issues, reducing guesswork and training needs.
4.8 Repair Data Online
Access a comprehensive online database of repair information, including operating skills, DTC help, automotive technology handbooks, repair cases, and maintenance tips, to enhance diagnostic efficiency. Visit repairdata.x431.com.
4.9 Extension Modules
The LAUNCH X431 PRO3 (V+) V5.0 can be paired with various X431 extension modules to expand its service capabilities:
- Battery Tester BST360: Tests 12V battery SOC/SOH/health status.
- i-TPMS Tool: Activates, relearns, and programs tire sensors.
- Endoscope VSP600: For in-depth inspection in engine, undercarriage, electrical, and interior areas.
- ScopeBox O2-1: Rapidly captures circuit signals.
- SensorBox S2-2: Mimics vehicle sensor malfunctions.
- Multimeter S2-2: มาตรการฉบับที่tage กระแสและความต้านทาน
- ADAS Pro/Mobile: Adjusts driver assistance systems.
4.10 FCA SGW Diagnostic Access
To diagnose FCA SGW (Security Gateway) vehicles, you must register for 'AutoAuth' service or make an in-app purchase. This provides access to diagnostic functions for compatible 2018+ Chrysler, Dodge, Jeep, Alfa Romeo, and Fiat models. Ensure you have a valid software subscription and the latest Chrysler Software installed, and your scan tool is connected to the internet.
Video: Instructions on how to register an AutoAuth account for diagnosing FCA vehicles with the LAUNCH X431 PRO3 (V+) V5.0.
4.11 CAN-FD & DoIP Compliance
This LAUNCH scanner supports CAN-FD and DoIP protocols for diagnosing modern vehicles. Compatible GM models include Blazer (2024), CT4 (2023-2024), CT5 (2023-2025), CT6 (2023-2024), Canyon (2024), and others. Compatible Jeep models include Grand Cherokee (WL) (2021-2024) and Grand Wagoneer (WS) (2022-2024).
5. การบำรุงรักษา
- การอัปเดตซอฟต์แวร์: Regularly update the software to ensure optimal performance and compatibility with new vehicle models.
- การทำความสะอาดอุปกรณ์: Keep the tablet and VCI connector clean and free from dust and debris. Use a soft, dry cloth for cleaning.
- การดูแลแบตเตอรี่ Charge the device regularly to maintain battery health. Avoid extreme temperatures.
- พื้นที่จัดเก็บ: ควรเก็บอุปกรณ์ไว้ในกล่องป้องกันเมื่อไม่ใช้งานเพื่อป้องกันความเสียหาย
6 การแก้ไขปัญหา
- ข้อผิดพลาดในการสื่อสาร: Ensure the VCI connector is securely plugged into the vehicle's OBD port and the tablet. Verify the vehicle's ignition is on.
- ปัญหาด้านซอฟต์แวร์: If experiencing crashes or glitches, ensure the Android OS is up-to-date and all diagnostic software is updated.
- ประสิทธิภาพการทำงานช้า: Check available internal storage and consider installing an SD card or clearing unnecessary files.
- แบตเตอรี่หมดเร็ว: Reduce screen brightness, close unused applications, and ensure the device is fully charged before use.
- ไม่มีไฟฟ้า: Check the charging cable and adapter. Ensure the device's battery is not completely depleted.
7. ข้อมูลจำเพาะ
- ยี่ห้อ: ปล่อย
- แบบอย่าง: LAUNCH X431 V+
- ระบบปฏิบัติการ: แอนดรอยด์ 10.0
- โปรเซสเซอร์: 4 คอร์
- RAM / ROM: แรม 4GB / รอม 64GB
- ขนาดหน้าจอ: 10.1 นิ้ว
- ความละเอียดหน้าจอ: จอ LCD 1280*800
- แบตเตอรี่: ลิเธียมโพลิเมอร์ 6300mAh (รวมอยู่ด้วย)
- กล้อง: กล้องหลัง 8MP
- การเชื่อมต่อ: Dual-Band Wi-Fi (2.4/5GHz), Bluetooth Wireless
- ขนาดสินค้า : ยาว 16.9 นิ้ว x กว้าง 6.3 นิ้ว x สูง 14.5 นิ้ว
- น้ำหนักสินค้า: 17.82 ปอนด์
- ภาษาที่รองรับ: English, French, German, Italian, Spanish (and 20+ others)
8. การรับประกันและการสนับสนุน
The LAUNCH X431 PRO3 (V+) V5.0 comes with 2 years of free updates to ensure compatibility with the latest car models and diagnostic protocols. Lifetime technical support is also provided.
For any questions or assistance with your LAUNCH X431 PRO3 (V+) V5.0, please contact the expert tech crew:
- โทรศัพท์: 1-888-756-2936 (Mon-Fri 9:00 AM–6:00 PM EST)
- อีเมล: launch-aftersales@outlook.com
If you are not satisfied with the scan tool and wish to return it, please ensure it is marked as [unsellable] to prevent it from being sent to other customers as a used item.


