1. บทนำ
This manual provides detailed instructions for the installation, configuration, and operation of your ASRock H81 PRO BTC Motherboard. Designed for reliable performance, this ATX motherboard supports Intel LGA 1150 processors and DDR3 memory, featuring multiple PCI Express slots suitable for various computing applications, including multi-GPU setups. Please read this manual thoroughly before beginning the installation process to ensure proper setup and to maximize the stability and longevity of your system.
2. เนื้อหาบรรจุภัณฑ์
ตรวจสอบว่ามีอุปกรณ์ทั้งหมดที่ระบุไว้ด้านล่างนี้อยู่ในบรรจุภัณฑ์เมนบอร์ดของคุณ หากมีอุปกรณ์ใดสูญหายหรือเสียหาย โปรดติดต่อตัวแทนจำหน่ายของคุณ
- ASRock H81 PRO BTC Motherboard
- คู่มือการติดตั้งแบบด่วน
- Support CD (Drivers and Utilities)
- I / O Shield
- สายเคเบิลข้อมูล SATA 2 เส้น
3. การตั้งค่าระบบ
3.1. การติดตั้งซีพียู
The ASRock H81 PRO BTC motherboard uses an LGA 1150 socket. Handle the CPU and socket with extreme care to avoid damaging the pins.
- Locate the CPU socket on the motherboard. Lift the load lever and open the metal load plate.
- Carefully align the CPU with the socket, ensuring the gold triangle on the CPU matches the triangle on the socket. Gently place the CPU into the socket without forcing it.
- Close the load plate and press down the load lever until it locks into place.
- ทาซิลิโคนระบายความร้อนลงบนซีพียู และติดตั้งพัดลมระบายความร้อนซีพียูตามคำแนะนำของผู้ผลิต
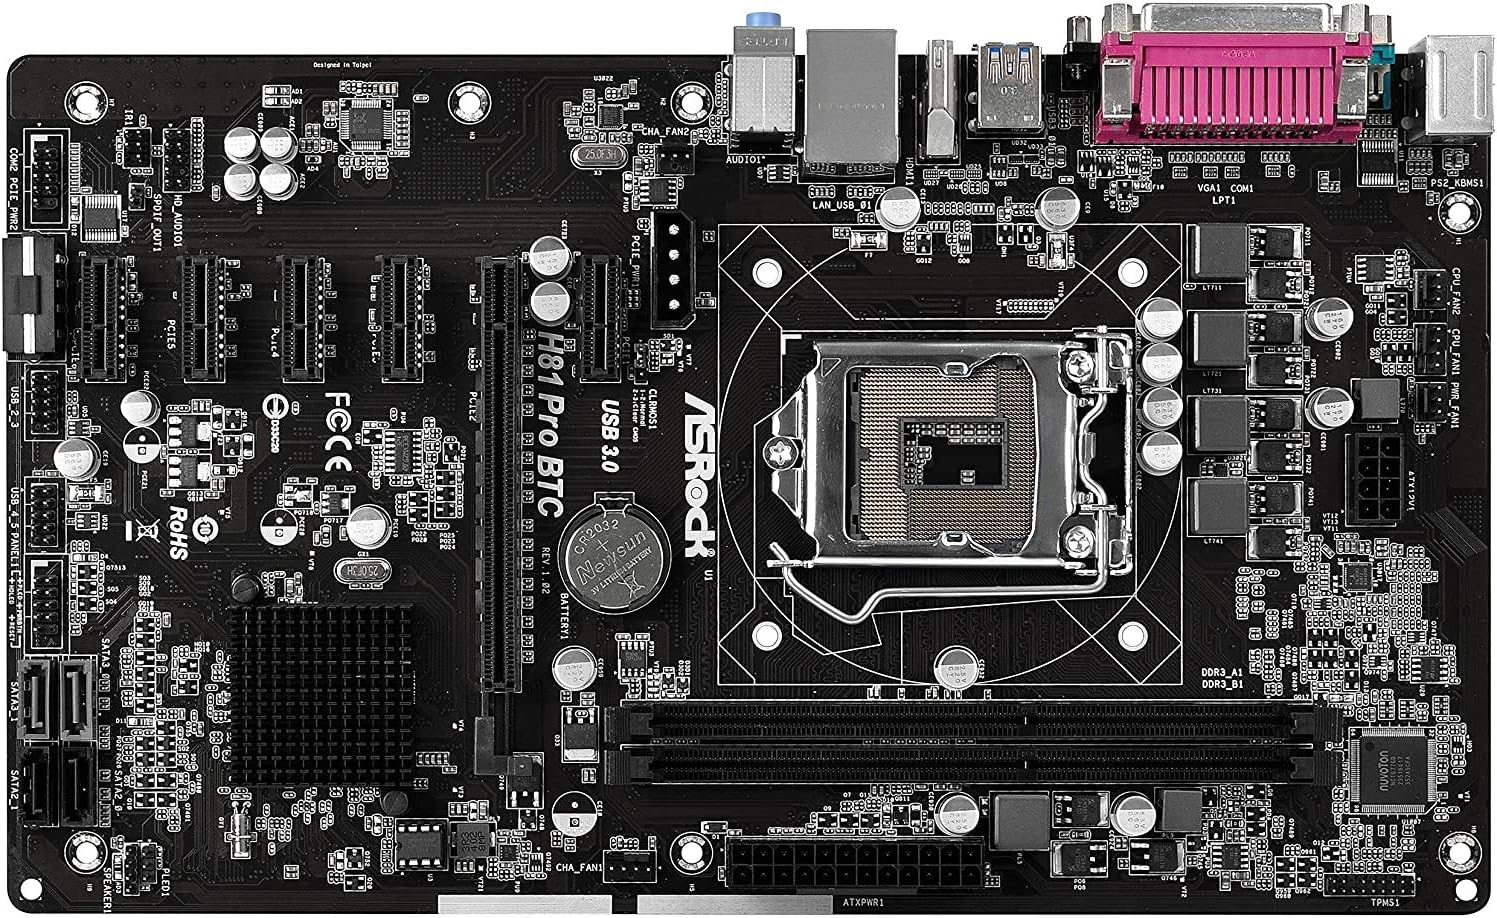
รูปที่ 1: จากบนลงล่าง view of the ASRock H81 PRO BTC Motherboard. This image displays the LGA 1150 CPU socket at the center, flanked by two DDR3 DIMM slots on the right and multiple PCI Express slots below.
3.2. การติดตั้งหน่วยความจำ
This motherboard supports DDR3 DIMM modules. Ensure the memory modules are compatible with the motherboard's specifications (DDR3-1600/1333/1066).
- เปิดคลิปที่ปลายทั้งสองด้านของช่อง DIMM
- จัดตำแหน่งรอยบากบนโมดูลหน่วยความจำ DDR3 ให้ตรงกับคีย์ในช่อง DIMM
- ใส่โมดูลหน่วยความจำเข้าไปในช่องให้แน่นจนกระทั่งตัวล็อกเข้าที่ ตรวจสอบให้แน่ใจว่าตัวล็อกทั้งสองปิดสนิทแล้ว
3.3. การติดตั้งเมนบอร์ดลงในเคส
Install the motherboard into a compatible ATX chassis.
- Install the I/O shield into the rear opening of your chassis.
- Align the motherboard with the standoffs in the chassis.
- ยึดเมนบอร์ดด้วยสกรู ตรวจสอบให้แน่ใจว่าติดตั้งแน่นสนิทแล้ว
3.4. การเชื่อมต่ออุปกรณ์ต่อพ่วงและพลังงาน
Connect all necessary components and power cables to the motherboard.
- ขั้วต่อสายไฟ: Connect the 24-pin ATX power connector and the 8-pin EPS power connector from your power supply to the motherboard. For multi-GPU configurations, connect the two additional Molex power connectors for PCIe stability.
- อุปกรณ์ SATA: Connect your storage drives (HDDs/SSDs) to the SATA3 (6Gb/s) or SATA2 (3Gb/s) ports.
- ขั้วต่อแผงด้านหน้า: Connect the chassis's front panel cables (power button, reset button, USB ports, audio jacks, LED indicators) to the corresponding headers on the motherboard. Refer to the motherboard diagram for exact locations.
- อุปกรณ์ยูเอสบี: Connect USB 2.0 and USB 3.0 devices to the rear I/O ports or internal headers.
- PCI Express Cards: Install graphics cards or other expansion cards into the PCI Express 2.0 x16 slot or the five PCI Express 2.0 x1 slots.
- การแสดงผลเอาท์พุต: Connect your monitor to the VGA or HDMI port on the rear I/O panel if using integrated graphics, or to your dedicated graphics card.

รูปที่ 2: มุม view of the ASRock H81 PRO BTC Motherboard. This image highlights the various internal connectors such as SATA ports, USB headers, and the arrangement of PCI Express slots.

Figure 3: Side-angled view of the ASRock H81 PRO BTC Motherboard. This perspective shows the main 24-pin ATX power connector, the 8-pin EPS power connector, and the two Molex power connectors designed to provide stable power to multiple PCI Express devices.

Figure 4: Close-up of the ASRock H81 PRO BTC Motherboard's rear I/O panel. This detailed view displays the PS/2 keyboard and mouse ports, a serial port, VGA and HDMI display outputs, two USB 3.0 ports, four USB 2.0 ports, an RJ45 LAN port, and audio input/output jacks.
4. คู่มือการใช้งาน
4.1. การบูตครั้งแรกและการตั้งค่า BIOS/UEFI
หลังจากประกอบระบบเสร็จแล้ว ให้เปิดเครื่อง กดปุ่ม เดล or F2 key during startup to enter the BIOS/UEFI setup utility. Here you can configure system settings such as boot order, date/time, and advanced hardware parameters.
- ลำดับการบูต: ตั้งค่าอุปกรณ์บูตที่คุณต้องการ (เช่น ไดรฟ์ USB สำหรับการติดตั้งระบบปฏิบัติการ SSD/HDD)
- ข้อมูลระบบ: ตรวจสอบการตรวจจับ CPU, หน่วยความจำ และอุปกรณ์จัดเก็บข้อมูล
- การตั้งค่าขั้นสูง: Adjust settings for integrated peripherals, power management, and CPU features as needed.
- บันทึกและออก: Save your changes and exit the BIOS/UEFI to proceed with operating system installation.
4.2. การติดตั้งไดร์เวอร์
After installing your operating system, install the necessary drivers from the provided support CD or download the latest versions from the ASRock official website. This includes chipset drivers, LAN drivers, audio drivers, and any other specific device drivers.
5. ข้อมูลจำเพาะ
| ชิปเซ็ต | อินเทล H81 |
| ซ็อคเก็ตซีพียู | แอลจีเอ 1150 |
| โปรเซสเซอร์ที่เข้ากันได้ | Intel Core i3/i5/i7 (4th and 5th Gen) |
| หน่วยความจำ | 2x DDR3 DIMM Slots, Dual Channel, Non-ECC, Buffered, Max 16GB, DDR3-1600/1333/1066 MHz |
| ช่องเสียบขยาย | 1x PCI-Express 2.0 x16, 5x PCI-Express 2.0 x1 |
| พื้นที่จัดเก็บ | 2x SATA3 (6Gb/s) Ports, 2x SATA2 (3Gb/s) Ports |
| แลน | Realtek RTL8111GR Gigabit Ethernet Controller |
| พอร์ต USB | 2x USB 3.0 (rear), 6x USB 2.0 (2 rear, 4 via headers) |
| พอร์ต I/O ด้านหลัง | 1x PS/2 Keyboard, 1x PS/2 Mouse, 1x VGA, 1x HDMI, 1x Serial Port, 1x RJ45 LAN, Audio I/O Jacks |
| ขั้วต่อภายใน | 1x Parallel Port Header, 1x Serial Port Header, 2x SLI/Xfire Molex Power Connectors |
| ฟอร์มแฟกเตอร์ | เอทีเอ็กซ์ |
| ขนาด | 13.2 x 3 x 10 นิ้ว (โดยประมาณ) |
| การรองรับระบบปฏิบัติการ | Microsoft Windows 10/8.1/8/7 (32-bit/64-bit) |
6 การแก้ไขปัญหา
หากคุณพบปัญหา โปรดดูขั้นตอนการแก้ไขปัญหาทั่วไปต่อไปนี้:
- ไม่มีไฟฟ้า: Ensure all power cables (24-pin ATX, 8-pin EPS, Molex for PCIe) are securely connected. Check the power supply unit (PSU) and wall outlet.
- ไม่มีจอแสดงผล: Verify that the monitor is connected to the correct display output (integrated graphics or dedicated GPU). Reseat the graphics card and memory modules.
- System Fails to POST (Power-On Self-Test): Listen for beep codes (if a speaker is connected) which can indicate specific hardware issues. Reseat CPU, memory, and expansion cards. Clear CMOS by removing the CMOS battery for a few minutes or using the clear CMOS jumper.
- ระบบปฏิบัติการไม่บูต: Check boot order in BIOS/UEFI. Ensure the storage drive with the OS is properly connected and detected.
- ไม่ตรวจพบอุปกรณ์ต่อพ่วง: Ensure the device is properly connected to the correct port/slot. Install or update relevant drivers.
For more advanced troubleshooting, consult the ASRock official webไซต์หรือติดต่อฝ่ายสนับสนุนด้านเทคนิคของพวกเขา
7. การบำรุงรักษา
การบำรุงรักษาตามปกติจะช่วยให้เมนบอร์ดของคุณมีอายุการใช้งานยาวนานและมีประสิทธิภาพเหมาะสมที่สุด
- การกำจัดฝุ่น: ทำความสะอาดฝุ่นออกจากเมนบอร์ดและส่วนประกอบต่างๆ เป็นระยะโดยใช้ลมอัด ตรวจสอบให้แน่ใจว่าได้ปิดเครื่องและถอดปลั๊กออกก่อนทำความสะอาด
- อัปเดต BIOS/UEFI: ตรวจสอบ ASRock website for BIOS/UEFI updates. Updates can improve compatibility, stability, and performance. Follow update instructions carefully.
- การอัปเดตไดรเวอร์: Keep your system drivers updated to ensure compatibility and optimal performance with your operating system and peripherals.
8. การรับประกันและการสนับสนุน
This ASRock H81 PRO BTC Motherboard is covered by the manufacturer's warranty. For specific warranty terms and conditions, please refer to the warranty card included in your package or visit the official ASRock webเว็บไซต์.
For technical assistance, driver downloads, or further support, please visit the ASRock official support page:


