1. บทนำ
This manual provides detailed instructions for the installation, operation, and maintenance of your Advance Darkside 8303B30 Micro ATX PC Case. Please read this manual thoroughly before beginning installation to ensure proper setup and to maximize the performance and longevity of your system components.
The Advance Darkside ATX Mid-Tower PC case features a top panel with a 2.5/3.5 inch SATA HDD docking station, 2 USB 3.0 ports, and 1 USB 2.0 port. It is designed to accommodate Micro ATX motherboards and offers efficient cooling solutions.
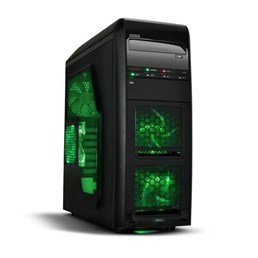
รูปที่ 1 : ด้านหน้า view of the Advance Darkside 8303B30 PC Case, showcasing its design and front panel features.
2. คุณสมบัติของผลิตภัณฑ์
- แบบอย่าง: Advance Darkside 8303B30
- วัสดุตัวถัง: SGCC Steel
- สี: Black (interior and exterior)
- ความเข้ากันได้ของเมนบอร์ด: ไมโคร ATX
- การเชื่อมต่อแผงด้านหน้า: 2 x USB 3.0, 1 x USB 2.0, Audio Jacks
- คุณสมบัติการจัดเก็บ: Top panel 2.5/3.5 inch SATA HDD docking station
- ระบบระบายความร้อน : Five 120mm fans included (two LED fans at the front, one LED fan on the side, one fan at the rear, and one fan at the top). Water cooling ready.
- การรองรับการ์ดกราฟิก: Designed for King Size graphics cards
- แผงด้านข้าง: Plexiglass window
3. คำแนะนำในการตั้งค่า
3.1. การเตรียมคดี
- Unpack the PC case carefully and remove all packaging materials.
- วางเคสไว้บนพื้นผิวที่มั่นคงและเรียบ
- ถอดแผงด้านข้างออกโดยคลายสกรูหัวแม่มือที่ด้านหลังของเคส แล้วเลื่อนแผงไปด้านหลัง
3.2. การติดตั้งพาวเวอร์ซัพพลาย
- Locate the power supply mounting area at the rear bottom of the case.
- Secure the power supply unit (PSU) using the provided screws. Ensure the PSU fan faces the bottom or top, depending on your PSU and case design for optimal airflow.
3.3. การติดตั้งเมนบอร์ด
- ติดตั้งแผ่นปิดพอร์ต I/O ลงในช่องที่ด้านหลังของเคส
- Align the motherboard with the standoffs inside the case. Ensure all standoffs match the motherboard's screw holes.
- ยึดเมนบอร์ดด้วยสกรูที่เหมาะสม
3.4. การติดตั้งไดรฟ์จัดเก็บข้อมูล
- For 3.5-inch HDDs, slide the drive into the drive bay trays. The trays are designed to flex slightly to accommodate the drive without screws in some configurations.
- For 2.5-inch SSDs/HDDs, secure them to the designated mounting points or use adapters if necessary.
- Utilize the top panel SATA docking station for quick access to 2.5/3.5 inch SATA drives. Simply insert the drive into the slot until it clicks into place.
3.5. การติดตั้งการ์ดจอและการ์ดขยาย
- ถอดฝาปิดช่องเสียบอุปกรณ์เสริมที่ด้านหลังเคสออกให้หมด
- Insert the graphics card or other expansion cards into the appropriate PCIe slots on the motherboard.
- Secure the cards with screws or retention clips.
3.6. การจัดการสายเคเบิล
Route all cables (power, SATA, front panel connectors) through the designated cutouts and tie-down points behind the motherboard tray to ensure clean airflow and an organized interior.
4. คู่มือการใช้งาน
4.1. การเปิดเครื่องของคุณ
- Ensure all components are correctly installed and cables are securely connected.
- เชื่อมต่อสายไฟเข้ากับแหล่งจ่ายไฟ (PSU) และเต้ารับที่ผนัง
- กดปุ่มเปิด/ปิดที่อยู่ด้านหน้าตัวเครื่อง
4.2. Using Front Panel Ports
- พอร์ต USB 3.0/2.0: Connect USB devices such as keyboards, mice, external drives, or flash drives.
- แจ็คเสียง: Connect headphones, microphones, or speakers.
- HDD Docking Station: Insert a 2.5-inch or 3.5-inch SATA HDD/SSD into the top docking slot for quick data access. Ensure the drive is properly seated.
5. การบำรุงรักษา
5.1. Cleaning the Case
- ควรทำความสะอาดภายนอกเคสเป็นประจำด้วยผ้าเนื้อนุ่มและแห้งamp ผ้า. หลีกเลี่ยงน้ำยาทำความสะอาดที่มีฤทธิ์กัดกร่อน
- ใช้ลมเป่าอัดเพื่อกำจัดฝุ่นออกจากแผ่นกรองพัดลมและชิ้นส่วนภายใน
5.2. การบำรุงรักษาพัดลม
- Periodically check the case fans for dust buildup. Clean them gently with compressed air or a soft brush.
- ตรวจสอบให้แน่ใจว่าไม่มีสายไฟกีดขวางใบพัดลม
6 การแก้ไขปัญหา
6.1. ระบบไม่เปิดเครื่อง
- ตรวจสอบว่าสายไฟเชื่อมต่อกับแหล่งจ่ายไฟและเต้ารับที่ผนังอย่างแน่นหนาแล้วหรือไม่
- ตรวจสอบให้แน่ใจว่าสวิตช์ของแหล่งจ่ายไฟ (PSU) อยู่ในตำแหน่ง 'เปิด'
- ตรวจสอบให้แน่ใจว่าสายเคเบิลปุ่มเปิดปิดด้านหน้าเชื่อมต่อกับเมนบอร์ดอย่างถูกต้องแล้ว
6.2. ปัญหาความร้อนสูงเกินไป
- Ensure all case fans are spinning correctly and are not obstructed.
- Check for excessive dust buildup on fans and heatsinks.
- Verify proper cable management to allow for unobstructed airflow.
6.3. พอร์ต USB/เสียงด้านหน้าใช้งานไม่ได้
- Confirm that the front panel USB and audio cables are correctly connected to the corresponding headers on the motherboard.
- Check motherboard drivers for USB and audio.
7. ข้อมูลจำเพาะ
| คุณสมบัติ | รายละเอียด |
|---|---|
| ยี่ห้อ | ก้าวหน้า |
| หมายเลขรุ่น | 8303B30 |
| สี | สีดำ |
| วัสดุตัวถัง | Alloy Steel (SGCC Steel) |
| ความเข้ากันได้ของเมนบอร์ด | ไมโคร ATX |
| ขนาด (กว้าง x ยาว x สูง) | 48 x 19.5 x 48.2 ซม. |
| น้ำหนักผลิตภัณฑ์ | 5.8 กก. |
| พอร์ตแผงด้านหน้า | 2 x USB 3.0, 1 x USB 2.0, Audio Jacks |
| ที่เก็บของ | Top panel 2.5/3.5 inch SATA HDD docking station |
| พัดลมรวม | 5 x 120mm (2 front LED, 1 side LED, 1 rear, 1 top) |
| รองรับการระบายความร้อน | Water cooling ready |
| แผงด้านข้าง | กระจกอะครีลิก |
| ข้อแนะนำการใช้ | การเล่นเกม |
8. การรับประกันและการสนับสนุน
8.1. การรับประกันของผู้ผลิต
This product comes with a manufacturer's warranty of 1 year from the date of purchase. Please retain your proof of purchase for warranty claims. The warranty covers defects in materials and workmanship under normal use.
8.2. การสนับสนุนลูกค้า
For technical assistance, troubleshooting, or warranty inquiries, please contact Advance customer support. Refer to the official Advance webไซต์สำหรับข้อมูลติดต่อและทรัพยากรสนับสนุนล่าสุด


