1. บทนำ
This manual provides detailed instructions for the installation, operation, and maintenance of the VEMER VN170700 KEO-B Flush-Mounting Thermostat. This battery-operated thermostat is designed for precise temperature control in both heating and air conditioning systems. Its user-friendly design features a rotary knob for temperature adjustment and a selector switch for mode selection.
2. สินค้าหมดview
The VEMER KEO-B thermostat is a flush-mounted device featuring a simple interface for temperature management.
คุณสมบัติหลัก:
- Flush-mounted design, suitable for standard electrical boxes.
- Battery-powered (2 x 1.5V AAA batteries).
- Rotary knob for intuitive temperature setting.
- Selector switch for choosing between heating (winter) or air conditioning (summer) modes.
- Integrated system for limiting the set temperature range, useful for public installations.
- Digital input for external device connection, allowing a 3°C reduction in the set temperature.
- Supplied with a frame for adaptation to various switch boxes or panels.

รูปที่ 1: ด้านหน้า view of the VEMER KEO-B thermostat, showing the rotary knob and mode selector.
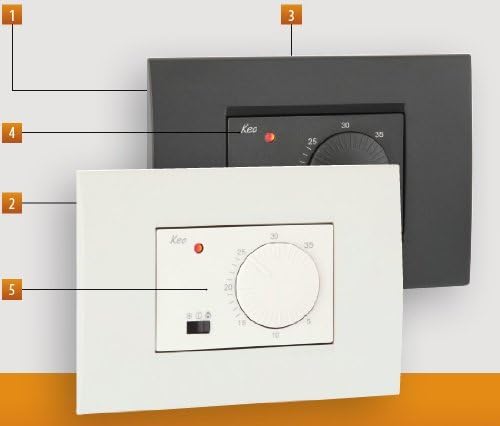
รูปที่ 2: VEMER KEO-B thermostat in both white and anthracite grey color options, demonstrating the interchangeable frames.
3. การติดตั้ง
3.1 ข้อควรระวังเพื่อความปลอดภัย
- Ensure the main power supply to the heating/cooling system is turned off before beginning installation.
- ควรให้ช่างไฟฟ้าหรือช่างเทคนิคที่มีคุณสมบัติเหมาะสมเป็นผู้ติดตั้ง
- ปฏิบัติตามข้อกำหนดและระเบียบข้อบังคับด้านไฟฟ้าในท้องถิ่นทั้งหมด
3.2 การติดตั้งเทอร์โมสตัท
- The KEO-B thermostat is designed for flush-mounting in a standard 3-module electrical box.
- Carefully remove the front cover and rotary knob from the thermostat unit.
- Connect the wiring as per the diagram provided in section 3.3.
- Secure the thermostat base into the electrical box using the provided screws.
- Attach the desired color frame (white or anthracite grey) to the thermostat base.
- Reattach the front cover and rotary knob.

รูปที่ 3: ระเบิด view of the VEMER KEO-B thermostat, showing the main unit, front cover, and rotary knob for assembly.
3.3 แผนผังการเดินสายไฟ
Refer to the diagram below for correct wiring connections. The thermostat operates on a battery supply and controls the heating/cooling system via a relay contact.
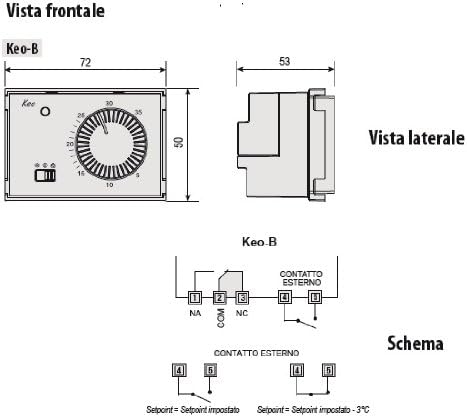
รูปที่ 4: Wiring diagram for the KEO-B thermostat, indicating connections for the external contact and relay terminals (NA, NC, COM). Dimensions are also shown.
ขั้วต่อสายไฟ:
- 1 (NA): ปกติเปิดติดต่อ
- 2 (COM): ติดต่อทั่วไป
- 3 (NC): ปกติปิดการติดต่อ
- 4, 5 (CONTATTO ESTERNO): อินพุตผู้ติดต่อภายนอก
The external contact input (terminals 4 and 5) can be used to reduce the set temperature by 3°C when activated.
3.4 การติดตั้งแบตเตอรี่
The thermostat requires two 1.5V AAA batteries.
- Remove the front cover of the thermostat.
- ค้นหาช่องใส่แบตเตอรี่
- ใส่แบตเตอรี่ AAA สองก้อน โดยตรวจสอบให้แน่ใจว่าขั้วถูกต้อง (+/-)
- เปลี่ยนฝาครอบด้านหน้า
4. คู่มือการใช้งาน
4.1 การตั้งอุณหภูมิ
The desired temperature is set using the large rotary knob on the front of the thermostat. Rotate the knob clockwise to increase the temperature and counter-clockwise to decrease it. The current setpoint is indicated by the position of the knob.
4.2 การเลือกโหมดการทำงาน
A selector switch, typically located below the rotary knob, allows you to choose the operating mode:
- Heating Mode (Winter): Activates the heating system when the ambient temperature falls below the setpoint.
- Air Conditioning Mode (Summer): Activates the cooling system when the ambient temperature rises above the setpoint.
- โหมดปิด: Disables both heating and cooling.
4.3 Limited Set Value System
The thermostat includes a patented system to limit the adjustable temperature range. This feature is particularly useful in public or commercial settings to prevent unauthorized persons from setting extreme temperatures. Consult the installation section or a qualified technician for details on how to configure this limit.
4.4 Digital Input Function
The digital input (terminals 4 and 5) allows connection of an external device (e.g., a timer or remote switch). When this input is activated, the thermostat will automatically reduce the set temperature by 3°C. This can be used for energy saving during specific periods or for remote control.
5. การบำรุงรักษา
5.1 การเปลี่ยนแบตเตอรี่
The thermostat is powered by two 1.5V AAA batteries. When the batteries are low, an indicator (if present) may illuminate or the thermostat's operation may become erratic.
- ถอดฝาครอบด้านหน้าของเทอร์โมสตัทออกอย่างระมัดระวัง
- ค้นหาช่องใส่แบตเตอรี่
- Insert new 1.5V AAA batteries, ensuring correct polarity.
- เปลี่ยนฝาครอบด้านหน้า
ทิ้งแบตเตอรี่ที่ใช้แล้วตามระเบียบข้อบังคับของท้องถิ่น
5.2 การทำความสะอาด
Clean the thermostat's exterior with a soft, dry cloth. Do not use abrasive cleaners, solvents, or excessive moisture, as these can damage the device.
6 การแก้ไขปัญหา
If you encounter issues with your VEMER KEO-B thermostat, refer to the following common problems and solutions:
| ปัญหา | สาเหตุที่เป็นไปได้ | สารละลาย |
|---|---|---|
| Thermostat not responding / No display. | แบตเตอรี่เสียหรือติดตั้งไม่ถูกต้อง | Replace batteries with new 1.5V AAA batteries, ensuring correct polarity. |
| Heating/Cooling system not turning on/off. | Incorrect mode selected (Heating/Cooling/Off). ปัญหาสายไฟ. Temperature setpoint not reached. | Verify the selector switch is in the correct mode. Check wiring connections (refer to Section 3.3). Adjust the set temperature to be above/below the current ambient temperature as required. |
| ไฟ LED ไม่ทำงาน | Possible internal fault or specific LED function. | While the thermostat may still function, if the LED is critical, contact VEMER support. Ensure batteries are fresh. |
| ระบบควบคุมอุณหภูมิไม่แม่นยำ | Thermostat location. Drafts or direct sunlight affecting the sensor. | ตรวจสอบให้แน่ใจว่าเทอร์โมสตัทไม่ได้สัมผัสกับแสงแดดโดยตรง ลมโกรก หรือแหล่งความร้อน ซึ่งอาจส่งผลต่อการอ่านอุณหภูมิได้ |
If the problem persists after attempting these solutions, please contact VEMER customer support.
7. ข้อมูลจำเพาะ
| คุณสมบัติ | รายละเอียด |
|---|---|
| ยี่ห้อ | เวเมอร์ |
| ชื่อรุ่น | VN170700 (KEO-B) |
| ประเภทตัวควบคุม | ลูกบิด |
| สี | White / Grey (Anthracite) |
| คุณสมบัติพิเศษ | Limited Set Value System, Sensor Integration for Temperature Adjustment |
| การใช้งานเฉพาะ | ระบบทำความร้อน, เครื่องปรับอากาศ |
| ประเภทการควบคุมอุณหภูมิ | คู่มือ |
| แหล่งพลังงาน | Battery Powered (2 x 1.5V AAA batteries required) |
| เล่มที่tage | 1.5 โวลต์ (ต่อแบตเตอรี่หนึ่งก้อน) |
| ประเภทจอภาพ | LED or LCD (implied by product image, no explicit LCD) |
| วิธีการควบคุม | Knob, Switch |
| ประเภทการติดตั้ง | Flush Mount (3-module housing) |
| น้ำหนักสินค้า | 0.11 กิโลกรัม (ประมาณ 3.87 ออนซ์) |
| ขนาดสินค้า | 2.76 x 1.97 x 1.97 นิ้ว (ประมาณ 70 x 50 x 50 มม.) |
| ผู้ผลิต | Vemer SpA |
| ทำใน | อิตาลี |
8. การรับประกันและการสนับสนุน
8.1 การสนับสนุนลูกค้า
For technical assistance, troubleshooting beyond this manual, or warranty inquiries, please contact VEMER customer support. Refer to the official VEMER webไซต์หรือบรรจุภัณฑ์ผลิตภัณฑ์เพื่อให้มีข้อมูลติดต่อล่าสุด
8.2 ข้อมูลการรับประกัน
Specific warranty terms and conditions are provided by the manufacturer, VEMER SpA. Please retain your proof of purchase for warranty claims.


