1. บทนำ
This manual provides detailed instructions for the safe and effective use of your Proster PST97 VC97 Digital Multimeter. This device is a versatile, auto-ranging digital multimeter designed for measuring AC/DC voltage, AC/DC current, resistance, capacitance, frequency, diode, transistor (HFE), and continuity. It also includes a temperature measurement function. Please read this manual thoroughly before operation and retain it for future reference.
2. สินค้าหมดview
2.1 คุณสมบัติหลัก
- จอแสดงผล LCD 4000 หลัก: Provides clear digital readings.
- อัตโนมัติ: เลือกช่วงการวัดที่เหมาะสมโดยอัตโนมัติ
- ความสามารถในการวัดที่ครอบคลุม: วัดปริมาตร AC/DCtage, AC/DC Current, Resistance, Capacitance, Frequency, Diode, Transistor (HFE), and Continuity.
- การวัดอุณหภูมิ: Includes a K-type temperature probe for measuring temperature.
- ฟังก์ชั่นการเก็บข้อมูล: หยุดภาพหน้าจอขณะอ่านค่า เพื่อให้บันทึกได้ง่าย
- สัญญาณเตือนแบตเตอรี่ต่ำ: แจ้งเตือนเมื่อถึงเวลาต้องเปลี่ยนแบตเตอรี่
- ระบบป้องกันการโอเวอร์โหลด: Ensures safety across all measurement ranges.
- Protective Rubber Casing: Provides shock and impact resistance.
- ขาตั้งแบบบูรณาการ: ช่วยให้ใช้งานได้โดยไม่ต้องใช้มือ
2.2 ส่วนประกอบ
The Proster PST97 VC97 Digital Multimeter package includes the following items:
- Proster PST97 VC97 Digital Multimeter
- สายทดสอบ (สีแดง 1 เส้น สีดำ 1 เส้น)
- K-Type Temperature Probe
- แบตเตอรี่ AAA 2 ก้อน (ติดตั้งมาแล้วหรือซื้อแยกต่างหาก)
- กระเป๋าใส่อุปกรณ์
- คู่มือการใช้งาน

รูปที่ 2.2.1: Proster PST97 VC97 Digital Multimeter with included test leads, temperature probe, and carrying pouch.

รูปที่ 2.2.2: ด้านหน้า view of the Proster PST97 VC97 Multimeter showing the display, rotary switch, and input jacks, along with connected test leads and temperature probe.
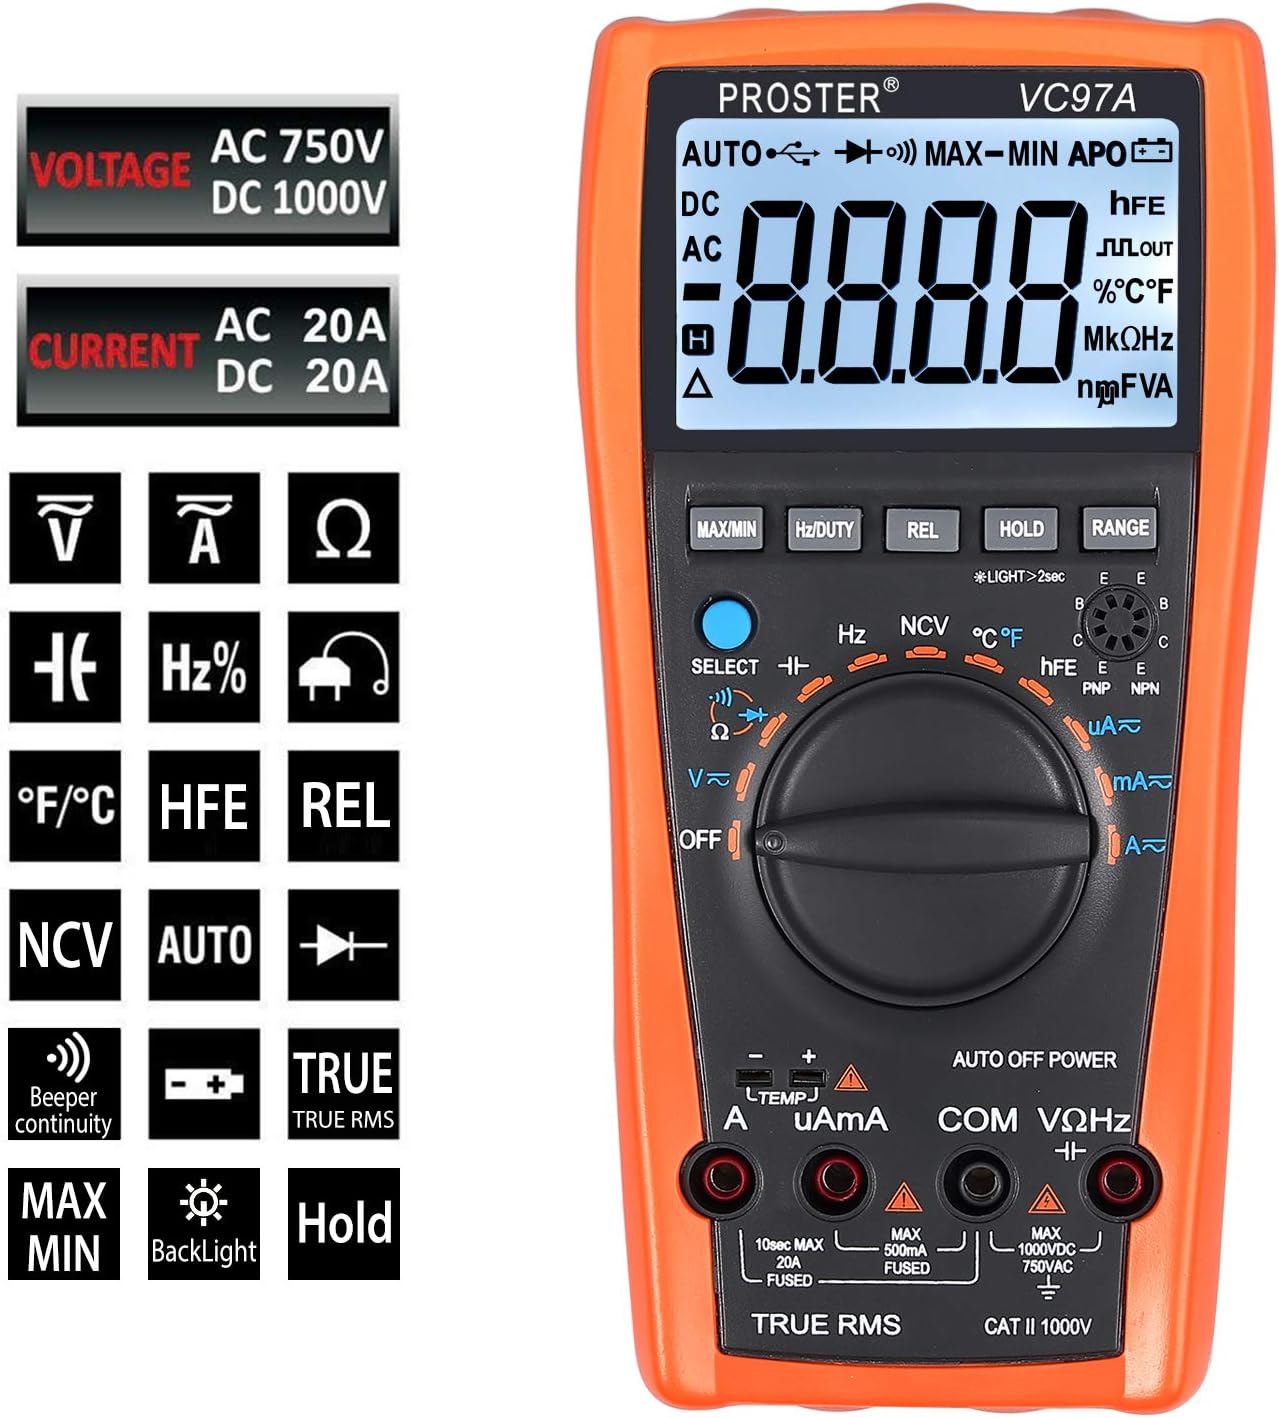
รูปที่ 2.2.3: Display icons indicating various measurement functions supported by the multimeter, including voltage, current, resistance, capacitance, frequency, diode, transistor, continuity, and temperature.
3. การตั้งค่า
3.1 การติดตั้งแบตเตอรี่
- ตรวจสอบให้แน่ใจว่ามัลติมิเตอร์ปิดอยู่
- Remove the protective rubber casing.
- ค้นหาฝาครอบช่องใส่แบตเตอรี่ที่ด้านหลังของมัลติมิเตอร์
- Unscrew the single screw holding the battery cover.
- ใส่แบตเตอรี่ AAA สองก้อน โดยสังเกตขั้วให้ถูกต้อง (+/-)
- ใส่ฝาครอบแบตเตอรี่และขันให้แน่นด้วยสกรู
- Re-attach the protective rubber casing.
Note: The multimeter may come with batteries pre-installed. If the display shows a low battery indicator, replace the batteries as described above.
3.2 การเชื่อมต่อสายทดสอบ
Always connect the black test lead to the "COM" (Common) jack. Connect the red test lead to the appropriate input jack based on the measurement type:
- VΩเฮิร์ตซ์: สำหรับฉบับที่tagเช่น การวัดค่าความต้านทาน ความถี่ ความจุ ไดโอด และความต่อเนื่อง
- มิลลิแอมป์: For small current measurements (milliamperes, microampเอเรส)
- A: For large current measurements (amperes, up to 20A).
Ensure test leads are fully inserted into the jacks before taking any measurements.
4. คู่มือการใช้งาน
Before taking any measurements, ensure the multimeter is set to the correct function and range, and the test leads are connected to the appropriate jacks. Always disconnect power to the circuit before measuring resistance, capacitance, or continuity.
4.1 โวลต์ AC/DCtage Measurement (V~ / V-)
- หมุนสวิตช์แบบโรตารี่ไปที่ "V~" (AC Vol)tage) หรือ "V-" (DC Vol)tagจ) ตำแหน่ง
- เชื่อมต่อสายวัดสีดำเข้ากับช่อง "COM" และสายวัดสีแดงเข้ากับช่อง "VΩHz"
- สำหรับ AC Voltage, if the multimeter defaults to DC, press the "SELECT" button to switch to AC.
- เชื่อมต่อโพรบวัดทดสอบแบบขนานเข้ากับวงจรหรือชิ้นส่วนที่ต้องการวัด
- อ่านเล่มที่tagค่า e บน LCD

รูปที่ 4.1.1: การวัด AC voltage from a power outlet using the multimeter. The display shows "AC 110.0V".
4.2 AC/DC Current Measurement (A~ / A-, mAµA~ / mAµA-)
คำเตือน: Never connect the multimeter in parallel for current measurement. Always connect it in series with the circuit. Ensure the circuit is de-energized before connecting the multimeter for current measurement.
- Turn the rotary switch to the "A~" (AC Current), "A-" (DC Current), "mAµA~" (AC mA/µA), or "mAµA-" (DC mA/µA) position.
- เชื่อมต่อสายทดสอบสีดำเข้ากับแจ็ค "COM"
- Connect the red test lead to the "mAµA" jack for currents up to 400mA, or to the "A" jack for currents up to 20A.
- เปิดวงจรที่ต้องการวัดกระแสไฟฟ้า แล้วต่อมัลติมิเตอร์แบบอนุกรมเข้าไป
- จ่ายไฟให้กับวงจรและอ่านค่ากระแสไฟฟ้าบนหน้าจอ LCD
4.3 การวัดค่าความต้านทาน (โอห์ม)
- ตรวจสอบให้แน่ใจว่าวงจรไม่มีพลังงาน
- หมุนสวิตช์แบบหมุนไปที่ตำแหน่ง "Ω"
- เชื่อมต่อสายวัดสีดำเข้ากับช่อง "COM" และสายวัดสีแดงเข้ากับช่อง "VΩHz"
- เชื่อมต่อหัววัดทดสอบเข้ากับชิ้นส่วนที่ต้องการวัด
- อ่านค่าความต้านทานบนหน้าจอ LCD
4.4 การวัดค่าความจุ (F)
- ตรวจสอบให้แน่ใจว่าตัวเก็บประจุถูกปล่อยประจุจนหมดก่อนทำการวัด
- หมุนสวิตช์แบบหมุนไปที่ตำแหน่ง "F"
- เชื่อมต่อสายวัดสีดำเข้ากับช่อง "COM" และสายวัดสีแดงเข้ากับช่อง "VΩHz"
- เชื่อมต่อโพรบทดสอบข้ามตัวเก็บประจุ
- Read the capacitance value on the LCD. Measurement may take several seconds for larger capacitors.
- Tip: For more accurate readings, press the "REL" button after connecting the leads but before connecting to the capacitor to zero out any residual capacitance from the leads.

รูปที่ 4.4.1: Measuring the capacitance of an electrolytic capacitor. The display shows "065.2 µF".
4.5 การวัดความถี่ (เฮิร์ตซ์)
- หมุนสวิตช์แบบหมุนไปที่ตำแหน่ง "Hz"
- เชื่อมต่อสายวัดสีดำเข้ากับช่อง "COM" และสายวัดสีแดงเข้ากับช่อง "VΩHz"
- เชื่อมต่อโพรบทดสอบเข้ากับแหล่งสัญญาณ
- อ่านค่าความถี่จากหน้าจอ LCD
4.6 Diode Test (symbol: arrow with bar)
- ตรวจสอบให้แน่ใจว่าวงจรไม่มีพลังงาน
- Turn the rotary switch to the Diode Test position (often indicated by an arrow with a bar symbol).
- เชื่อมต่อสายวัดสีดำเข้ากับช่อง "COM" และสายวัดสีแดงเข้ากับช่อง "VΩHz"
- เชื่อมต่อโพรบสีแดงเข้ากับขั้วบวก และโพรบสีดำเข้ากับขั้วลบของไดโอด
- จอแสดงผลจะแสดงปริมาตรไปข้างหน้าtage drop. สลับขั้วโพรบ หน้าจอควรแสดง "OL" (Overload) สำหรับไดโอดที่ดี
4.7 Continuity Test (symbol: sound wave)
- ตรวจสอบให้แน่ใจว่าวงจรไม่มีพลังงาน
- Turn the rotary switch to the Continuity Test position (often indicated by a sound wave symbol).
- เชื่อมต่อสายวัดสีดำเข้ากับช่อง "COM" และสายวัดสีแดงเข้ากับช่อง "VΩHz"
- เชื่อมต่อหัววัดทดสอบเข้ากับส่วนประกอบหรือเส้นทางวงจร
- ถ้าค่าความต้านทานต่ำกว่าประมาณ 50 โอห์ม เสียงกริ่งจะดังขึ้น ซึ่งแสดงว่ามีการเชื่อมต่อกัน
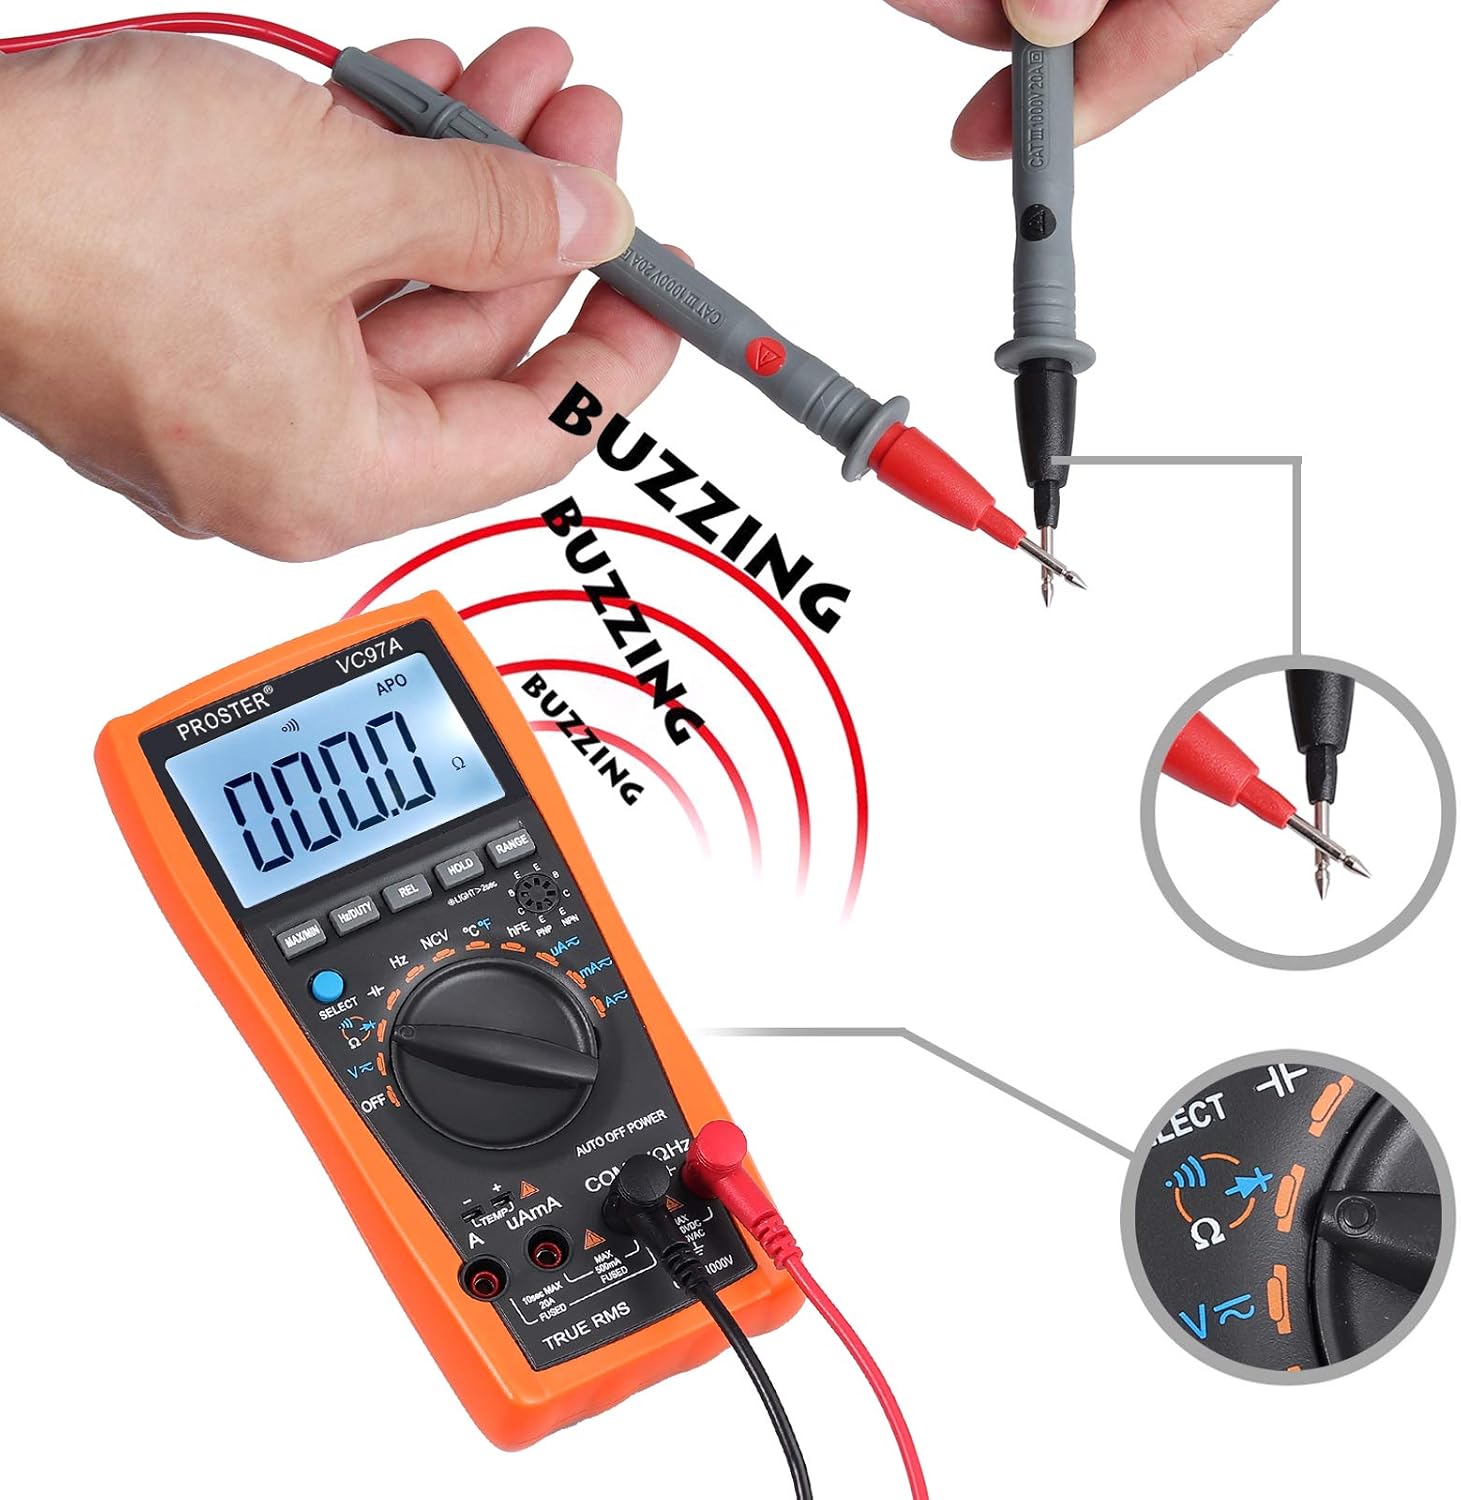
รูปที่ 4.7.1: Performing a continuity test by touching the two test probes together. The display shows "000.0" and a buzzing sound is indicated.
4.8 การทดสอบ HFE ของทรานซิสเตอร์
- Turn the rotary switch to the "HFE" position.
- ระบุว่าทรานซิสเตอร์เป็น NPN หรือ PNP
- เสียบขาของทรานซิสเตอร์ (ตัวส่งสัญญาณ, ฐาน, ตัวรับสัญญาณ) ลงในรูที่ตรงกันในซ็อกเก็ต HFE บนมัลติมิเตอร์
- Read the HFE (DC current gain) value on the LCD.
4.9 การวัดอุณหภูมิ (°C/°F)
- Turn the rotary switch to the "TEMP" position.
- Connect the K-type temperature probe to the "VΩHz" and "COM" jacks, observing polarity (red to VΩHz, black to COM).
- Place the tip of the temperature probe on or in the object to be measured.
- Read the temperature value on the LCD. Press "SELECT" to switch between Celsius (°C) and Fahrenheit (°F).

รูปที่ 4.9.1: The multimeter displaying surrounding temperature (top) and tested liquid temperature (bottom) using the K-type probe.
4.10 ไม่สัมผัส Voltagการตรวจจับ e (NCV)
- หมุนสวิตช์แบบหมุนไปที่ตำแหน่ง "NCV"
- Move the top part of the multimeter close to the AC voltagแหล่งที่มา (เช่น สายไฟหรือเต้ารับไฟฟ้า)
- The multimeter will emit an audible beep and the NCV indicator will light up if AC voltagอีถูกตรวจพบ

รูปที่ 4.10.1: Using the NCV function to detect AC voltage near a power outlet. The display shows dashes and sound waves indicate detection.
4.11 ฟังก์ชั่นพิเศษ
- ถือ: กดปุ่มนี้เพื่อหยุดการแสดงค่าปัจจุบันบนหน้าจอ กดอีกครั้งเพื่อปล่อย
- พิสัย: In auto-ranging modes, press this button to switch to manual ranging. Subsequent presses will cycle through available ranges. Press and hold to return to auto-ranging.
- REL (การวัดเชิงสัมพัทธ์): Press this button to store the current reading as a reference value. Subsequent measurements will be displayed as the difference from this reference. Useful for zeroing out lead resistance or capacitance.
- Hz/DUTY: ในฉบับ ACtage or AC Current modes, press this button to display the frequency or duty cycle of the AC signal.
- สูงสุด/นาที: Press this button to display the maximum or minimum measured value since the function was activated.
- แสงไฟด้านหลัง: Press the "LIGHT" button (often combined with another function, e.g., long press HOLD) to turn on/off the display backlight.
5. การบำรุงรักษา
5.1 การทำความสะอาด
เช็ดมัลติมิเตอร์ด้วยสารกันบูดamp ใช้ผ้าและผงซักฟอกอ่อนๆ เช็ดทำความสะอาด ห้ามใช้สารขัดถูหรือตัวทำละลาย ตรวจสอบให้แน่ใจว่าอุปกรณ์แห้งสนิทก่อนจัดเก็บหรือใช้งาน
5.2 การเปลี่ยนแบตเตอรี่
Refer to Section 3.1 for detailed instructions on replacing the AAA batteries when the low battery indicator appears on the display.
5.3 การเปลี่ยนฟิวส์
The multimeter is equipped with internal fuses for protection. If the current measurement functions cease to work, a fuse may need replacement. Replacing the fuses requires disassembling the multimeter casing. This process involves removing the rubber casing, unscrewing the back panel (three screws), and then further disassembling the internal circuit board (additional screws) to access the fuses. Due to the complexity and potential to void warranty, it is recommended that fuse replacement be performed by qualified personnel or the manufacturer's service center.
- ฟิวส์ 10A: For the 20A input jack.
- 500mA Fuse: For the mAµA input jack.
Always replace fuses with ones of the identical type and rating.
6 การแก้ไขปัญหา
| ปัญหา | สาเหตุที่เป็นไปได้ | สารละลาย |
|---|---|---|
| ไม่มีจอแสดงผลหรือจอแสดงผลมืด | แบตเตอรี่หมดหรือไฟอ่อน; ติดตั้งแบตเตอรี่ไม่ถูกต้อง | Replace batteries (Section 3.1); ensure correct polarity. |
| แสดง "OL" (โอเวอร์โหลด) | ค่าที่วัดได้เกินช่วงที่เลือกหรือเกินความจุสูงสุดของมิเตอร์ | Switch to a higher range (if in manual range) or ensure the measured value is within the meter's limits. |
| การอ่านไม่ถูกต้อง | Incorrect function selected; loose test leads; damaged test leads; external interference. | Verify function setting; ensure leads are fully inserted; inspect leads for damage; move away from strong electromagnetic fields. |
| การวัดกระแสไฟฟ้าไม่ทำงาน | ฟิวส์ขาด | Replace the appropriate fuse (Section 5.3). |
| Slow capacitance measurement | Normal for large capacitors; residual charge on capacitor. | Allow sufficient time for measurement; ensure capacitor is fully discharged before testing. Use REL function to zero out lead capacitance. |
| Multimeter beeps continuously | Low battery warning; continuity test active. | Check battery indicator and replace if necessary. If in continuity mode, this is normal when continuity is detected. |
7. ข้อมูลจำเพาะ
| คุณสมบัติ | รายละเอียด |
|---|---|
| ยี่ห้อ | โปรสเตอร์ |
| หมายเลขรุ่น | VC97 |
| แสดง | จอ LCD 4000 นับ |
| แหล่งพลังงาน | แบตเตอรี่อัลคาไลน์ 2 x AAA |
| ฉบับ ACtagอี เรนจ์ | สูงถึง 750V |
| DC ฉบับที่tagอี เรนจ์ | สูงถึง 1000V |
| ช่วงกระแสไฟ AC | สูงสุด 20A |
| ช่วงกระแสไฟตรง | สูงสุด 20A |
| ช่วงความต้านทาน | ใช่ |
| ช่วงความจุ | สูงสุด 200µF |
| การวัดความถี่ | ใช่ |
| การวัดอุณหภูมิ | Yes (with K-type probe) |
| การทดสอบ Diode | ใช่ |
| การทดสอบความต่อเนื่อง | ใช่ (พร้อมเสียงกริ่ง) |
| Transistor HFE Test | ใช่ |
| แบบไม่สัมผัส Voltagอี (NCV) | ใช่ |
| ปิดเครื่องอัตโนมัติ | ใช่ |
| ขนาด (กว้าง x ยาว x สูง) | 18.5 x 9.3 x 3.5 ซม. (ประมาณ 7.3 x 3.7 x 1.4 นิ้ว) |
| น้ำหนัก | 290 กรัม (ประมาณ 0.64 ปอนด์) |
| ระดับความปลอดภัย | แคททู 1000V |
8. การรับประกันและการสนับสนุน
Proster products are designed for reliability and performance. For warranty information, technical support, or service inquiries, please refer to the contact details provided with your purchase documentation or visit the official Proster webไซต์ โปรดเก็บหลักฐานการซื้อไว้เพื่อใช้ในการเรียกร้องการรับประกัน


