1. บทนำ
This manual provides essential instructions for the safe and efficient operation, installation, and maintenance of your Vulcan LG300-1 Economy Fryer. Please read this manual thoroughly before operating the appliance and retain it for future reference. Proper installation, operation, and maintenance are crucial for optimal performance and longevity of the unit.
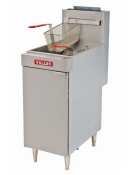
รูปที่ 1: Vulcan LG300-1 Economy Fryer. This image displays the Vulcan LG300-1 Economy Fryer. It is a freestanding unit constructed from stainless steel, featuring a fry tank, front panel, and door. Two fry baskets with plastic-coated handles are visible, along with adjustable nickel-plated stainless steel legs.
2. ข้อมูลด้านความปลอดภัย
Operating commercial cooking equipment involves inherent risks. Adhere to all safety precautions to prevent injury or damage.
- บุคลากรที่ผ่านการรับรอง: การติดตั้ง การบำรุงรักษา และการซ่อมแซม ต้องดำเนินการโดยช่างผู้ชำนาญการเท่านั้น
- ความปลอดภัยของก๊าซ: This appliance uses natural gas. Ensure proper ventilation and check for gas leaks after installation. Do not store or use gasoline or other flammable vapors and liquids in the vicinity of this or any other appliance.
- อันตรายจากน้ำมันร้อน: Hot oil can cause severe burns. Exercise extreme caution when operating, cleaning, or moving the fryer. Allow oil to cool completely before draining or cleaning.
- ความปลอดภัยทางไฟฟ้า: Ensure the appliance is properly grounded. Do not operate with damaged cords or plugs.
- ความปลอดภัยจากอัคคีภัย: Keep the area around the fryer clear of combustible materials. In case of a grease fire, do not use water; use a Class K fire extinguisher or smother the flames.
- อุปกรณ์ป้องกันส่วนบุคคล (PPE): Always wear appropriate PPE, such as heat-resistant gloves and safety glasses, when operating or cleaning the fryer.
3. การเปิดออกและการติดตั้ง
3.1 การแกะกล่อง
Carefully remove the fryer from its packaging. Inspect the unit for any shipping damage. Report any damage immediately to the carrier and your dealer. Do not attempt to operate a damaged appliance.
3.2 การวางตำแหน่งและการปรับระดับ
Place the fryer in a location that allows for adequate ventilation and clearance from combustible surfaces. The unit is equipped with four adjustable nickel-plated stainless steel legs. Use these legs to ensure the fryer is perfectly level for even cooking and proper drainage.
3.3 การเชื่อมต่อแก๊ส
This fryer is designed for Natural Gas operation. A 3/4" rear gas connection is provided. All gas connections must be made by a qualified technician in accordance with local codes and regulations. Ensure all connections are leak-tested before initial operation.
3.4 การทำความสะอาดเบื้องต้น
Before first use, clean the fry tank and all accessible surfaces with a mild detergent and warm water. Rinse thoroughly and dry completely.
4. การดำเนินการ
4.1 Filling the Fry Tank
Ensure the drain valve is closed. Fill the stainless steel fry tank with 35-40lb of cooking oil. Do not overfill or underfill the tank.
4.2 การควบคุมอุณหภูมิ
The fryer features a millivolt thermostat control. Adjust the control knob to set the desired oil temperature, ranging from 200°F to 400°F. Allow sufficient time for the oil to reach the set temperature before cooking.
4.3 Using Fry Baskets
The fryer includes twin fry baskets with plastic-coated handles. Load food into the baskets and carefully lower them into the hot oil. Avoid overloading the baskets, as this can lower oil temperature and result in uneven cooking.
4.4 Cold Zone Function
The large "V" shaped cold zone at the bottom of the fry tank helps collect food particles, preventing them from burning and extending the life of the cooking oil. Regularly clean the cold zone as part of your maintenance routine.
5. การบำรุงรักษาและการทำความสะอาด
Regular maintenance and cleaning are essential for the performance and safety of your fryer.
- การทำความสะอาดรายวัน: After each use, allow the oil to cool. Drain the oil using the 1-1/4" full port ball type drain valve. Clean the fry tank and baskets with hot soapy water and a non-abrasive brush or cloth. Rinse thoroughly and dry.
- การทำความสะอาดภายนอก: Wipe down the stainless steel exterior (front top and door) with a damp cloth and mild detergent. Avoid abrasive cleaners or scouring pads that can scratch the surface.
- Basket Hanger: The basket hanger is easily removable for cleaning. Remove it periodically and clean thoroughly to prevent grease buildup.
- Oil Filtration/Replacement: Regularly filter or replace cooking oil according to usage and quality.
- การบริการระดับมืออาชีพ: Schedule periodic inspections and maintenance by a qualified service technician to ensure all components, especially gas connections and controls, are functioning correctly.
6 การแก้ไขปัญหา
This section provides solutions to common issues. For problems not listed here or if issues persist, contact a qualified service technician.
- Fryer Not Heating:
- ตรวจสอบการจ่ายก๊าซ
- ตรวจสอบให้แน่ใจว่าได้ตั้งค่าตัวควบคุมอุณหภูมิอย่างถูกต้อง
- Verify pilot light is lit (if applicable for millivolt system).
- การให้ความร้อนที่ไม่สม่ำเสมอ:
- Ensure the fryer is level.
- Avoid overloading baskets.
- Excessive Smoke/Burning Smell:
- Oil may be old or contaminated; replace or filter.
- Clean the cold zone to remove food particles.
- Check oil level; ensure it's not too low.
- Oil Drains Slowly:
- Check for blockages in the drain valve or pipe.
- Ensure oil is sufficiently warm to flow (but not hot enough to cause burns).
7. ข้อมูลจำเพาะ
| คุณสมบัติ | ข้อมูลจำเพาะ |
|---|---|
| แบบอย่าง | LG300-1 |
| ยี่ห้อ | วัลแคน |
| ความจุน้ำมัน | 35-40 ปอนด์ |
| ประเภทแก๊ส | ก๊าซธรรมชาติ |
| อินพุตทั้งหมด | 90,000 บีทียู/ชม. |
| ช่วงอุณหภูมิ | 200°F to 400°F (Millivolt Thermostat Control) |
| Fry Tank Size | กว้าง 14 นิ้ว x ยาว 14 นิ้ว |
| ขนาดสินค้า (ลึก x กว้าง x สูง) | ลึก 29.75 นิ้ว x กว้าง 15.5 นิ้ว x สูง 46.63 นิ้ว |
| วัสดุ | สแตนเลส |
| การเชื่อมต่อแก๊ส | 3/4" Rear |
| วาล์วระบายน้ำ | 1-1/4" Full Port Ball Type |
| การรับรอง | NSF Listed, CSA Certified |
8. การรับประกันและการสนับสนุน
For warranty information, technical support, or to locate authorized service providers, please refer to the documentation provided with your purchase or contact Vulcan customer service directly. Keep your purchase receipt and model number handy when contacting support.


