1. บทนำ
This manual provides detailed instructions for the safe and efficient operation of your Vivitek Qumi Q5 Pocket DLP Projector. Please read this manual thoroughly before using the projector and retain it for future reference. The Vivitek Qumi Q5 is a compact, high-definition LED projector designed for portability and versatility, featuring 500 lumens brightness, WXGA resolution, and various connectivity options.
2. ข้อมูลด้านความปลอดภัยที่สำคัญ
โปรดปฏิบัติตามข้อควรระวังด้านความปลอดภัยต่อไปนี้เพื่อป้องกันความเสียหายต่อโปรเจ็กเตอร์และเพื่อความปลอดภัยของผู้ใช้งาน:
- อย่าปิดกั้นช่องระบายอากาศ ตรวจสอบให้แน่ใจว่ามีอากาศถ่ายเทเพียงพอรอบๆ โปรเจ็กเตอร์
- อย่ามองตรงเข้าไปในเลนส์โปรเจ็กเตอร์เมื่อลamp เปิดอยู่ แสงจ้าอาจทำให้ดวงตาเสียหายได้
- ใช้เฉพาะอะแดปเตอร์ไฟฟ้าที่มาพร้อมกับโปรเจ็กเตอร์เท่านั้น
- อย่าวางโปรเจ็กเตอร์ไว้ในที่ที่มีฝนหรือความชื้น เพื่อลดความเสี่ยงจากไฟไหม้หรือไฟฟ้าช็อต
- วางโปรเจ็กเตอร์บนพื้นผิวที่ได้ระดับและมั่นคง
- ถอดปลั๊กโปรเจคเตอร์ออกจากเต้าเสียบไฟก่อนทำความสะอาดหรือเมื่อไม่ได้ใช้งานเป็นเวลานาน
- ส่งต่อการบริการทั้งหมดไปยังบุคลากรบริการที่มีคุณสมบัติเหมาะสม
3. เนื้อหาบรรจุภัณฑ์
ตรวจสอบว่ารายการทั้งหมดที่ระบุไว้ด้านล่างนี้รวมอยู่ในแพ็คเกจของคุณ:
- Vivitek Qumi Q5 Projector
- อะแดปเตอร์แปลงไฟ
- Universal I/O to VGA Cable
- สาย HDMI
- 3.5mm AV-in Cable
- กระเป๋าใส่อุปกรณ์
- รีโมทคอนโทรล
- คู่มือเริ่มต้นอย่างรวดเร็ว
- บัตรรับประกัน
4. สินค้าหมดview
Familiarize yourself with the various components and features of your Vivitek Qumi Q5 projector.
4.1 ด้านหน้า View

ภาพที่ 4.1: ด้านหน้า view of the Vivitek Qumi Q5 projector, showing the lens and ventilation grilles.
The front of the projector features the projection lens and air vents for cooling. Ensure these vents are not obstructed during operation.
4.2 ด้านบน View

ภาพที่ 4.2: สูงสุด view of the Vivitek Qumi Q5 projector, highlighting the touch-sensitive control panel.
The top panel includes touch-sensitive controls for navigation and menu selection. The "Qumi" logo is also visible.
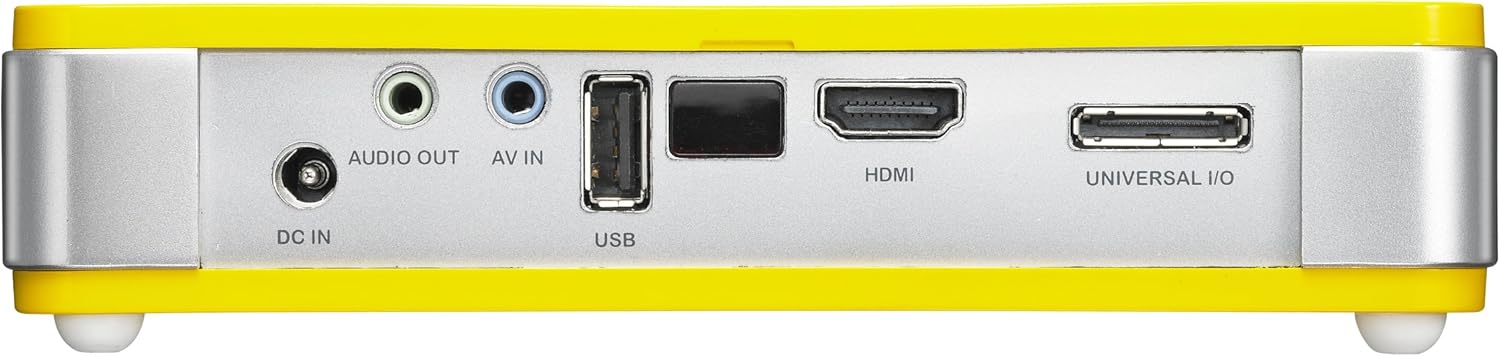
4.3 ด้านหลัง View (พอร์ตเชื่อมต่อ)

ภาพที่ 4.3: หลัง view of the Vivitek Qumi Q5 projector, displaying all input and output ports.
The rear panel houses all essential connectivity ports:
- DC IN: สำหรับการเชื่อมต่ออะแดปเตอร์ไฟฟ้า
- เสียงออก: 3.5mm jack for external speakers or headphones.
- AV ใน: 3.5mm jack for composite video and stereo audio input.
- ยูเอสบี: สำหรับเชื่อมต่ออุปกรณ์จัดเก็บข้อมูล USB
- ช่องต่อ HDMI: High-Definition Multimedia Interface for digital video and audio input.
- UNIVERSAL I/O: Multi-purpose port for VGA and other analog inputs via adapter.
5. การตั้งค่า
Follow these steps to set up your Vivitek Qumi Q5 projector.
5.1 Powering On the Projector
- เชื่อมต่ออะแดปเตอร์เพาเวอร์เข้ากับ ดีซี ใน พอร์ตบนโปรเจ็กเตอร์
- เสียบอะแดปเตอร์ไฟฟ้าเข้ากับเต้ารับไฟฟ้าที่ผนัง
- Press the power button on the projector or remote control to turn on the device. The power indicator light will illuminate.
5.2 การเชื่อมต่อแหล่งอินพุต
The Qumi Q5 supports various input sources:
- ช่องต่อ HDMI: เชื่อมต่อสาย HDMI จากอุปกรณ์ต้นทาง (เช่น แล็ปท็อป เครื่องเล่นบลูเรย์) เข้ากับ... HDMI พอร์ตบนโปรเจ็กเตอร์
- VGA: Use the supplied Universal I/O to VGA cable to connect your computer's VGA output to the UNIVERSAL I/O ท่าเรือ.
- AV (ภาพและเสียง): Use the supplied 3.5mm AV-in cable to connect composite video and stereo audio devices to the AV IN ท่าเรือ.
- ยูเอสบี: ใส่แฟลชไดรฟ์ USB ลงใน ยูเอสบี port to play media fileโดยตรงเลย
- ไร้สาย (อุปกรณ์เสริม): If using an optional WiFi USB dongle, insert it into the USB port for wireless connectivity. Refer to the dongle's instructions for setup.
5.3 การปรับโฟกัส
Locate the focus wheel on the side of the projector. Rotate the wheel until the projected image appears sharp and clear on your screen or wall.
ภาพที่ 5.3: ด้านข้าง view of the Vivitek Qumi Q5, indicating the location of the focus adjustment wheel.
6. การใช้งานโปรเจ็กเตอร์
6.1 การใช้งานเมนู
Use the touch-sensitive buttons on the top panel or the remote control to navigate the projector's on-screen display (OSD) menu. The menu allows you to adjust image settings, input sources, and other system configurations.
6.2 การเลือกแหล่งข้อมูลอินพุต
Press the "Source" button on the remote control or navigate through the OSD menu to select the desired input source (HDMI, VGA, AV, USB, or Wireless).
6.3 การปรับแต่งภาพ
Within the OSD menu, you can adjust various image parameters:
- ความสว่าง/คอนทราสต์: ปรับค่าเพื่อให้ภาพคมชัดที่สุด
- สี/เฉดสี: ปรับแต่งการสร้างสีให้ละเอียดยิ่งขึ้น
- อัตราส่วนภาพ: Select between 4:3, 16:9, or other available ratios to match your content.
- การแก้ไขคีย์สโตน: แก้ไขการบิดเบี้ยวรูปทรงสี่เหลี่ยมคางหมูหากโปรเจ็กเตอร์ไม่ได้ตั้งฉากกับจอภาพอย่างสมบูรณ์
6.4 Playing Media from USB
When a USB drive is inserted, the projector's media player interface will typically launch automatically. You can browse and play supported video, audio, and image fileโดยตรงจากไดรฟ์ USB
6.5 ฟังก์ชันการทำงานแบบ 3 มิติ
The Qumi Q5 is 3D-ready via DLP Link technology. To view 3D content, you will need compatible 3D source material, a 3D-capable player, and active DLP Link 3D glasses (sold separately).
7. การบำรุงรักษา
การบำรุงรักษาอย่างถูกต้องจะช่วยให้โปรเจ็กเตอร์ของคุณมีอายุการใช้งานยาวนานและมีประสิทธิภาพเหมาะสมที่สุด
7.1 การทำความสะอาดโปรเจ็กเตอร์
- ภายนอก: ใช้ผ้านุ่มไม่เป็นขุยเช็ดเล็กน้อยampด้วยน้ำหรือน้ำยาทำความสะอาดอ่อนๆ อย่าใช้น้ำยาทำความสะอาดหรือตัวทำละลายที่มีฤทธิ์กัดกร่อน
- เลนส์: Gently wipe the lens with a lens cleaning cloth or lens paper. Avoid touching the lens surface with your fingers.
- ช่องระบายอากาศ: Use a soft brush or compressed air to clear dust from the ventilation openings.
7.2 แหล่งกำเนิดแสง LED
The Qumi Q5 utilizes an LED light source with an estimated operational life of up to 30,000 hours, significantly reducing the need for lamp ทดแทนเมื่อเทียบกับโปรเจ็กเตอร์แบบดั้งเดิม
7.3 พื้นที่จัดเก็บ
When not in use for extended periods, store the projector in its carrying pouch in a cool, dry place, away from direct sunlight and extreme temperatures.
8 การแก้ไขปัญหา
โปรดดูหัวข้อนี้เพื่อดูวิธีแก้ไขปัญหาทั่วไปที่คุณอาจพบเจอ
| ปัญหา | สาเหตุที่เป็นไปได้ | สารละลาย |
|---|---|---|
| ไม่มีภาพปรากฏ |
|
|
| ภาพเบลอ |
|
|
| ไม่มีเสียง |
|
|
| Projector overheats or shuts down. |
|
|
9. ข้อมูลจำเพาะ
Key technical specifications for the Vivitek Qumi Q5 projector:
- แบบอย่าง: Qumi Q5
- เทคโนโลยีการแสดงผล: DLP Pico chipset
- ความละเอียดดั้งเดิม: WXGA (1280 x 720)
- ความสว่าง: ถึง 500 ลูเมนส์
- แหล่งกำเนิดแสง: LED (Estimated 30,000 hours operation)
- การเชื่อมต่อ: HDMI, Universal I/O (VGA), AV mini-jack, USB, Audio-out mini-jack, Wireless (via optional USB dongle)
- หน่วยความจำภายใน: 4GB
- 3D พร้อม: Yes, via DLP Link
- ขนาด : 4 x 6.3 x 1.3 นิ้ว (10.16 x 16.00 x 3.30 ซม.)
- น้ำหนัก: 1.1 ปอนด์ (0.5 กก.)
- แหล่งจ่ายไฟ: อะแดปเตอร์ไฟภายนอก
10. การรับประกันและการสนับสนุน
Your Vivitek Qumi Q5 projector is covered by a limited warranty. Please refer to the included Warranty Card for specific terms and conditions, including warranty period and coverage details. For technical support, service, or further inquiries, please visit the official Vivitek webหรือติดต่อฝ่ายบริการลูกค้า เก็บใบเสร็จรับเงินไว้เป็นหลักฐานการซื้อสำหรับการเคลมประกัน


