การแนะนำ
This manual provides detailed instructions for the operation and maintenance of your Eton Grundig G2 AM/FM/Shortwave Radio Recorder. Please read this manual thoroughly before using the device to ensure proper function and longevity.
เนื้อหาแพ็คเกจ
ตรวจสอบว่ามีรายการทั้งหมดอยู่ในแพ็คเกจ:
- Eton Grundig G2 Radio Recorder
- สายไฟ
- แบตเตอรี่แบบชาร์จไฟได้
- คู่มือการใช้งาน (เอกสารนี้)
สินค้าเกินview
Familiarize yourself with the various components and controls of your Grundig G2 radio.

Figure 1: Front Panel Controls and Display. This image shows the front of the Eton Grundig G2 radio, highlighting the LCD display, dual speakers, numeric keypad, and various function buttons for power, volume, tuning, and mode selection.

Figure 2: Portable Use Exampเล. The radio is shown being held by two hands, demonstrating its compact and portable design suitable for use in various environments, such as outdoor events.

Figure 3: Rear Panel and Battery Compartment. This image displays the back of the radio, including the battery cover, product information, and ventilation grilles.

Figure 4: Top Panel with Micro SD Slot. A close-up of the top edge of the radio, showing the Micro SD card slot for media playback and recording storage.
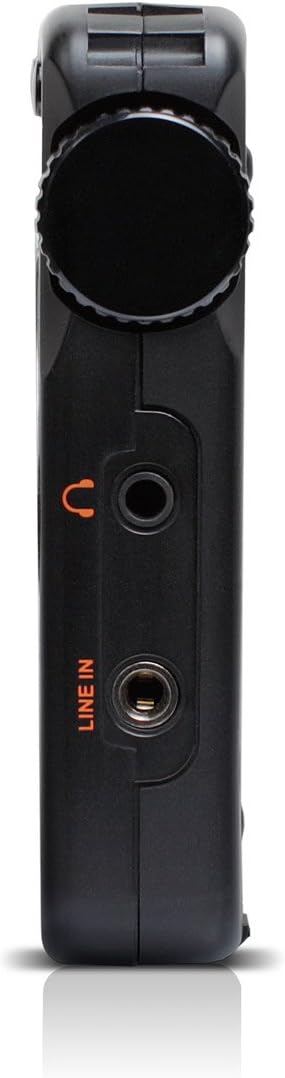
Figure 5: Left Side Panel. นี้ view highlights the headphone jack and line-in audio input on the left side of the device.

Figure 6: Right Side Panel. This image shows the USB port, microphone input, and power switch located on the right side of the radio.
การตั้งค่า
1. การติดตั้งและการชาร์จแบตเตอรี่
- Locate the battery compartment on the rear of the radio (refer to Figure 3).
- Open the compartment cover and insert the provided rechargeable battery, ensuring correct polarity.
- ปิดฝาช่องใส่แบตเตอรี่ให้แน่น
- Connect the power cord to the radio's power input and a suitable power outlet. The radio will begin charging. Allow approximately four hours for a full charge during initial use.
2. เปิดเครื่องครั้งแรก
- Ensure the battery is installed or the power cord is connected.
- กดปุ่ม พลัง button (usually located on the top left of the front panel) to turn on the radio.
- หน้าจอ LCD จะสว่างขึ้น
คำแนะนำการใช้งาน
เปิด/ปิดเครื่อง
กดปุ่ม พลัง ปุ่มเพื่อเปิดหรือปิดเครื่อง
การปรับระดับเสียง
ใช้ V- และ V+ buttons to decrease or increase the volume level.
Radio Tuning (AM/FM/SW)
The Grundig G2 offers five tuning methods:
- การเลือกวงดนตรี: กดปุ่ม FM, MW (AM), or SW buttons to select the desired frequency band.
- Jog Tuning: Rotate the tuning knob (often labeled เมนู/ENTER or similar) to manually scan frequencies.
- การปรับด้วยตนเอง: ใช้ ลูกศรขึ้น/ลง ปุ่มสำหรับปรับความถี่ทีละขั้น
- ปรับอัตโนมัติ: กดปุ่มค้างไว้ ลูกศรขึ้น/ลง ปุ่มสำหรับสแกนหาสถานีที่ว่างอยู่ถัดไปโดยอัตโนมัติ
- ATS (Auto Tuning Storage): กดปุ่มค้างไว้ ชุด button to automatically scan and store strong stations in the current band.
- Memory Tuning: Use the numeric keypad (0-9) to directly enter a stored station number or frequency.
Station Memory Storage
ในการจัดเก็บสถานี:
- ปรับไปยังสถานีที่ต้องการ
- กดปุ่ม ชุด button. The memory location number will flash on the display.
- Use the numeric keypad or tuning knob to select a memory location.
- กด ชุด again to confirm. The station is now stored.
The radio supports up to 248 station memory storage locations.
MP3 and WMA Playback
The Grundig G2 can play MP3 and WMA audio fileจาก Micro SD การ์ด
- Insert a Micro SD card containing MP3/WMA files into the Micro SD slot (refer to Figure 4).
- กดปุ่ม RADIO/MP3 button to switch to MP3 mode.
- ใช้ เล่น/หยุดชั่วคราว, เพลงถัดไป/เพลงก่อนหน้า ปุ่มเพื่อควบคุมการเล่น
ฟังก์ชั่นการบันทึก
The radio supports recording of radio broadcasts and external audio via the microphone or line-in input.
- Ensure a Micro SD card is inserted.
- To record radio: Tune to the desired station. Press the บันทึก button (if available, or a combination like เมนู/ENTER then select record).
- To record via microphone: Ensure the radio is in recording mode. Speak into the built-in microphone.
- To record via line-in: Connect an external audio source to the ไลน์อิน jack (refer to Figure 5). Ensure the radio is in recording mode.
- กดปุ่ม หยุด button to end recording. Recordings are saved to the Micro SD card.
การตั้งค่าภาษา
The radio supports multiple display languages. To change the language:
- กดปุ่ม เมนู/ENTER ปุ่ม.
- Navigate through the menu options using the tuning knob or arrow buttons until you find "Language" or a similar setting.
- Select the desired language and confirm.
การซ่อมบำรุง
- การทำความสะอาด: ใช้ผ้าแห้งนุ่มเช็ดทำความสะอาดภายนอกวิทยุ ห้ามใช้น้ำยาทำความสะอาดหรือวัสดุที่มีฤทธิ์กัดกร่อน
- พื้นที่จัดเก็บ: When not in use for extended periods, store the radio in a cool, dry place. Remove the battery if storing for several months.
- การดูแลแบตเตอรี่ Recharge the battery regularly to maintain its lifespan. Avoid fully discharging the battery frequently.
- เสาอากาศ: Handle the telescopic antenna with care to prevent damage.
การแก้ไขปัญหา
| ปัญหา | สาเหตุที่เป็นไปได้ | สารละลาย |
|---|---|---|
| วิทยุไม่สามารถเปิดได้ | Battery is discharged or not installed correctly. Power cord is not connected. | Ensure battery is charged and correctly inserted. Connect the power cord. |
| การรับสัญญาณวิทยุไม่ดี | Weak signal. Antenna not extended. Interference from other electronics. | Extend the telescopic antenna fully. Reposition the radio. Move away from interfering devices. |
| MP3/WMA fileเขาไม่ได้เล่นอยู่ | Micro SD card not inserted or corrupted. Incorrect file รูปแบบ | Ensure Micro SD card is properly inserted. Verify files are MP3 or WMA format. Try a different Micro SD card. |
| การบันทึกไม่ทำงาน | No Micro SD card inserted. Card full. | ใส่การ์ด Micro SD ลบข้อมูลเก่า fileส เพื่อเพิ่มพื้นที่ว่าง |
| หน้าจอแสดงเวลาไม่ถูกต้อง | Time not set or ATS not used. | Manually set the time or use the ATS function on an FM station that broadcasts RDS time data. |
ข้อมูลจำเพาะ
| หมายเลขรุ่น | NG2B |
| ขนาด (กว้าง x ยาว x สูง) | 7.5 x 3.5 x 0.8 นิ้ว |
| น้ำหนัก | 9.6 ออนซ์ |
| รองรับคลื่นวิทยุ | AM, FM, Shortwave (SW) |
| Tuning Methods | Jog, Manual, Auto, Memory, ATS |
| หน่วยความจำที่ตั้งไว้ล่วงหน้า | 248 สถานี |
| การเล่นเสียง | MP3, WMA (via Micro SD card) |
| การบันทึก | Radio broadcasts, Microphone, Line-in |
| การเชื่อมต่อ | ยูเอสบี |
| แหล่งพลังงาน | แบตเตอรี่แบบชาร์จไฟได้ ไฟฟ้าแบบมีสาย |
| ส่วนประกอบที่รวมอยู่ | Power Cord, Battery |
การรับประกันและการสนับสนุน
For warranty information and technical support, please refer to the official Eton or Grundig webหรือติดต่อฝ่ายบริการลูกค้า โปรดเก็บหลักฐานการซื้อไว้เพื่อใช้ในการเคลมประกัน
หมายเหตุ: เงื่อนไขการรับประกันเฉพาะอาจแตกต่างกันไปตามภูมิภาคและผู้ค้าปลีก


