1. บทนำ
Thank you for choosing the Progress Lighting Gather Collection Five-Light Chandelier. This elegant fixture, featuring etched glass shades and a brushed nickel finish, is designed to enhance your home's ambiance. This manual provides essential information for safe installation, operation, and maintenance of your new chandelier.
2. ข้อมูลด้านความปลอดภัยที่สำคัญ
คำเตือน: ผลิตภัณฑ์นี้อาจทำให้คุณสัมผัสสารเคมีต่างๆ รวมถึงตะกั่ว ซึ่งรัฐแคลิฟอร์เนียทราบว่าก่อให้เกิดมะเร็งและข้อบกพร่องแต่กำเนิดหรืออันตรายต่อระบบสืบพันธุ์อื่นๆ หากต้องการข้อมูลเพิ่มเติม โปรดไปที่ www.P65Warnings.ca.gov.
ควรปิดสวิตช์ไฟหลักที่เบรกเกอร์ก่อนเริ่มการติดตั้งระบบไฟฟ้าทุกครั้ง หากไม่แน่ใจเกี่ยวกับขั้นตอนการติดตั้งใดๆ ควรปรึกษาช่างไฟฟ้าที่มีคุณสมบัติเหมาะสม ตรวจสอบให้แน่ใจว่าการเชื่อมต่อสายไฟทั้งหมดแน่นหนาและเป็นไปตามข้อกำหนดด้านไฟฟ้าในท้องถิ่น ห้ามใช้กำลังไฟเกินพิกัดสูงสุดtage ตามที่ระบุไว้สำหรับหลอดไฟ
3. เนื้อหาบรรจุภัณฑ์
ตรวจสอบว่าส่วนประกอบทั้งหมดมีอยู่ก่อนเริ่มการติดตั้ง:
- Chandelier Fixture (Brushed Nickel)
- Etched Glass Shades (5)
- ชุดอุปกรณ์ติดตั้ง
- Chain and Canopy Assembly
- แผ่นการติดตั้ง
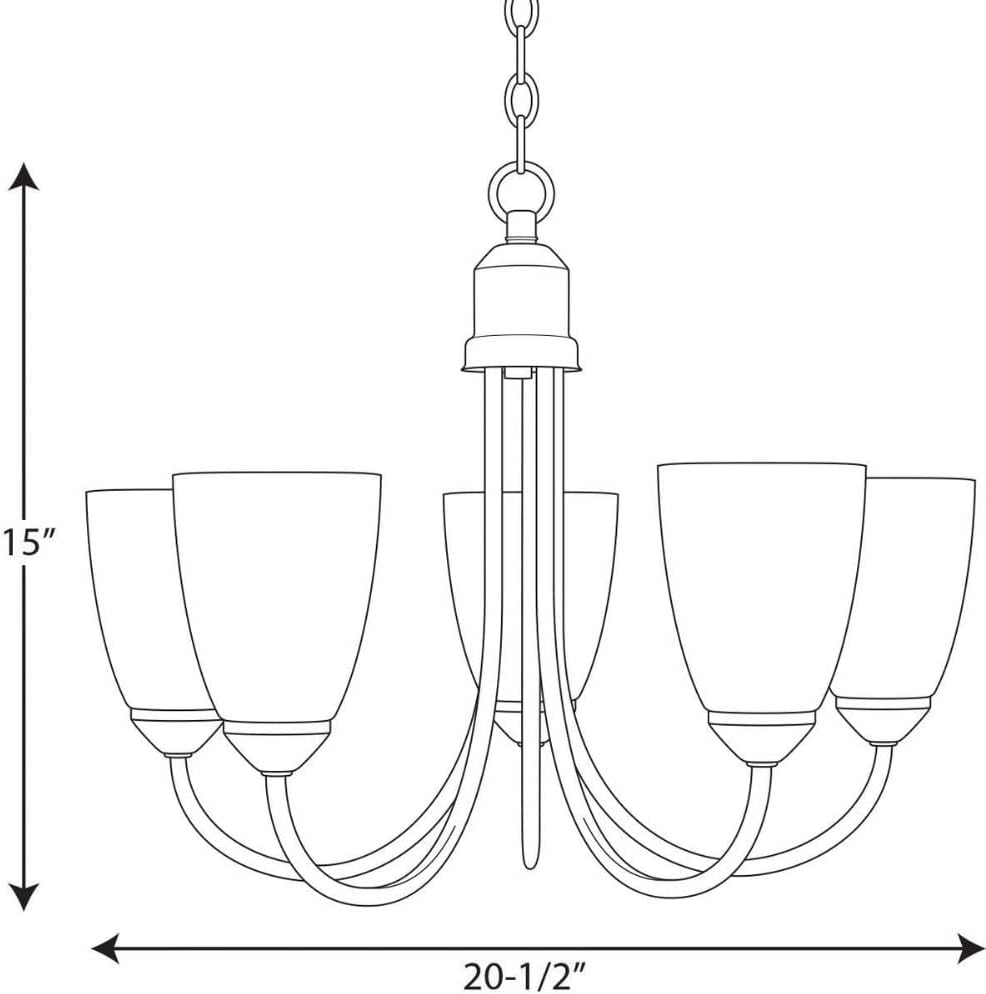
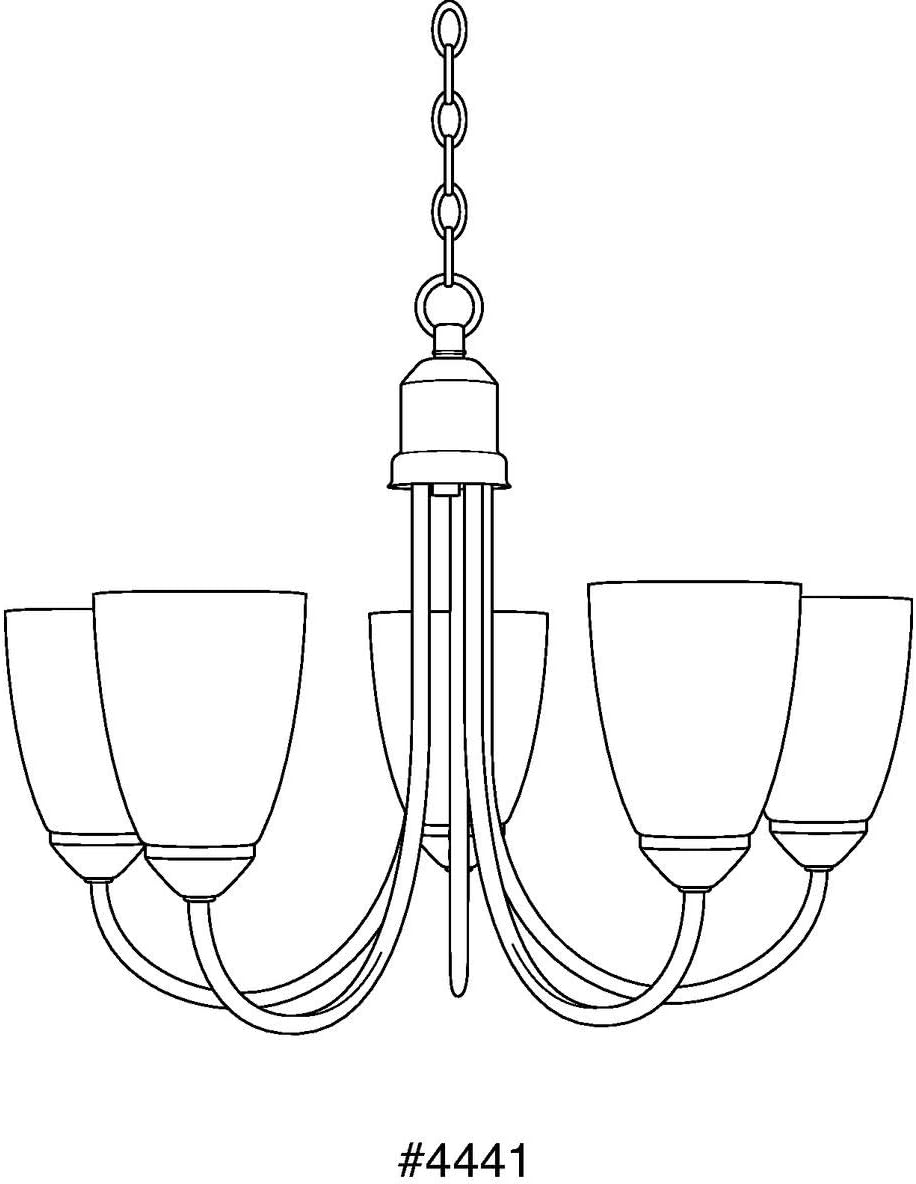
4. ข้อมูลจำเพาะผลิตภัณฑ์
| คุณสมบัติ | ข้อมูลจำเพาะ |
|---|---|
| หมายเลขรุ่น | P4441-09 |
| ยี่ห้อ | โปรเกรสไลท์ติ้ง |
| สี | นิกเกิลขัดเงา |
| วัสดุ | เหล็กอัลลอย (ตัวโคมไฟ), กระจก (โป๊ะไฟ) |
| ขนาด (กว้าง x ยาว x สูง) | 20.2" x 20.63" x 15" |
| น้ำหนักสินค้า | 5 ปอนด์ |
| จำนวนแหล่งกำเนิดแสง | 5 |
| แม็กซ์ วัตtage ต่อหลอด | 100 วัตต์ |
| เล่มที่tage | 120 โวลต์ |
| ประเภทการติดตั้ง | ถาวร |
| ประเภทแหล่งกำเนิดแสง | หลอดไส้ (เข้ากันได้กับ LED, CFL, ฮาโลเจน) |
| ประเภทห้อง | Dining Room, Great Room, Bathroom |
5. การตั้งค่าและการติดตั้ง
Installation of this chandelier typically requires two people for safety and ease of handling. Follow the detailed instructions provided in the included installation sheet. Below are general steps and helpful visual aids.
5.1. ก่อนการติดตั้ง
- ปิดเครื่อง: หาตำแหน่งสวิตช์ตัดไฟที่ควบคุมโคมไฟ และปิดสวิตช์นั้น
- แกะ: นำชิ้นส่วนทั้งหมดออกจากบรรจุภัณฑ์อย่างระมัดระวัง และตรวจสอบดูว่ามีส่วนใดเสียหายหรือไม่
- เครื่องมือที่จำเป็น: Gather necessary tools such as a screwdriver, wire strippers, pliers, and a ladder.
5.2. การประกอบและการติดตั้ง
Assemble the main body of the chandelier according to the diagrams in your installation sheet. This may involve unfolding the arms and attaching the chain. Adjust the chain length to achieve the desired hanging height. For dining room tables, the bottom of the chandelier should typically hang 30-36 inches above the table surface for an 8-foot ceiling. For higher ceilings, consider the guidelines in the video below.


5.3. Chandelier Hanging Height Guidelines
For optimal lighting and aesthetic appeal, consider the following guidelines for hanging your chandelier. This video provides a comprehensive overview of recommended hanging heights for various room types.
5.4. การเดินสาย
Connect the fixture wires to the house wires according to the provided wiring diagram. Ensure all connections are secure with wire nuts. Proper grounding is crucial for safety; do not skip this step.
5.5. การประกอบขั้นสุดท้าย
Once wired, secure the canopy to the ceiling junction box. Install the light bulbs (not included) into the sockets. The chandelier uses five medium base bulbs (100W max per bulb). Finally, attach the etched glass shades to each light base.
6. Operating Your Chandelier
After installation, restore power at the circuit breaker. Your chandelier is now ready for use. This fixture is fully dimmable when used with dimmable bulbs and a compatible dimmer switch (sold separately), allowing you to adjust the light intensity to suit your needs.
7. การดูแลรักษา
7.1. การทำความสะอาด
To maintain the finish of your chandelier, wipe it with a soft, dry cloth. Avoid using abrasive cleaners or solvents, as these can damage the finish. For glass shades, use a mild glass cleaner and a soft cloth.
7.2. การเปลี่ยนหลอดไฟ
Always turn off the power to the fixture at the circuit breaker before replacing bulbs. Allow bulbs to cool completely before handling. Replace bulbs with the same type and wattage (medium base, 100W max) to ensure proper operation and prevent damage.
8 การแก้ไขปัญหา
หากโคมระย้าของคุณทำงานผิดปกติ โปรดดูปัญหาและวิธีแก้ไขที่พบบ่อยต่อไปนี้:
- ไฟไม่ติด:
- ตรวจสอบว่าเบรกเกอร์เปิดอยู่หรือไม่
- Ensure bulbs are securely screwed in and not burnt out.
- ตรวจสอบว่าการเชื่อมต่อสายไฟทั้งหมดมีความปลอดภัย
- Lights flickering or dimming improperly:
- โปรดตรวจสอบให้แน่ใจว่าคุณใช้หลอดไฟแบบหรี่แสงได้ร่วมกับสวิตช์หรี่ไฟที่ใช้งานร่วมกันได้
- ตรวจสอบการเชื่อมต่อสายไฟว่าหลวมหรือไม่
- อุปกรณ์ยึดหลวม:
- Ensure the mounting hardware is securely fastened to the ceiling junction box.
If problems persist, contact Progress Lighting customer support or a qualified electrician.
9. การรับประกันและการสนับสนุน
This Progress Lighting product comes with a รับประกันจำกัด 1 ปี, guaranteeing your complete satisfaction and including professional after-sales customer service support. For warranty claims, technical assistance, or replacement parts, please contact Progress Lighting customer service directly.
ข้อมูลติดต่อ: Refer to the contact details provided on the original product packaging or the official Progress Lighting webเว็บไซต์.


