1. บทนำ
คู่มือนี้ให้คำแนะนำอย่างละเอียดสำหรับการใช้งาน PeakTech True RMS P 3131 Cl อย่างปลอดภัยและมีประสิทธิภาพamp มิเตอร์พร้อมมัลติมิเตอร์ อุปกรณ์นี้ออกแบบมาเพื่อวัดกระแสไฟฟ้า AC/DC โดยไม่ต้องตัดวงจร รวมถึงวัดแรงดันไฟฟ้า AC/DC ด้วยtagเครื่องวัดความเหนี่ยวนำและความต้านทาน พร้อมความสามารถในการทดสอบความต่อเนื่อง มีจอแสดงผล LCD 3 3/4 หลัก พร้อมการวัดค่า True RMS เพื่อการอ่านค่าที่แม่นยำ
โปรดอ่านคู่มือนี้อย่างละเอียดก่อนใช้งานอุปกรณ์และเก็บคู่มือนี้ไว้เพื่อใช้อ้างอิงในอนาคต
2. ข้อมูลด้านความปลอดภัย
คำเตือน: การใช้งานมิเตอร์นี้อย่างไม่ถูกต้องอาจทำให้เกิดความเสียหาย ไฟฟ้าช็อต การบาดเจ็บ หรือเสียชีวิตได้ โปรดปฏิบัติตามข้อควรระวังด้านความปลอดภัยทุกประการเสมอ
- ปฏิบัติตามรหัสความปลอดภัยระดับท้องถิ่นและระดับประเทศเสมอ
- ห้ามใช้มิเตอร์หากพบว่าชำรุดเสียหาย หรือฉนวนหุ้มสายวัดมีสภาพไม่ดี
- ตรวจสอบให้แน่ใจว่าได้ตั้งค่ามิเตอร์ไปที่ฟังก์ชันและช่วงการวัดที่ถูกต้องก่อนทำการวัด
- หลีกเลี่ยงการสัมผัสวงจรไฟฟ้าที่มีกระแสไฟอยู่ สวมใส่อุปกรณ์ป้องกันส่วนบุคคล (PPE) ที่เหมาะสม
- อุปกรณ์นี้ได้รับการรับรองสำหรับ CAT II 600V ห้ามใช้งานเกินขีดจำกัดนี้
- ควรเปลี่ยนแบตเตอรี่ทันทีเมื่อไฟแสดงสถานะแบตเตอรี่ต่ำปรากฏขึ้น
- ห้ามใช้งานมิเตอร์ในบริเวณที่มีอากาศอาจเกิดการระเบิดได้
3. สินค้าหมดview และส่วนประกอบ
PeakTech P 3131 เป็นเครื่องตัดหญ้าที่แข็งแรงทนทานและเชื่อถือได้amp มิเตอร์ โปรดทำความคุ้นเคยกับส่วนประกอบหลักๆ ของมัน:

รูปที่ 1 : ด้านหน้า view ของ PeakTech P 3131 Clamp มิเตอร์ที่แสดงค่า clamp ขากรรไกร, ตัวเลือกฟังก์ชัน, จอแสดงผล LCD และขั้วต่ออินพุต
- Clamp ขากรรไกร: สำหรับการวัดกระแสไฟฟ้า AC/DC แบบไม่สัมผัส
- แป้นหมุนเลือกฟังก์ชัน: เพื่อเลือกโหมดการวัด (A~, A=, V~, V=, Ω/ความต่อเนื่อง, ปิด)
- จอแสดงผล LCD: แสดงค่าการวัด หน่วย และตัวบ่งชี้
- ปุ่ม: AC/DC, ZERO, H/MAX (Data Hold/Max Hold)
- ช่องเสียบอินพุต: COM (ทั่วไป) และ VΩ (ปริมาตร)tag(ความต้านทานไฟฟ้า) สำหรับสายทดสอบ
- การ์ดมือ: ช่วยป้องกันการสัมผัสโดยไม่ตั้งใจ
4. การตั้งค่า
4.1 การติดตั้งแบตเตอรี่
เครื่องดูดฝุ่น PeakTech P 3131 ใช้แบตเตอรี่ AAA ขนาด 1.5V จำนวน 2 ก้อน (มีมาให้ในชุด) วิธีการติดตั้งหรือเปลี่ยนแบตเตอรี่:
- ตรวจสอบให้แน่ใจว่าอุปกรณ์ปิดอยู่
- หาฝาปิดช่องใส่แบตเตอรี่ที่ด้านหลังของมิเตอร์
- ใช้ไขควงเพื่อเปิดช่อง
- ใส่แบตเตอรี่ AAA สองก้อน โดยสังเกตขั้วให้ถูกต้อง (+ และ -)
- ใส่ฝาปิดช่องใส่แบตเตอรี่และขันให้แน่นด้วยสกรู
เมื่อไฟแสดงสถานะแบตเตอรี่ต่ำปรากฏขึ้นบนหน้าจอ ให้เปลี่ยนแบตเตอรี่ทันทีเพื่อให้ได้ค่าการวัดที่แม่นยำ
4.2 การเชื่อมต่อสายทดสอบ
สำหรับเล่มtagสำหรับการวัดค่าความต้านทานและความต่อเนื่อง ให้เชื่อมต่อสายวัดที่ให้มา:
- ใส่สายวัดทดสอบสีดำลงใน คอม ขั้วต่ออินพุต (ทั่วไป)
- ใส่สายวัดทดสอบสีแดงลงใน วีΩ ขั้วอินพุต

รูปที่ 2: PeakTech P 3131 Clamp ในภาพแสดงมิเตอร์พร้อมกระเป๋าพกพา สายวัด แบตเตอรี่ และคู่มือการใช้งาน
5. คู่มือการใช้งาน
5.1 เปิด/ปิดเครื่อง
หมุนแป้นเลือกฟังก์ชันจากตำแหน่ง "ปิด" ไปยังฟังก์ชันการวัดที่ต้องการเพื่อเปิดเครื่องวัด หากต้องการปิดเครื่อง ให้หมุนแป้นกลับไปที่ตำแหน่ง "ปิด" เครื่องวัดมีฟังก์ชันปิดเครื่องอัตโนมัติ (สามารถปิดใช้งานได้) เพื่อประหยัดแบตเตอรี่
5.2 การวัดกระแสไฟฟ้ากระแสสลับ/กระแสตรง (Cl)amp)
วิธีการวัดกระแสไฟฟ้าโดยไม่ต้องตัดวงจร:
- หมุนปุ่มเลือกฟังก์ชันไปที่ A~ (กระแสไฟฟ้าสลับ) หรือ A= ตำแหน่ง (กระแสไฟฟ้าตรง)
- กดปุ่ม ไฟฟ้ากระแสสลับ/ไฟฟ้ากระแสตรง กดปุ่มนี้หากคุณต้องการสลับระหว่างโหมดกระแสไฟฟ้า AC และ DC (หากตำแหน่งของปุ่มหมุนรวมทั้งสองโหมดเข้าด้วยกัน)
- กดปุ่ม ศูนย์ กดปุ่มเพื่อปรับค่าหน้าจอให้เป็นศูนย์ก่อนทำการวัดกระแสตรง โดยเฉพาะอย่างยิ่งสำหรับกระแสขนาดเล็ก เพื่อชดเชยสนามแม่เหล็กตกค้าง
- เปิด clamp ขากรรไกรโดยการกดไกปืน
- ห่อไว้เท่านั้น หนึ่ง ตัวนำที่มี clamp ขากรรไกร ตรวจสอบให้แน่ใจว่าขากรรไกรปิดสนิทแล้ว
- อ่านค่าปัจจุบันบนจอ LCD
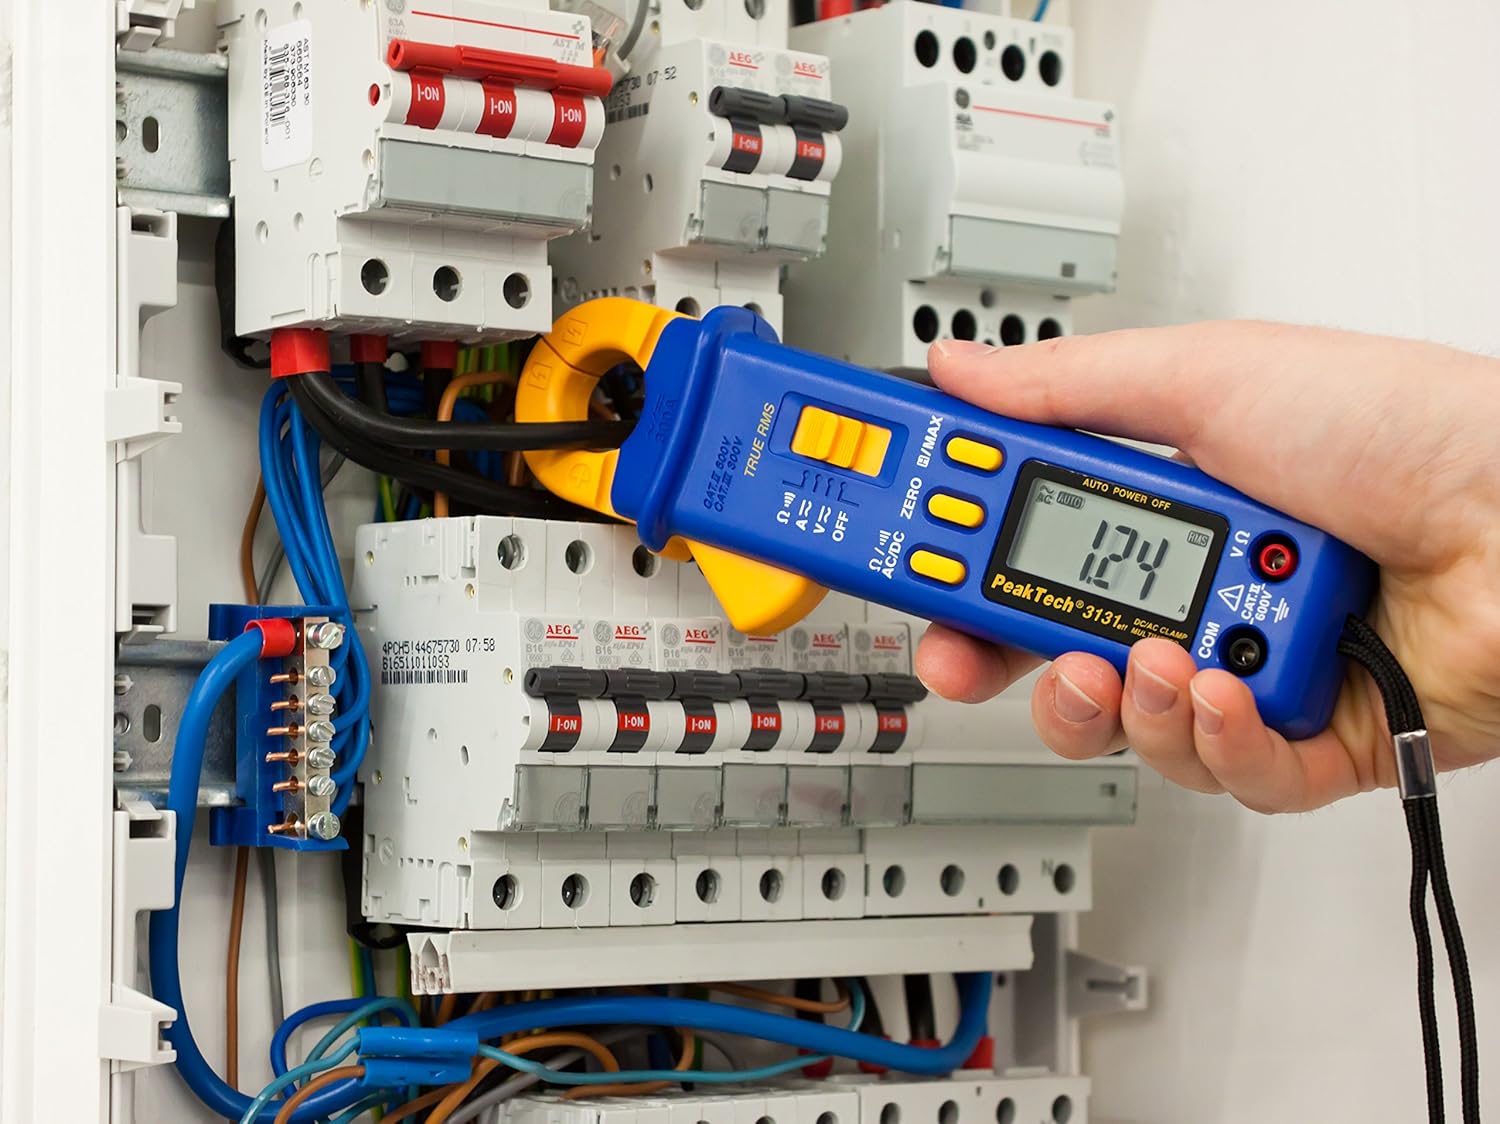
รูปที่ 3: PeakTech P 3131 Clamp มิเตอร์กำลังใช้งาน วัดกระแสไฟฟ้าในตัวนำเดี่ยวภายในแผงควบคุมไฟฟ้า
5.3 โวลต์ AC/DCtagอีการวัด
การวัดปริมาตรtage:
- เชื่อมต่อสายทดสอบตามที่อธิบายไว้ในหัวข้อ 4.2
- หมุนปุ่มเลือกฟังก์ชันไปที่ V~ (AC เล่มtagจ) หรือ V= (DC เล่มtagจ) ตำแหน่ง
- เชื่อมต่อหัววัดทดสอบแบบขนานกับวงจรหรือส่วนประกอบที่คุณต้องการวัด
- อ่านเล่มที่tagค่า e บนจอ LCD
5.4 การวัดความต้านทานและความต่อเนื่อง
เพื่อวัดค่าความต้านทานหรือตรวจสอบความต่อเนื่อง:
- เชื่อมต่อสายทดสอบตามที่อธิบายไว้ในหัวข้อ 4.2
- หมุนปุ่มเลือกฟังก์ชันไปที่ Ω/))) ตำแหน่ง (ความต้านทาน/ความต่อเนื่อง)
- สำหรับการวัดความต้านทาน: ต่อโพรบวัดทดสอบเข้ากับชิ้นส่วน ตรวจสอบให้แน่ใจว่าวงจรไม่มีกระแสไฟไหลผ่าน
- สำหรับการตรวจสอบความต่อเนื่อง: นำหัววัดทดสอบแตะที่จุดสองจุดที่คุณต้องการตรวจสอบ หากมีเสียงบี๊บต่อเนื่อง แสดงว่ามีเส้นทางความต้านทานต่ำ (ความต่อเนื่อง)
- อ่านค่าความต้านทานบนจอ LCD
5.5 ฟังก์ชั่นพิเศษ
- RMS ที่แท้จริง: มิเตอร์นี้ใช้วัดค่า True Root Mean Square สำหรับแรงดันไฟฟ้ากระแสสลับtage และกระแสไฟฟ้า ให้ค่าการอ่านที่แม่นยำสำหรับรูปคลื่นที่ไม่ใช่รูปคลื่นไซน์
- การระงับข้อมูล (H): กดปุ่ม เอช/แม็กซ์ กดปุ่มสั้นๆ เพื่อหยุดการแสดงค่าปัจจุบันบนหน้าจอ กดอีกครั้งเพื่อปล่อย
- ค่าสูงสุดที่สามารถคงไว้ (MAX): กดปุ่มค้างไว้ เอช/แม็กซ์ ปุ่มนี้ใช้สำหรับบันทึกและแสดงค่าสูงสุดที่วัดได้ กดอีกครั้งเพื่อออก
- ฟังก์ชันศูนย์: ใช้สำหรับปรับค่าศูนย์ของหน้าจอแสดงผลสำหรับการวัดกระแสไฟฟ้ากระแสตรง เพื่อขจัดข้อผิดพลาดจากการชดเชยค่า (offset errors)
- การปรับระยะอัตโนมัติ: เครื่องวัดจะเลือกช่วงการวัดที่เหมาะสมโดยอัตโนมัติ
- ปิดเครื่องอัตโนมัติ: มิเตอร์จะปิดตัวเองโดยอัตโนมัติหลังจากไม่มีการใช้งานเป็นระยะเวลาหนึ่งเพื่อประหยัดแบตเตอรี่ โดยปกติแล้วสามารถปิดใช้งานคุณสมบัตินี้ได้โดยการกดปุ่มเฉพาะค้างไว้ขณะเปิดเครื่อง (โปรดดูตัวบ่งชี้บนหน้าจอของอุปกรณ์หรือคู่มือฉบับเต็มหากมี)
6. การบำรุงรักษา
6.1 การทำความสะอาด
เช็ดตัวเรือนมิเตอร์ด้วยน้ำยาทำความสะอาดamp ผ้าและผงซักฟอกอ่อนๆ ห้ามใช้สารกัดกร่อนหรือตัวทำละลาย ตรวจสอบให้แน่ใจว่ามิเตอร์แห้งสนิทก่อนใช้งาน
6.2 การเปลี่ยนแบตเตอรี่
โปรดดูคำแนะนำในการเปลี่ยนแบตเตอรี่ในหัวข้อ 4.1 ควรใช้แบตเตอรี่ AAA ขนาด 1.5 โวลต์ใหม่ 2 ก้อนเสมอ ถอดแบตเตอรี่ออกหากไม่ได้ใช้งานมิเตอร์เป็นเวลานานเพื่อป้องกันการรั่วไหล
6.3 พื้นที่จัดเก็บ
เก็บเครื่องวัดไว้ในที่แห้งและเย็น หลีกเลี่ยงแสงแดดโดยตรงและอุณหภูมิที่สูงหรือต่ำเกินไป ใช้กล่องใส่ที่ให้มาเพื่อป้องกันความเสียหาย
7 การแก้ไขปัญหา
| ปัญหา | สาเหตุที่เป็นไปได้ | สารละลาย |
|---|---|---|
| มิเตอร์ไม่เปิดใช้งาน | แบตเตอรี่เสียหรือติดตั้งไม่ถูกต้อง | ตรวจสอบขั้วแบตเตอรี่ เปลี่ยนแบตเตอรี่ |
| แสดงข้อความ "OL" หรือ "OVER" | ค่าที่วัดได้เกินช่วงที่เลือกหรือเกินความจุสูงสุดของมิเตอร์ | เลือกช่วงการวัดที่สูงขึ้น (หากตั้งค่าช่วงการวัดด้วยตนเอง) หรือตรวจสอบให้แน่ใจว่าการวัดอยู่ในช่วงที่เครื่องวัดสามารถวัดได้ |
| การอ่านค่ากระแสไฟฟ้า DC ไม่แม่นยำ | แม่เหล็กตกค้างใน clamp กราม. | กดปุ่ม ศูนย์ กดปุ่มก่อนทำการวัด |
| ไม่มีเสียงบี๊บแสดงความต่อเนื่อง | วงจรเปิดหรือความต้านทานสูง | ตรวจสอบการเชื่อมต่อ ตรวจสอบให้แน่ใจว่าวงจรสมบูรณ์ |
หากปัญหายังคงอยู่ โปรดติดต่อฝ่ายบริการลูกค้าของ PeakTech หรือช่างเทคนิคบริการที่มีคุณสมบัติเหมาะสม
8. ข้อมูลจำเพาะทางเทคนิค
| พารามิเตอร์ | ข้อมูลจำเพาะ |
|---|---|
| แสดง | จอ LCD 3 3/4 หลัก สูงสุด 3999 จำนวนนับ |
| DC ฉบับที่tagอี (DCV) | 0.1 มิลลิโวลต์ ถึง 600 โวลต์ (ความแม่นยำ: 0.5% + 2 หลัก) |
| ฉบับ ACtagอี (ACV) | 1 มิลลิโวลต์ ถึง 600 โวลต์ (ความแม่นยำ: 1.5% + 5 หลัก) |
| กระแสไฟฟ้ากระแสตรง (DCA) | 10 มิลลิแอมป์ ถึง 300 แอมป์ (ความแม่นยำ: 1% + 2 หลัก) |
| กระแสไฟฟ้ากระแสสลับ (ACA) | 10 มิลลิแอมป์ ถึง 300 แอมป์ (ความแม่นยำ: 1% + 3 หลัก) |
| ความต้านทาน (Ω) | 0.1 โอห์ม ถึง 40 เมกะโอห์ม (ความแม่นยำ: 0.9% + 2 หลัก) |
| การทดสอบความต่อเนื่อง | ฟังก์ชั่นออด |
| ค่า RMS ที่แท้จริง | ใช่ สำหรับการวัดค่ากระแสสลับ |
| การเปิดขากรรไกร | เส้นผ่านศูนย์กลางตัวนำสูงสุด 22 มม. |
| ระดับความปลอดภัย | EN 61010-1, CAT II 600 V |
| แหล่งจ่ายไฟ | แบตเตอรี่ AAA 2x1.5V |
| ขนาด (กว้าง x ยาว x สูง) | 192 x 66 x 27 มม. (ประมาณ 7.56 x 2.6 x 1.06 นิ้ว) |
| น้ำหนัก | 205 กรัม (ประมาณ 0.45 ปอนด์) |
9. การรับประกันและการสนับสนุน
ผลิตภัณฑ์ของ PeakTech ผลิตภายใต้การควบคุมคุณภาพอย่างเข้มงวด ผลิตภัณฑ์นี้อยู่ภายใต้การรับประกันมาตรฐานของผู้ผลิตสำหรับข้อบกพร่องในวัสดุและฝีมือการผลิต โปรดดูบัตรรับประกันที่แนบมากับผลิตภัณฑ์ของคุณหรือเยี่ยมชมเว็บไซต์อย่างเป็นทางการของ PeakTech webเว็บไซต์สำหรับข้อกำหนดและเงื่อนไขการรับประกันโดยละเอียด
หากต้องการความช่วยเหลือด้านเทคนิค บริการ หรือสอบถามเกี่ยวกับการสอบเทียบ โปรดติดต่อตัวแทนจำหน่าย PeakTech ในพื้นที่ของคุณ หรือแผนกบริการลูกค้าของ PeakTech โดยทั่วไปแล้ว ข้อมูลการติดต่อจะพบได้ในเว็บไซต์ PeakTech webเว็บไซต์หรือในบรรจุภัณฑ์ของผลิตภัณฑ์


