1. บทนำและเรื่องอื่นๆview
The OSD Audio ATM-7 is a sophisticated 7-zone automatic speaker selector designed to distribute amplified audio signals to various zones within a home or commercial space. It allows users to select between two distinct music sources for each designated zone, providing flexible audio management. This passive device is engineered for seamless integration into existing audio systems, offering remote control capabilities for enhanced convenience.
For optimal performance and to prevent potential damage to your amplifier, it is highly recommended to use impedance matching in-wall volume controls in conjunction with the ATM-7, as this unit does not include built-in impedance protection.

Figure 1.1: OSD Audio ATM-7 Speaker Selector and its accompanying remote control, showcasing the front panel and rear connections.
2. คุณสมบัติหลัก
- 7-Zone Audio Distribution: Distributes amplified audio signals to up to seven independent zones.
- Dual Source Selection: Allows selection between two distinct music sources (A or B) in each zone when operating in 2-input mode.
- รีโมทคอนโทรล: Includes an IR remote control for convenient operation from a distance of up to 10 meters.
- Front Panel Controls & LEDs: Features status LEDs for Power, Multi-zone, Master/Slave, Zone In/Out Select, In/Out Mode, and Zone Out/In Selector.
- Master-Slave Functionality: A Master-Slave switch on the rear panel enables parallel connection of two ATM-7 units for expanded zone control.
- ฟังก์ชั่นหน่วยความจำ: The remote control includes a backup memory function to retain settings.
- การออกแบบเชิงรับ: A passive device, requiring external impedance matching for ampการป้องกันไลไฟเออร์
3. เนื้อหาบรรจุภัณฑ์
โปรดตรวจสอบให้แน่ใจว่าสินค้าทุกชิ้นครบถ้วนและอยู่ในสภาพดีเมื่อแกะกล่อง
- OSD Audio ATM-7 Speaker Selector Unit
- รีโมทคอนโทรลอินฟราเรด
- อะแดปเตอร์ไฟฟ้า (DC 12V 1.5A)
- External IR Receiver (for remote placement)
- คู่มือการใช้งาน (เอกสารนี้)
4. ข้อมูลด้านความปลอดภัย
เพื่อให้มั่นใจถึงความปลอดภัยในการใช้งานและป้องกันความเสียหาย โปรดปฏิบัติตามข้อควรระวังต่อไปนี้:
- แหล่งพลังงาน: ใช้เฉพาะอะแดปเตอร์ไฟฟ้าที่ให้มาเท่านั้น ตรวจสอบให้แน่ใจว่าระดับเสียงtage ตรงกับแหล่งจ่ายไฟในพื้นที่ของคุณ
- การระบายอากาศ : อย่าปิดกั้นช่องระบายอากาศ ตรวจสอบให้แน่ใจว่าอากาศไหลเวียนรอบเครื่องอย่างเพียงพอเพื่อป้องกันความร้อนสูงเกินไป
- ความชื้น: Do not expose the unit to water, moisture, or excessive humidity. Avoid placing liquids near the device.
- การจัดวาง: วางเครื่องบนพื้นผิวที่มั่นคงและเรียบ หลีกเลี่ยงการวางใกล้แหล่งความร้อนหรือในที่ที่มีแสงแดดส่องโดยตรง
- การบริการ: ห้ามซ่อมแซมเครื่องด้วยตนเอง โปรดส่งต่อเครื่องให้ช่างผู้ชำนาญการเป็นผู้ดำเนินการซ่อมแซม
- การจับคู่ค่าอิมพีแดนซ์: As a passive device, the ATM-7 does not provide impedance protection. Always use impedance matching volume controls or ensure your amplifier can handle the combined speaker load to prevent damage to your ampชีวิต.
5. การตั้งค่าและการติดตั้ง
Follow these steps to connect your OSD Audio ATM-7 speaker selector:
- Power Off All Equipment: ก่อนทำการเชื่อมต่อใดๆ โปรดตรวจสอบให้แน่ใจว่า... amplifier and all audio sources are powered off and unplugged from the wall outlet.
- เชื่อมต่อ Amplifier เอาท์พุท: Connect the speaker output terminals from your amplifier to the "ZONE IN/OUT" terminals on the rear of the ATM-7. The ATM-7 supports two input modes: 2-input (for dual source selection) or 7-input (for individual zone control). Refer to the rear panel diagram for correct wiring.
- เชื่อมต่อลำโพง: Connect your speakers to the corresponding "ZONE OUT" terminals on the rear of the ATM-7. Ensure correct polarity (+ to + and - to -) for all connections.
- Install Impedance Matching Volume Controls (Recommended): For optimal performance and amplifier protection, install impedance matching in-wall volume controls between the ATM-7 and your speakers. This is crucial to maintain a safe impedance load for your amplifier, especially when multiple zones are active.
- เชื่อมต่อตัวรับสัญญาณอินฟราเรด: If the ATM-7 unit will be placed out of direct line of sight for the remote control, connect the external IR receiver to the "EXT IR Receiver" port on the rear panel. Position the IR receiver in a location where it can receive signals from the remote.
- เชื่อมต่อพลังงาน: Plug the provided DC 12V 1.5A power adapter into the "DC 12V 1.5A" input on the rear of the ATM-7, then plug the adapter into a wall outlet.

Figure 5.1: Rear panel connections of the ATM-7, including speaker terminals, IR receiver port, and power input.

รูปที่ 5.2: รายละเอียด view of the speaker wire terminals on the rear of the ATM-7, showing positive and negative connections for a zone.
6. คู่มือการใช้งาน
The ATM-7 can be operated using the front panel controls or the included IR remote control.
6.1 แผงควบคุมด้านหน้า

Figure 6.1: Front panel of the ATM-7, displaying power button, status LEDs, and zone selectors.
- ปุ่มเพาเวอร์: Press to turn the unit On or Off. The "ON" LED indicates power status.
- Multi Zone Enable: Activates or deactivates multi-zone operation.
- ปุ่มปิดเสียง: Mutes all active audio outputs.
- Master/Slave Control Select (M/S): Toggles between Master and Slave mode when chaining two ATM-7 units.
- Zone In/Out Select: Toggles individual zones between input and output modes.
- IN/OUT Mode (2 IN / 7 IN): Selects between 2-input mode (allowing selection of Source A or B for each zone) or 7-input mode (where each zone acts as an independent input/output).
- ZONE OUT/IN SELECTOR (ZONE1-ZONE7): Buttons to individually activate or deactivate each of the seven zones. Corresponding LEDs indicate active zones.
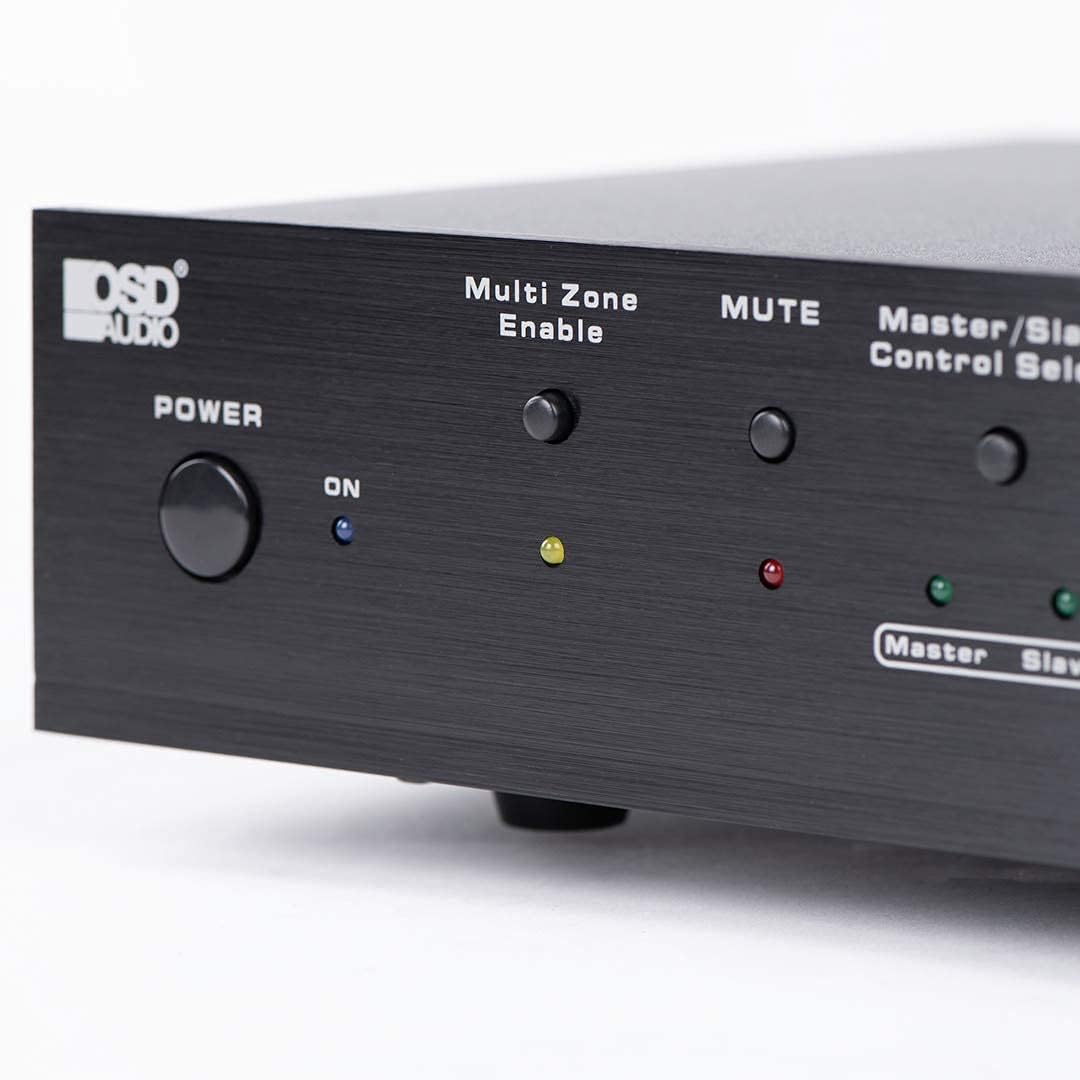
Figure 6.2: Detail of the Power and Multi Zone Enable buttons on the ATM-7 front panel.

Figure 6.3: Detail of the IN/OUT Mode (2 IN / 7 IN) and individual Zone Selector buttons on the ATM-7 front panel.
6.2 IR รีโมทคอนโทรล
The included IR remote control provides full functionality for the ATM-7. Point the remote towards the unit's IR sensor or the external IR receiver.
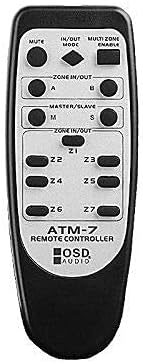
Figure 6.4: The ATM-7 remote control, featuring buttons for mute, input/output mode, master/slave, and individual zone selection.
- ใบ้: ปิดเสียงเอาต์พุตทั้งหมด
- IN/OUT MODE: Toggles between 2-input and 7-input modes.
- MULTI ZONE ENABLE: Activates or deactivates multi-zone operation.
- ZONE IN/OUT (A/B): In 2-input mode, selects between Source A and Source B for the active zones.
- MASTER/SLAVE (M/S): Selects Master or Slave mode for multi-unit configurations.
- Z1-Z7 Buttons: Individually activate or deactivate each of the seven zones.
The remote control has a backup memory function, retaining the last settings even after power cycling the unit. This allows for integration with smart plugs or switched outlets.
7. การบำรุงรักษา
The OSD Audio ATM-7 requires minimal maintenance. Follow these guidelines to ensure longevity:
- การทำความสะอาด: Use a soft, dry cloth to clean the exterior of the unit. Do not use liquid cleaners or abrasive chemicals.
- การระบายอากาศ : ตรวจสอบเป็นระยะว่าช่องระบายอากาศไม่มีฝุ่นและเศษสิ่งสกปรกอุดตัน
- การเชื่อมต่อ: Ensure all speaker wire connections remain secure and free from corrosion.
8 การแก้ไขปัญหา
| ปัญหา | สาเหตุที่เป็นไปได้ | สารละลาย |
|---|---|---|
| No audio output from speakers. |
|
|
| รีโมทคอนโทรลไม่ทำงาน |
|
|
| Sound distortion or low volume. |
|
|
9. ข้อมูลจำเพาะ
| คุณสมบัติ | ข้อมูลจำเพาะ |
|---|---|
| หมายเลขรุ่น | ATM-7 |
| ขนาดสินค้า | 21.5 x 12 x 5.5 นิ้ว |
| น้ำหนักสินค้า | 7 ปอนด์ |
| สี | สีดำ |
| ประเภทขั้วต่อ | Speaker Wire (Banana Plugs compatible) |
| ประเภทสายเคเบิล | สายลำโพง |
| ผู้ผลิต | OSD ออดิโอ |
| กำลังไฟเข้า | กระแสตรง 12V 1.5A |
| Remote Operating Distance | สูงสุด 10 เมตร |
10. ข้อมูลการรับประกัน
Warranty information for the OSD Audio ATM-7 Speaker Selector is typically provided with the product at the time of purchase or can be found on the official OSD Audio website. Please retain your proof of purchase for warranty claims. For detailed terms and conditions, please visit the OSD Audio official webไซต์หรือติดต่อฝ่ายสนับสนุนลูกค้าของพวกเขา
11. การสนับสนุนลูกค้า
For technical assistance, troubleshooting, or general inquiries regarding your OSD Audio ATM-7, please contact OSD Audio customer support. You can find contact information, FAQs, and additional resources on the official OSD Audio webเว็บไซต์:


