การแนะนำ
The Hinkley Landscape 0150BK Standard Transformer is designed to convert 120V line voltage to a safer, energy-efficient 12V low voltage for outdoor landscape lighting systems. This manual provides essential information for the proper installation, operation, and maintenance of your transformer.
Proposition 65 Warning: This product may contain chemicals known to the State of California to cause cancer and birth defects or other reproductive harm. Please check your local laws before purchasinก.ผลิตภัณฑ์นี้
คุณสมบัติผลิตภัณฑ์
- การป้องกันไฟกระชาก: Converts 120V line voltage to 12V low-voltage, suitable for outdoor lighting.
- Automated Timer: Includes an automated timer that activates at dusk and can be set for 4-hour, 6-hour, or 8-hour periods.
- เซ็นเซอร์ตาแมว: Automatically turns lights on at dusk and off at dawn.
- สวิตช์เปิด/ปิด: Manual control option.
- ไม่มีการหรี่แสง: Cannot be used with a dimmer switch or the Hinkley Smart Landscape Wireless Control + Dimmer.
- คะแนนความปลอดภัย: เหมาะสำหรับดamp locations, defined by NEC and CEC; Meets UL & CSA Product Safety Standards.
- วัสดุ: Durable Composite Resin construction.

Image: Graphic detailing the key features of the Hinkley transformer, including 12V tap, automatic timer, photocell sensor, and built-in circuit breaker.
Planning Your Landscape Lighting System
Proper planning is crucial for an effective and safe landscape lighting system. Consider the following:
- Safety and Operation: 12V systems are safe to use, and fixtures are rated for wet locations.
- ติดตั้งง่าย: Wires can typically be buried about 6 inches deep, simplifying installation.
- Flexible Fixture Placement: Fixture locations are adaptable and can be easily moved as your landscape matures or if you wish to add more pieces.
- ประสิทธิภาพการใช้พลังงาน: LED landscape lighting is energy-efficient and economical to operate, providing excellent light output for minimal wattage.
Creating a Sketch
Before beginning installation, sketch out the areas that will benefit from landscape lighting. Pay special attention to safety, security, and focal points on your property. This will help define the scope of your project and ensure a distinctive look.
Selecting the Right Transformer
The transformer is the heart of your system. It converts 120V household current to a safe 12V. Most residential projects can be accommodated by a 150W transformer. Always size up your transformer if you anticipate using over 75% of its capacity to allow for future additions.
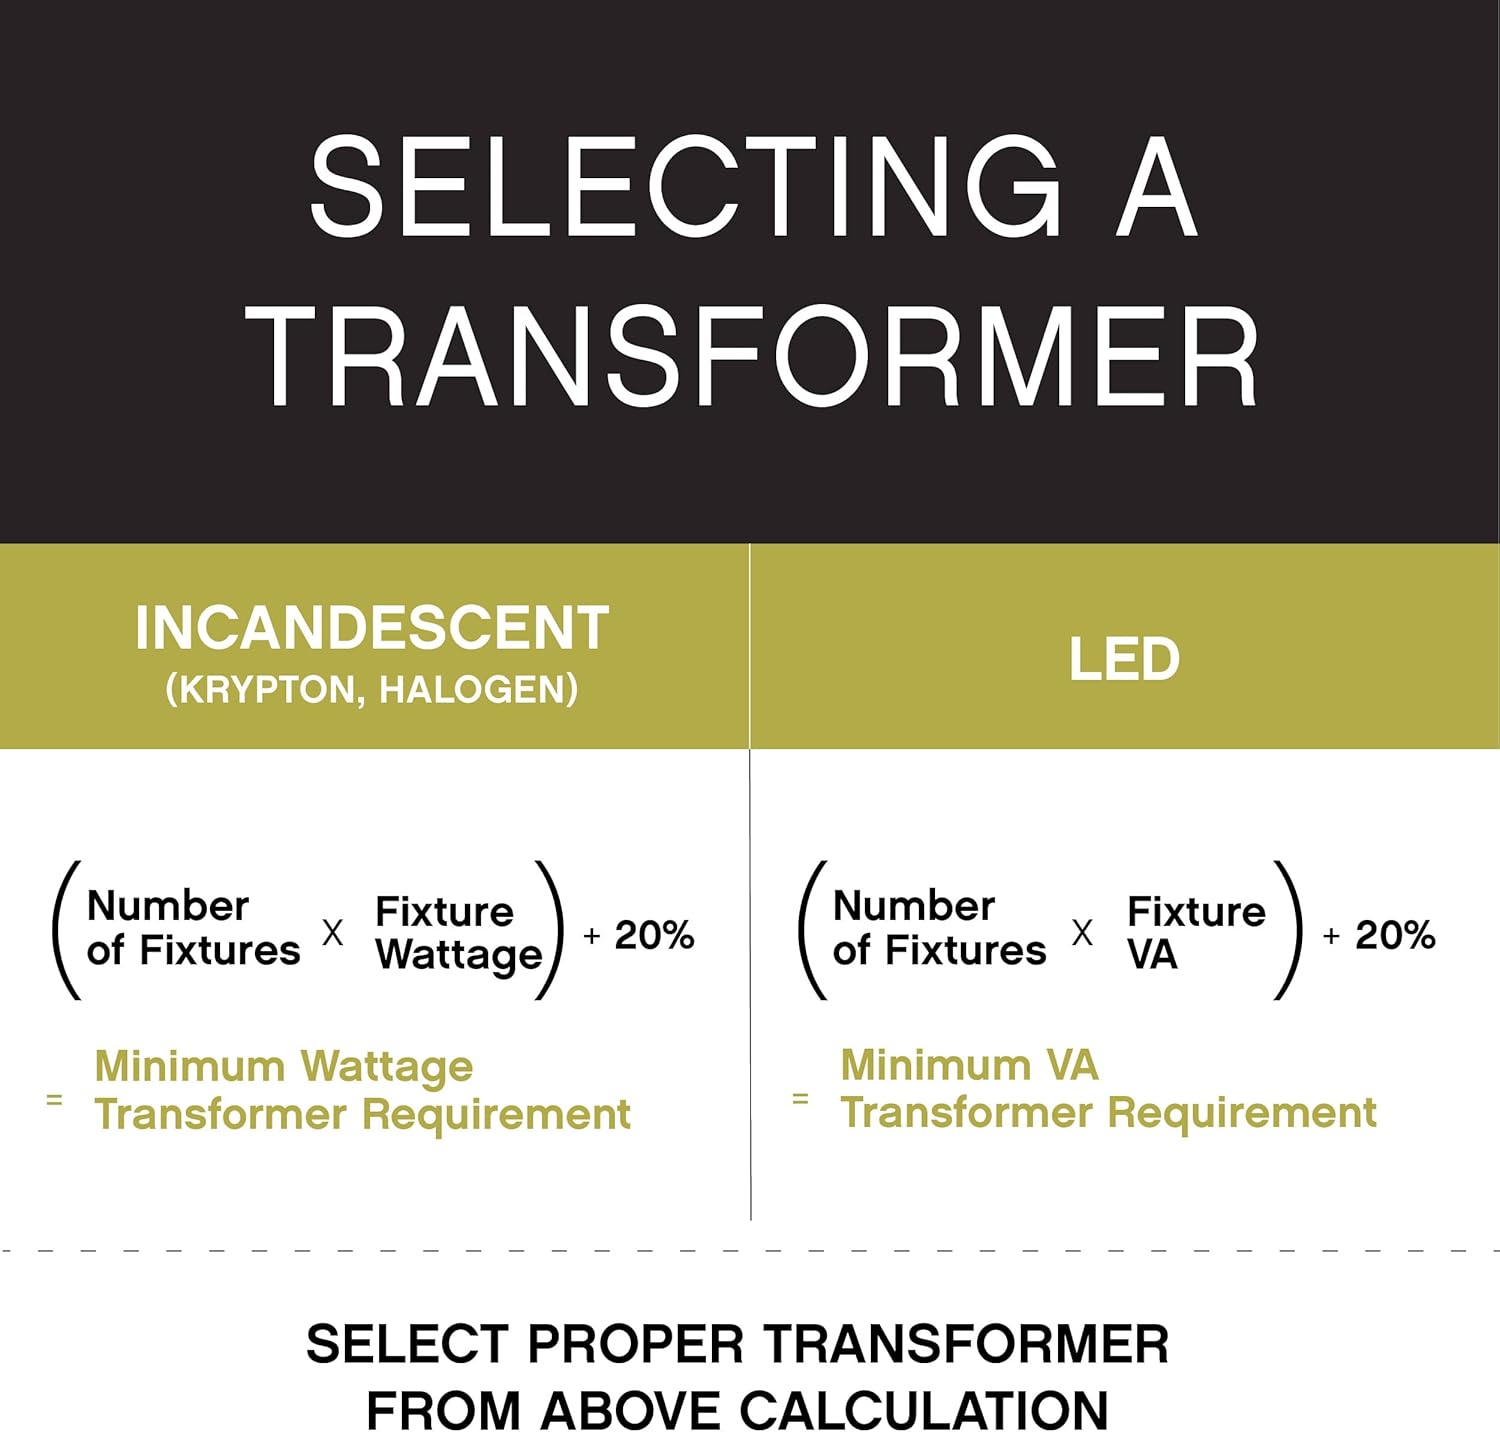
Image: Graphic providing formulas for calculating minimum wattage or VA transformer requirements for incandescent and LED fixtures.
คำแนะนำในการติดตั้ง
This section outlines the steps for installing your Hinkley Landscape Transformer and lighting system.
Video: Detailed guide on installing a low voltage landscape lighting system, covering basics, planning, transformers, and wiring.
1. Running Wire Cable
- Run your wire cable from the transformer to all lighting fixture locations. You may have multiple runs or trunk lines depending on your layout.
- Wait to bury your cable until the very end of the installation process.
- While lighter gauge wire can be used for LED lighting, a minimum of 12 gauge is recommended to ensure minimal voltage drop and extra durability.
2. Connecting Fixtures to Cable
- Once your cable is run to the fixture locations, connect each fixture to the 12-gauge cable.
- Ensure you leave plenty of excess cable to allow for repositioning of fixtures at night and to accommodate future growth of plants and trees.
- Make a strong, watertight connection. Cut your line, strip approximately 3/4 inch of insulation from the cable wire, then twist it together tightly with a gel-filled wire connector. Wrap the connection with electrical tape.
3. Connecting Main Cable Run to Transformer
- Run your cables exiting the transformer through conduit, approximately 6 inches into the ground, for a neat and professional installation.
- The transformer has large wire taps to accommodate multiple 12-gauge wires.
- Connect your main cable run into the transformer. This is a simple two-wire system; it does not matter which wire strand goes into the common and which into the voltagอีแตะ
- Strip the wire back about 3/4 inch and place one side into the common tap and the other side into the 12V tap. Use a flathead screwdriver to tighten each tap down.
- If you have a longer run (over approximately 100 feet), use the 15V tap to ensure the correct voltage ไปที่การแข่งขัน
- For multiple runs, place one strand from each run into the common tap and the other wire strand into the corresponding voltage tap, depending on the length of the run.
- Always identify each cable entering the wiring cavity. Colored electrical tape works well to mark each individual wire and identify the cable run on the inside of the transformer door.
4. การติดตั้งหม้อแปลง
- Once the main cable run is securely attached to the transformer, you can mount your transformer to a structure or use a secured post.
- The bottom of the transformer must be mounted at least 12 inches above grade and at least 10 feet from any open water.
- A post is usually the preferred method, as it allows you to position the transformer out of the line of sight. Use discretion when mounting on a front or back porch, as most homeowners prefer the transformer not to be in plain view.
5. แหล่งพลังงาน
- After the transformer is secured, it must be plugged into a 120V power source that is a GFCI (Ground Fault Circuit Interrupter) protected outlet. This is in accordance with the National Electrical Code.
- If you do not have a GFCI outlet, contact a qualified electrician to have one installed.
6. การฝังสายเคเบิล
- After all adjustments are made and you are satisfied with the fixture placement, you can bury the cable.
- Use a flat spade to slice through the landscape and bury the cable wire at least 6 inches into the soil.
- For landscape beds and sidewalks that are edged, you may want to bury your cable deeper than 6 inches to avoid damage from edging and tilling.

Image: The Hinkley Landscape 0150BK Standard Transformer installed on the exterior siding of a building.
การดำเนินการ
The Hinkley 0150BK transformer offers flexible control options for your landscape lighting:
- ตั้งเวลาอัตโนมัติ: The built-in timer, combined with the photocell, allows lights to turn on at dusk and remain on for 4, 6, or 8 hours.
- ตาแมว: The photocell sensor detects ambient light levels, automatically activating the system at dusk.
- สวิตช์เปิด/ปิด: A manual switch provides immediate control over your lighting system.
- dimming: This transformer is not compatible with dimmer switches or the Hinkley Smart Landscape Wireless Control + Dimmer.
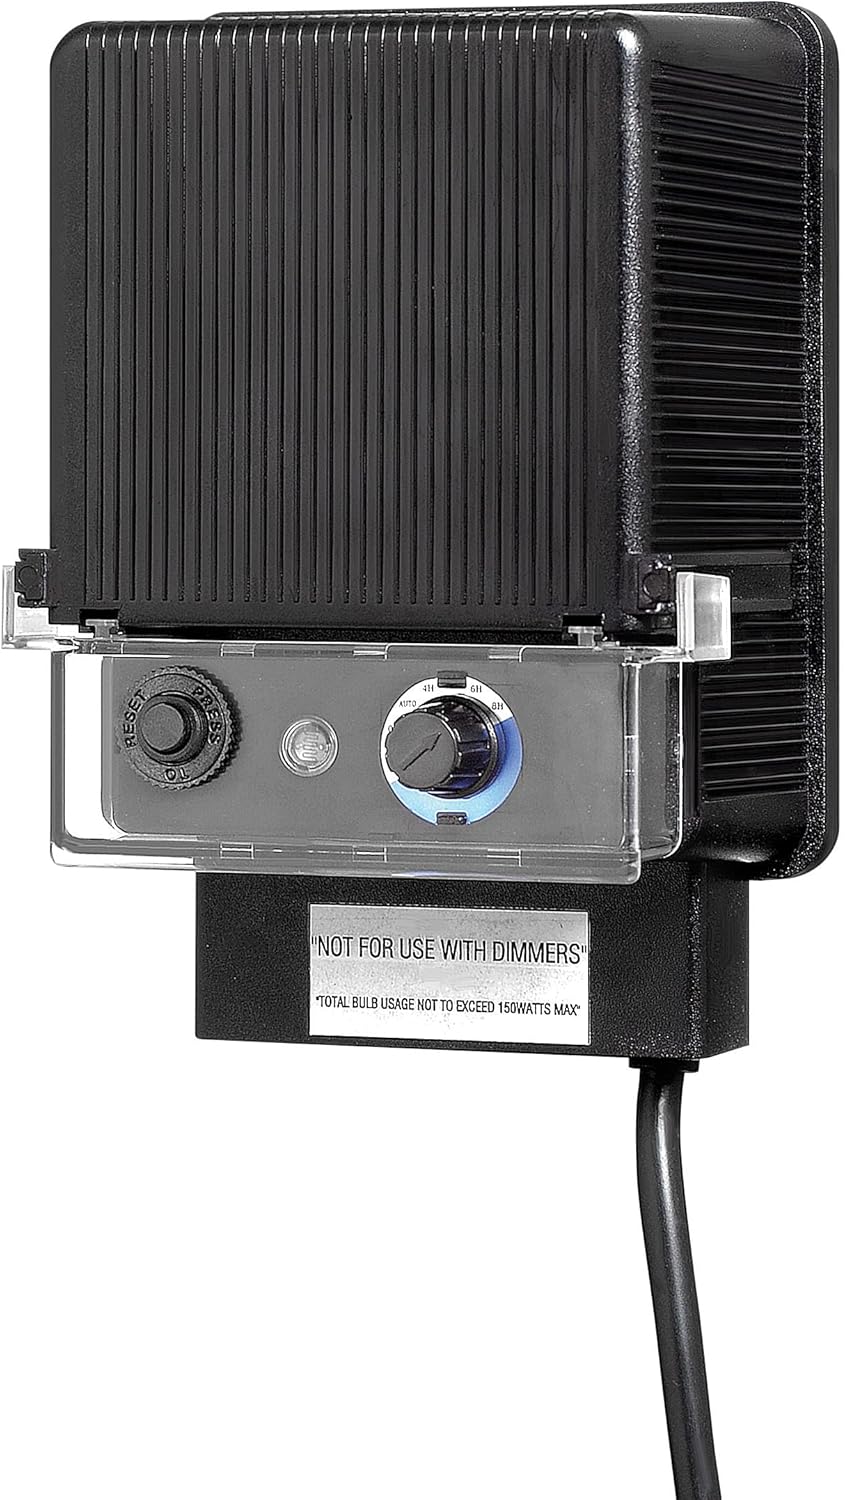
ภาพ: ด้านหน้า view of the Hinkley Landscape 0150BK Standard Transformer, highlighting the control panel with timer and photocell settings.
การซ่อมบำรุง
To ensure the longevity and optimal performance of your Hinkley Landscape Transformer, consider the following maintenance tips:
- การทำความสะอาดปกติ: Periodically wipe down the exterior of the transformer with a soft, damp cloth to remove dirt and debris. Ensure the unit is unplugged before cleaning.
- ตรวจสอบการเชื่อมต่อ: Annually inspect all wire connections for tightness and signs of corrosion. Re-tighten or clean as necessary.
- ตรวจสอบความเสียหาย: Regularly check the transformer casing and power cord for any physical damage. If damage is found, discontinue use and contact customer support.
- ล้างสิ่งกีดขวาง: Ensure the photocell sensor is clear of any obstructions (leaves, dirt) that might interfere with its operation.
- การปรับตามฤดูกาล: Adjust timer settings as needed with seasonal changes to optimize lighting schedules.
การแก้ไขปัญหา
If you encounter issues with your Hinkley Landscape Transformer, refer to the following common troubleshooting steps:
- ไฟไม่เปิด:
- Check if the transformer is plugged into a working GFCI outlet.
- Verify timer settings are correct and the photocell is not obstructed.
- Inspect all wire connections for looseness or corrosion.
- ตรวจสอบให้แน่ใจว่าวัตต์รวมtage of connected fixtures does not exceed the transformer's 150W capacity.
- ไฟกะพริบหรือหรี่ลง:
- สิ่งนี้อาจบ่งชี้ถึงปริมาณtage drop. Ensure you are using at least 12-gauge wire, especially for longer runs.
- Check if the 15V tap is used for longer runs (over 100 feet) to compensate for voltagอีลดลง
- Verify all connections are secure and free of corrosion.
- Transformer Not Responding:
- Check the GFCI outlet by pressing the 'Reset' button.
- ตรวจสอบให้แน่ใจว่าสายไฟไม่เสียหาย
If these steps do not resolve the issue, please contact Hinkley customer support for further assistance.
ข้อมูลจำเพาะ
| ข้อมูลจำเพาะ | ค่า |
|---|---|
| ยี่ห้อ | ฮิงคลีย์ |
| หมายเลขรุ่น | 0150BK |
| น้ำหนักสินค้า | 5 ปอนด์ |
| ขนาดสินค้า | ลึก 4 นิ้ว x กว้าง 6.75 นิ้ว x สูง 4 นิ้ว |
| วัดtage | 150 วัตต์ |
| เล่มที่tage | 12 โวลต์ |
| ก๊อกน้ำ | (1) 12v |
| วัสดุ | เรซินคอมโพสิต |
| สี | สีดำ |
| สไตล์ | มาตรฐาน |
| เสร็จ | สีดำ |
| ระดับความปลอดภัย | C-US Damp Rated (UL & CSA Product Safety Standards) |
| แหล่งพลังงาน | ไฟฟ้ากระแสสลับ |
| รูปแบบปลั๊ก | A - US style |
| ยูพีซี | 784497842403, 640665015003 |
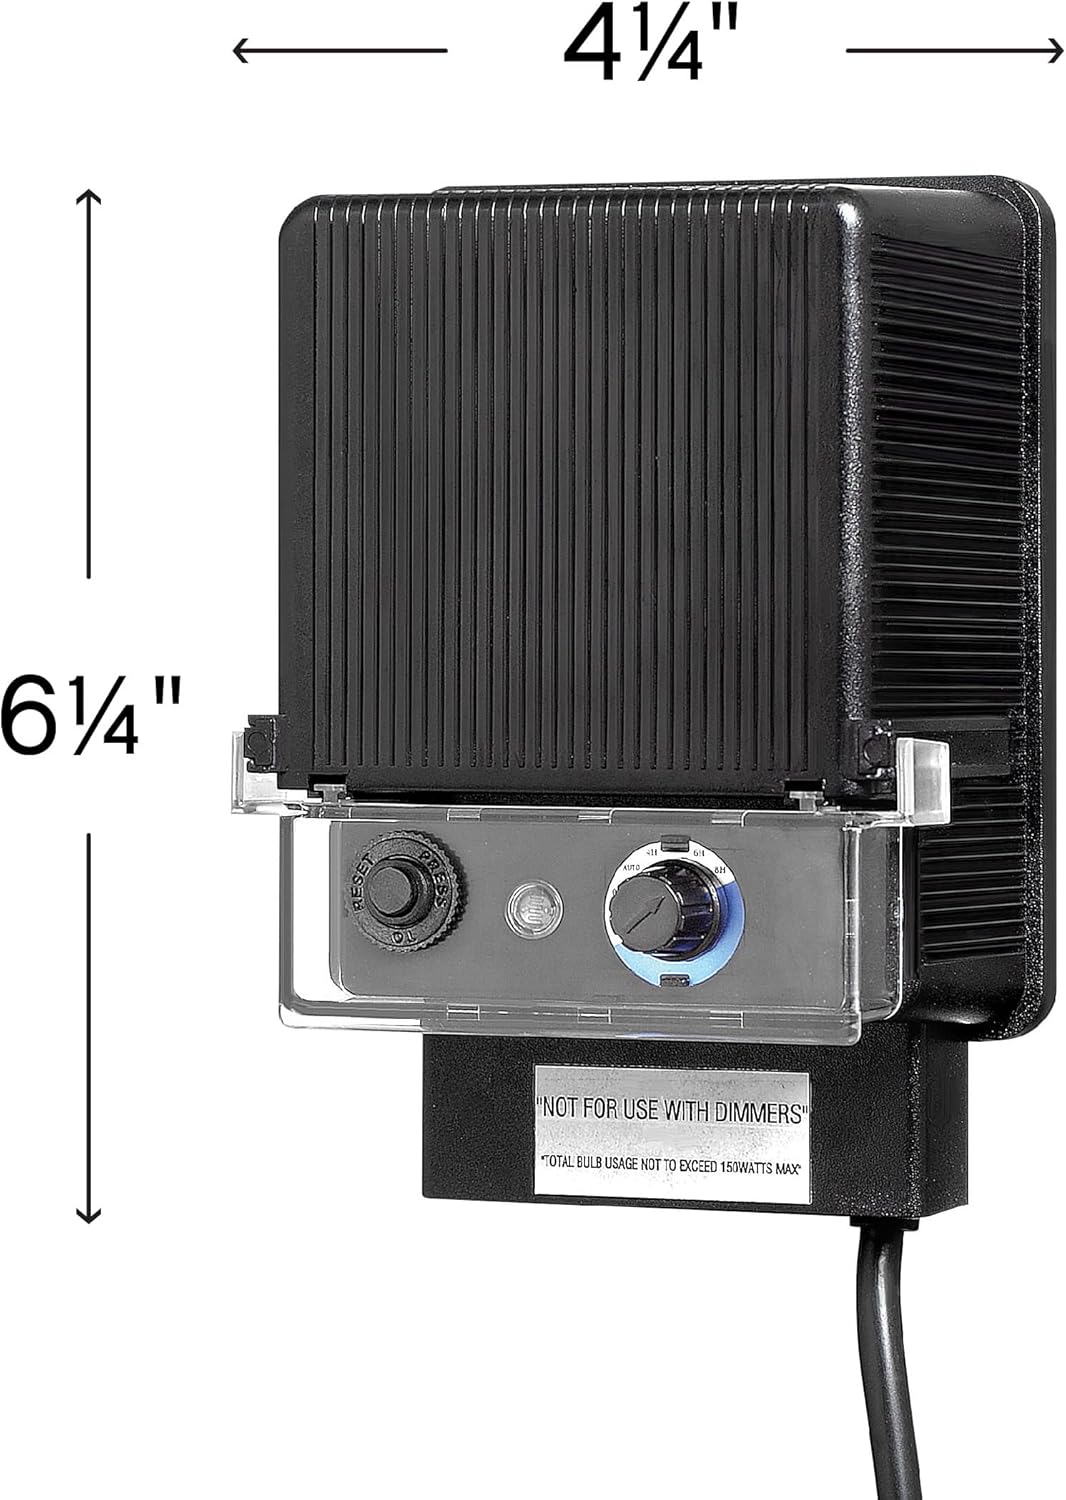
Image: Diagram illustrating the physical dimensions of the Hinkley 0150BK transformer.
การรับประกัน
The Hinkley Landscape 0150BK Standard Transformer comes with a 5-year limited warranty. For detailed terms and conditions, please refer to the warranty documentation included with your product or contact Hinkley customer support.
สนับสนุน
For further assistance, technical support, or to learn more about Hinkley products, please visit the official Hinkley webเว็บไซต์หรือติดต่อฝ่ายบริการลูกค้าของพวกเขา
แหล่งข้อมูลออนไลน์: www.hinkleylighting.com


