1. บทนำ
The Velleman DVM810 is a compact and economical 3 1/2 digit digital multimeter designed for measuring DC and AC voltages, DC currents, resistance, and for performing diode and transistor (hFE) tests. It features overload protection and automatic polarity indication, making it suitable for hobbyists, field use, and workshops. This manual provides essential information for the safe and effective operation of your DVM810 multimeter.
2. คุณสมบัติของผลิตภัณฑ์
- Automatic polarity indication
- เล่มที่tage measurements: AC 500V and DC 500V maximum
- Current measurements: DC 10A maximum (0.2A fused, 10A unfused)
- Resistance measurements: Up to 2MΩ
- Diode and transistor (hFE) test functions
- ป้องกันการโอเวอร์โหลด
- Compact design with 3 1/2 digit LCD display
3. เนื้อหาบรรจุภัณฑ์
กรุณาตรวจสอบเนื้อหาในแพ็คเกจเพื่อให้แน่ใจว่ามีสินค้าครบทั้งหมด:
- Velleman DVM810 มัลติมิเตอร์แบบดิจิตอล
- สายทดสอบ (สีแดง 1 เส้น สีดำ 1 เส้น)
- คู่มือการใช้งาน
4. ข้อมูลด้านความปลอดภัยที่สำคัญ
Read all safety warnings and instructions carefully before using this product. Failure to follow these instructions may result in electric shock, fire, or serious injury.
- ควรตรวจสอบให้แน่ใจเสมอว่าได้ตั้งค่ามัลติมิเตอร์ไปที่ฟังก์ชันและช่วงการวัดที่ถูกต้องก่อนทำการวัดใดๆ
- Never exceed the maximum input limits for any range. The maximum voltage for AC/DC is 500V.
- อย่าพยายามวัดกระแสในวงจรที่มีแรงดันไฟฟ้าtagเกิน 250V.
- Inspect test leads for damaged insulation or exposed metal before each use. Replace damaged leads immediately.
- ห้ามใช้มัลติมิเตอร์หากตัวเครื่องชำรุดหรือหากฝาครอบเปิดอยู่
- Exercise extreme caution when working with live circuits. Use appropriate personal protective equipment.
- ถอดปลั๊กไฟออกจากวงจรและปล่อยประจุไฟฟ้าแรงสูงออกทุกครั้งtage capacitors before measuring resistance or performing diode/transistor tests.
- ควรเปลี่ยนแบตเตอรี่เมื่อไฟแสดงสถานะแบตเตอรี่ต่ำปรากฏขึ้นบนหน้าจอแสดงผล เพื่อให้ได้ค่าที่แสดงถูกต้องแม่นยำ
5. สินค้าหมดview
Familiarize yourself with the components of your Velleman DVM810 multimeter:
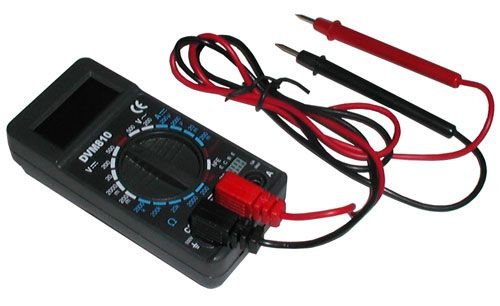
Figure 1: Velleman DVM810 Digital Multimeter. This image displays the front view of the compact multimeter, highlighting its liquid crystal display (LCD), the central rotary function switch, and the input jacks for test leads at the bottom.
- จอแสดงผล LCD: Shows measurement readings, units, and polarity.
- สวิตช์โรตารี่: ใช้สำหรับเลือกฟังก์ชันและช่วงการวัดที่ต้องการ
- แจ็คอินพุต:
- COM แจ็ค: Common (negative) input for all measurements. Connect the black test lead here.
- แจ็ค VΩmA: อินพุตเชิงบวกสำหรับเล่มtage, resistance, and current measurements up to 200mA. Connect the red test lead here.
- แจ็ค 10A: Positive input for high current measurements (up to 10A). Connect the red test lead here for 10A measurements.
- นำไปสู่การทดสอบ: Red and black leads used to connect the multimeter to the circuit under test.
6. การตั้งค่า
6.1 การติดตั้งแบตเตอรี่
The DVM810 multimeter requires a 9V battery (not always included). To install or replace the battery:
- Ensure the multimeter is turned OFF (rotary switch set to OFF).
- ค้นหาฝาครอบช่องใส่แบตเตอรี่ที่ด้านหลังของเครื่อง
- Remove the screw(s) securing the cover and carefully lift it off.
- ต่อแบตเตอรี่ 9V ก้อนใหม่เข้ากับคลิปหนีบแบตเตอรี่ โดยสังเกตขั้วให้ถูกต้อง
- ใส่แบตเตอรี่ลงในช่องใส่แบตเตอรี่ แล้วปิดฝาให้สนิท โดยขันสกรูให้แน่น
6.2 การเชื่อมต่อสายทดสอบ
เพื่อให้ได้การวัดที่แม่นยำและปลอดภัย ควรต่อสายวัดให้ถูกต้องเสมอ:
- ใส่สายวัดทดสอบสีดำลงใน คอม (แจ็ค) ทั่วไป
- สำหรับการวัดส่วนใหญ่ (ปริมาตร)tage, resistance, diode, hFE, and current up to 200mA), insert the red test lead into the VΩmA แจ็ค.
- สำหรับการวัดกระแสไฟฟ้าสูง (สูงสุด 10A) ให้เสียบสายวัดสีแดงเข้าไปในช่อง 10เอ แจ็ค.
7. คู่มือการใช้งาน
Before making any measurement, ensure the test leads are correctly connected and the rotary switch is set to the appropriate function and range.
7.1 การวัดปริมาตร DCtage (V=)
- ใส่สายสีแดงเข้าไปใน VΩmA jack and the black lead into the คอม แจ็ค.
- ตั้งสวิตช์หมุนไปที่ DC Vol ที่ต้องการtage (V=) range. Start with the highest range if the voltagอีไม่เป็นที่รู้จัก
- Connect the test leads across the component or circuit to be measured (in parallel).
- อ่านเล่มที่tage value on the LCD display. The display will show the correct polarity.
7.2 การวัดปริมาณไฟฟ้ากระแสสลับtagอี (วี~)
- ใส่สายสีแดงเข้าไปใน VΩmA jack and the black lead into the คอม แจ็ค.
- ตั้งสวิตช์หมุนไปที่ AC Vol. ที่ต้องการtage (V~) range. Start with the highest range if the voltagอีไม่เป็นที่รู้จัก
- Connect the test leads across the component or circuit to be measured (in parallel).
- อ่านเล่มที่tagค่า e บนจอ LCD
7.3 การวัดกระแสไฟฟ้ากระแสตรง (A=)
Caution: Never connect the multimeter in parallel with a voltagอย่าให้แหล่งจ่ายไฟอยู่ใกล้เกินไปขณะวัดกระแสไฟฟ้า เพราะอาจทำให้ฟิวส์ขาดหรือมิเตอร์เสียหายได้
- Determine the expected current. For currents up to 200mA, insert the red lead into the VΩmA แจ็ค สำหรับกระแสไฟไม่เกิน 10A ให้เสียบสายสีแดงเข้าไปในแจ็ค 10เอ jack. Always insert the black lead into the คอม แจ็ค.
- Set the rotary switch to the appropriate DC Current (A=) range. Start with the highest range if the current is unknown.
- Turn off power to the circuit. Open the circuit where the current is to be measured.
- ต่อมัลติมิเตอร์แบบอนุกรมเข้ากับวงจร
- Restore power to the circuit and read the current value on the LCD display.
7.4 การวัดค่าความต้านทาน (โอห์ม)
Caution: Ensure the circuit is completely de-energized and all capacitors are discharged before measuring resistance.
- ใส่สายสีแดงเข้าไปใน VΩmA jack and the black lead into the คอม แจ็ค.
- หมุนสวิตช์ไปที่ช่วงค่าความต้านทาน (โอห์ม) ที่ต้องการ หากไม่ทราบค่าความต้านทาน ให้เริ่มจากช่วงค่าที่สูงกว่าก่อน
- เชื่อมต่อสายทดสอบข้ามส่วนประกอบที่ต้องการวัด
- อ่านค่าความต้านทานบนจอ LCD
7.5 การทดสอบไดโอด
Caution: Ensure the diode is disconnected from the circuit or the circuit is de-energized before testing.
- ใส่สายสีแดงเข้าไปใน VΩmA jack and the black lead into the คอม แจ็ค.
- Set the rotary switch to the Diode symbol (|).
- ต่อสายสีแดงเข้ากับขั้วบวกและสายสีดำเข้ากับขั้วลบของไดโอด หน้าจอจะแสดงแรงดันไฟฟ้าไปข้างหน้าtagแรงดันตกคร่อม (โดยทั่วไปอยู่ที่ 0.5V ถึง 0.8V สำหรับไดโอดซิลิคอน)
- Reverse the leads. The display should show 'OL' (Overload) for a good diode. If it shows a reading in both directions or 'OL' in both directions, the diode may be faulty.
7.6 การทดสอบทรานซิสเตอร์ (hFE)
Caution: Ensure the transistor is disconnected from the circuit before testing.
- ใส่สายสีแดงเข้าไปใน VΩmA jack and the black lead into the คอม แจ็ค.
- ตั้งสวิตช์หมุนไปที่ตำแหน่ง hFE
- Identify if the transistor is NPN or PNP. Insert the transistor's emitter, base, and collector leads into the corresponding holes in the hFE socket on the multimeter.
- อ่านค่า hFE (อัตราขยายกระแสตรง) บนหน้าจอ LCD
8. ข้อมูลจำเพาะ
| พารามิเตอร์ | ค่า |
|---|---|
| ยี่ห้อ | Velleman |
| หมายเลขรุ่น | ดีวีเอ็ม810 |
| ประเภทการวัด | มัลติมิเตอร์ |
| DC ฉบับที่tagอี เรนจ์ | สูงถึง 500V |
| ฉบับ ACtagอี เรนจ์ | สูงถึง 500V |
| ช่วงกระแสไฟตรง | Up to 10A (0.2A fused, 10A unfused) |
| ช่วงความต้านทาน | สูงสุด 2MΩ |
| การทดสอบ Diode | ใช่ |
| การทดสอบทรานซิสเตอร์ (hFE) | ใช่ |
| แสดง | 3 1/2 Digit LCD |
| แหล่งพลังงาน | แบตเตอรี่ 9V (ไม่รวม) |
| ขนาด | ขนาดโดยประมาณ 3.70" x 1.81" x 1.03" |
| น้ำหนักสินค้า | ประมาณ 3.2 ออนซ์ (0.2 ปอนด์) |
| ยูพีซี | 836479002272 |
9. การบำรุงรักษา
9.1 การเปลี่ยนแบตเตอรี่
When the low battery indicator appears on the LCD, replace the 9V battery as described in Section 6.1. A weak battery can lead to inaccurate readings.
9.2 การทำความสะอาด
ในการทำความสะอาดมัลติมิเตอร์ ให้เช็ดตัวเครื่องด้วยผ้าamp cloth and a mild detergent. Do not use abrasives or solvents. Ensure the unit is completely dry before use.
9.3 การตรวจสอบสายทดสอบ
Regularly inspect the test leads for any signs of damage, such as cracked insulation, exposed wires, or loose connections. Replace damaged leads immediately to prevent electric shock hazards.
10 การแก้ไขปัญหา
- ไม่มีจอแสดงผลหรือจอแสดงผลจางๆ: ตรวจสอบแบตเตอรี่ เปลี่ยนใหม่หากจำเป็น
- การอ่านค่าที่ไม่ถูกต้อง:
- ตรวจสอบให้แน่ใจว่าสวิตช์หมุนถูกตั้งค่าไว้ที่ฟังก์ชันและช่วงที่ถูกต้อง
- ตรวจสอบปริมาณแบตเตอรี่tage; replace if low.
- ตรวจสอบให้แน่ใจว่าสายทดสอบเชื่อมต่ออย่างถูกต้องและไม่มีความเสียหาย
- สำหรับการวัดความต้านทาน โปรดตรวจสอบให้แน่ใจว่าวงจรไม่มีพลังงานอยู่
- แสดงข้อความ 'OL' (Overload): ค่าที่วัดได้เกินช่วงที่เลือกไว้ โปรดเลือกช่วงที่สูงกว่า หรือตรวจสอบให้แน่ใจว่าวงจรอยู่ในขีดความสามารถของมิเตอร์
- Fuse blown (during current measurement): If the meter stops measuring current, the internal fuse may have blown. Refer to a qualified technician for fuse replacement.
11. การรับประกันและการสนับสนุน
Warranty information for the Velleman DVM810 Digital Multimeter is typically provided with your purchase documentation or can be found on the official Velleman website. For technical support, service, or further inquiries, please refer to the contact information provided by your retailer or the manufacturer's official support channels.


