1. บทนำ
Thank you for choosing the Roadstar CD-853 USMP car stereo. This manual provides detailed instructions for the proper installation, operation, and maintenance of your new car audio system. Please read this manual thoroughly before using the product to ensure correct usage and to prevent damage.
The Roadstar CD-853 USMP is designed to provide high-quality audio entertainment in your vehicle, featuring CD, MP3, CD-R, and CD-RW playback capabilities, along with an FM/AM radio tuner.
2. ข้อมูลด้านความปลอดภัย
- แนะนำการติดตั้งอย่างมืออาชีพ: เพื่อให้ได้ประสิทธิภาพและความปลอดภัยสูงสุด ขอแนะนำอย่างยิ่งให้ติดตั้งอุปกรณ์นี้โดยช่างผู้เชี่ยวชาญ
- แหล่งจ่ายไฟ: This unit is designed for a 12V DC negative ground electrical system. Ensure correct wiring to prevent short circuits or damage.
- หลีกเลี่ยงน้ำและความชื้น: อย่าให้เครื่องโดนน้ำหรือความชื้นมากเกินไป เพราะอาจทำให้เกิดไฟฟ้าช็อตหรือไฟไหม้ได้
- อุณหภูมิ: Avoid extreme temperatures. Ensure proper ventilation around the unit.
- ความปลอดภัยในการขับขี่: อย่าใช้งานอุปกรณ์ในลักษณะที่รบกวนสมาธิในการขับขี่ ให้ความสำคัญกับความปลอดภัยบนท้องถนนเสมอ
- การควบคุมระดับเสียง: Keep the volume at a level where you can still hear outside traffic sounds. Prolonged exposure to high volume levels can cause hearing damage.
3. สินค้าหมดview
เค้าโครงแผงด้านหน้า
The following image illustrates the main controls and features on the front panel of your Roadstar CD-853 USMP car stereo.
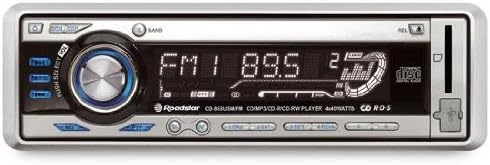
Figure 1: Front panel of the Roadstar CD-853 USMP car stereo. This image displays the front panel of the Roadstar CD-853 USMP car stereo, highlighting the main controls and display. Key features visible include the central volume/select knob, radio band selection, CD slot, and display showing radio frequency and playback information.
- ปุ่มเปิด/ปิด: Located on the top left, used to turn the unit on or off.
- EQ/DSP Button: Adjusts equalizer and digital sound processing settings.
- PUSH SELECT / VOL Knob: Central rotary knob for volume control. Pressing it typically accesses menu options or selection.
- ปุ่ม BAND: Selects between different radio bands (FM1, FM2, FM3, AM1, AM2).
- แสดง: Shows current status, radio frequency, track information, and menu options.
- ช่องใส่ซีดี: For inserting audio CDs, MP3 CDs, CD-R, and CD-RW discs.
- ปุ่ม REL: Release button, typically for detaching the front panel.
- ปุ่มดีดออก: Located near the CD slot, used to eject discs.
- ช่องเสียบ USB/AUX: (If present, typically indicated by an icon) For connecting external audio devices or USB storage.
4. การตั้งค่า
4.1 การติดตั้ง
Due to the complexity of vehicle electrical systems, professional installation is strongly recommended. Incorrect installation can lead to damage to the unit, your vehicle, or personal injury. Refer to your vehicle's service manual for specific wiring diagrams and dashboard disassembly instructions.
4.2 การเชื่อมต่อสายไฟ
Ensure all wiring connections are secure and correctly matched. Common wiring colors include:
- เหลือง: แรงดันไฟคงที่ 12V (แบตเตอรี่)
- สีแดง: ไฟ 12V แบบสวิตช์ (จุดระเบิด/อุปกรณ์เสริม)
- สีดำ: พื้น
- สีฟ้า: เสาอากาศไฟฟ้า / Ampเครื่องขยายเสียง เปิด/ปิดจากระยะไกล
- สายลำโพง: Typically pairs of solid and striped wires (e.g., White/White-Black for Left Front, Grey/Grey-Black for Right Front, Green/Green-Black for Left Rear, Purple/Purple-Black for Right Rear).
Always consult the wiring diagram provided with your unit and your vehicle's specific wiring information.
4.3 การเปิดเครื่องครั้งแรก
After installation, turn on your vehicle's ignition. Press the Power button on the unit. The display should illuminate, indicating successful power-up. If the unit does not power on, recheck all wiring connections and your vehicle's fuse box.
5. คู่มือการใช้งาน
5.1 การทำงานพื้นฐาน
- เปิด/ปิดเครื่อง: กดปุ่ม พลัง button (top left) to turn the unit on. Press and hold the Power button for a few seconds to turn it off.
- การควบคุมระดับเสียง: Rotate the central PUSH SELECT / VOL หมุนปุ่มตามเข็มนาฬิกาเพื่อเพิ่มระดับเสียง และหมุนทวนเข็มนาฬิกาเพื่อลดระดับเสียง
- การเลือกแหล่งที่มา: กดปุ่ม โหมด or เอสอาร์ซี button (if present, typically below the volume knob) to cycle through available audio sources (e.g., Radio, CD, USB, AUX).
5.2 การใช้งานวิทยุ
- เลือกแบนด์: กดปุ่ม วงดนตรี ปุ่มสำหรับสลับระหว่างคลื่นความถี่ FM1, FM2, FM3, AM1 และ AM2
- การปรับด้วยตนเอง: ใช้ ทำนอง buttons (typically left/right arrows) to manually adjust the frequency.
- การค้นหาการปรับอัตโนมัติ: กดปุ่มค้างไว้ ทำนอง ปุ่มเพื่อค้นหาสถานีที่แข็งแกร่งถัดไปโดยอัตโนมัติ
- สถานีที่ตั้งไว้ล่วงหน้า: To store a station, tune to the desired frequency, then press and hold one of the numbered preset buttons (1-6) until you hear a beep. To recall a preset, simply press the corresponding numbered button.
5.3 การเล่นซีดี/MP3
- การใส่แผ่นดิสก์: Gently insert a CD (audio CD, MP3 CD, CD-R, or CD-RW) into the ช่องใส่ซีดี with the label side facing up. The unit will automatically pull the disc in and begin playback.
- การดีดแผ่นดิสก์ออก: กดปุ่ม ดีดออก button (located near the CD slot) to remove the disc.
- เล่น/หยุดชั่วคราว: กดปุ่ม เล่น/หยุดชั่วคราว button (if present, often integrated with the volume knob press) to pause or resume playback.
- ติดตามการข้าม: ใช้ ข้าม buttons (typically forward/backward arrows) to skip to the next or previous track.
- กรอเดินหน้า/ย้อนกลับ: กดปุ่มค้างไว้ ข้าม buttons to fast forward or reverse within a track.
- Folder Navigation (MP3): For MP3 CDs, use the FOLDER UP/DOWN buttons (if present) to navigate between folders.
5.4 การตั้งค่าเสียง
- อีควอไลเซอร์ (EQ): กดปุ่ม EQ/DSP button to cycle through preset equalizer modes (e.g., Pop, Rock, Classic) or to access manual bass/treble adjustments.
- เบส/เสียงแหลม: When in EQ adjustment mode, rotate the PUSH SELECT / VOL knob to adjust bass or treble levels. Press the knob to confirm selection or move to the next setting.
6. การบำรุงรักษา
- การทำความสะอาดหน่วย: Use a soft, dry cloth to clean the front panel. For stubborn dirt, dampen the cloth lightly with water. Never use harsh chemicals, abrasive cleaners, or solvents.
- การจัดการดิสก์: Handle discs by their edges. Keep them clean and free from scratches. Store discs in their cases when not in use. Do not use cracked, warped, or irregularly shaped discs, as they can damage the player mechanism.
- Detachable Front Panel: If your unit has a detachable front panel, remove it when leaving your vehicle to deter theft. Store it in a protective case.
7 การแก้ไขปัญหา
หากคุณพบปัญหาเกี่ยวกับอุปกรณ์ โปรดดูตารางต่อไปนี้สำหรับปัญหาที่พบบ่อยและวิธีแก้ไข
| ปัญหา | สาเหตุที่เป็นไปได้ | สารละลาย |
|---|---|---|
| ไม่มีไฟฟ้า | สายไฟไม่ถูกต้อง ฟิวส์ขาด กุญแจสตาร์ทรถดับ | Check power and ground connections. Replace fuse if necessary. Turn vehicle ignition to ACC or ON position. |
| ไม่มีเสียง | ระดับเสียงต่ำเกินไป; ฟังก์ชันปิดเสียงทำงานอยู่; การเดินสายลำโพงไม่ถูกต้อง | Increase volume. Deactivate mute. Check speaker connections. |
| Disc error / Disc not playing | Disc is dirty, scratched, or inserted incorrectly; Disc format not supported. | Clean the disc. Insert disc correctly. Use supported disc formats (CD, MP3, CD-R, CD-RW). |
| การรับสัญญาณวิทยุไม่ดี | Antenna not connected; Weak signal area; Antenna damaged. | Ensure antenna is securely connected. Try tuning to a stronger station. Check antenna for damage. |
| ปุ่มไม่ตอบสนอง | Unit frozen; Detachable panel not properly seated. | Reset the unit (refer to manual for reset button location, often a small pinhole). Re-attach the front panel securely. |
If the problem persists after trying these solutions, please contact customer support or a qualified service technician.
8. ข้อมูลจำเพาะ
- แบบอย่าง: Roadstar CD-853 USMP
- กำลังขับ: 160 Watts (4 x 40 Watts)
- สื่อที่รองรับ: ซีดี, MP3, ซีดี-อาร์, ซีดี-อาร์ดับบลิว
- จูนเนอร์: วิทยุ FM/AM
- แหล่งจ่ายไฟ: 12V DC (กราวด์เชิงลบ)
- ASIN: B000YSFRMY
9. การรับประกันและการสนับสนุน
Roadstar products are manufactured to high-quality standards. This product is covered by a limited warranty from the date of purchase. Please refer to the warranty card included with your product for specific terms and conditions.
For technical support, service inquiries, or further assistance, please visit the official Roadstar website or contact your authorized Roadstar dealer. Keep your proof of purchase for warranty claims.


