1. บทนำ
This manual provides essential information for the safe and efficient operation of your Singer Tiny Tailor Mending Sewing Machine, Model TT600. Designed for quick mending tasks, this compact and portable machine offers a durable lockstitch for various fabric repairs.

Image 1.1: The Singer Tiny Tailor Mending Sewing Machine shown in its original packaging. This image provides a general overview ของผลิตภัณฑ์ตามที่ปรากฏเมื่อแกะกล่อง
2. คำแนะนำด้านความปลอดภัย
โปรดอ่านคำแนะนำทั้งหมดก่อนใช้งานเครื่องใช้ไฟฟ้านี้ เพื่อลดความเสี่ยงจากไฟไหม้ ไฟฟ้าช็อต หรือการบาดเจ็บต่อบุคคล
- Always unplug the machine from the electrical outlet immediately after using and before cleaning, making any adjustments, or removing/attaching any parts.
- ห้ามใช้งานเครื่องหากสายไฟหรือปลั๊กชำรุด หรือหากเครื่องตกหล่นหรือได้รับความเสียหาย
- วางนิ้วให้ห่างจากชิ้นส่วนที่เคลื่อนไหวทั้งหมด ต้องใช้ความระมัดระวังเป็นพิเศษรอบ ๆ เข็มจักรเย็บผ้า
- ใช้เฉพาะไฟล์แนบที่แนะนำโดยผู้ผลิต
- ห้ามทำตกหรือเสียบวัตถุใดๆ ลงในช่องเปิดใดๆ
- ห้ามใช้กลางแจ้ง
- ห้ามดำเนินการในบริเวณที่มีการใช้ผลิตภัณฑ์สเปรย์ หรือในบริเวณที่มีการส่งออกซิเจน
3. เนื้อหาบรรจุภัณฑ์
ตรวจสอบว่ามีรายการทั้งหมดอยู่ในแพ็คเกจ:
- Singer Tiny Tailor Mending Sewing Machine (Model TT600)
- ชุดควบคุมเท้า
- อะแดปเตอร์แปลงไฟ
- Extra Needle
- Bobbins (pre-wound or empty)
- ที่สนเข็ม
- Seam Opener/Thread Trimmer
- คู่มือการใช้งาน (เอกสารนี้)
4. การระบุชิ้นส่วน
Familiarize yourself with the components of your sewing machine:
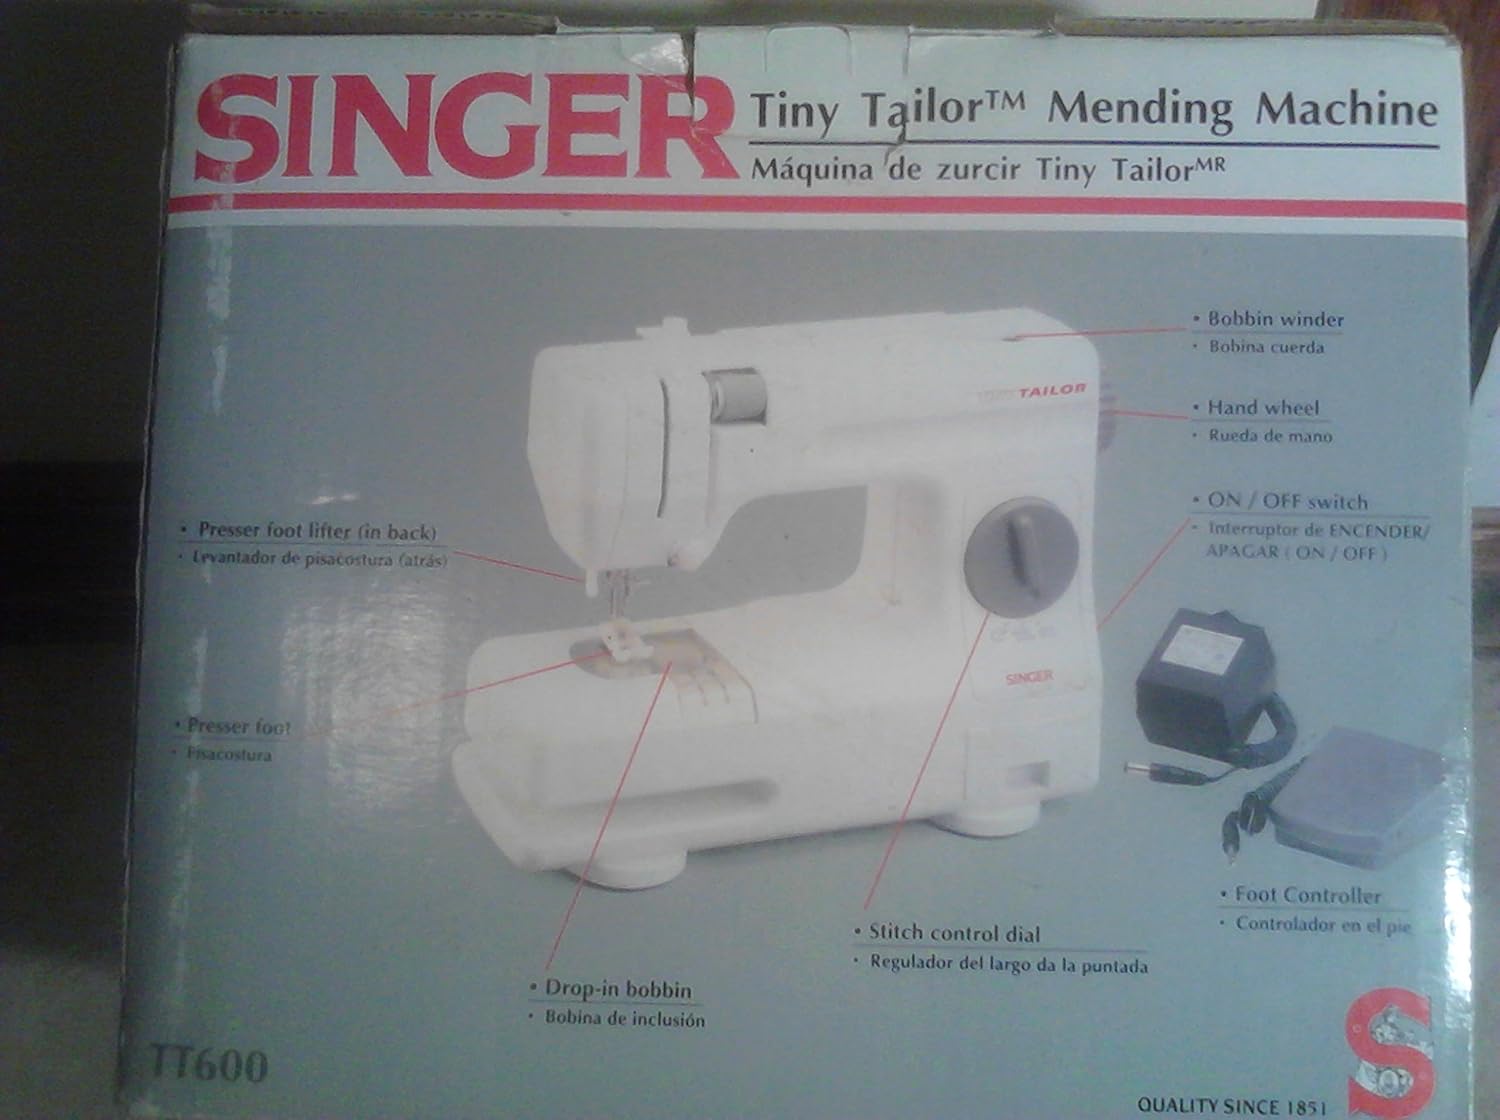
Image 4.1: Diagram illustrating the key parts of the Singer Tiny Tailor Mending Sewing Machine, including the bobbin winder, hand wheel, ON/OFF switch, presser foot lifter, presser foot, drop-in bobbin, stitch control dial, and foot controller.
- เครื่องม้วนด้าย: ใช้สำหรับพันด้ายลงบนกระสวย
- ล้อมือ: ยกและลดเข็มด้วยมือ
- สวิตช์เปิด/ปิด: เปิดหรือปิดเครื่อง
- อุปกรณ์ยกตีนผีจักรเย็บผ้า: Raises and lowers the presser foot.
- ตีนผีเย็บผ้า: ช่วยยึดผ้าให้แน่นขณะเย็บ
- Drop-in Bobbin: Easy access bobbin system.
- Stitch Control Dial: Adjusts the length of the stitch.
- ตัวควบคุมเท้า: Controls the sewing speed, freeing hands for fabric guidance.
5. การตั้งค่า
5.1 การเชื่อมต่อสายไฟ
- Ensure the ON/OFF switch is in the "OFF" position.
- Insert the power adapter plug into the machine's power jack.
- เสียบอะแดปเตอร์จ่ายไฟเข้ากับเต้ารับไฟฟ้ามาตรฐาน
5.2 Foot Control Connection
- Locate the foot control jack on the machine.
- Insert the foot control plug firmly into the jack.
5.3 การพันด้ายเข้ากระสวย
- วางหลอดด้ายไว้บนแกนยึดหลอดด้าย
- นำเส้นด้ายผ่านแผ่นปรับความตึงเพื่อพันด้ายลงกระสวย
- วางหลอดด้ายเปล่าลงบนแกนม้วนหลอดด้าย
- พันด้ายรอบกระสวยสองสามรอบ แล้วดันแกนหมุนกระสวยไปทางขวา
- Turn on the machine and gently press the foot control until the bobbin is sufficiently wound.
- Push the bobbin winder spindle back to the left and trim the thread.
5.4 Inserting the Drop-in Bobbin
- เปิดฝาครอบกระสวย
- ใส่กระสวยที่พันด้ายแล้วเข้าไปในกล่องกระสวย ตรวจสอบให้แน่ใจว่าด้ายคลายตัวในทิศทางที่ถูกต้อง (โดยปกติคือทวนเข็มนาฬิกา)
- นำด้ายจากกระสวยผ่านสปริงปรับความตึงและเข้าไปในช่องนำด้าย
- ปิดฝาครอบกระสวย
5.5 การร้อยเกลียวด้านบน
- ยกตีนผีขึ้น
- วางหลอดด้ายไว้บนแกนยึดหลอดด้าย
- Guide the thread through the upper thread guides and tension discs as indicated by the machine's markings.
- Thread the needle from front to back using the needle threader or manually.
- ดึงด้ายผ่านรูเข็มประมาณ 6 นิ้ว
5.6 การดึงด้ายกระสวยขึ้นมา
- ใช้มือซ้ายจับเส้นด้ายด้านบนเบาๆ
- Turn the hand wheel towards you to lower the needle into the needle plate and then raise it again.
- The needle thread will catch the bobbin thread, forming a loop.
- Pull the loop to bring the bobbin thread up through the needle plate opening.
- ดึงทั้งด้ายบนและด้ายล่างลอดใต้ตีนผีและไปทางด้านหลังของเครื่อง
6. การใช้งานเครื่อง
6.1 การเย็บพื้นฐาน
- Place the fabric under the presser foot, aligning the edge with a seam guide if available.
- ลดตีนผีลงโดยใช้ตัวยกตีนผี
- เปิดเครื่องโดยใช้สวิตช์เปิด/ปิด
- Gently press the foot control to start sewing. The harder you press, the faster the machine will sew.
- Guide the fabric gently with both hands, ensuring it feeds evenly. Do not pull or push the fabric forcefully.
- To stop sewing, release the foot control.
- Raise the needle to its highest position by turning the hand wheel.
- Raise the presser foot and pull the fabric away from the machine.
- Trim the threads using the seam opener/thread trimmer or scissors.
6.2 การปรับความยาวตะเข็บ
The Stitch Control Dial allows you to adjust the length of your stitches. Turn the dial to select the desired stitch length. Experiment on scrap fabric to find the appropriate setting for your project.
6.3 Mending Techniques
The Tiny Tailor is ideal for quick mending. For tears, align the edges of the fabric and stitch across the tear, overlapping the stitches slightly for reinforcement. For seams, simply stitch along the original seam line. For delicate fabrics, use a finer needle and thread and a shorter stitch length.
7. การบำรุงรักษา
7.1 การทำความสะอาด
การทำความสะอาดอย่างสม่ำเสมอจะช่วยรักษาประสิทธิภาพการทำงานของเครื่องของคุณ:
- ถอดปลั๊กเครื่องก่อนทำความสะอาดทุกครั้ง
- Use a soft brush or lint brush to remove lint and dust from the bobbin area and under the needle plate.
- เช็ดทำความสะอาดภายนอกเครื่องด้วยผ้าแห้งเนื้อนุ่ม ห้ามใช้น้ำยาทำความสะอาดหรือสารเคมีรุนแรง
7.2 การเปลี่ยนเข็ม
Replace the needle regularly, especially if it becomes bent, dull, or if you experience skipped stitches or thread breakage.
- ตรวจสอบให้แน่ใจว่าได้ถอดปลั๊กเครื่องแล้ว
- คลายเข็ม clamp สกรู
- ถอดเข็มเก่าออก
- ใส่เข็มใหม่โดยให้ด้านแบนหันเข้าด้านหลังของเครื่อง แล้วดันขึ้นให้สุด
- ขันเข็มให้แน่นamp ขันสกรูให้แน่น
8 การแก้ไขปัญหา
| ปัญหา | สาเหตุที่เป็นไปได้ | สารละลาย |
|---|---|---|
| เครื่องไม่เปิด | Power cord not plugged in; ON/OFF switch off. | Check power connections; ensure switch is ON. |
| ข้ามตะเข็บ | Bent or dull needle; incorrect needle size; improper threading. | Replace needle; ensure correct needle for fabric; re-thread machine. |
| ด้ายแตก | ความตึงของด้ายไม่ถูกต้อง; ด้ายคุณภาพต่ำ; เข็มงอหรือทื่อ; การร้อยด้ายไม่ถูกวิธี | Adjust tension; use good quality thread; replace needle; re-thread machine. |
| ผ้าไม่ป้อน | Presser foot not lowered; lint under needle plate. | Lower presser foot; clean bobbin area. |
| ด้ายกระสวยพันกัน | Improper bobbin insertion; incorrect bobbin winding. | Re-insert bobbin correctly; re-wind bobbin evenly. |
9. ข้อมูลจำเพาะ
| หมายเลขรุ่น | TT600 |
| ยี่ห้อ | SINGER |
| ASIN | B000KGIHVI |
| ยูพีซี | 037431203144 |
| สี | สีขาว |
| เป็นไฟฟ้า | ใช่ |
| แบตเตอรี่ที่จำเป็น | เลขที่ |
| น้ำหนักสินค้า | 6.05 ปอนด์ |
| ขนาดแพ็คเกจ | 13.4 x 10.3 x 8.5 นิ้ว |
10. การรับประกันและการสนับสนุน
For warranty information, product registration, or technical support, please refer to the official SINGER webหรือติดต่อฝ่ายบริการลูกค้าโดยตรง โปรดเก็บใบเสร็จรับเงินไว้เป็นหลักฐานการซื้อ
หมายเหตุ: เงื่อนไขการรับประกันเฉพาะอาจแตกต่างกันไปตามภูมิภาคและผู้ค้าปลีก


