การแนะนำ
This manual provides essential instructions for the installation, operation, maintenance, and troubleshooting of the IBM 49P1599 FRU System Board. This system board is designed for personal computers, featuring a 400/533 Front Side Bus, integrated 10/100 Ethernet, and support for DDR2 memory.
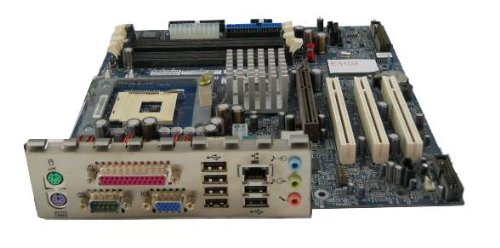
Image: The IBM 49P1599 FRU System Board. This image displays the main components and layout of the motherboard, including CPU socket, memory slots, and various connectors.
การติดตั้งและการตั้งค่า
Careful installation is crucial for the proper functioning of your system board. Always handle the board by its edges to avoid static discharge.
1. การเตรียมการติดตั้ง
- Ensure your computer case is compatible with the system board's form factor.
- เตรียมอุปกรณ์ที่จำเป็น: ไขควงหัวฟิลิปส์, สายรัดข้อมือป้องกันไฟฟ้าสถิต
- Unplug the power supply from the wall outlet before beginning.
2. Installing the System Board
- ติดตั้งแผ่นปิดพอร์ต I/O เข้ากับช่องเปิดด้านหลังของเคสคอมพิวเตอร์ของคุณ
- Carefully align the system board with the standoffs in the case.
- Secure the system board with screws, ensuring it is firmly seated.
3. การติดตั้งส่วนประกอบ
หน่วยประมวลผล (CPU)
This system board is supplied without a processor. Refer to your CPU's manual for specific installation instructions. Ensure the CPU is correctly oriented in the socket before securing the retention lever.
หน่วยความจำ (RAM)
The board supports DDR2 RAM and has 2 memory slots.
- เปิดคลิปที่ปลายทั้งสองด้านของช่องใส่หน่วยความจำ
- จัดตำแหน่งโมดูลหน่วยความจำให้ตรงกับช่อง โดยให้แน่ใจว่ารอยบากบนโมดูลตรงกับกุญแจในช่อง
- กดปลายทั้งสองข้างของโมดูลลงให้แน่นจนกระทั่งคลิปล็อกเข้าที่
การ์ดจอ
The system board features an Integrated Graphics Card Interface and a PCI-Express x16 slot for dedicated graphics cards.
- ค้นหาสล็อต PCI-Express x16
- ถอดฝาปิดช่องเสียบส่วนขยายที่เกี่ยวข้องออกจากเคสของคุณ
- Insert the graphics card firmly into the slot until it clicks. Secure it with a screw to the case.
4. การเชื่อมต่อสายเคเบิล
- ขั้วต่อสายไฟ: Connect the main 24-pin ATX power connector and the 4-pin CPU power connector from your power supply to the system board.
- อุปกรณ์ SATA: Connect SATA 3 data cables from your storage devices (hard drives, SSDs) to the SATA ports on the system board.
- ขั้วต่อแผงด้านหน้า: Connect the power button, reset button, HDD LED, power LED, and USB ports from your case to the corresponding headers on the system board. Refer to the board's silkscreen labels for correct orientation.
- อีเธอร์เน็ต: The board has integrated 10/100 Ethernet. Connect your network cable to the RJ-45 port on the I/O panel.
คำแนะนำการใช้งาน
After completing the physical installation, you can proceed with the initial boot and operating system setup.
1. การบูตเริ่มต้น
- ตรวจสอบให้แน่ใจว่าส่วนประกอบทั้งหมดเชื่อมต่ออย่างแน่นหนา
- เชื่อมต่อจอภาพ คีย์บอร์ด และเมาส์ของคุณ
- Plug in the power supply and turn on the system.
- ระบบควรจะเปิดขึ้นมา และคุณควรจะเห็นจอแสดงผลบนจอภาพของคุณ
2. การตั้งค่า BIOS/UEFI
During the initial boot sequence, press the designated key (commonly DEL, F2, F10, or F12) to enter the BIOS/UEFI setup utility. Here you can configure boot order, system time, and other hardware settings. Save changes before exiting.
3. การติดตั้งระบบปฏิบัติการ
This system board is compatible with platforms such as Windows 10. Insert your operating system installation media (USB drive or DVD) and follow the on-screen prompts to install the operating system. Ensure all necessary drivers for the system board components are installed after the OS installation.
การซ่อมบำรุง
Regular maintenance helps ensure the longevity and stable performance of your system board.
- การทำความสะอาด: Periodically clean dust from the system board and components using compressed air. Ensure the system is powered off and unplugged before cleaning.
- อัปเดต BIOS: Check the official IBM support website for BIOS updates. BIOS updates can improve compatibility, stability, and performance. Follow the provided instructions carefully when updating the BIOS.
- การตรวจสอบส่วนประกอบ: Ensure all cables and components remain securely connected.
การแก้ไขปัญหา
หากคุณพบปัญหา โปรดดูขั้นตอนการแก้ไขปัญหาทั่วไปต่อไปนี้:
ไม่มีไฟฟ้า
- Verify the power supply is connected to the wall outlet and turned on.
- Check that the 24-pin and 4-pin power connectors are securely attached to the system board.
- Ensure the front panel power button cable is correctly connected to the system board header.
ไม่มีการแสดงผล
- Confirm the monitor is powered on and connected to the correct video output (either integrated or dedicated graphics card).
- Reseat the graphics card (if applicable) and memory modules.
- หากเป็นไปได้ ให้ลองใช้จอภาพหรือสายวิดีโออื่นดู
System Fails to Boot
- Check for any loose cables or components.
- Ensure the CPU is properly seated and its cooler is installed correctly.
- Try booting with only one memory module installed, rotating through the modules and slots to identify a faulty one.
- Reset the BIOS to default settings (refer to your system board's specific instructions for clearing CMOS).
ข้อมูลจำเพาะ
การรับประกันและการสนับสนุน
For warranty information and technical support, please refer to the official IBM website or contact your point of purchase. Keep your proof of purchase for warranty claims. IBM provides resources and support for its products to ensure customer satisfaction.
หากต้องการความช่วยเหลือเพิ่มเติม โปรดไปที่ ฝ่ายสนับสนุนของ IBM webเว็บไซต์.
| คุณสมบัติ | ข้อมูลจำเพาะ |
|---|---|
| หมายเลขรุ่น | 49P1599 FRU |
| รถบัสด้านหน้า (FSB) | 400/533เมกะเฮิรตซ์ |
| เทคโนโลยีหน่วยความจำ RAM | DDR2 |
| ความเร็วสัญญาณนาฬิกาหน่วยความจำ | 2133 เมกะเฮิรตซ์ |
| มีช่องหน่วยความจำให้เลือก | 2 |
| อินเทอร์เฟซการ์ดกราฟิก | รวมอยู่ในตัว, PCI-Express x16 |
| รองรับมาตรฐานบัสระบบ | SATA3 ขึ้นไป |
| Integrated Ethernet | 10/100 เมกะบิตต่อวินาที |
| อุปกรณ์ที่รองรับ | เครื่องคอมพิวเตอร์ส่วนบุคคล |
| ความเข้ากันได้ของแพลตฟอร์ม | วินโดวส์ 10 |
| น้ำหนักสินค้า | 8 ปอนด์ |