
1. บทนำ
Thank you for choosing the iScooter i14 Electric Scooter with Seat. This manual provides essential information for the safe assembly, operation, and maintenance of your new electric scooter. Please read it thoroughly before your first ride and keep it for future reference. Proper use and care will ensure optimal performance and longevity of your scooter.
2. ข้อมูลด้านความปลอดภัย
Your safety is paramount. Always wear a helmet and appropriate protective gear (knee pads, elbow pads) when riding. Familiarize yourself with local laws and regulations regarding electric scooter use. Do not ride in adverse weather conditions or on slippery surfaces. Avoid riding under the influence of alcohol or drugs. Regular maintenance checks are crucial for safe operation.
- ควรสวมหมวกนิรภัยและอุปกรณ์ป้องกันเสมอ
- Check brakes, tires, and all fasteners before each ride.
- ปฏิบัติตามกฎหมายและข้อบังคับจราจรท้องถิ่น
- ไม่เกินความจุน้ำหนักสูงสุด 264 ปอนด์
- Avoid riding in heavy rain, snow, or on icy roads.
3. เนื้อหาบรรจุภัณฑ์
เมื่อแกะกล่องโปรดตรวจสอบว่ามีส่วนประกอบทั้งหมดอยู่ครบ:
- i14 สกู๊ตเตอร์ไฟฟ้า
- เครื่องชาร์จ
- คู่มือการใช้งาน (เอกสารนี้)
- ชุดเครื่องมือ
4. การติดตั้งและการประกอบ
Follow these steps to assemble your iScooter i14 Electric Scooter. A detailed assembly video is provided below for visual guidance.
4.1 การแกะกล่องและการตรวจสอบเบื้องต้น
นำส่วนประกอบทั้งหมดออกจากบรรจุภัณฑ์อย่างระมัดระวัง ตรวจสอบความเสียหายที่อาจเกิดขึ้นระหว่างการขนส่ง

Figure 4.1: The iScooter i14 Electric Scooter with Seat.
4.2 Front Wheel and Fender Installation
Attach the front wheel and fender to the scooter's fork using the provided tools. Ensure all bolts are securely tightened.
4.3 ชุดแฮนด์บาร์
Insert the handlebar stem into the main frame and secure it. Adjust the handlebar height to your preference and tighten the quick-release clamp. Attach the handlebar to the stem and secure it with the provided screws.

Figure 4.2: Adjusting the height of the handlebar for comfortable riding.
4.4 การติดตั้งเบาะนั่ง
Insert the seat post into the designated slot on the scooter frame. Adjust the seat height for comfortable riding and secure it with the quick-release lever. Ensure the seat is firmly in place.

Figure 4.3: Adjusting the seat height to suit individual rider preferences.
4.5 Rear Basket Attachment
Secure the rear storage basket to the designated mounting points on the scooter's rear rack using the provided hardware. Ensure it is stable and can safely carry items.

Figure 4.4: The spacious rear basket for carrying personal belongings.
4.6 คู่มือวิดีโอการประกอบ
Video 4.1: This video demonstrates the assembly process for the iScooter i14 Electric Scooter with Seat, including unboxing, attaching the front wheel, handlebar, seat, and rear basket.
5. คู่มือการใช้งาน
Understand the controls and features of your iScooter i14 for a safe and enjoyable ride.
5.1 Power On/Off and Key Ignition
Insert the mechanical key into the ignition slot and turn it to the 'ON' position to power on the scooter. The LCD display will illuminate. Turn the key to 'OFF' to power down.
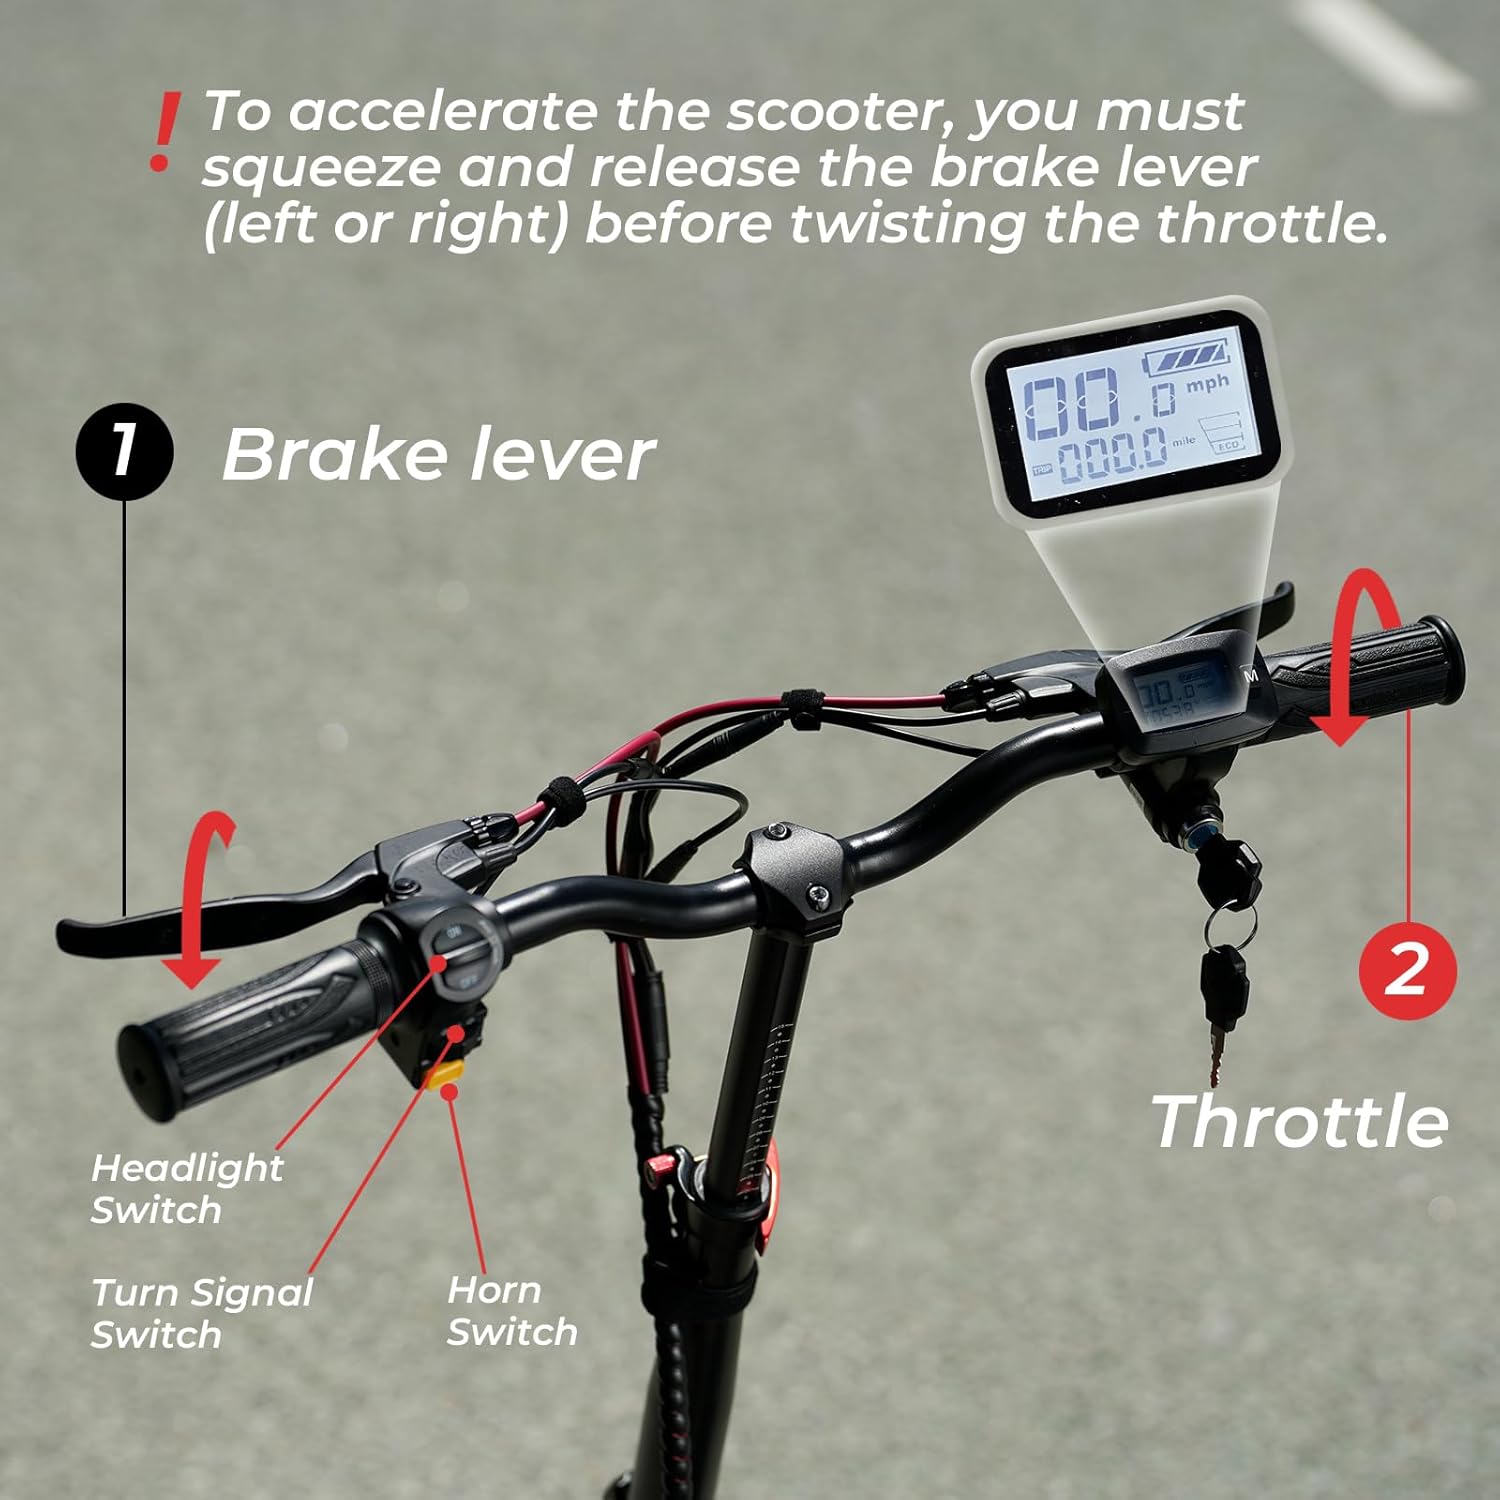
รูปที่ 5.1: เกินview of the handlebar controls, including the LCD display, key ignition, and switches.
โหมดความเร็ว 5.2 ระดับ
The iScooter i14 offers 3 adjustable speed modes: 9 MPH, 21 MPH, and 28 MPH. To switch between modes, press the 'M' button on the display twice. Select the appropriate speed mode based on your riding environment and experience level.
5.3 การทำงานของคันเร่ง
To accelerate, you must first squeeze and release either the left or right brake lever before twisting the throttle. This safety feature prevents accidental acceleration. Twist the throttle gently to control your speed.
5.4 Lights, Horn, and Turn Signals
Use the dedicated switches on the handlebar to activate the front and rear LED lights for visibility, the horn for alerts, and the turn signals to indicate your direction to others.

Figure 5.2: The bright front LED light enhances visibility during low-light conditions.

Figure 5.3: The rear LED light ensures you are seen from behind, improving safety.
5.5 ระบบเบรก
The scooter is equipped with front and rear disc brakes, along with an electric lock system, for powerful and reliable stopping performance. Apply both brake levers gently and evenly to slow down or stop. Avoid sudden, harsh braking, especially at high speeds.

Figure 5.4: The robust disc brake system provides effective stopping power.
6. การชาร์จ
To charge your iScooter i14, locate the charging port on the scooter's deck. Connect the charger to the port, then plug the charger into a standard wall outlet. The indicator light on the charger will typically turn red during charging and green when fully charged. A full charge takes approximately 8 hours.
Video 6.1: This video demonstrates the charging process for the iScooter i14 Electric Scooter.
7. การบำรุงรักษา
การบำรุงรักษาอย่างสม่ำเสมอจะช่วยให้สกูตเตอร์ของคุณใช้งานได้ยาวนานและปลอดภัย
- แรงดันลมยาง: Check the pressure of the 14-inch pneumatic tires regularly. Maintain the recommended PSI as indicated on the tire sidewall for optimal ride comfort and range.
- การตรวจสอบเบรค: Periodically inspect the front and rear disc brakes for wear and proper function. Adjust brake cables if necessary to ensure responsive braking.
- การทำความสะอาด: ทำความสะอาดสกู๊ตเตอร์ด้วยโฆษณาamp ผ้า. หลีกเลี่ยงการใช้น้ำแรงดันสูงฉีดใส่ชิ้นส่วนอิเล็กทรอนิกส์โดยตรง
- การดูแลแบตเตอรี่ Store the scooter in a cool, dry place. If storing for extended periods, charge the battery to approximately 50-70% and recharge every 1-2 months to prevent deep discharge.
- ตัวล็อค: Regularly check all screws, bolts, and quick-release mechanisms to ensure they are tight and secure.
8 การแก้ไขปัญหา
ต่อไปนี้คือปัญหาทั่วไปบางประการและแนวทางแก้ไขที่เป็นไปได้:
| ปัญหา | สาเหตุที่เป็นไปได้ | สารละลาย |
|---|---|---|
| สกู๊ตเตอร์เปิดไม่ติด | Low battery; Key not fully turned; Loose connections | Charge battery; Ensure key is in 'ON' position; Check all visible cable connections. |
| มอเตอร์ไม่ทำงาน | Brake lever not released before throttle; Faulty throttle; Motor issue | Ensure brake lever is released; Contact customer support if issue persists. |
| เบรกรู้สึกอ่อนแรง | ผ้าเบรกสึกหรอ; สายเบรกหลวม; มีอากาศในระบบไฮดรอลิก (ถ้ามี) | Inspect brake pads for wear and replace if needed; Adjust brake cable tension; Consult a professional for hydraulic brake issues. |
| มีเสียงดังผิดปกติขณะใช้งาน | ชิ้นส่วนหลวม; เศษสิ่งสกปรกในล้อ/เบรก; ปัญหาเกี่ยวกับมอเตอร์ | Check all fasteners; Inspect wheels and brakes for obstructions; Contact customer support. |
9. ข้อมูลจำเพาะ
| คุณสมบัติ | ข้อมูลจำเพาะ |
|---|---|
| ยี่ห้อ | ไอสกู๊ตเตอร์ |
| ชื่อรุ่น | ไอ14 |
| กำลังมอเตอร์ | 800วัตต์ |
| ความเร็วสูงสุด | 28 ไมล์ต่อชั่วโมง |
| ระยะทางสูงสุด | 34 ไมล์ |
| แบตเตอรี่ | 48V 10.4Ah |
| เวลาในการชาร์จ | 8 ชั่วโมง |
| ขนาดยาง | 14 นิ้ว |
| ประเภทยาง | นิวเมติกส์ |
| ประเภทการแขวนลอย | ระบบกันสะเทือนคู่ (ด้านหน้าและด้านหลัง) |
| สไตล์เบรค | Double Disc Brakes & EABS Braking Systems |
| จำกัด น้ำหนัก | 264 ปอนด์ |
| น้ำหนักสินค้า | 72 ปอนด์ |
| ขนาดสินค้า (กxยxส) | ยาว 43 นิ้ว x กว้าง 17 นิ้ว x สูง 45 นิ้ว |
| วัสดุกรอบ | อลูมิเนียม |
| คุณสมบัติพิเศษ | 800W Motor, 28MPH Top Speed, 34MILES Long Range, Dual Suspension, Adjustable Height, Adjustable Seat |
| การใช้ที่แนะนำ | การเดินทาง |
10. การรับประกันและการสนับสนุน
10.1 ข้อมูลการรับประกัน
iScooter offers a 12-month or 180-day warranty on different components of your product. Please refer to the specific warranty terms provided with your purchase for detailed coverage.
10.2 การสนับสนุนลูกค้า
For any questions, concerns, or assistance with your iScooter i14, please contact our customer support team:
- คอลเซ็นเตอร์ : +1 (855) 916-2366
- แชทสด/อีเมล: support@iscooterglobal.com
ทีมบริการลูกค้าของเราพร้อมให้ความช่วยเหลือคุณ

Figure 10.1: iScooter customer support details for assistance.