
1. บทนำ
Thank you for choosing the ELECROW 5-inch IPS Touch Screen Monitor. This compact display offers a high-definition visual experience with responsive touch functionality, designed for a wide range of applications including single-board computers and mini PCs. This manual provides essential information for the proper installation, operation, and care of your device.

The ELECROW 5-inch IPS Touch Screen Monitor, a versatile display solution.
คุณสมบัติที่สำคัญ ได้แก่:
- HD Display Experience: 5-inch IPS capacitive touchscreen with a 1024 x 600 resolution, 178° viewing angle, and support for up to 1080P signal input.
- Responsive Touch: Supports 5-point multi-touch on Windows and single-touch on Raspberry Pi/Jetson Nano.
- Plug-and-Play ง่าย: No additional drivers required for most compatible systems.
- ฟังก์ชั่นระดับมืออาชีพ: Features a headphone jack for audio output and a built-in OSD menu for display adjustments.
2. อะไรอยู่ในกล่อง
โปรดตรวจสอบว่ารายการทั้งหมดที่ระบุไว้ด้านล่างมีอยู่ในแพ็คเกจของคุณหรือไม่:
- 1x 5-inch Touch Screen Monitor
- 1x HD Cable (1m)
- 1x USB-A to USB-C Cable (1m)
- 1x Micro-HD Adapter (for Raspberry Pi 4B & 5)
- 4x Hexagonal Copper Standoff Kit (M2.5)
- 2x Pro Stand
- ไขควง 1x
- 1x User Manual (Quick Start Guide)
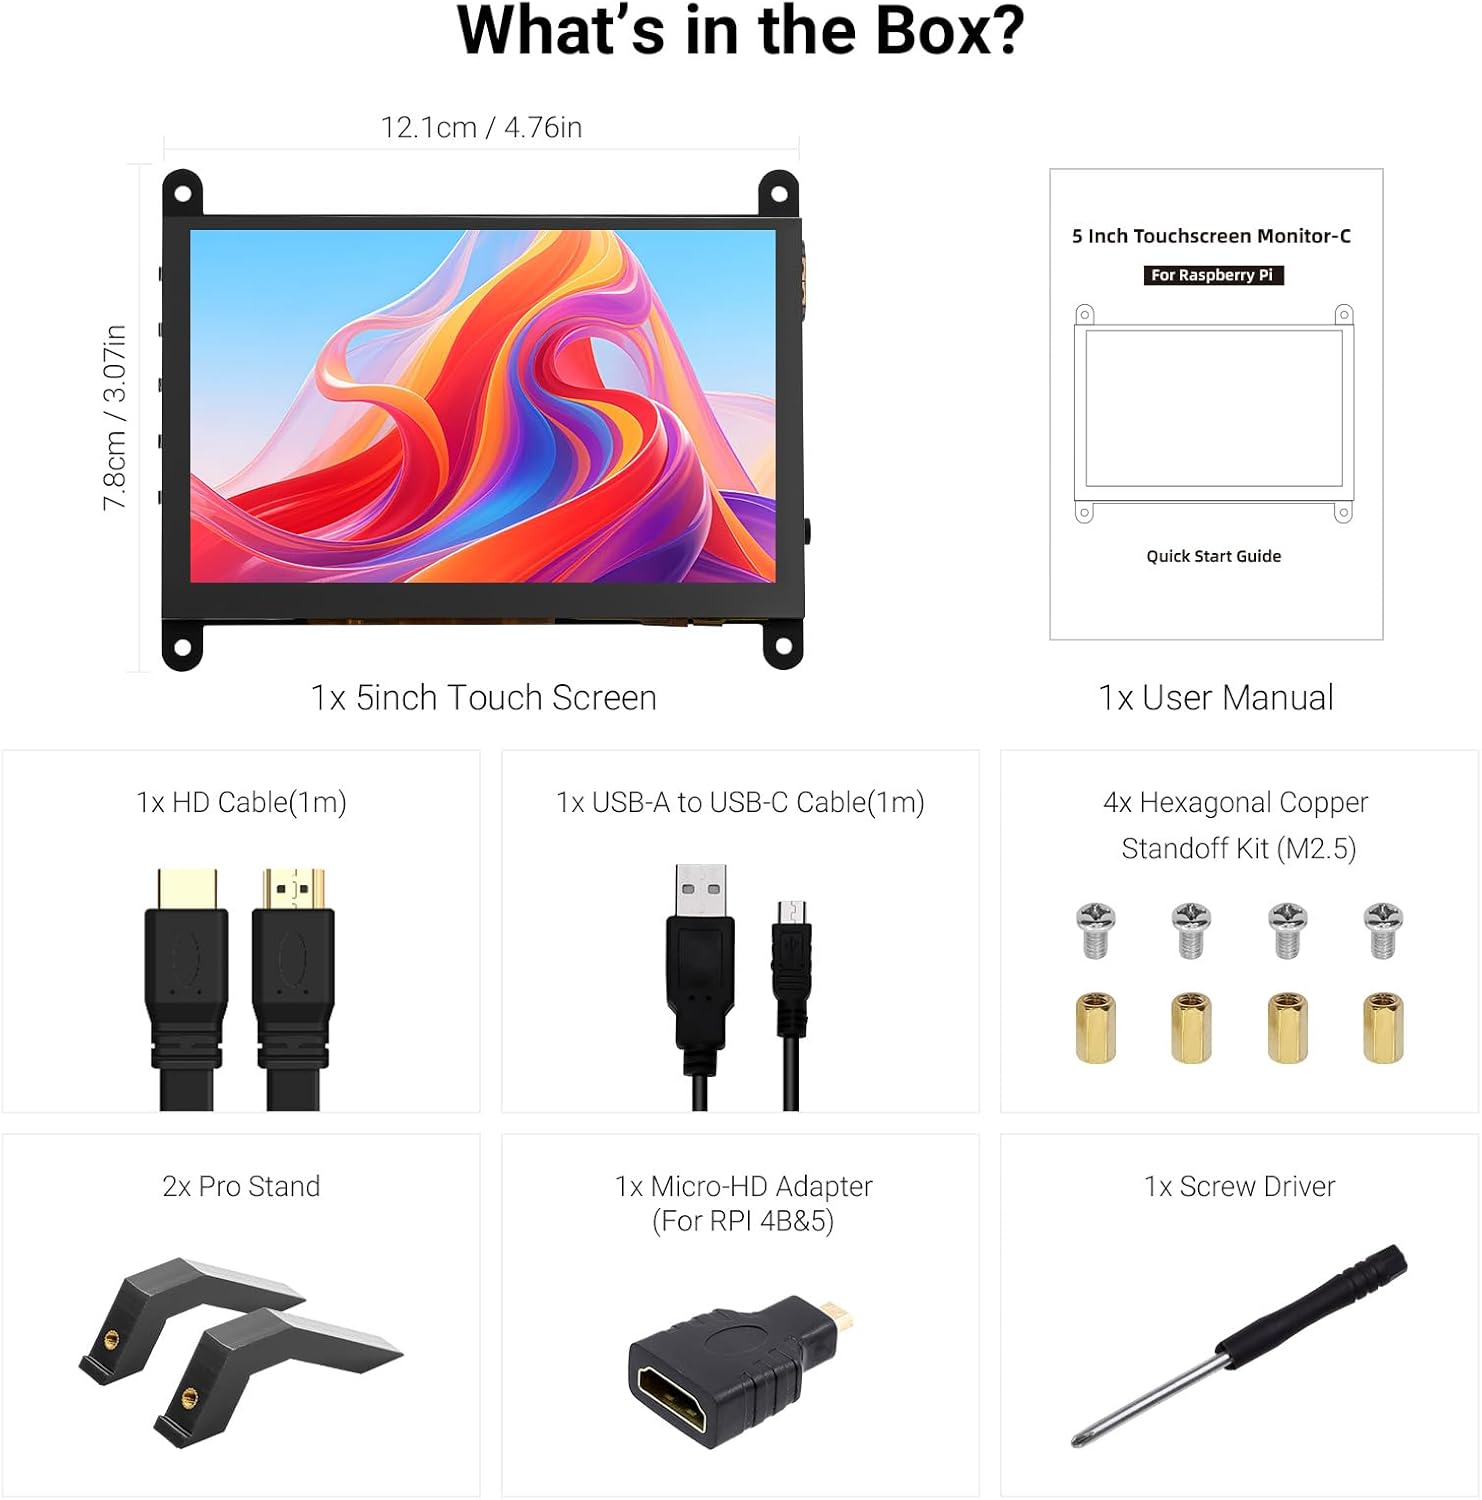
ส่วนประกอบทั้งหมดที่รวมอยู่ในบรรจุภัณฑ์ของผลิตภัณฑ์
3. สินค้าหมดview
Familiarize yourself with the ports and buttons on your ELECROW 5-inch Touch Screen Monitor:

รายละเอียด view of the monitor's ports and control buttons.
- HD Input Port: สำหรับการรับสัญญาณวิดีโอ
- พอร์ต USB-C: For power supply and touch signal transmission.
- แจ็คหูฟัง 3.5 มม.: สำหรับเอาต์พุตเสียง
- ปุ่มเมนู: เข้าถึงเมนูแสดงผลบนหน้าจอ (OSD)
- ปุ่มซ้าย/ขึ้น: Navigates left or up in the OSD menu.
- ปุ่มขวา/ลง: Navigates right or down in the OSD menu.
- ปุ่มย้อนกลับ: Exits a menu or returns to the previous option.
- ปุ่มเปิด/ปิด: เปิดหรือปิดจอแสดงผล
- 20P-FPC-0.5mm Display Port: For flexible cable expansion in embedded systems.
4. คำแนะนำในการตั้งค่า
Follow these steps to connect your ELECROW 5-inch Touch Screen Monitor to a compatible device:
4.1 การเชื่อมต่อกับ Raspberry Pi
- Connect HD Cable: Use the provided HD cable to connect the monitor's HD Input Port to the HDMI port on your Raspberry Pi. If using Raspberry Pi 4B or 5, use the included Micro-HD adapter.
- เชื่อมต่อสาย USB: Connect the USB-C port on the monitor to a USB-A port on your Raspberry Pi using the provided USB-A to USB-C cable. This supplies power to the monitor and enables touch functionality.
- เปิดเครื่อง: Power up your Raspberry Pi. The display should automatically detect the signal and power on.
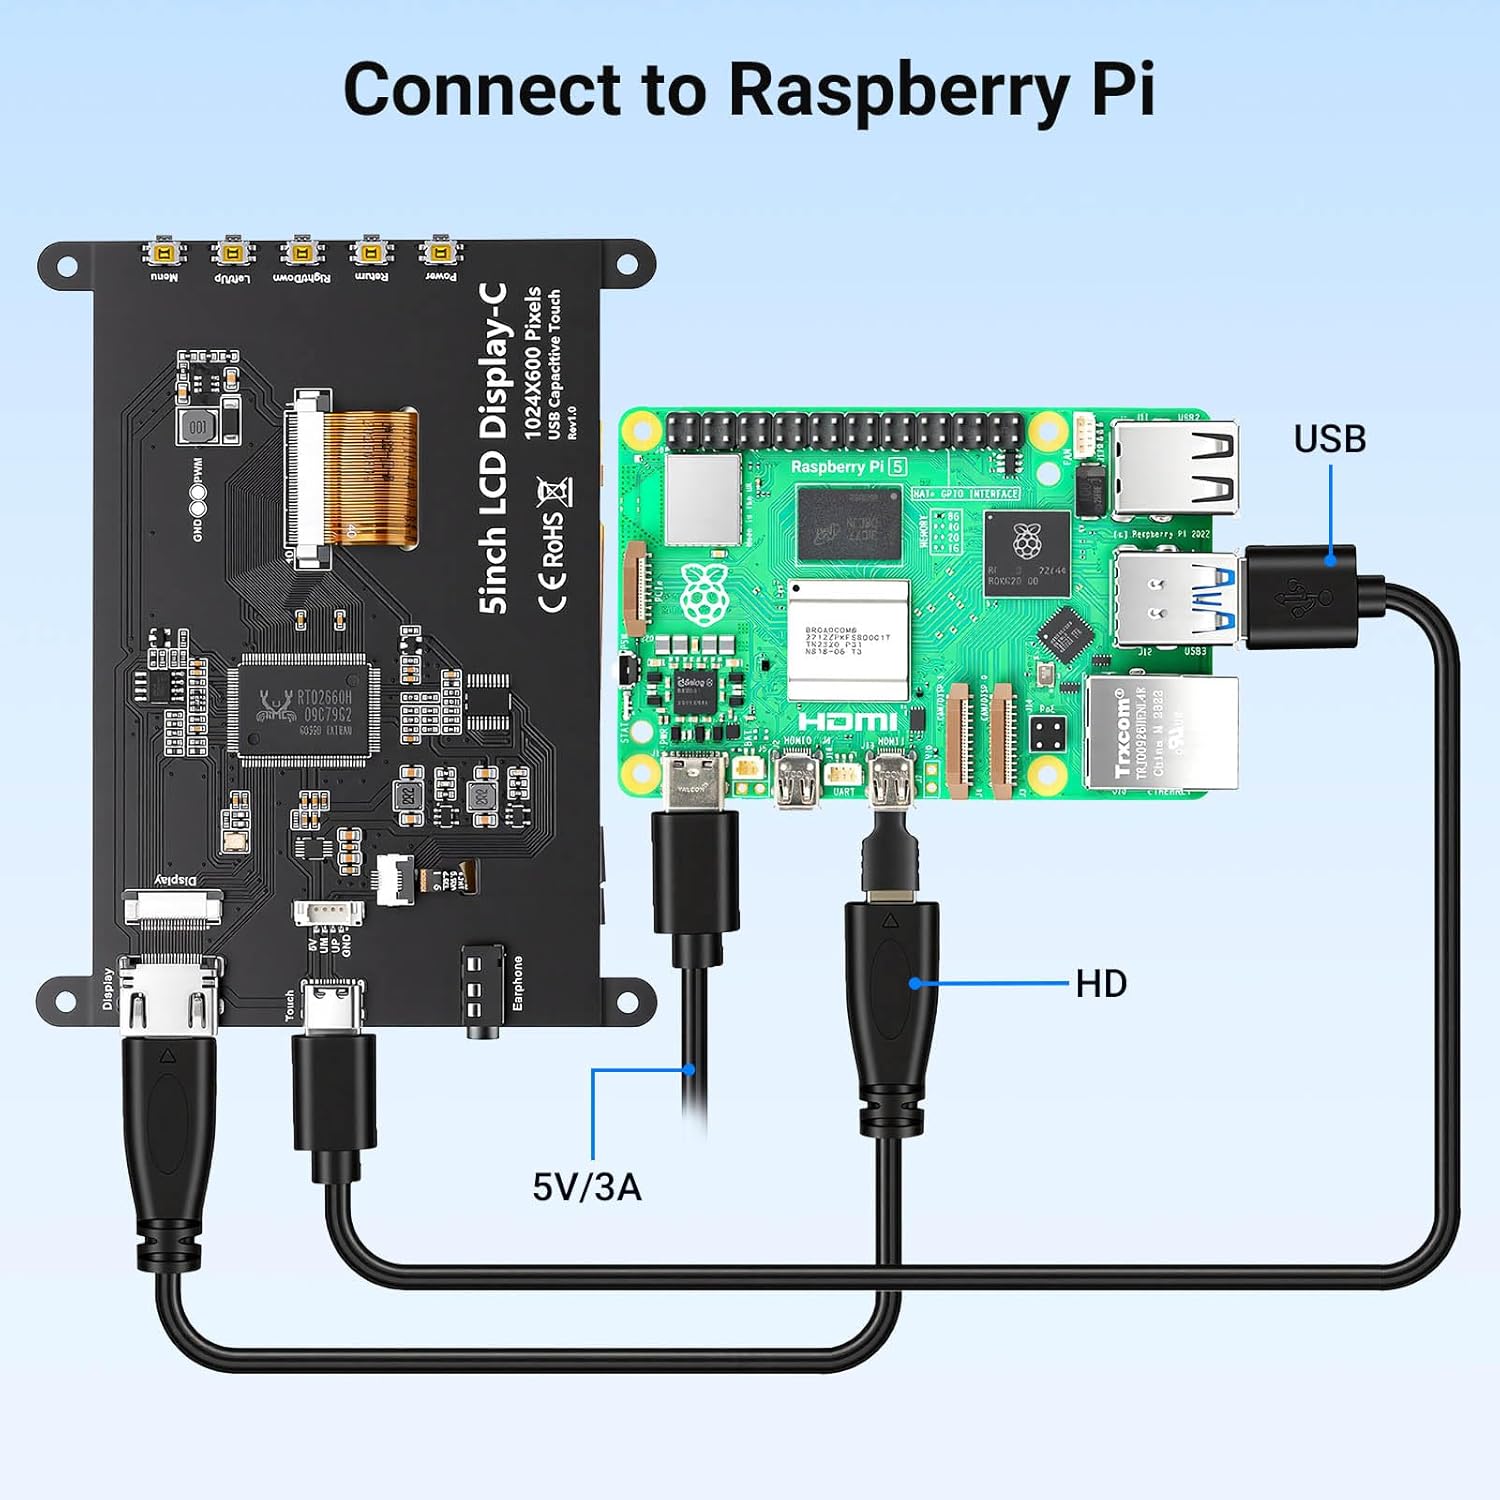
Connection diagram for Raspberry Pi.
4.2 Connecting to Windows PC/Laptop
- Connect HD Cable: Use the provided HD cable to connect the monitor's HD Input Port to the HDMI port on your PC/laptop.
- เชื่อมต่อสาย USB: Connect the USB-C port on the monitor to a USB-A port on your PC/laptop using the provided USB-A to USB-C cable. This provides power and enables touch functionality.
- เปิดเครื่อง: Power on your PC/laptop. The display should be recognized automatically. No additional drivers are typically required for Windows 7/8/10/11.
5. คู่มือการใช้งาน
5.1 การทำงานพื้นฐาน
- เปิด/ปิดเครื่อง: Press the Power Button (8) to turn the display on or off.
- ฟังก์ชั่นสัมผัส: The monitor features a capacitive touchscreen. On Windows systems, it supports 5-point multi-touch. On Raspberry Pi (Raspbian, Ubuntu, Kali, Retropie) and Jetson Nano, it supports single-touch operation.

Responsive touch experience for various devices.
5.2 การนำทางเมนู OSD
The On-Screen Display (OSD) menu allows you to adjust various display settings:
- กดปุ่ม Menu Button (4) เพื่อเปิดเมนู OSD
- ใช้ Left/Up Button (5) และ Right/Down Button (6) เพื่อไปยังตัวเลือกต่างๆ ในเมนู
- กดปุ่ม Menu Button (4) อีกครั้งเพื่อเลือกตัวเลือกหรือยืนยันการตั้งค่า
- กดปุ่ม ปุ่มย้อนกลับ (7) to exit the current menu or return to the previous level.
Common adjustable settings include Brightness, Contrast, and other display parameters.
5.3 เอาต์พุตเสียง
เชื่อมต่อหูฟังหรือลำโพงภายนอกเข้ากับ... 3.5mm Headphone Jack (3) for audio output from the connected device.
6. ความเข้ากันได้
The ELECROW 5-inch Touch Screen Monitor offers broad compatibility with various operating systems and hardware platforms:
- ระบบปฏิบัติการ: Raspbian, Ubuntu, Kali, Retropie, Windows 7/8/10/11, Windows 10 IoT.
- อุปกรณ์ที่รองรับ: Raspberry Pi 5, Raspberry Pi 4, Raspberry Pi 3 B+, BB Black, Banana Pi, Jetson Nano, PS4, Xbox.

Broad compatibility with popular operating systems and devices.
7. ข้อมูลจำเพาะ
| คุณสมบัติ | รายละเอียด |
|---|---|
| ยี่ห้อ | อิเล็คโทรโครว์ |
| หมายเลขรุ่น | DLH04950B |
| ขนาดหน้าจอ | 5 นิ้ว |
| ปณิธาน | 1024 x 600 พิกเซล |
| ประเภทจอภาพ | ไอพีเอส |
| Viewอิงแองเกิล | 178 องศา |
| ความสว่าง | 410 ซีดี/ตรม. |
| อัตราการรีเฟรช | 60 เฮิรตซ์ |
| เวลาตอบสนอง | 2 มิลลิวินาที |
| การเชื่อมต่อ | สาย HDMI, สาย USB Type C |
| เล่มที่tage | 5 โวลต์ |
| ขนาด (กว้าง x สูง) | 12.1 ซม. x 7.8 ซม. (4.76 นิ้ว x 3.07 นิ้ว) |
| คุณสมบัติเพิ่มเติม | Portable, Touchscreen, Headphone Jack, OSD Menu |

Visual representation of key display specifications.
8. การบำรุงรักษา
Proper care and maintenance will ensure the longevity and optimal performance of your monitor:
- การทำความสะอาดหน้าจอ: ใช้ผ้านุ่มไม่เป็นขุยเช็ดเล็กน้อยampened with water or a screen-cleaning solution. Avoid harsh chemicals, abrasive materials, or excessive moisture.
- การทำความสะอาดทั่วไป: Wipe the exterior of the monitor with a dry, soft cloth.
- พื้นที่จัดเก็บ: เมื่อไม่ได้ใช้งานเป็นเวลานาน ควรเก็บจอภาพไว้ในที่แห้งและเย็น หลีกเลี่ยงแสงแดดโดยตรงและอุณหภูมิที่สูงหรือต่ำเกินไป
- การจัดการ: Avoid dropping the monitor or subjecting it to strong impacts. Do not apply excessive pressure to the screen.
- การระบายอากาศ : Ensure the monitor has adequate ventilation to prevent overheating. Do not block any vents.
9 การแก้ไขปัญหา
If you encounter issues with your ELECROW 5-inch Touch Screen Monitor, refer to the following common problems and solutions:
9.1 ไม่มีจอแสดงผล / หน้าจอสีดำ
- ตรวจสอบการเชื่อมต่อ: Ensure the HD cable is securely connected to both the monitor and the source device.
- แหล่งจ่ายไฟ: Verify that the USB-C cable is properly connected and providing sufficient power (5V). Try a different USB port or power adapter if available.
- อุปกรณ์ต้นทาง: Confirm that your source device (e.g., Raspberry Pi, PC) is powered on and outputting a video signal.
- การตั้งค่าความละเอียด: Ensure the output resolution of your source device is compatible with the monitor (1024x600 or a resolution that can be scaled).
9.2 Touch Function Not Working
- การเชื่อมต่อ USB: The USB-C cable is essential for touch functionality. Ensure it is connected to both the monitor and the source device.
- รองรับระบบปฏิบัติการ: Verify that your operating system supports touch input and that necessary drivers (if any, though usually plug-and-play) are installed. For Raspberry Pi, ensure the OS is configured for touch.
- การปรับเทียบใหม่: Some operating systems may require touch screen calibration. Refer to your OS documentation for instructions.
9.3 Image Quality Issues (Flickering, Distorted Colors)
- ความสมบูรณ์ของสายเคเบิล: Try a different HD cable to rule out a faulty cable.
- Source Signal: Test the monitor with a different source device to determine if the issue is with the monitor or the source.
- การตั้งค่า OSD: Adjust brightness, contrast, and other color settings via the OSD menu.
10. การรับประกันและการสนับสนุน
10.1 ข้อมูลการรับประกัน
This ELECROW 5-inch Touch Screen Monitor comes with a การรับประกันจากผู้ผลิต 1 ปี. This warranty covers defects in materials and workmanship under normal use. It does not cover damage caused by misuse, accident, modification, or unauthorized repair.
10.2 การสนับสนุนด้านเทคนิค
For technical assistance, troubleshooting beyond this manual, or warranty claims, please contact ELECROW customer support through their official website or the platform where you purchased the product. Please have your model number (DLH04950B) and purchase details ready when contacting support.