
1. บทนำ
The ELECROW ThinkNode M6 is an outdoor solar-powered LoRa node repeater designed for reliable communication in off-grid and remote areas. It integrates a 6W monocrystalline solar panel, a 7000mAh lithium battery, GPS, and the nRF52840 core processor with an nRFLR1262 LoRa transceiver module. This device supports both Bluetooth and LoRa dual-mode connectivity, offering stable signal coverage and high-precision positioning for various IoT applications.

Image 1.1: The ELECROW ThinkNode M6 Solar Powered LoRa Node Repeater.
2. อะไรอยู่ในกล่อง
ตรวจสอบว่ามีส่วนประกอบทั้งหมดอยู่ครบเมื่อแกะกล่อง:
- 1x ThinkNode M6 Outdoor Solar Power Unit
- 1x LoRa Antenna (915MHz)
- 1x เสาอากาศ GPS
- 1x Universal Bracket (Wall Mounted)
- 1x Screw Package for mounting
- 1x คู่มือผู้ใช้ (เอกสารนี้)
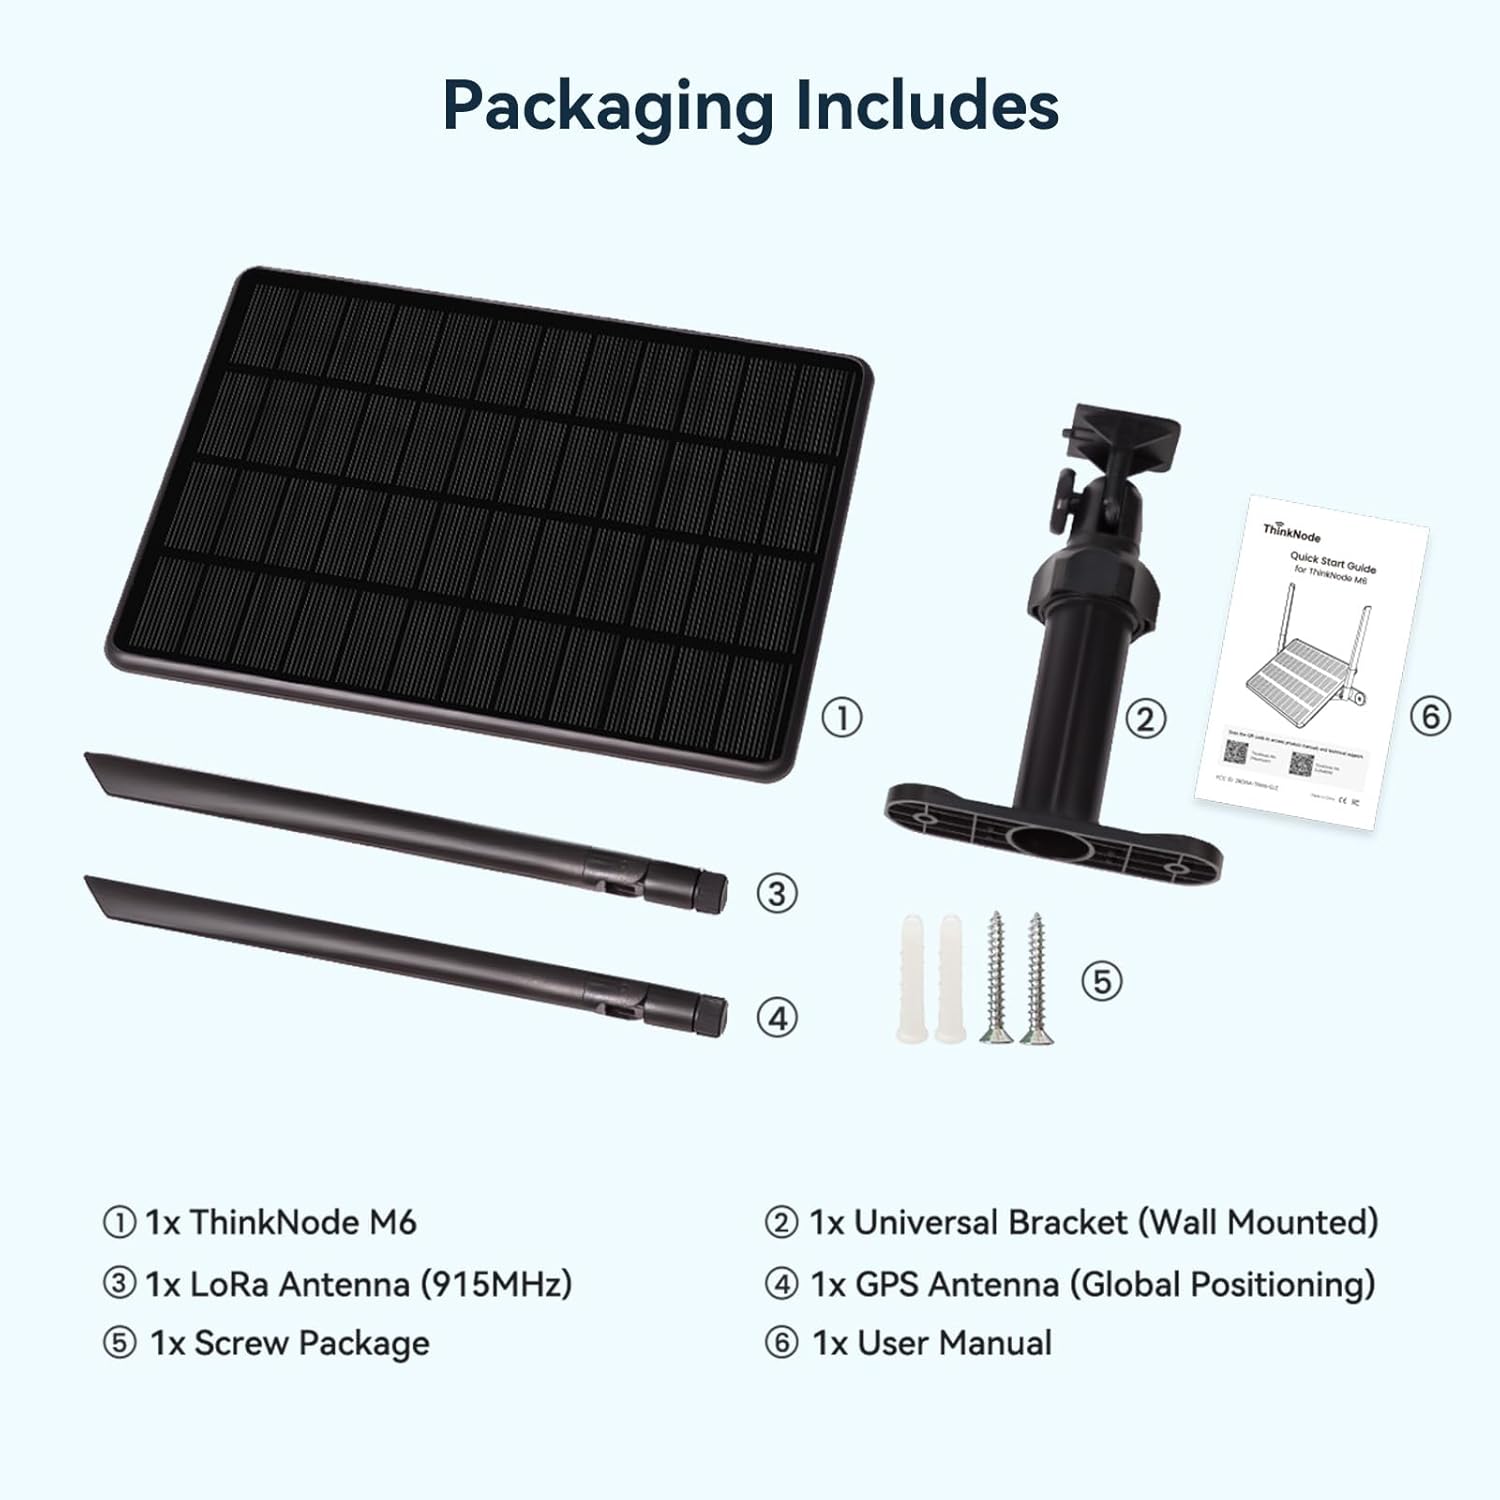
Image 2.1: Packaging contents of the ThinkNode M6.
3. การตั้งค่า
3.1 ฮาร์ดแวร์เกินview
ทำความคุ้นเคยกับพอร์ตและไฟแสดงสถานะของอุปกรณ์

ภาพที่ 3.1: รายละเอียด view of the ThinkNode M6 hardware, including USB-C, antenna ports, and indicator lights.
3.2 การติดตั้งทางกายภาพ
- ติดเสาอากาศ: Carefully screw the LoRa Antenna (915MHz) and GPS Antenna into their respective ports on the ThinkNode M6. Ensure they are finger-tight.
- การติดตั้ง: Use the provided universal bracket and screw package to securely mount the ThinkNode M6 in an outdoor location. Choose a spot with direct sunlight exposure for optimal solar charging and minimal obstructions for LoRa signal transmission.
3.3 การเปิดเครื่อง
The ThinkNode M6 is equipped with a 6W solar panel and a 7000mAh battery for continuous operation.
- ค่าใช้จ่ายเริ่มต้น: For first-time use or after prolonged storage, it is recommended to charge the device via the USB-C port for a few hours, or place it in direct sunlight.
- ปุ่มเปิด/ปิด: Press and hold the function button for 5 seconds to power on the device.
- ตัวบ่งชี้: Upon power-on, the red Power LED will blink at 1Hz, and the blue Data LED will show a breathing effect, indicating successful startup.

Image 3.2: The 6W solar panel and 7000mAh battery provide all-day power.
3.4 อัพเดตเฟิร์มแวร์
It is crucial to ensure your device runs the latest firmware for optimal performance and to resolve potential issues. The manufacturer provides firmware updates on their GitHub page.
- ดาวน์โหลดเฟิร์มแวร์: Visit the official GitHub repository for the ThinkNode M6 firmware: bit.ly/46SxjgT. Download the latest factory firmware file.
- เข้าสู่โหมดการเขียนโปรแกรม: Connect the device to your computer via the USB-C cable. Double-click the 'Reset' button on the device to enter programming mode. A new disk drive (e.g., 'ThinkNodeM6') should appear on your computer.
- Copy Firmware: คัดลอกเฟิร์มแวร์ที่ดาวน์โหลดมา file (e.g., .uf2 file) to the 'ThinkNodeM6' disk drive. The disk will automatically eject upon successful transfer.
- รีสตาร์ทอุปกรณ์: After the firmware transfer, restart the device. The Power LED will blink at 1Hz, and the Data LED will show a breathing effect if the upgrade is successful.
Video 3.1: Instructions on how to update the M6 LoRaWAN version firmware.
4. Operating the ThinkNode M6
4.1 การเชื่อมต่อ
The ThinkNode M6 supports both Bluetooth and LoRa for communication.
- บลูทูธ (BLE): Use a compatible mobile application (e.g., Meshtastic APP) to connect to the ThinkNode M6 via Bluetooth for configuration and monitoring.
- เครือข่าย LoRaWAN: The device operates on the 915 MHz frequency band, enabling long-range data transmission within a LoRaWAN network. It can function as a repeater to extend network coverage.
4.2 ฟังก์ชัน GPS
The integrated L76K GPS module provides real-time, accurate location data. This data can be shared through the LoRaWAN network, making it suitable for asset tracking and outdoor IoT applications.

Image 4.1: The ThinkNode M6 features high-precision GPS for location tracking.
4.3 Sensor and Interface Expansion
The ThinkNode M6 offers waterproof connector interfaces for IIC and UART expansion, allowing connection of external sensors and modules. This flexibility supports various customizable edge data projects, such as environmental sensing, agriculture monitoring, and industrial IoT.
4.4 LoRa Communication Range Test
The ThinkNode M6 demonstrates superior long-range communication stability. In tests comparing it with other solar nodes, the M6 consistently delivered zero packet loss across distances up to 10 KM, while other devices experienced packet loss at shorter ranges.
Video 4.1: LoRa communication range test demonstrating the ThinkNode M6's performance.
5. การบำรุงรักษา
5.1 Outdoor Protection
The ThinkNode M6 features an IP65-rated waterproof and dustproof enclosure, allowing it to operate reliably in extreme temperatures ranging from -20°C to 60°C. This design makes it suitable for continuous outdoor deployment.

Image 5.1: The IP65 rating ensures the ThinkNode M6 withstands various weather conditions.
5.2 การดูแลรักษาแบตเตอรี่และแผงโซลาร์เซลล์
To ensure optimal battery life and solar charging efficiency:
- แผงโซล่าเซลล์สะอาด: Periodically clean the solar panel surface to remove dust, dirt, or debris that may hinder charging efficiency. Use a soft, damp ผ้า.
- ตำแหน่งที่เหมาะสมที่สุด: Ensure the solar panel remains in a location with maximum direct sunlight exposure throughout the day.
- ช่วงอุณหภูมิ: While designed for extreme temperatures, avoid prolonged exposure to temperatures outside the specified operating range (-20°C to 60°C) if possible, to maximize component lifespan.
6 การแก้ไขปัญหา
6.1 Device Unresponsive or No Power
- ตรวจสอบปุ่มเพาเวอร์: Ensure the function button was pressed and held for 5 seconds to power on.
- ชาร์จแบตเตอรี่: Connect the device to a USB-C power source or place it in direct sunlight for several hours to ensure the 7000mAh battery is charged.
- ปัญหาเฟิร์มแวร์: If the device remains unresponsive, indicator lights do not function, or it does not charge, perform a firmware update as described in Section 3.4. Outdated or corrupted firmware can cause these issues.
6.2 ปัญหาสัญญาณ GPS
- สวิตช์ GPS: Verify that the GPS function is enabled in your device's settings via the connected mobile application.
- ตำแหน่งกลางแจ้ง: The device must be placed outdoors with a clear view of the sky to acquire a GPS signal. Indoor or obstructed locations will prevent GPS functionality.
- เฟิร์มแวร์ล่าสุด: Ensure your device has the latest firmware installed, as updates often include GPS performance improvements.
- คืนค่าการตั้งค่าจากโรงงาน: If issues persist, try restoring factory settings through the mobile application and then re-enabling the GPS switch.
6.3 LoRa Communication Problems
- การเชื่อมต่อเสาอากาศ: Ensure the LoRa antenna is securely attached and oriented vertically for optimal signal.
- แนวสายตา: LoRa performance is best with a clear line of sight between devices. Minimize physical obstructions.
- ย่านความถี่: Confirm that all communicating devices are operating on the correct 915 MHz frequency band.
7. ข้อมูลจำเพาะ
| คุณสมบัติ | รายละเอียด |
|---|---|
| ยี่ห้อ | อิเล็คโทรโครว์ |
| แบบอย่าง | ThinkNode M6 |
| ตัวรับส่งสัญญาณ LoRa | เอ็นอาร์เอฟแอลอาร์1262 |
| Core Processor | เอ็นอาร์เอฟ52840 |
| แผงโซล่าเซลล์ | 6W โมโนคริสตัลไลน์ |
| ความจุของแบตเตอรี่ | แบตเตอรี่ลิเธียม 7000mAh |
| โมดูลจีพีเอส | L76K |
| ย่านความถี่ | 915 เมกะเฮิรตซ์ |
| การเชื่อมต่อ | Bluetooth, LoRa |
| ระดับการป้องกัน | IP65 กันน้ำและกันฝุ่น |
| อุณหภูมิในการทำงาน | -20°C ถึง 60°C |
| ส่วนประกอบที่รวมอยู่ | 1x ThinkNode M6, 1x LoRa Antenna, 1x GPS Antenna, 1x Universal Bracket, 1x Screw Package |
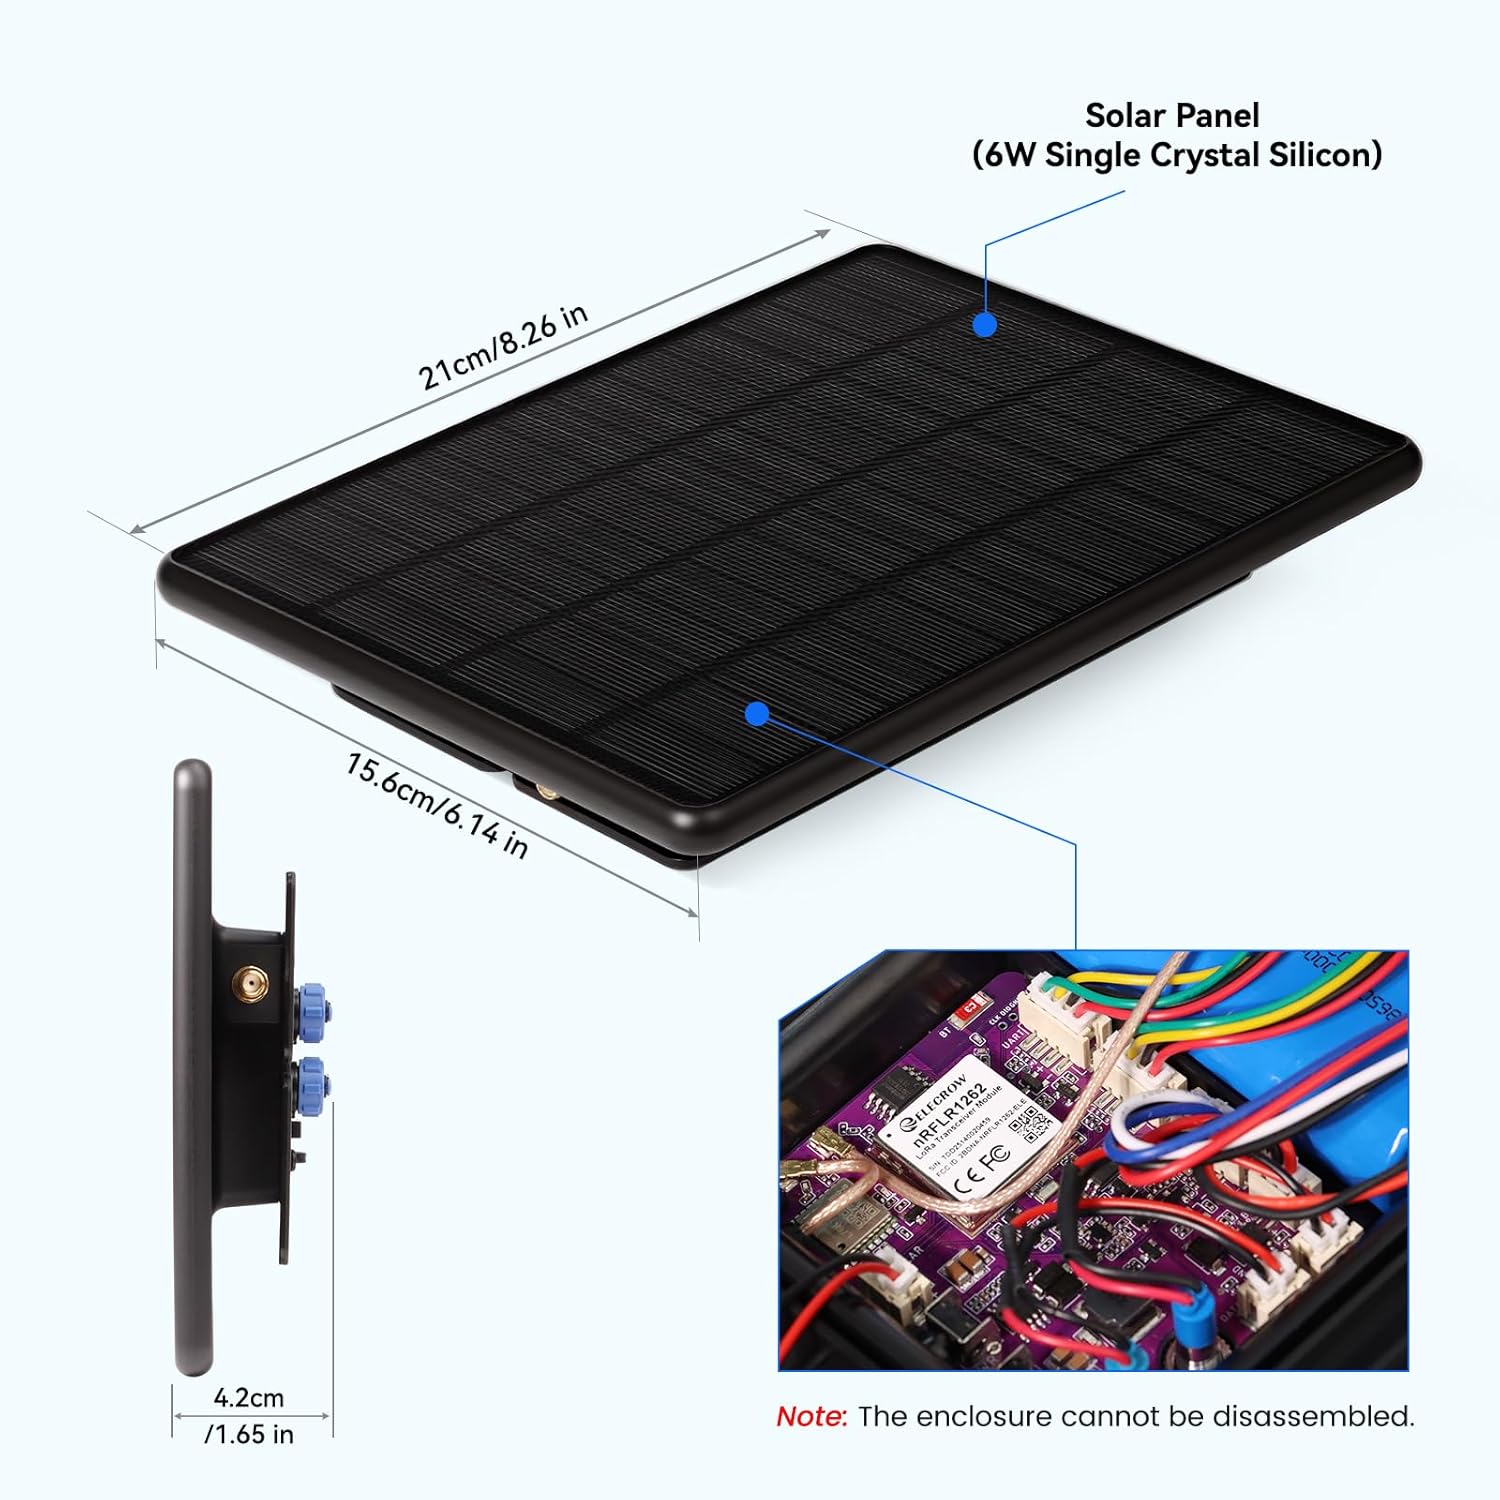
Image 7.1: Physical dimensions of the ThinkNode M6 solar panel.
8. การรับประกันและการสนับสนุน
The ELECROW ThinkNode M6 comes with a การรับประกันจากผู้ผลิต 1 ปี. For technical support, troubleshooting assistance, or warranty claims, please contact ELECROW customer service through their official website or the platform where the product was purchased. Refer to the provided documentation for additional support resources.