ESX VMX1000DAB
ESX Vision VMX1000DAB User Manual
Universal 1-DIN Multi-Angle Media Moniceiver with 10 Inch Touchscreen
การแนะนำ
Thank you for choosing the ESX Vision VMX1000DAB Multi-Angle Media Moniceiver. This device is a universal 1-DIN car multimedia system featuring a 10-inch touchscreen display. It offers advanced connectivity options including wireless Apple CarPlay and Android Auto, DAB+ digital radio, Bluetooth hands-free calling and audio streaming, and a versatile media player. This manual provides essential information for the proper installation, operation, and maintenance of your VMX1000DAB unit.
มีอะไรอยู่ในกล่อง
Carefully unpack your ESX Vision VMX1000DAB and ensure all items are present:
- VMX1000DAB Moniceiver Unit
- เครื่องรับ GPS
- DAB+ Window Adhesive Antenna
- ไมโครโฟนภายนอก
- Mounting Hardware and Cables (ISO harness, USB cables, RCA cables)
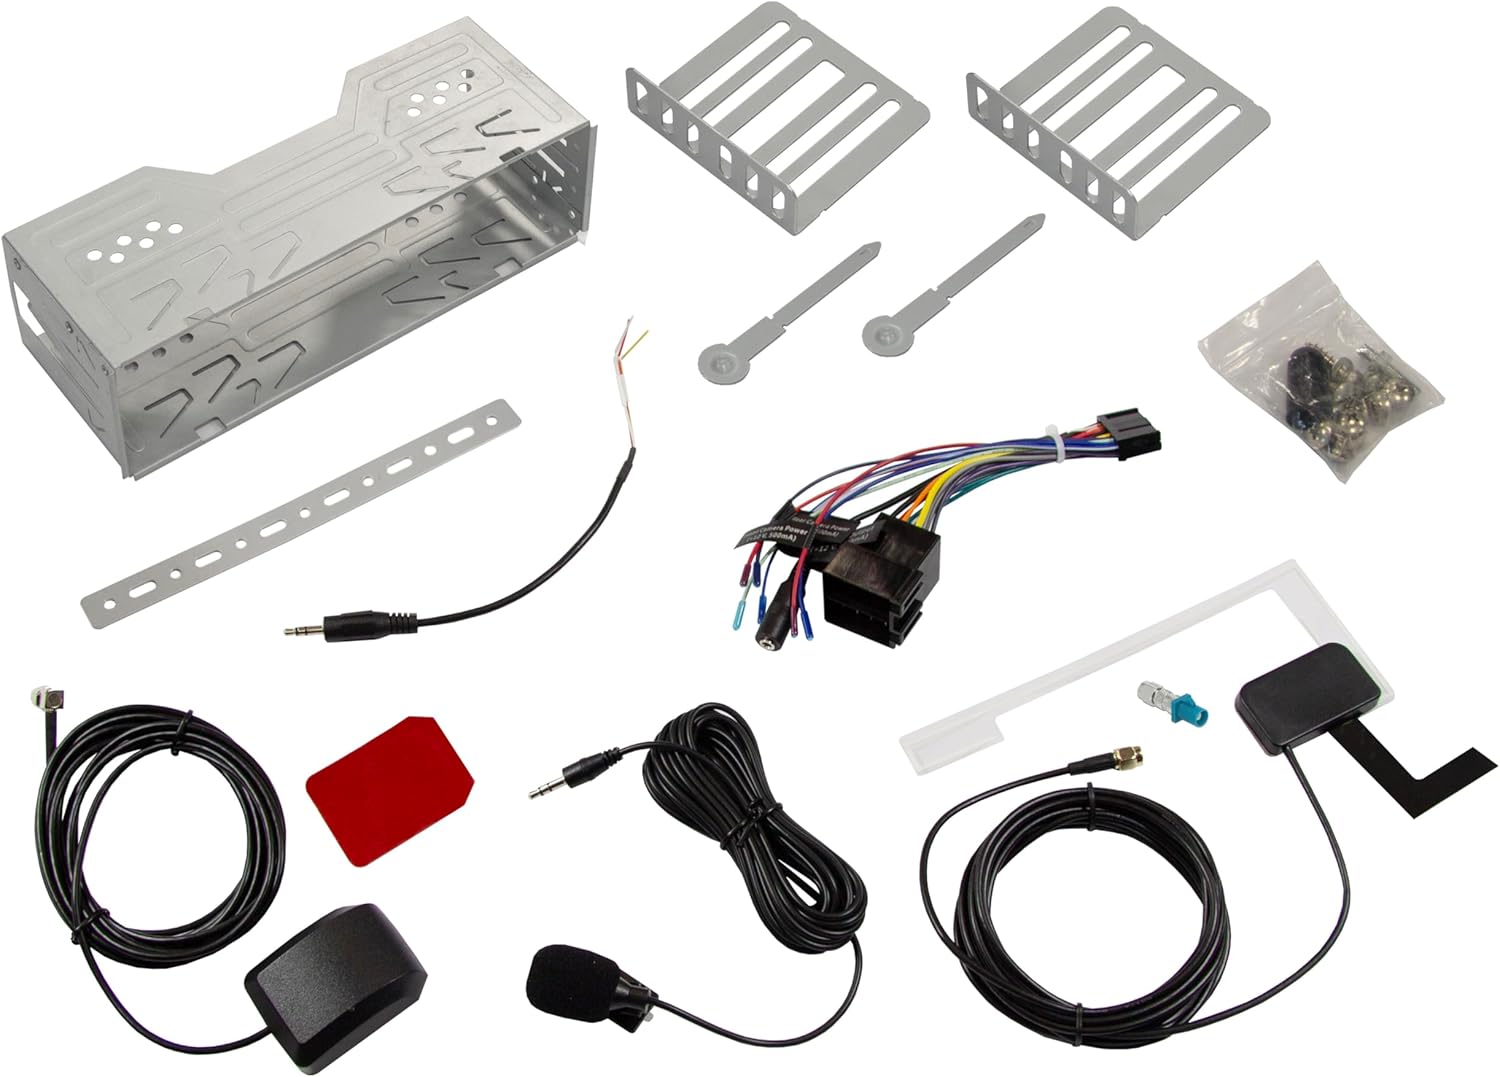
Image: All components included in the ESX Vision VMX1000DAB package.
การติดตั้งและการตั้งค่า
The VMX1000DAB is designed for universal 1-DIN installation. Professional installation is recommended to ensure correct wiring and functionality.
1. การติดตั้งตัวเครื่อง
- Install the 1-DIN chassis into your vehicle's dashboard opening using the provided mounting cage and brackets.
- The 10-inch monitor is multi-angle adjustable and removable for anti-theft protection. To attach, slide the monitor onto the front of the main unit until it clicks securely into place. To remove, press the release button (if applicable) and slide it off.

Image: The VMX1000DAB unit with its detachable monitor.
2. การเชื่อมต่อสายไฟ
Connect the wiring harness, antennas, and external devices to the rear of the moniceiver. Refer to the wiring diagram provided with your unit for specific connections.
- สายไฟ/ลำโพง: Connect the main ISO harness to your vehicle's wiring.
- พอร์ต USB-A: Two USB-A ports are available. One for media playback and charging (1.5A), and another specifically for Apple CarPlay/Android Auto and charging (1.5A).
- พรีเอาท์ RCA: Six 4V RCA preamplifier outputs (FL/FR/RL/RR/SUB1/SUB2) for connecting external ampลิตเตอร์
- RCA AUX Inputs: Stereo audio (L/R) and video input for external sources.
- อินพุตกล้อง: Dedicated RCA inputs for front and rear cameras.
- เสาอากาศ GPS: Connect the GPS receiver for optimized navigation.
- เสาอากาศ DAB+: Connect the included DAB+ window adhesive antenna for digital radio reception.
- ไมโครโฟนภายนอก: Plug in the external microphone for clear hands-free calls.
- ระบบควบคุมพวงมาลัย: Connect to your vehicle's analog steering wheel controls (learnable function).

Image: Rear connections of the VMX1000DAB unit.
คำแนะนำการใช้งาน
The VMX1000DAB features a user-friendly interface controlled via its 10-inch touchscreen, a large volume knob, and four function keys.
1. การควบคุมพื้นฐาน
- เปิด/ปิดเครื่อง: Press and hold the power button (usually integrated with the volume knob).
- ปริมาณ: Rotate the large knob to adjust the volume.
- ปุ่มฟังก์ชัน: Use the dedicated function keys for quick access to common features.
- หน้าจอสัมผัส: Navigate menus and control functions by touching the display icons.

Image: VMX1000DAB Home Screen with various application icons.
2. Apple CarPlay และ Android Auto
The VMX1000DAB supports both wireless and wired (via USB) Apple CarPlay and Android Auto. This allows you to mirror and control compatible smartphone apps directly from the 10-inch touchscreen.
- การเชื่อมต่อแบบไร้สาย: Enable Bluetooth and Wi-Fi on your smartphone and pair it with the VMX1000DAB. Follow the on-screen prompts to initiate CarPlay or Android Auto.
- การเชื่อมต่อแบบมีสาย: Connect your smartphone to the dedicated USB-A port using a certified USB cable.
- คุณสมบัติ: Access navigation apps (e.g., Google Maps with Live Trading), music streaming services (e.g., Spotify), phone calls, messages, and other compatible applications.

Image: Apple CarPlay interface on the VMX1000DAB.
3. ฟังก์ชั่นวิทยุ
- วิทยุดิจิตอล DAB+: Select the DAB+ source to enjoy high-quality digital radio. Ensure the DAB+ antenna is properly installed.
- วิทยุ FM/AM: Tune into FM or AM stations. The RDS (Radio Data System) function provides station information and traffic announcements where available.
- สถานีที่ตั้งไว้ล่วงหน้า: บันทึกสถานีที่คุณชื่นชอบเพื่อการเข้าถึงอย่างรวดเร็ว
4. การเชื่อมต่อบลูทูธ
- การจับคู่: Go to the Bluetooth menu on the moniceiver and your smartphone. ค้นหา and select the VMX1000DAB to pair.
- การโทรแบบแฮนด์ฟรี: Make and receive calls directly through the moniceiver using the external microphone and your car's speakers.
- การสตรีมเสียง: Play music from your smartphone via Bluetooth audio streaming (A2DP).
5. เครื่องเล่นสื่อ
The integrated media player supports various audio, video, and photo formats from USB storage devices.
- รูปแบบที่เข้ากันได้: AVI, FLV, MOV, MKV, WMV (video); WMA, MP3, FLAC (audio); JPEG, PNG, BMP (photo).
- การเล่น USB: Insert a USB drive into the media USB-A port. The unit will automatically detect and allow you to browse and play media files.
6. ช่องรับสัญญาณกล้อง
Connect front and rear cameras to the dedicated RCA inputs for enhanced safety and parking assistance. The unit will automatically switch to the rear camera view when reverse gear is engaged (if properly wired).
7. การตั้งค่าเสียง
The VMX1000DAB features a 4 x 80 Watt max integrated amplifier. Access the equalizer (EQ) and sound settings to customize your audio experience. Future software updates (available from ESX homepage) will include advanced audio features such as variable high-pass/low-pass filters, time alignment for front, rear, and subwoofer, and dual HD camera input support.
การซ่อมบำรุง
To ensure the longevity and optimal performance of your ESX Vision VMX1000DAB, follow these maintenance guidelines:
- การทำความสะอาดหน้าจอ: ใช้ผ้านุ่มไม่เป็นขุยเช็ดหน้าจอสัมผัสเบาๆ สำหรับรอยเปื้อนฝังแน่น ให้เช็ดเบาๆampชุบผ้าด้วยน้ำหรือน้ำยาทำความสะอาดที่ปลอดภัยต่อหน้าจอ หลีกเลี่ยงวัสดุที่มีฤทธิ์กัดกร่อนหรือสารเคมีรุนแรง
- การทำความสะอาดหน่วย: Wipe the main unit and buttons with a dry, soft cloth. Do not allow liquids to enter the unit.
- การเชื่อมต่อ: ตรวจสอบการเชื่อมต่อสายเคเบิลทั้งหมดเป็นระยะ เพื่อให้แน่ใจว่าแน่นหนาและปราศจากสนิม
- การอัปเดตซอฟต์แวร์: Check the official ESX homepage for available software updates to benefit from new features and improvements.
การแก้ไขปัญหา
If you encounter issues with your VMX1000DAB, refer to the following common troubleshooting steps:
- ไม่มีไฟฟ้า: Check the power connections and the vehicle's fuse box. Ensure the unit is properly seated in its harness.
- ไม่มีเสียง: Verify speaker connections. Check volume levels and ensure the mute function is not active. Confirm that the correct audio source is selected.
- ปัญหาการเชื่อมต่อบลูทูธ: Ensure Bluetooth is enabled on both the moniceiver and your smartphone. Delete previous pairings and attempt to re-pair. Try restarting both devices.
- CarPlay/Android Auto ไม่เชื่อมต่อ: For wired connections, try a different USB cable or port. For wireless, ensure Wi-Fi is also enabled on your phone. Check for any software updates for your phone or the moniceiver.
- การรับสัญญาณวิทยุไม่ดี: Check the antenna connection. For DAB+, ensure the adhesive antenna is correctly positioned and not obstructed.
- หน้าจอสัมผัสไม่ตอบสนอง: ลองรีสตาร์ทเครื่องดู หากปัญหายังคงอยู่ อาจจำเป็นต้องรีเซ็ตเป็นค่าเริ่มต้นจากโรงงาน (ดูตัวเลือกนี้ได้จากการตั้งค่าบนหน้าจอ)
- Monitor Detachment: Ensure the monitor is fully inserted and clicked into place. If it detaches easily, inspect the locking mechanism for any damage.
หากขั้นตอนเหล่านี้ไม่สามารถแก้ไขปัญหาได้ โปรดติดต่อฝ่ายสนับสนุนลูกค้าหรือช่างเทคนิคที่มีคุณสมบัติ
ข้อมูลจำเพาะ
| คุณสมบัติ | รายละเอียด |
|---|---|
| ยี่ห้อ | อีเอสเอ็กซ์ |
| หมายเลขรุ่น | VMX1000DAB |
| เทคโนโลยีการเชื่อมต่อ | AUX, Bluetooth, USB, Wi-Fi |
| วิธีการควบคุม | Touch, Mechanical Knob |
| คุณสมบัติพิเศษ | Apple CarPlay/Android Auto (Wireless & USB), Removable Monitor with CLICK System |
| อุปกรณ์ที่รองรับ | สมาร์ทโฟน |
| โหมดเอาต์พุตเสียง | สเตอริโอ |
| การเข้ารหัสวิดีโอ | AVI, FLV, MOV, MKV, WMV |
| รูปแบบเสียง | WMA, MP3, FLAC |
| รูปแบบภาพ | JPEG, PNG, BMP |
| กำลังขับ (RMS) | 80 Watts (per channel, max) |
| รวมวัดtage | 320 วัตต์ (สูงสุด) |
| จำนวนช่องสัญญาณ | 4 |
| พรีamplifier เอาท์พุท | 4V RCA (FL/FR/RL/RR/SUB1/SUB2) |
| อินพุต USB | USB Type A (with 1.5A charging) |
| เนื้อหาแพ็คเกจ | Moniceiver, GPS receiver, DAB+ window adhesive antenna |
การรับประกันและการสนับสนุน
ข้อมูลการรับประกัน: Please refer to your purchase documentation, retailer, or the official ESX webเว็บไซต์สำหรับข้อกำหนดและเงื่อนไขการรับประกันโดยละเอียดที่ใช้บังคับกับภูมิภาคของคุณ
การสนับสนุนลูกค้า: For technical assistance, troubleshooting beyond this manual, or inquiries regarding service, please contact your authorized ESX dealer or visit the official ESX homepage for support resources and contact information.
การอัปเดตซอฟต์แวร์: New functions and software updates are periodically released and made available free of charge via the ESX homepage. It is recommended to check for updates to ensure your device has the latest features and performance enhancements.
Ask a question about this manual
Ask about setup, troubleshooting, compatibility, parts, safety, or missing instructions. Manuals+ will review the question and use this page’s manual context to help answer it.