
การแนะนำ
This manual provides detailed instructions for the installation, operation, and maintenance of your new AXLAHA Headlight Assembly. Designed specifically for 2014-2015 Chevrolet Silverado models, these headlight assemblies are engineered for optimal performance and durability. Please read this manual thoroughly before beginning installation to ensure proper fitment and safe operation.
ข้อมูลด้านความปลอดภัย
- ควรตัดการเชื่อมต่อแบตเตอรี่รถยนต์ทุกครั้งก่อนทำการซ่อมแซมหรือบำรุงรักษาใดๆ ที่เกี่ยวข้องกับระบบไฟฟ้า เพื่อป้องกันไฟฟ้าช็อตหรือความเสียหายจากไฟฟ้า
- ต้องสวมอุปกรณ์ป้องกันส่วนบุคคลที่เหมาะสม รวมถึงแว่นตานิรภัยและถุงมือ ระหว่างการติดตั้ง
- Ensure the vehicle is parked on a level surface with the parking brake engaged before starting any work.
- หากคุณไม่แน่ใจเกี่ยวกับขั้นตอนใด ๆ ในกระบวนการติดตั้ง โปรดปรึกษาช่างเทคนิคยานยนต์ที่มีคุณสมบัติเหมาะสม
- Handle headlight bulbs with care. Avoid touching the glass portion of halogen bulbs with bare hands, as oils can cause premature failure.
เนื้อหาแพ็คเกจ
ตรวจสอบว่าส่วนประกอบทั้งหมดมีอยู่ก่อนเริ่มการติดตั้ง:
- AXLAHA Headlight Assembly (Left)
- AXLAHA Headlight Assembly (Right)
- คู่มือการใช้งาน (เอกสารนี้)
Note: Headlight bulbs (HB3 High Beam, H11 Low Beam) are NOT included and must be purchased separately.
การติดตั้งและการตั้งค่า
Follow these steps carefully for proper installation of your new headlight assemblies.
1. การเตรียมพร้อม
- Park your vehicle on a flat, level surface and engage the parking brake.
- ดับเครื่องยนต์และถอดกุญแจออกจากสวิตช์กุญแจ
- ถอดขั้วลบของแบตเตอรี่รถยนต์
- Open the hood to access the headlight area.
2. Removing the Old Headlight Assembly
- Locate the mounting bolts/clips securing the existing headlight assembly. These are typically found on the top and side of the assembly.
- Carefully remove all securing hardware.
- Gently pull the old headlight assembly forward to disengage it from its mounting points.
- Disconnect all electrical connectors from the bulbs and the main harness. Twist and pull out bulbs if they are to be reused.
- ถอดชุดไฟหน้าเก่าออกจากรถ
3. Installing Bulbs (If not pre-installed)
If your new AXLAHA Headlight Assembly does not come with bulbs, install them now. The assembly requires HB3 bulbs for high beam and H11 bulbs for low beam.
- Carefully insert the HB3 bulb into the high beam socket and twist to secure.
- Carefully insert the H11 bulb into the low beam socket and twist to secure.
- Ensure the bulbs are seated correctly and firmly.
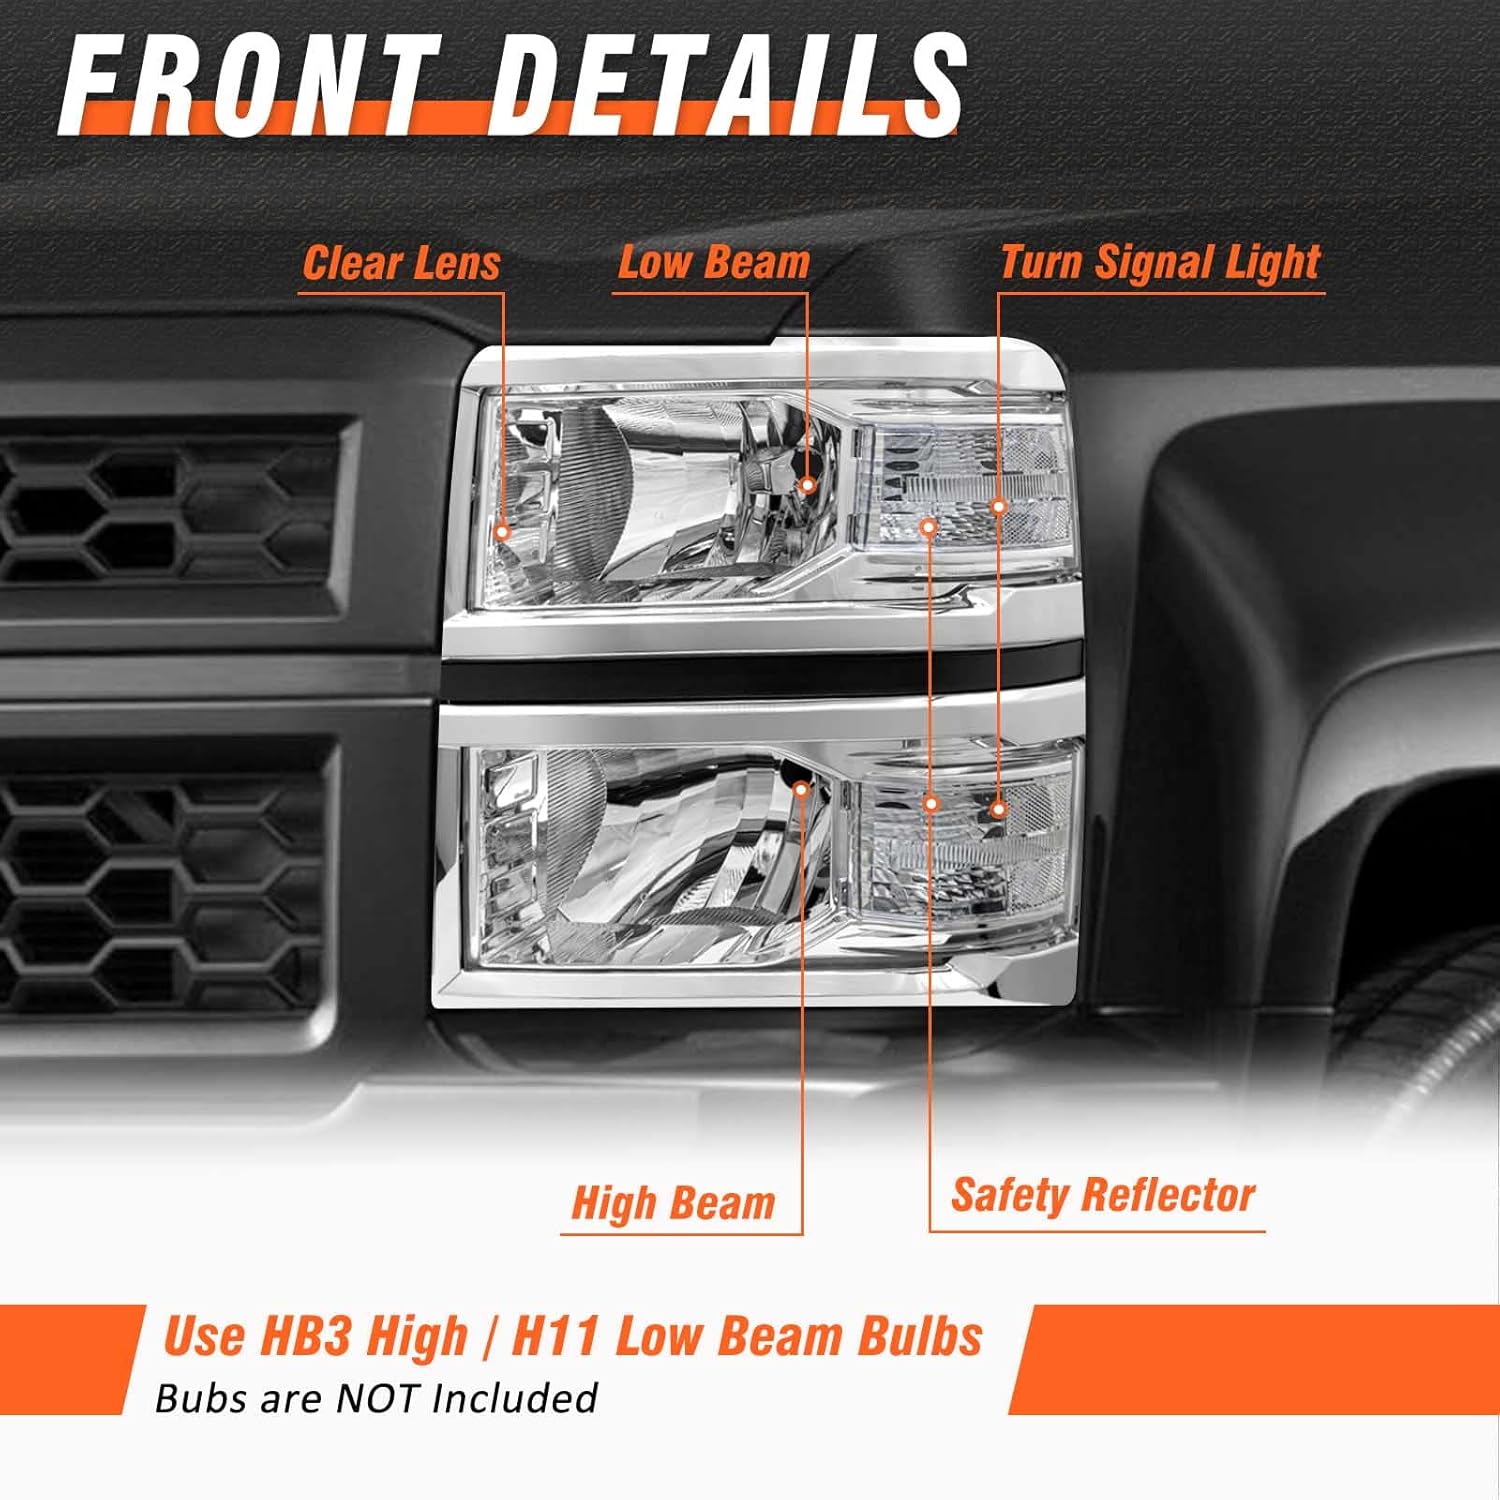
Figure 1: Front details of the headlight assembly, highlighting bulb types required.

Figure 2: Rear details of the headlight assembly, showing bulb access and adjustment points.
4. Installing the New Headlight Assembly
- Connect all electrical connectors from the vehicle's harness to the corresponding sockets on the new AXLAHA headlight assembly. Ensure connections are secure.
- Carefully slide the new headlight assembly into its mounting position, ensuring all tabs and alignment pins engage correctly.
- Reinstall all mounting bolts/clips that were removed earlier. Tighten them securely, but do not overtighten.

Figure 3: Visual representation of the headlight assembly fitment on a Chevrolet Silverado.
5. การตรวจสอบหลังการติดตั้ง
- เชื่อมต่อขั้วลบของแบตเตอรี่รถยนต์อีกครั้ง
- Turn on the vehicle's headlights (low beam, high beam, turn signals) to ensure all functions are working correctly.
- Verify that the turn signals flash at the correct rate.
- Proceed to the "Headlight Aiming" section to adjust the beam pattern.
คำแนะนำการใช้งาน
Headlight Aiming
Proper headlight aiming is crucial for safe driving and to avoid blinding oncoming traffic. This assembly features an adjuster screw (refer to Figure 2) for vertical beam adjustment.
- Park your vehicle on a level surface approximately 25 feet (7.6 meters) from a wall or garage door.
- Ensure tire pressure is correct and the vehicle is not heavily loaded.
- Measure the height from the ground to the center of your low beam bulb. Mark this height on the wall.
- Turn on your low beam headlights.
- Using a Phillips head screwdriver, turn the adjuster screw (located on the rear of the headlight assembly, see Figure 2) to raise or lower the beam until the top edge of the brightest part of the beam is at or slightly below the marked line on the wall.
- ทำซ้ำขั้นตอนเดียวกันสำหรับไฟหน้าอีกข้าง
- Horizontal adjustment is typically not required or available on most aftermarket assemblies. If horizontal adjustment is needed, it may require professional assistance.
Note: Always check local regulations for specific headlight aiming requirements.
การซ่อมบำรุง
การทำความสะอาด
To maintain optimal light output and appearance, clean the headlight lenses regularly.
- Use a soft cloth and mild automotive soap with water.
- Avoid abrasive cleaners or harsh chemicals, as these can damage the lens or its UV protective coating.
- ล้างออกให้สะอาดด้วยน้ำเปล่า แล้วเช็ดให้แห้งด้วยผ้าเนื้อนุ่มที่ไม่เป็นขุย

Figure 4: The UV Block Clear Coat helps prevent yellowing and cracking, extending the life of the headlight.
การเปลี่ยนหลอดไฟ
If a bulb fails, replace it promptly to ensure safe driving. Refer to the "Setup and Installation" section for general access to the bulbs.
- Ensure the vehicle is off and the battery is disconnected.
- เข้าถึงด้านหลังของชุดไฟหน้า
- Twist the bulb socket counter-clockwise to remove the old bulb.
- Disconnect the electrical connector from the bulb.
- Connect the new bulb (HB3 for high beam, H11 for low beam) to the electrical connector.
- Insert the new bulb into the housing and twist clockwise to secure.
- Reconnect the battery and test the new bulb.
การแก้ไขปัญหา
| ปัญหา | สาเหตุที่เป็นไปได้ | สารละลาย |
|---|---|---|
| ไฟหน้าไม่ทำงาน | หลอดไฟขาด, การเชื่อมต่อไฟฟ้าหลวม, ฟิวส์ขาด, สายไฟชำรุด | Check and replace bulb. Ensure all electrical connectors are secure. Check vehicle's fuse box for blown headlight fuses. Inspect wiring for damage. |
| แสงสลัวหรือแสงกระพริบ | Loose connection, failing bulb, insufficient power. | Check electrical connections. Replace bulb. Consult a technician if power issues persist. |
| ความชื้นภายในไฟหน้า | Condensation (normal in some conditions), improper seal, damaged housing. | Small amounts of condensation usually dissipate. Ensure all caps and seals are properly seated. If persistent or excessive, inspect for cracks or damage. |
| Improper beam aim | Incorrect adjustment after installation. | Refer to the "Headlight Aiming" section for adjustment procedures. |
ข้อมูลจำเพาะ
- ยี่ห้อ: แอกลาฮา
- แบบอย่าง: B0FZTXHFCX
- ความเข้ากันได้: เชฟโรเลต ซิลเวอราโด 2014-2015
- Bulb Type (High Beam): HB3 (Not Included)
- Bulb Type (Low Beam): H11 (Not Included)
- วัสดุเลนส์: Polycarbonate with UV Block Clear Coat
- ความทนทานต่อสภาพอากาศ: Water, Snow, Dust Resistant (Refer to Figure 5)

Figure 5: The headlight assembly is designed to be water, snow, and dust resistant for reliable performance in various weather conditions.
การสนับสนุนลูกค้า
For technical assistance, troubleshooting beyond this manual, or inquiries regarding your AXLAHA Headlight Assembly, please contact AXLAHA customer support through the retailer where the product was purchased.
Please have your product model number (B0FZTXHFCX) and purchase details ready when contacting support.