1. บทนำ
Thank you for choosing the Keenso Front Rear Dash Cam. This device is designed to provide reliable video recording of your journeys, offering enhanced safety and security for your vehicle. This manual will guide you through the installation, operation, and maintenance of your dash cam to ensure optimal performance.
2. ข้อมูลด้านความปลอดภัย
- ห้ามใช้งานกล้องติดรถยนต์ขณะขับรถ ปรับการตั้งค่าเฉพาะเมื่อจอดรถอย่างปลอดภัยเท่านั้น
- ตรวจสอบให้แน่ใจว่ากล้องติดรถยนต์ติดตั้งอย่างแน่นหนาและไม่กีดขวางทัศนวิสัยของคุณ view กีดขวางถนนหรือรบกวนการควบคุมยานพาหนะ
- หลีกเลี่ยงการให้เครื่องสัมผัสกับอุณหภูมิที่สูงหรือต่ำเกินไป แสงแดดโดยตรงเป็นเวลานาน หรือความชื้นที่มากเกินไป
- Use only the provided car charger and data cable to prevent damage to the device.
- Do not attempt to disassemble or repair the dash cam yourself. Contact customer support for assistance.
- สำรองข้อมูลวิดีโอสำคัญเป็นประจำ files to prevent loss.
3. เนื้อหาบรรจุภัณฑ์
ตรวจสอบว่ามีรายการทั้งหมดอยู่ในแพ็คเกจของคุณ:
- 1 x Keenso Car DVR Unit
- เครื่องชาร์จในรถยนต์ 1 ชิ้น
- 1 x คู่มือผู้ใช้ (เอกสารนี้)
- สายเคเบิลข้อมูล (USB) 1 เส้น
- 2 x Mounts (for installation)
- 1 x เทปสองหน้า
- 1 x Magic Base
รูปที่ 3.1: All components included in the Keenso Dash Cam package.
4. คุณสมบัติของผลิตภัณฑ์
The Keenso Front Rear Dash Cam offers a range of features for reliable vehicle monitoring:
- วัสดุคุณภาพสูง: Constructed from durable ABS material for long-lasting performance.
- แบตเตอรี่ลิเธียมในตัว: Features a 180mAh lithium-ion battery for continuous recording even when external power is interrupted.
- จอแสดงผลที่ใช้งานง่าย: Equipped with a 2.0-inch screen (960x240 resolution) for easy viewing and management of recordings.
- Enhanced Parking Safety: Motion detection feature automatically records movement around your parked vehicle.
- การบันทึกแบบวนซ้ำ: Automatically overwrites older, non-protected files when the memory card is full, ensuring continuous recording without manual deletion.
- อินฟราเรดคืนวิสัยทัศน์: Professional configuration of 4 infrared night lights combined with WDR technology enhances night recording clarity.
- Supercapacitors: Designed to operate reliably in temperatures ranging from -10℃ to 70℃.
- กล้องความละเอียดสูง: 10MP image sensor with a 170-degree wide-angle lens, covering multiple lanes.

รูปที่ 4.1: ด้านหน้า view of the dash cam, highlighting the display screen and control buttons.
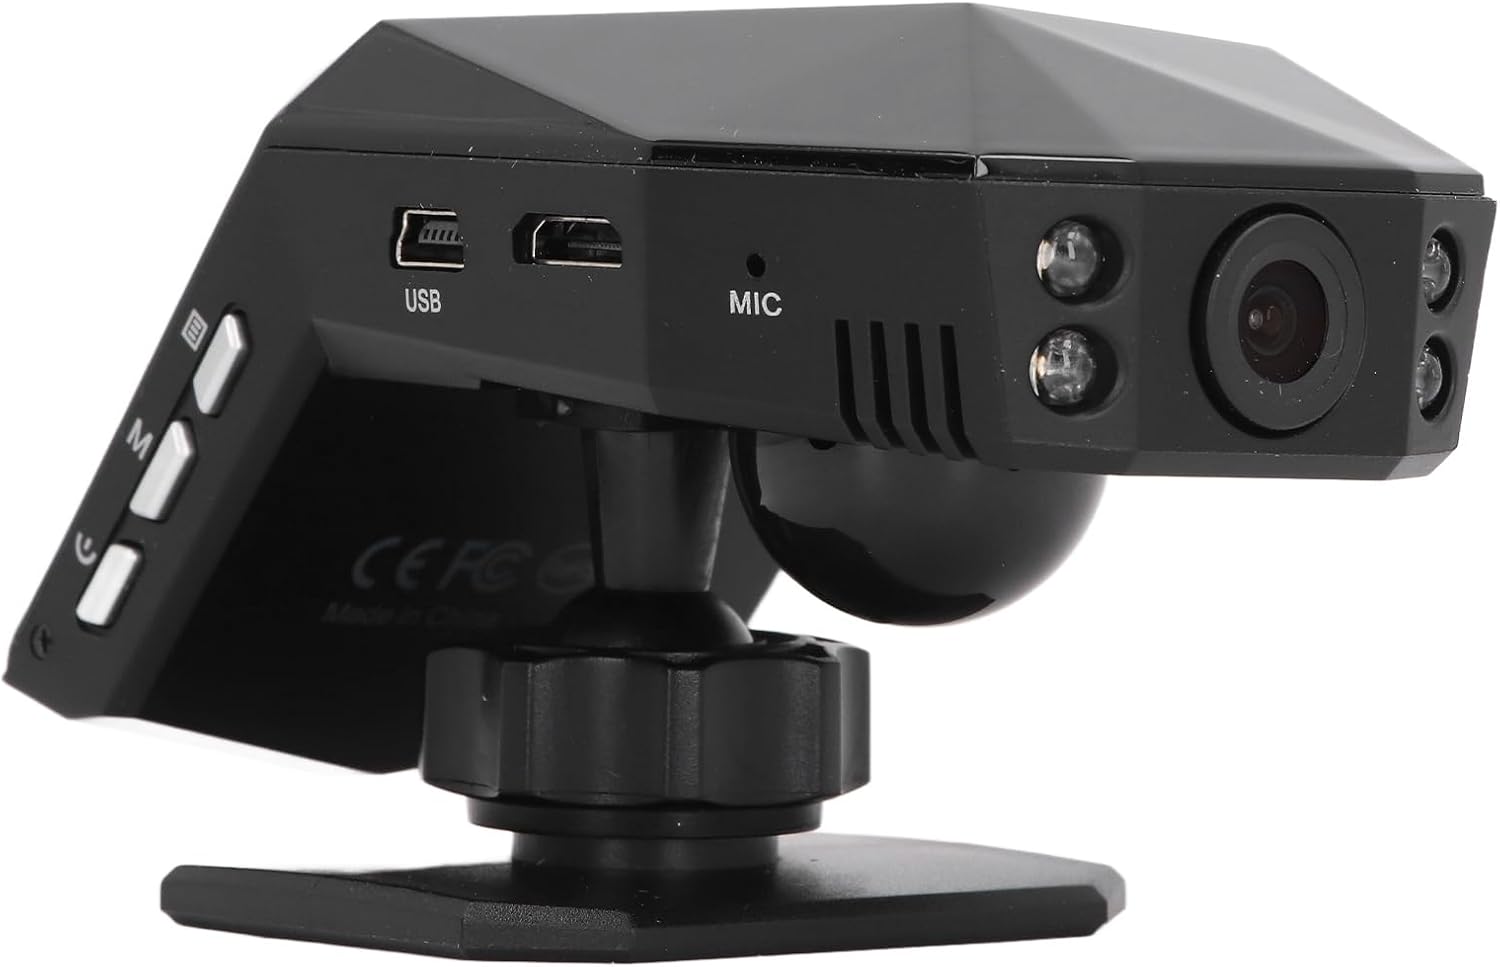
รูปที่ 4.2: หลัง view of the dash cam, showing the camera lens and four infrared night vision lights.
5. การตั้งค่า
5.1 Inserting the Micro Memory Card
- ตรวจสอบให้แน่ใจว่ากล้องติดรถยนต์ปิดอยู่
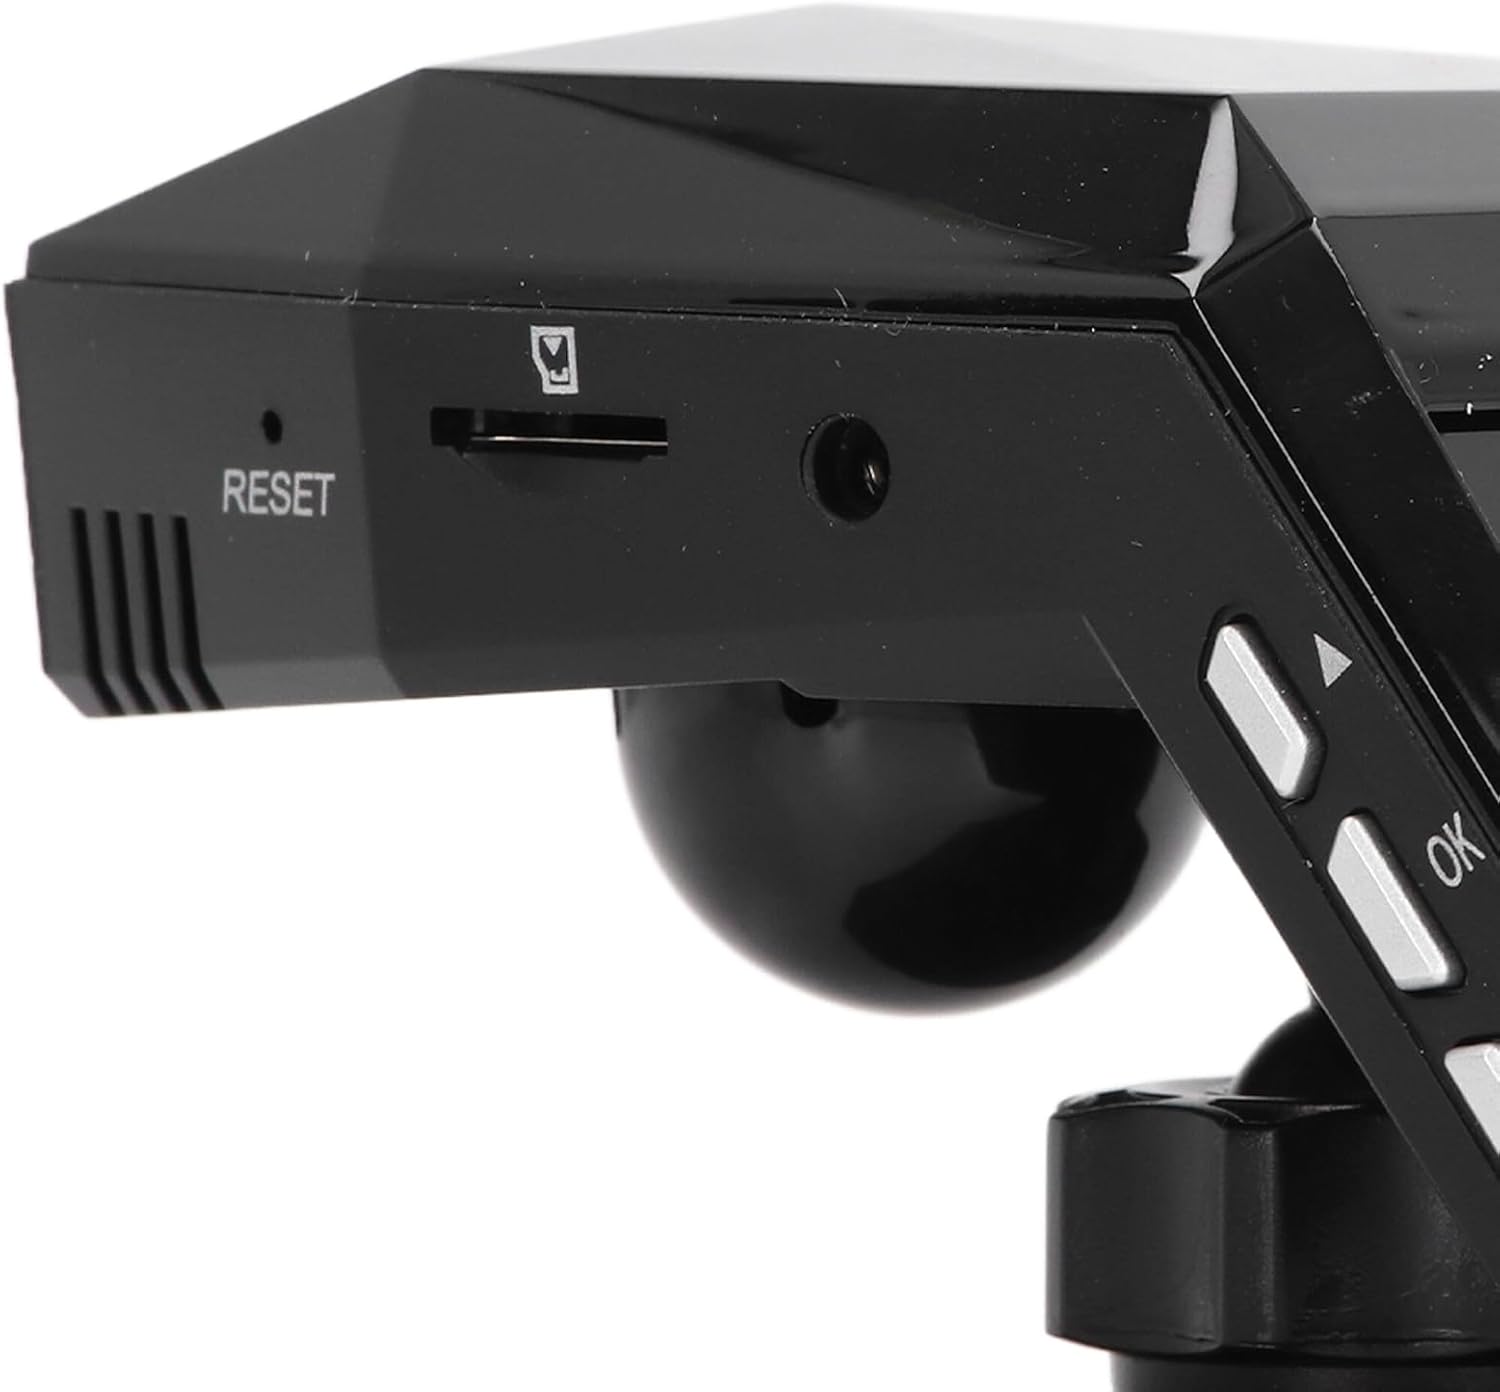
- Locate the Micro Memory Card slot on the side of the device.
- Gently insert a Micro Memory Card (up to 32GB, not included) into the slot until it clicks into place.
- ในการถอดออก ให้ดันการ์ดเบาๆ จนกว่าจะมีเสียงคลิก จากนั้นปล่อยเพื่อดีดออก

รูปที่ 5.1: ด้านข้าง view showing the Micro Memory Card slot and Reset button.
5.2 การติดตั้ง Dash Cam
- เลือกตำแหน่งบนกระจกหน้ารถที่ไม่บดบังทัศนวิสัยของคุณ viewโดยทั่วไปจะอยู่ด้านหลังview กระจกเงา.
- ทำความสะอาดพื้นผิวกระจกหน้ารถให้สะอาดหมดจด
- Attach the magic base to the chosen location using the double-sided tape. Ensure it is firmly secured.
- Connect the dash cam to one of the provided mounts.
- Attach the mount with the dash cam to the magic base. Adjust the camera angle for optimal road coverage.
5.3 การต่อสายไฟ
- เสียบที่ชาร์จในรถยนต์เข้ากับช่องเสียบที่จุดบุหรี่ในรถของคุณ
- Connect the other end of the car charger cable to the USB port on the dash cam.
- จัดวางสายเคเบิลให้เรียบร้อยไปตามขอบกระจกหน้ารถเพื่อหลีกเลี่ยงการกีดขวางการขับขี่
- โดยปกติแล้ว กล้องติดรถยนต์จะเปิดใช้งานโดยอัตโนมัติเมื่อสตาร์ทรถ และจะปิดเมื่อดับเครื่องยนต์
6. คู่มือการใช้งาน
6.1 การทำงานพื้นฐาน
- เปิด/ปิดเครื่อง: The device powers on automatically when connected to vehicle power and off when power is cut. You can also manually power on/off using the power button.
- การบันทึก: Once powered on, the dash cam will automatically begin continuous loop recording. A recording indicator will be visible on the screen.
- การนำทางเมนู: Use the 'M' button to access the menu and the up/down arrow buttons to navigate. The 'OK' button confirms selections.
6.2 การบันทึกแบบวนซ้ำ
The dash cam features intelligent loop recording. When the Micro Memory Card reaches its capacity, the system will automatically delete the oldest unprotected video fileเพื่อจัดสรรพื้นที่สำหรับการบันทึกใหม่ ซึ่งจะช่วยให้การบันทึกดำเนินไปอย่างต่อเนื่องโดยไม่ต้องมีการแทรกแซงด้วยตนเอง
6.3 ระบบตรวจสอบการจอดรถตลอด 24 ชั่วโมง
To activate 24-hour parking monitoring, ensure the feature is enabled in the settings. When the car encounters a collision while parked, the dash cam will automatically start recording for approximately one minute. For continuous monitoring when the car is off, a voltage reducing cable (purchased separately) is required.
6.4 การตรวจจับการเคลื่อนไหว
If enabled in the settings, the motion detection feature will automatically activate and begin recording if a significant object enters the camera's monitoring range while the vehicle is parked. It is recommended to turn off motion detection when driving to avoid unnecessary recordings.
6.5 Viewing บันทึก
คุณสามารถทำได้ view recorded videos directly on the 2.0-inch display screen. Navigate to the playback mode in the menu to browse and play files. Alternatively, remove the Micro Memory Card and insert it into a computer to view files.
7. การบำรุงรักษา
- การทำความสะอาด: Use a soft, dry cloth to clean the dash cam's lens and screen. Do not use abrasive cleaners or solvents.
- การ์ดหน่วยความจำ: Format the Micro Memory Card regularly (e.g., once a month) within the dash cam's settings to maintain optimal performance and prevent data corruption.
- การอัปเดตซอฟต์แวร์: ตรวจสอบของผู้ผลิต webโปรดตรวจสอบเว็บไซต์เป็นระยะเพื่อดูการอัปเดตเฟิร์มแวร์ที่มีให้ใช้งาน ปฏิบัติตามคำแนะนำที่ให้มาพร้อมกับการอัปเดตอย่างระมัดระวัง
- พื้นที่จัดเก็บ: เมื่อไม่ได้ใช้งานเป็นเวลานาน ควรเก็บกล้องติดรถยนต์ไว้ในที่แห้งและเย็น หลีกเลี่ยงแสงแดดโดยตรง
8 การแก้ไขปัญหา
| ปัญหา | สาเหตุที่เป็นไปได้ | สารละลาย |
|---|---|---|
| กล้องติดรถยนต์ไม่สามารถเปิดได้ | No power supply; faulty car charger; depleted internal battery. | Check car charger connection and vehicle's power outlet. Ensure the car charger is functional. Charge the internal battery. |
| การบันทึกหยุดโดยไม่คาดคิด | Memory card full; memory card error; power interruption. | Format the memory card. Replace the memory card if errors persist. Check power connection. |
| คุณภาพวิดีโอไม่ดี | Dirty lens; protective film on lens; incorrect resolution settings. | Clean the lens. Remove any protective film. Adjust video resolution settings to 1080P. |
| กล้องติดรถยนต์หยุดทำงานหรือขัดข้อง | Software error; memory card issue. | Press the RESET button (refer to Figure 5.1). Format or replace the memory card. |
| ระบบตรวจสอบการจอดรถใช้งานไม่ได้ | Feature not enabled; no voltage reducing cable for continuous power. | Enable parking monitoring in settings. Consider installing a voltage reducing cable for 24/7 monitoring. |
9. ข้อมูลจำเพาะ
| คุณสมบัติ | ข้อมูลจำเพาะ |
|---|---|
| วัสดุผลิตภัณฑ์ | เอบีเอส |
| ความละเอียดวิดีโอ | 1920x1080P/30เฟรมต่อวินาที |
| ความละเอียดของภาพ | 10MP |
| ประเภทแบตเตอรี่ | แบตเตอรี่ลิเธียมไอออน |
| ความจุของแบตเตอรี่ | 180mAh |
| ขนาดหน้าจอแสดงผล | 2.0 นิ้ว |
| ความละเอียดหน้าจอแสดงผล | ขนาด 960x240 |
| Supported Micro Memory Card | ความจุสูงสุด 32GB (ไม่รวมอยู่ในชุด) |
| อุณหภูมิในการทำงาน | -10℃ ถึง 70℃ |
| ขนาดสินค้า (ลึก x กว้าง x สูง) | 5.91" x 4.72" x 3.54" |
10. การรับประกันและการสนับสนุน
This Keenso product is covered by a manufacturer warranty for 90 days from the date of purchase. This warranty covers defects in materials and workmanship under normal use.
For technical support, warranty claims, or any questions regarding your Keenso Front Rear Dash Cam, please contact your retailer or visit the official Keenso webเว็บไซต์สำหรับข้อมูลการบริการลูกค้า