
1. บทนำ
This manual provides comprehensive instructions for the installation, operation, and maintenance of your GLEDOPTO ESP32 WLED Digital LED Controller. This advanced controller is designed to manage addressable LED strips, offering dynamic lighting effects, sound reactivity, and smart home integration. Please read this manual carefully before use to ensure proper functionality and safety.

Image 1.1: GLEDOPTO ESP32 WLED Digital LED Controller overview.
2. ข้อมูลด้านความปลอดภัย
- ตรวจสอบให้แน่ใจปริมาณอินพุตtage (DC 5-12-24V) matches your power supply and LED strip requirements. Incorrect voltage can damage the device and LED strips.
- Do not exceed the total output current of 15A or 10A per channel. Overloading can cause overheating and damage.
- Install the controller in a dry environment, suitable for indoor use only. Avoid exposure to moisture or extreme temperatures.
- ตัดการเชื่อมต่อไฟฟ้าก่อนทำการเชื่อมต่อใดๆ หรือดำเนินการบำรุงรักษา
- เก็บให้พ้นจากมือเด็ก
3. เนื้อหาบรรจุภัณฑ์
ตรวจสอบว่ามีรายการทั้งหมดอยู่ในแพ็คเกจของคุณ:
- 1 x GLEDOPTO ESP32 WLED Digital LED Controller (Model: GL-C-016WL-D)
- 1 x 3cm Trigger (likely a small wire or component for specific functions)
- 1 x คู่มือผู้ใช้
4. สินค้าหมดview
The GLEDOPTO ESP32 WLED Digital LED Controller is a versatile device for controlling addressable LED strips. Key features include:
- ESP32 Chip: High-performance processing and stable Wi-Fi connectivity.
- WLED Integration: Direct control via the WLED application, no gateway required.
- แสงไดนามิก: Over 100 built-in dynamic modes and customizable effects.
- ไมโครโฟนในตัว: Enables sound-reactive lighting effects.
- USB-C UART Interface: For easy firmware updates.
- ความเข้ากันได้กว้าง: Supports various addressable LED strip types (e.g., WS2811, WS2812, SK6812, TM1814, WS2813, WS2815).
- บ้านอัจฉริยะพร้อมแล้ว: ใช้งานร่วมกับ Amazon Alexa ได้

Image 4.1: Supported Addressable LED Strip Types.
5. การตั้งค่าและการติดตั้ง
5.1 การต่อสายไฟแถบ LED
Follow these steps to connect your addressable LED strip to the controller:
- Identify the data (DAT), ground (GND), and power (V+) wires of your LED strip.
- Locate the quick-connect terminals on the GLEDOPTO controller.
- Open the connector upwards: Gently lift the lever on the terminal block to open the wire entry point.
- ใส่ลวด: Carefully insert the stripped end (10mm stripping length recommended) of the LED strip wire into the corresponding terminal (V+, GND, Data). Ensure a secure connection.
- กดลง: Push the lever back down to secure the wire in place.
- Repeat for all necessary connections (V+, GND, Data).
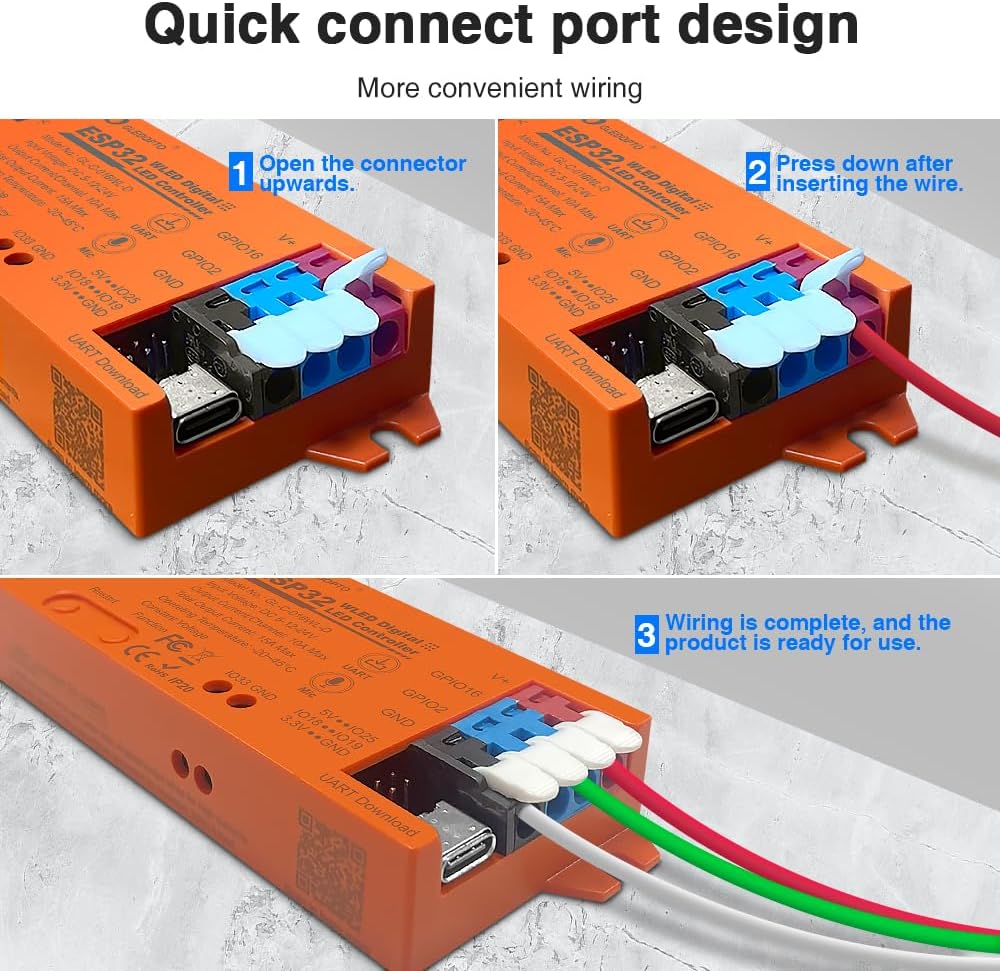
Image 5.1: Quick Connect Port Wiring Guide.
5.2 การเชื่อมต่อสายไฟ
Connect a DC 5-12-24V power supply to the controller's input terminals. Ensure the polarity is correct (V+ to V+, GND to GND). The controller supports a total output current of up to 15A, with a maximum of 10A per channel. Select a power supply appropriate for your LED strip's total power consumption.
6. คู่มือการใช้งาน
6.1 WLED Application Control
The GLEDOPTO controller integrates seamlessly with the WLED application, allowing for intuitive control via Wi-Fi. No additional gateway is required.
- Download WLED App: ค้นหา "WLED" in your smartphone's app store and install it.
- Connect to Controller's Wi-Fi: Power on the controller. On your smartphone, go to Wi-Fi settings and connect to the Wi-Fi network broadcast by the controller (usually named "WLED-AP" followed by some numbers).
- กำหนดค่าเครือข่าย: Open the WLED app. It should detect the controller. Follow the in-app instructions to connect the controller to your home Wi-Fi network.
- ควบคุมแสงสว่าง: Once connected to your home network, you can use the WLED app to select from over 100 dynamic modes, customize colors, brightness, and create personalized lighting effects.

Image 6.1: WLED App Control Interface.
6.2 ฟังก์ชันไมโครโฟน
The built-in sensitive microphone allows the LED lights to react to ambient sounds, especially music. This creates dynamic lighting effects that synchronize with audio, enhancing your environment.
- To activate sound-reactive modes, select the appropriate effect within the WLED application.
- Ensure the microphone is not obstructed for optimal performance.

Image 6.2: Microphone Function in action.
6.3 Firmware Updates (UART)
The controller features a USB-C UART interface for convenient firmware updates, ensuring your device always has the latest features and improvements.
- Connect the controller to your computer using a USB-C cable.
- Access the UART download function (refer to WLED documentation for specific software and procedures).
- Download the latest firmware (e.g., WLED_x.xx.x_ESP32.bin) and flash it to the controller.

Image 6.3: USB-C Interface for Firmware Updates.

Image 6.4: UART Download via Type-C Port.
6.4 การรวมระบบบ้านอัจฉริยะ
The controller is highly compatible with Amazon Alexa, allowing you to control your lighting with voice commands. Refer to the WLED documentation and Alexa app for setup instructions.
7. ข้อมูลจำเพาะ
| คุณสมบัติ | ข้อมูลจำเพาะ |
|---|---|
| หมายเลขรุ่น | จีแอล-ซี-016ดับเบิลยูแอล-ดี |
| อินพุต Voltage | กระแสตรง 5-12-24 โวลต์ |
| กระแสไฟขาออก/ช่อง | สูงสุด 10A |
| กระแสไฟขาออกทั้งหมด | สูงสุด 15A |
| อุณหภูมิในการทำงาน | -20 ~ 45 องศาเซลเซียส |
| โปรโตคอลการสื่อสาร | ไวไฟ |
| ประเภทสายไฟที่แนะนำ | 0.34-4 มม.² (22-12AWG) |
| วัสดุ | PC ทนไฟ |
| ระยะเวลาในการปอก | 10มม. |
| น้ำหนักสุทธิ (NW) | 49.3กรัม |
| น้ำหนักรวม (GW) | 57.3กรัม |
| ขนาด | 108x45x18มม. |
| วิธีการควบคุม | Application (WLED App), Amazon Alexa |
| แถบไฟ LED ที่รองรับ | WS2811, WS2812, WS2813, SK6812, TM1814, WS2815, etc. |

Image 7.1: GLEDOPTO Controller Product Parameters.
8 การแก้ไขปัญหา
If you encounter issues with your GLEDOPTO ESP32 WLED Digital LED Controller, refer to the following common problems and solutions:
- ไฟ LED ไม่ติด:
- Check power supply connection and ensure correct voltage (DC 5-12-24V) and polarity.
- Verify LED strip wiring (Data, V+, GND) is correct and secure.
- Ensure the LED strip type selected in the WLED app matches your physical strip.
- Confirm the power supply provides sufficient current for your LED strip length.
- ไม่สามารถเชื่อมต่อกับ Wi-Fi:
- Ensure the controller is powered on and within range of your Wi-Fi router.
- Try restarting the controller.
- If connecting to the controller's access point (AP mode), ensure your phone is disconnected from other Wi-Fi networks.
- Verify correct Wi-Fi credentials if connecting to your home network.
- Lights are flickering or behaving erratically:
- ตรวจสอบการเชื่อมต่อสายไฟว่าหลวมหรือไม่
- Ensure the power supply is stable and adequate for the number of LEDs.
- Consider adding a capacitor across the power lines near the LED strip if flickering persists, especially with long strips.
- Verify the data line is not too long or experiencing interference.
- Microphone function not responding:
- Ensure a sound-reactive mode is selected in the WLED app.
- Check that the microphone port on the controller is not obstructed.
- เพิ่มระดับเสียงของแหล่งกำเนิดเสียง
9. การบำรุงรักษา
- การทำความสะอาด: ใช้ผ้าแห้งนุ่มๆ เช็ดทำความสะอาดตัวควบคุม ห้ามใช้น้ำยาทำความสะอาดหรือสารละลายใดๆ
- สิ่งแวดล้อม: Keep the controller in a clean, dry, and well-ventilated area. Avoid dusty or humid environments.
- เฟิร์มแวร์: Regularly check for and install firmware updates via the USB-C UART interface to ensure optimal performance and access to new features.
10. การรับประกันและการสนับสนุน
GLEDOPTO products are designed for reliability and performance. For warranty information, technical support, or service inquiries, please contact your retailer or visit the official GLEDOPTO website. Please have your model number (GL-C-016WL-D) and purchase information ready when contacting support.