
1. บทนำ
This manual provides detailed instructions for the installation, operation, and maintenance of your MakeSkyBlue 60A MPPT Solar Charge Controller V124 with CloudBOX. This advanced controller is designed for stable, efficient, and intelligent solar charging in various applications, including home, RV, cabin, and off-grid power systems.
คุณสมบัติหลัก:
- Upgraded 60A MPPT Controller with CloudBOX: New generation controller for stable, efficient, and intelligent solar charging.
- Advanced MPPT Charging Technology: True 100% MPPT algorithm and intelligent DSP control for faster, more precise power point tracking, improving efficiency by up to 30% compared to PWM controllers.
- ระบบจัดการแบตเตอรี่อัจฉริยะ: Automatic detection of 12V/24V/48V systems and 3-stage charging (Bulk, Absorption, Float). Supports AGM, Gel, and Flooded batteries.
- Comprehensive Protection System: Protection against overcharge, over-discharge, overheating, reverse polarity, and short circuit.
- User-Friendly & Expandable Design: LCD display for real-time data and charging status. Supports parallel connection.
2. ข้อมูลด้านความปลอดภัย
โปรดอ่านคำแนะนำและคำเตือนทั้งหมดอย่างละเอียดก่อนการติดตั้งและการใช้งาน การไม่ปฏิบัติตามคำแนะนำเหล่านี้อาจทำให้เกิดไฟฟ้าช็อต ไฟไหม้ หรือการบาดเจ็บร้ายแรงได้
ข้อควรระวังเพื่อความปลอดภัยทั่วไป:
- ติดตั้งตัวควบคุมในบริเวณที่มีอากาศถ่ายเทสะดวก และห่างจากวัสดุที่ติดไฟได้ง่าย
- ตรวจสอบให้แน่ใจว่าระบบต่อสายดินอย่างถูกต้อง
- ห้ามถอดประกอบหรือพยายามซ่อมแซมตัวควบคุมด้วยตนเอง โปรดติดต่อช่างผู้ชำนาญการเพื่อขอรับบริการ
- Keep children away from the solar power system components.
ความปลอดภัยทางไฟฟ้า:
- Always disconnect the solar panel array and battery bank before installing or servicing the controller.
- ควรใช้เบรกเกอร์และฟิวส์ที่เหมาะสมสำหรับการเชื่อมต่อทั้งหมด
- Ensure all wiring is correctly polarized (+ to + and - to -). Reverse polarity can damage the controller and other components.
- ควรใช้เครื่องมือที่มีฉนวนหุ้มเพื่อป้องกันการลัดวงจรโดยไม่ตั้งใจ
- Verify that the solar panel open-circuit voltage (VOC) does not exceed the controller's maximum input voltagอี (160VDC)
3. สินค้าหมดview
The MakeSkyBlue 60A MPPT Solar Charge Controller V124 is a robust device designed for optimal solar energy harvesting. It features a durable aluminum casing for heat dissipation and an intuitive LCD display for monitoring.
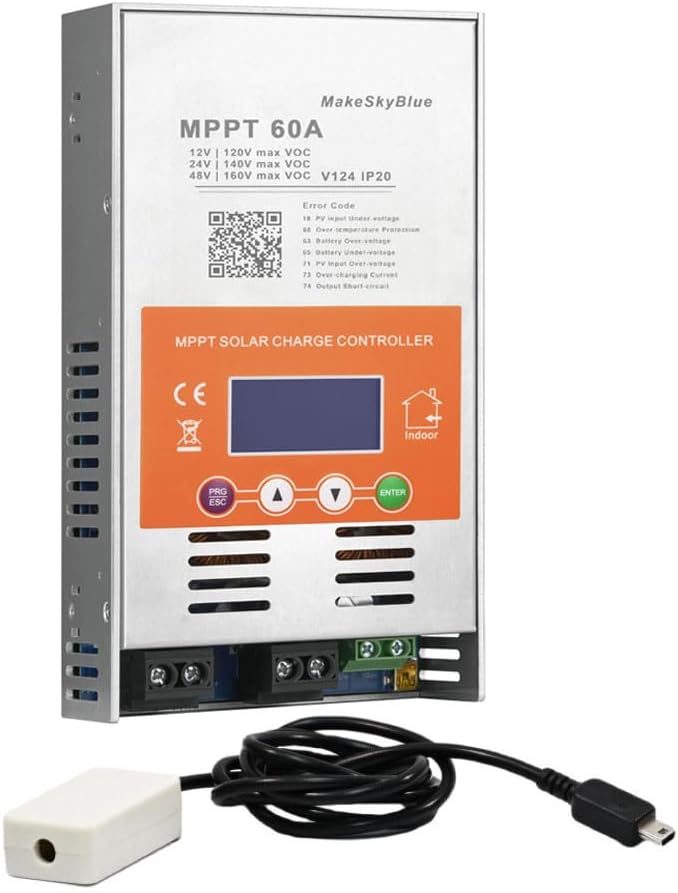
Figure 1: MakeSkyBlue 60A MPPT Solar Charge Controller V124 with CloudBOX
ส่วนประกอบ:
- MPPT Solar Charge Controller Unit
- CloudBOX (for remote monitoring/control)
- คู่มือการใช้งาน
รายละเอียดทางกายภาพ:
The controller features a metallic enclosure with ventilation slots and a cooling fan for temperature management. The front panel includes an LCD display and control buttons. Connection terminals for solar input, battery, and DC load are located at the bottom.

Figure 2: Controller Dimensions (8.46 x 4.52 x 1.96 inches)
จอแสดงผล LCD:
The LCD provides real-time data and status indicators. It typically shows:
- PV อินพุต Voltagอี (พีวี)
- ปริมาณแบตเตอรี่tage (BATT)
- Charging Current (CHARGE)
- Load Output (LOAD)
- Operating Mode (e.g., 24H for continuous load, 00H for light control)
- อุณหภูมิ (TEMP)
- Error Codes (FAULT)
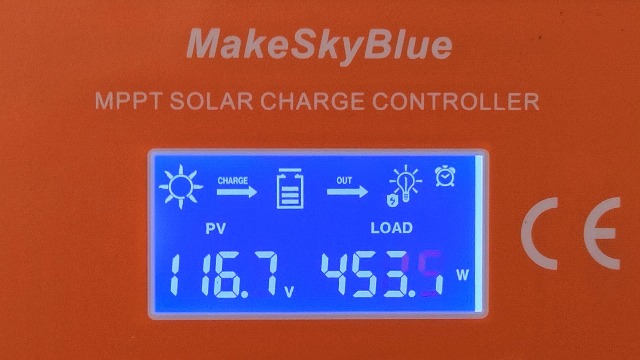
รูปที่ 3: อินเทอร์เฟซจอแสดงผล LCD
4. การตั้งค่าและการติดตั้ง
การติดตั้งอย่างถูกต้องมีความสำคัญอย่างยิ่งต่อการทำงานที่ปลอดภัยและมีประสิทธิภาพของตัวควบคุมการชาร์จพลังงานแสงอาทิตย์ของคุณ โปรดปฏิบัติตามขั้นตอนเหล่านี้อย่างระมัดระวัง
4.1 Mounting the Controller:
- Choose a dry, well-ventilated indoor location, protected from direct sunlight, high temperatures, and moisture.
- Ensure adequate clearance (at least 75mm) around all sides of the controller for proper airflow and heat dissipation.
- Securely mount the controller to a stable surface using appropriate screws.

Figure 4: Temperature Protection and Mounting Considerations
4.2 การเชื่อมต่อสายไฟ:
เชื่อมต่อชิ้นส่วนตามลำดับต่อไปนี้เพื่อป้องกันความเสียหาย:
- เชื่อมต่อแบตเตอรี่: Connect the battery to the controller's battery terminals (+ to + and - to -). Ensure a secure connection. The controller will automatically detect the system voltagอี (12V/24V/48V)
- เชื่อมต่อแผงโซลาร์เซลล์: Connect the solar panel array to the controller's PV input terminals (+ to + and - to -). Ensure the PV open-circuit voltagไม่เกิน 160VDC
- เชื่อมต่อโหลด DC (ไม่จำเป็น): Connect your DC loads to the controller's load terminals (+ to + and - to -).

รูปที่ 5: แผนภาพการเดินสายระบบทั่วไป
4.3 Parallel Connection (Optional):
The controller supports parallel connection for expanding your solar power system. Refer to the official video for detailed instructions on parallel setup and communication line configuration.
Video 1: HHJ60-PRO Paralleling Guide. This video demonstrates the installation and configuration of multiple controllers for parallel operation, including wiring and communication settings.
5. คู่มือการใช้งาน
After successful installation, the controller will power on and display the main interface. Use the control buttons to navigate and adjust settings.
5.1 LCD Display Navigation:
Use the "Up" and "Down" arrow buttons to cycle through different display interfaces, showing PV voltage, ปริมาณแบตเตอรี่tage, charging current, load status, temperature, and error codes.
Video 2: MPPT Controller Connected | Real-Time LCD Display Demo. This video illustrates how to navigate the LCD display to view real-time system data.
5.2 การตั้งค่าพารามิเตอร์:
To enter the settings interface, press the "PRG/ESC" button. Use the "Up" and "Down" arrows to adjust values and "ENTER" to confirm. Key settings include:
- d00 (Load Operating Mode): Configure how the DC load operates (e.g., 24H for continuous, 00H for light control, 1H-23H for timed operation).
- d01 (Charging Voltagจ): ตั้งค่าปริมาณการชาร์จบูสต์tage.
- d02 (Float Charging Voltagจ): ตั้งค่าปริมาณการชาร์จแบบลอยtage.
- d03 (Low Voltagอี การป้องกัน): Set the battery low voltagเกณฑ์การตัดการเชื่อมต่อ (LVD)
- d04 (Battery Voltage การสอบเทียบ): Calibrate the displayed battery voltage if it differs from a multimeter reading.
- d05 (Parallel Communication Code): Define the communication address for parallel operation (lowest code acts as master).
- d06 (Battery Type): Select the battery type (e.g., Sealed, Gel, Flooded, Lithium Iron Phosphate). Choosing "USE" allows manual settings for d01, d02, and d03.
- d07 (System Voltagจ): Configure the system voltagเช่น 12V, 24V, 48V
Video 3: D01-D06 Parameter Setting Information. This video guides you through adjusting various operational parameters of the controller.
6. การบำรุงรักษา
การบำรุงรักษาตามปกติจะช่วยให้ตัวควบคุมการชาร์จพลังงานแสงอาทิตย์ของคุณมีประสิทธิภาพสูงสุดและมีอายุการใช้งานยาวนาน
- ความสะอาด : รักษาตัวควบคุมให้สะอาด ปราศจากฝุ่นและเศษขยะ ใช้ผ้าแห้งเช็ดทำความสะอาด
- การเชื่อมต่อ: ตรวจสอบการเชื่อมต่อสายไฟทั้งหมดเป็นระยะๆ เพื่อดูความแน่นหนาและการกัดกร่อน
- การระบายอากาศ : ตรวจสอบให้แน่ใจว่าช่องระบายอากาศไม่ถูกปิดกั้น เพื่อให้ความร้อนระบายออกได้อย่างเหมาะสม
- อัพเดตเฟิร์มแวร์: ตรวจสอบของผู้ผลิต webเข้าชมเว็บไซต์เพื่อตรวจสอบการอัปเดตเฟิร์มแวร์ที่มีให้ใช้งาน เพื่อปรับปรุงประสิทธิภาพหรือเพิ่มคุณสมบัติใหม่ๆ
7 การแก้ไขปัญหา
If you encounter issues with your controller, refer to the following common problems and their solutions. The LCD display may show error codes to help diagnose the problem.
รหัสข้อผิดพลาด:
| รหัส | คำอธิบาย | สาเหตุที่เป็นไปได้ / วิธีแก้ไข |
|---|---|---|
| E1 | อินพุต PV เกินปริมาตรtage | อาร์เรย์ PV ฉบับที่tage exceeds maximum allowed. Reduce the number of solar panels in series. |
| E2 | PV input under-voltage | อาร์เรย์ PV ฉบับที่tage is too low. Check solar panel connections, ensure sufficient sunlight. |
| E3 | ป้องกันอุณหภูมิเกิน | Controller is overheating. Ensure adequate ventilation and ambient temperature. |
| E4 | ปริมาณแบตเตอรี่เกินtage | ปริมาณแบตเตอรี่tage เกินค่าที่ตั้งไว้tage protection. Check battery settings (d01, d02). |
| E5 | แบตเตอรี่ภายใต้ปริมาตรtage | ปริมาณแบตเตอรี่tage is below the set low voltage protection. Charge battery or reduce load. |
| E6 | อินพุต PV เกินกระแส | PV array current exceeds maximum allowed. Check PV array configuration. |
| E7 | เอาต์พุตลัดวงจร | Short circuit detected on the load output. Disconnect load, check wiring, and reconnect. |
| E8 | เอาท์พุตโอเวอร์โหลด | Load current exceeds maximum allowed. Reduce the connected load. |
เคล็ดลับการแก้ไขปัญหาทั่วไป:
- If the controller is not charging, ensure solar panels are receiving adequate sunlight and all connections are secure.
- If the load is not working, check the load operating mode (d00) and ensure the battery has sufficient charge.
- For persistent issues, power cycle the controller by disconnecting the solar panels, then the battery, waiting a few minutes, and reconnecting in the correct order (battery first, then solar).
8. ข้อมูลจำเพาะ
| คุณสมบัติ | ข้อมูลจำเพาะ |
|---|---|
| แบบอย่าง | 60A-V124 |
| เล่มระบบtage | 12V/24V/48V Auto-detection |
| อินพุต PV สูงสุด Voltage | 160VDC |
| กระแสไฟชาร์จที่กำหนด | 60เอ |
| รองรับประเภทแบตเตอรี่ | AGM, เจล, แบบน้ำ, ลิเธียม |
| อัลกอริทึมการชาร์จ | 3-สtage (ปริมาณมาก, การดูดซับ, การลอยตัว) |
| ประเภทจอภาพ | จอแอลซีดี |
| วัสดุ | อลูมิเนียม |
| น้ำหนักสินค้า | 3.5 ปอนด์ |
| ขนาดแพ็คเกจ | 8.46 x 4.52 x 1.96 นิ้ว |
| ส่วนประกอบที่รวมอยู่ | Solar Charge Controller, CloudBOX, User Manual |
9. การรับประกันและการสนับสนุน
For warranty information, technical support, or service inquiries, please contact MakeSkyBlue customer service through the retailer where the product was purchased or visit the official MakeSkyBlue webไซต์ โปรดเตรียมรุ่นผลิตภัณฑ์และวันที่ซื้อให้พร้อมเมื่อติดต่อฝ่ายสนับสนุน