1. บทนำ
This manual provides detailed instructions for the installation, operation, and maintenance of your plplaaoo 100A MPPT Solar Charge Controller. This advanced controller is designed to optimize energy harvest from your solar panels and manage battery charging efficiently for 12V, 24V, 36V, and 48V solar power systems. Please read this manual thoroughly before installation and use to ensure proper function and safety.
2. คำแนะนำด้านความปลอดภัย
โปรดปฏิบัติตามข้อควรระวังด้านความปลอดภัยต่อไปนี้ในระหว่างการติดตั้งและการใช้งาน:
- ตรวจสอบให้แน่ใจว่าสายไฟทั้งหมดเชื่อมต่ออย่างถูกต้องและยึดแน่นหนา เพื่อป้องกันการหลวมและการเกิดความร้อนสูงเกินไป
- ควรตัดการเชื่อมต่อแผงโซลาร์เซลล์และแบตเตอรี่ทุกครั้งก่อนติดตั้งหรือปรับแต่งตัวควบคุม
- Use appropriate tools and wear protective gear, including eye protection, during installation.
- Install the controller in a well-ventilated area, away from flammable gases and liquids.
- ห้ามถอดประกอบหรือพยายามซ่อมแซมตัวควบคุมด้วยตนเอง โปรดติดต่อช่างผู้ชำนาญการเพื่อขอรับบริการ
- Ensure the battery bank is properly sized and compatible with the controller's voltage และการจัดอันดับปัจจุบัน
- Avoid short-circuiting the solar panel, battery, or load terminals.
3. คุณสมบัติของผลิตภัณฑ์
- Maximum Power Point Tracking (MPPT): Achieves up to 98% conversion efficiency by intelligently tracking the maximum power point of solar panels under varying conditions.
- ปริมาตรอัตโนมัติtagการปรับตัว: Automatically detects and adapts to 12V, 24V, 36V, or 48V battery systems.
- การควบคุมแบบมัลติฟังก์ชั่น: Supports various operating modes including PWM charging, constant current output, and voltagอีระเบียบ
- Integrated USB and DC Outputs: Features dual 5V 1A USB ports and a 2A DC output for charging external devices.
- การป้องกันที่ครอบคลุม: Includes safeguards against overvoltage, overcurrent, overtemperature, overload, short circuits, and reverse polarity.
- อินเทอร์เฟซที่เป็นมิตรกับผู้ใช้: Equipped with a backlit LCD display for real-time monitoring and intuitive buttons for configuration.
- โครงสร้างทนทาน: Features an aluminum heatsink for efficient cooling and robust design for harsh environments (0°C to 60°C).
- ความเข้ากันได้ของแบตเตอรี่: Compatible with gel, sealed lead-acid, and lithium batteries.
4. เนื้อหาบรรจุภัณฑ์
- 1 x plplaaoo 100A MPPT Solar Charge Controller
- 1 x คู่มือผู้ใช้
5. สินค้าหมดview และส่วนประกอบ
Familiarize yourself with the main components and interface of the solar charge controller.

รูปที่ 5.1: ด้านหน้า view of the solar charge controller, highlighting the LCD screen and various connection terminals.
The controller features an intuitive LCD display and clearly labeled ports for easy connection. The display provides real-time information about the system's status.
รูปที่ 5.2: รายละเอียด view of the controller's connection ports.

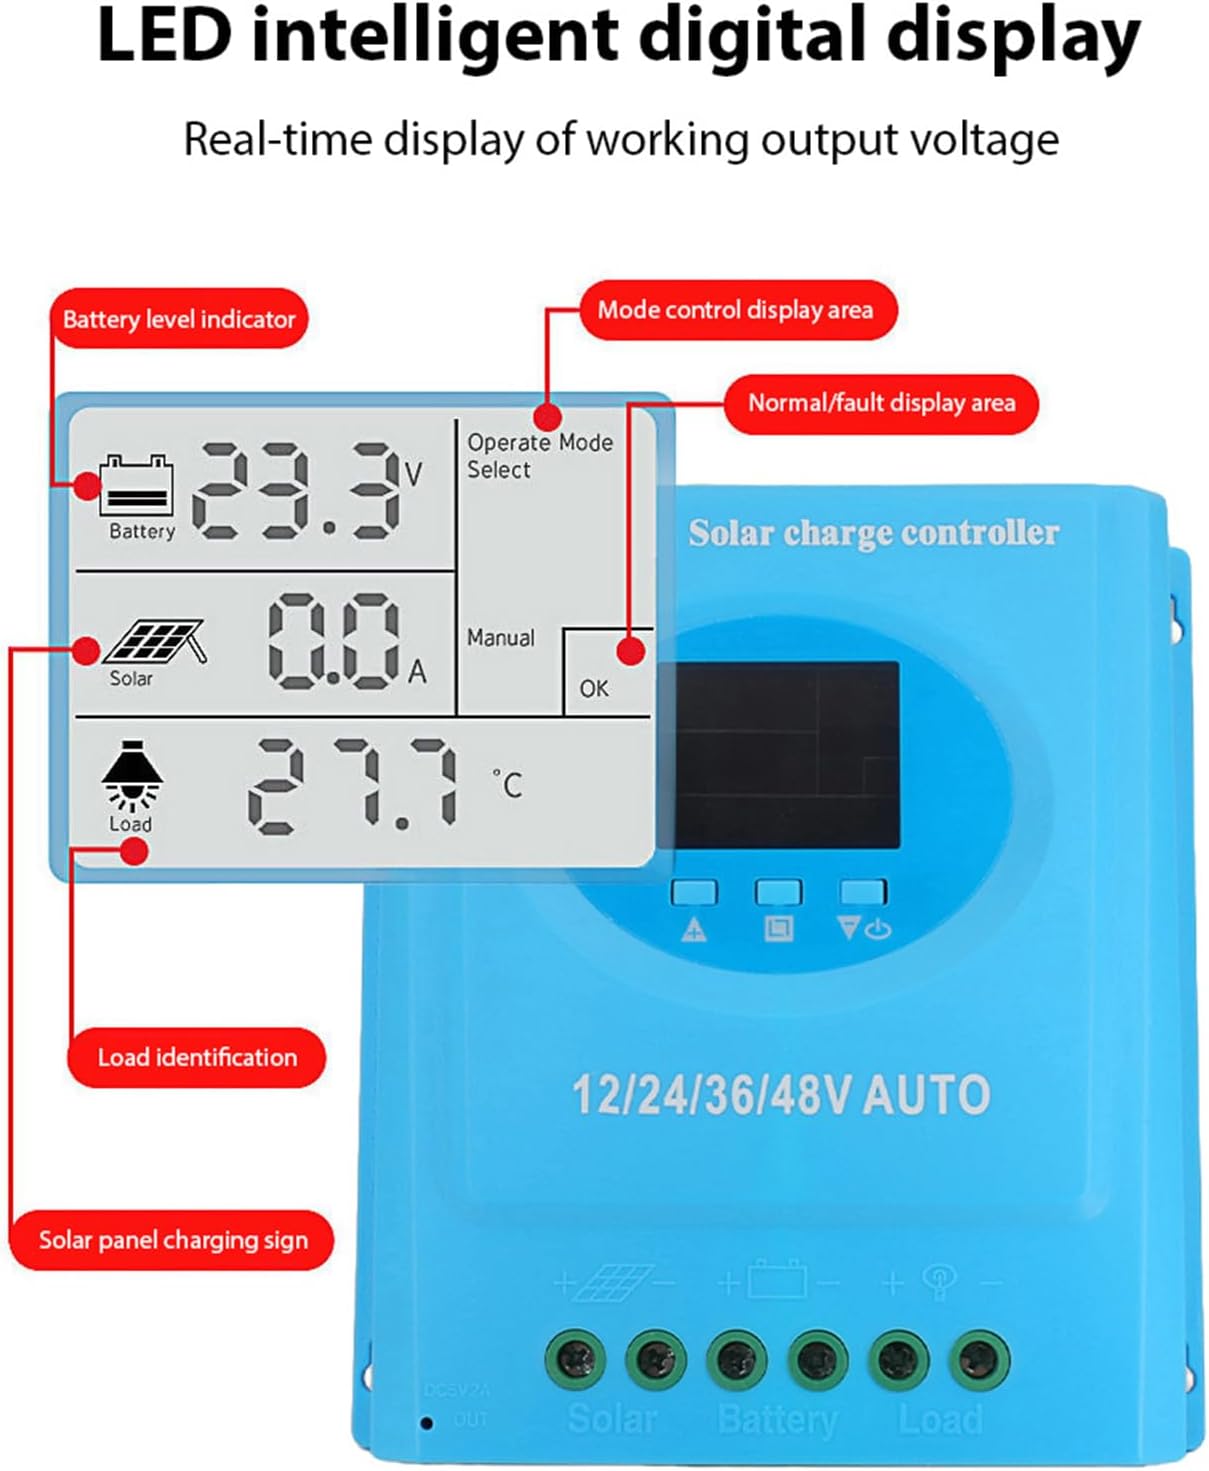
รูปที่ 5.3: รายละเอียด view of the LCD display, indicating battery level, solar panel charging sign, load identification, operating mode, and real-time voltage.
5.1. พอร์ตการเชื่อมต่อ
- อินเทอร์เฟซ USB คู่: Two 5V 1A USB ports for charging mobile devices.
- ช่องเสียบแผงโซลาร์เซลล์: Connects to your solar panels (positive and negative).
- พอร์ตแบตเตอรี่: Connects to your battery bank (positive and negative).
- DC Load Port: Connects to your DC loads (positive and negative).
- พอร์ตเอาต์พุต DC: Additional DC output.
6. การตั้งค่าและการติดตั้ง
Follow these steps for proper installation of the solar charge controller. Ensure all power sources are disconnected before beginning.
6.1. วิธีการเดินสายไฟ
เชื่อมต่อชิ้นส่วนตามลำดับต่อไปนี้เพื่อป้องกันความเสียหาย:
- เชื่อมต่อแบตเตอรี่: เชื่อมต่อแบตเตอรี่เข้ากับขั้วแบตเตอรี่ของตัวควบคุม (ขั้วบวกต่อกับขั้วบวก ขั้วลบต่อกับขั้วลบ) ตัวควบคุมจะตรวจจับระดับแบตเตอรี่โดยอัตโนมัติtage.
- เชื่อมต่อแผงโซล่าเซลล์: Connect the solar panel to the controller's solar panel terminals (positive to positive, negative to negative).
- เชื่อมต่อโหลด DC: เชื่อมต่อโหลด DC เข้ากับขั้วต่อโหลดของตัวควบคุม (ขั้วบวกต่อกับขั้วบวก ขั้วลบต่อกับขั้วลบ)
สำคัญ: ควรต่อแบตเตอรี่ก่อนเสมอ จากนั้นจึงต่อแผงโซลาร์เซลล์ และสุดท้ายจึงต่ออุปกรณ์ไฟฟ้าที่ต้องการใช้งาน ส่วนการถอดควรทำในลำดับย้อนกลับ

รูปที่ 6.1: Solar energy system wiring diagram. Note the correct polarity for all connections.
6.2. การติดตั้ง
Mount the controller vertically on a flat surface in a well-ventilated area, ensuring adequate clearance for air circulation around the heatsink. Avoid direct sunlight, high temperatures, and humid environments.
7. คู่มือการใช้งาน
Once installed, the controller will automatically begin operating. The LCD display provides real-time system status.
7.1. ข้อมูลจอแสดงผล LCD
หน้าจอ LCD แสดงค่าพารามิเตอร์ต่างๆ ดังนี้:
- ตัวบ่งชี้ระดับแบตเตอรี่: Shows the current charge status of the battery.
- Solar Panel Charging Sign: Indicates when the solar panels are actively charging the battery.
- การระบุโหลด: Shows the status of the connected DC load.
- Operating Mode Display Area: Displays the current operating mode (e.g., manual, automatic).
- Normal/Fault Display Area: Indicates normal operation or displays error codes if a fault occurs.
- Real-time Working Output Voltage: แสดงปริมาณกระแสไฟฟ้าtagอีของระบบ
7.2. ปุ่มฟังก์ชัน
The controller typically features multiple buttons for navigation and setting adjustments:
- ปุ่มเมนู: Used to enter and exit the menu settings.
- ปุ่มขึ้น/ลง: ใช้สำหรับเลื่อนดูตัวเลือกในเมนูและปรับค่าพารามิเตอร์
- ปุ่มตกลง: Used to confirm selections and save settings.
Refer to the on-screen menu for specific parameter adjustments such as battery type, load control mode, and charging thresholds.
8. การบำรุงรักษา
การบำรุงรักษาตามปกติจะช่วยให้ตัวควบคุมการชาร์จพลังงานแสงอาทิตย์ของคุณมีประสิทธิภาพสูงสุดและมีอายุการใช้งานยาวนาน
- การทำความสะอาด: Periodically clean the controller's exterior with a dry cloth to remove dust and debris. Ensure ventilation openings are clear.
- ตรวจสอบการเชื่อมต่อ: ตรวจสอบความแน่นหนาและการกัดกร่อนของจุดเชื่อมต่อสายไฟทั้งหมดเป็นประจำทุกปี ขันให้แน่นขึ้นหากจำเป็น
- การตรวจสอบสิ่งแวดล้อม: Ensure the installation environment remains within the specified operating temperature range and is free from excessive moisture or dust.
- การตรวจสอบแบตเตอรี่: Regularly check the battery terminals for corrosion and ensure the battery is in good condition.
9 การแก้ไขปัญหา
หากคุณพบปัญหาเกี่ยวกับตัวควบคุมการชาร์จพลังงานแสงอาทิตย์ โปรดดูปัญหาทั่วไปและวิธีแก้ไขต่อไปนี้:
| ปัญหา | สาเหตุที่เป็นไปได้ | สารละลาย |
|---|---|---|
| ตัวควบคุมไม่เปิดเครื่อง / หน้าจอ LCD ว่างเปล่า |
|
|
| แบตเตอรี่ไม่ชาร์จ |
|
|
| โหลดไม่ทำงาน |
|
|
| แสดงรหัสข้อผิดพลาด | ความผิดพลาดของระบบเฉพาะ | Refer to the controller's display for the specific error code and consult the full product documentation or contact support for detailed interpretation and resolution. |
10. ข้อมูลจำเพาะ
| พารามิเตอร์ | ค่า |
|---|---|
| แบบอย่าง | plplaaoozi6egog4wm-0A |
| ยี่ห้อ | ได้โปรด |
| กระแสไฟฟ้าที่ได้รับการจัดอันดับ | 100เอ |
| เล่มระบบtage | 12V / 24V / 36V / 48V Automatic Adaptation |
| ประเภทการชาร์จ | MPPT (การติดตามจุดพลังงานสูงสุด) |
| ประสิทธิภาพการแปลง | สูงสุดถึง 98% |
| เอาท์พุต USB | Dual 5V 1A ports |
| เอาท์พุท DC | 2A |
| อุณหภูมิในการทำงาน | 0°C ถึง 60°C |
| ขนาด (โดยประมาณ) | 19.5 ซม. x 18.3 ซม. x 6.8 ซม. (7.7 นิ้ว x 7.2 นิ้ว x 2.7 นิ้ว) |

รูปที่ 10.1: Approximate dimensions of the solar charge controller.
11. การรับประกันและการสนับสนุน
สำหรับข้อมูลการรับประกัน การสนับสนุนทางเทคนิค หรือสอบถามบริการ โปรดติดต่อผู้ค้าปลีกหรือผู้ผลิตของคุณโดยตรง โปรดเก็บใบเสร็จรับเงินไว้เป็นหลักฐานการซื้อ