1. สินค้าหมดview
The ATTACK SHARK X8SE is a high-performance wireless gaming mouse designed for precision and versatility. It features tri-mode connectivity, an advanced optical sensor, and a lightweight ergonomic design for extended use.

Figure 1: ATTACK SHARK X8SE Wireless Gaming Mouse highlighting ultra-light design, PAW3311 sensor, adjustable DPI, 1000Hz polling rate, tri-mode connection, Broadcom BK52820 chip, web driver, and 500mAh battery.
2. เนื้อหาบรรจุภัณฑ์
- ATTACK SHARK X8SE Wireless Gaming Mouse
- สายชาร์จ/ข้อมูล USB-C
- ตัวรับสัญญาณ USB 2.4G
- Griptape (pre-applied or included separately)
- คู่มือการใช้งาน
3. การตั้งค่า
3.1 การชาร์จเริ่มต้น
Before first use, connect the mouse to a USB-A port on your computer using the provided USB-C cable to ensure it is fully charged. The mouse can be used in wired mode while charging.
3.2 โหมดการเชื่อมต่อ
The X8SE mouse supports three connection modes: 2.4GHz Wireless, Bluetooth, and USB-C Wired. A switch on the bottom of the mouse allows you to select the desired mode.
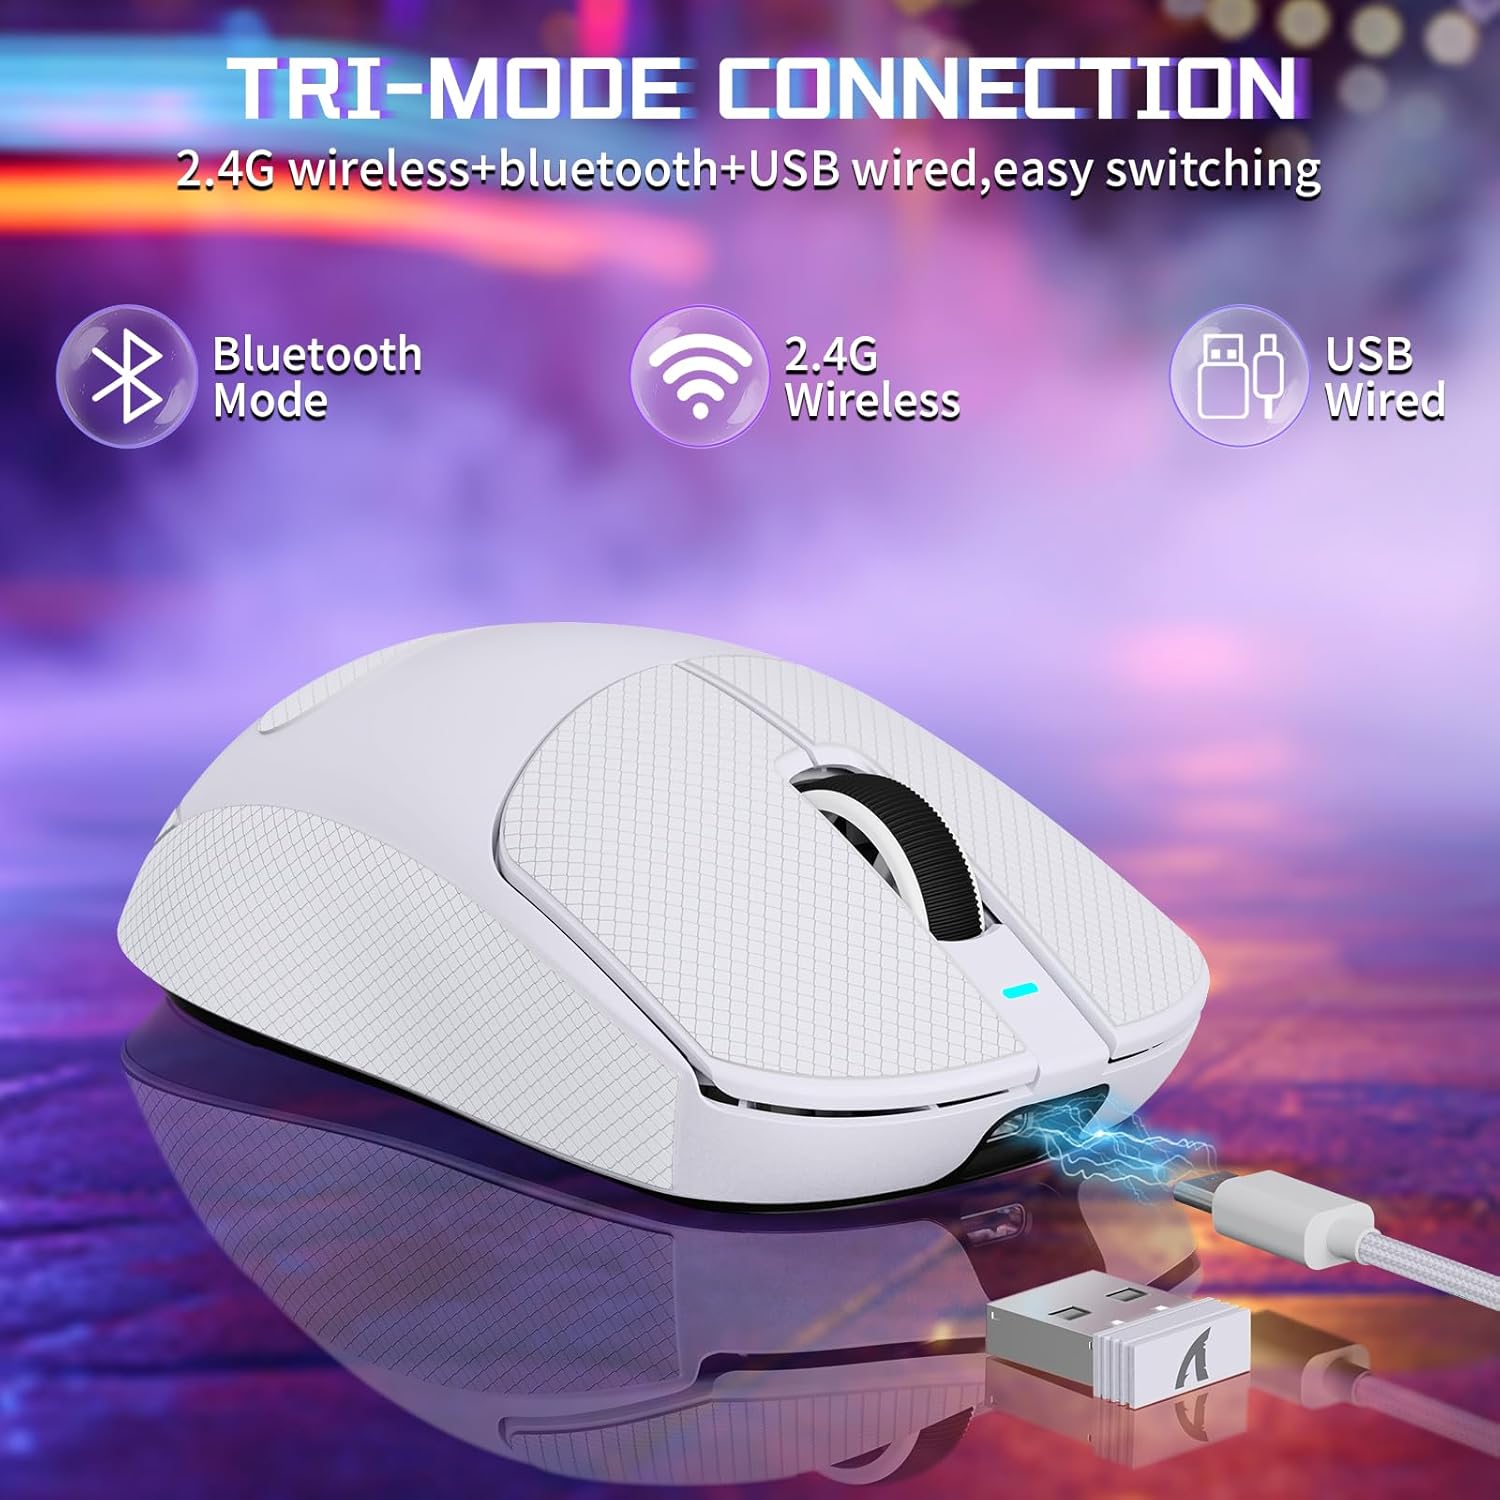
Figure 2: Tri-mode connection options including Bluetooth, 2.4G Wireless, and USB Wired.
โหมดไร้สาย 3.2.1 2.4GHz
- ค้นหาตัวรับสัญญาณ USB 2.4G ที่เก็บไว้ในช่องด้านล่างของเมาส์
- เสียบตัวรับสัญญาณ USB เข้ากับพอร์ต USB-A ที่ว่างอยู่บนคอมพิวเตอร์ของคุณ
- Switch the mode selector on the bottom of the mouse to the '2.4G' position.
- เมาส์ควรเชื่อมต่อกับคอมพิวเตอร์ของคุณโดยอัตโนมัติ
3.2.2 โหมดบลูทู ธ
- Switch the mode selector on the bottom of the mouse to the 'BT' position.
- บนคอมพิวเตอร์หรืออุปกรณ์ของคุณ ให้ไปที่การตั้งค่าบลูทูธ แล้วเปิดใช้งานบลูทูธ
- ค้นหา new devices and select 'ATTACK SHARK X8SE' to pair.
3.2.3 โหมดใช้งานแบบมีสาย USB-C
- Connect one end of the provided USB-C cable to the mouse and the other end to a USB-A port on your computer.
- เมาส์จะเปลี่ยนเป็นโหมดสายโดยอัตโนมัติและเริ่มชาร์จ
3.3 การติดตั้งไดรเวอร์
The ATTACK SHARK X8SE utilizes an intelligent cloud-based driver for customization. This driver typically auto-detects your system. For advanced settings and customization, visit the official ATTACK SHARK website to download the latest software if not automatically prompted.
4. คู่มือการใช้งาน
4.1 ฟังก์ชันปุ่ม
The X8SE mouse features 5 programmable buttons and a DPI switch.
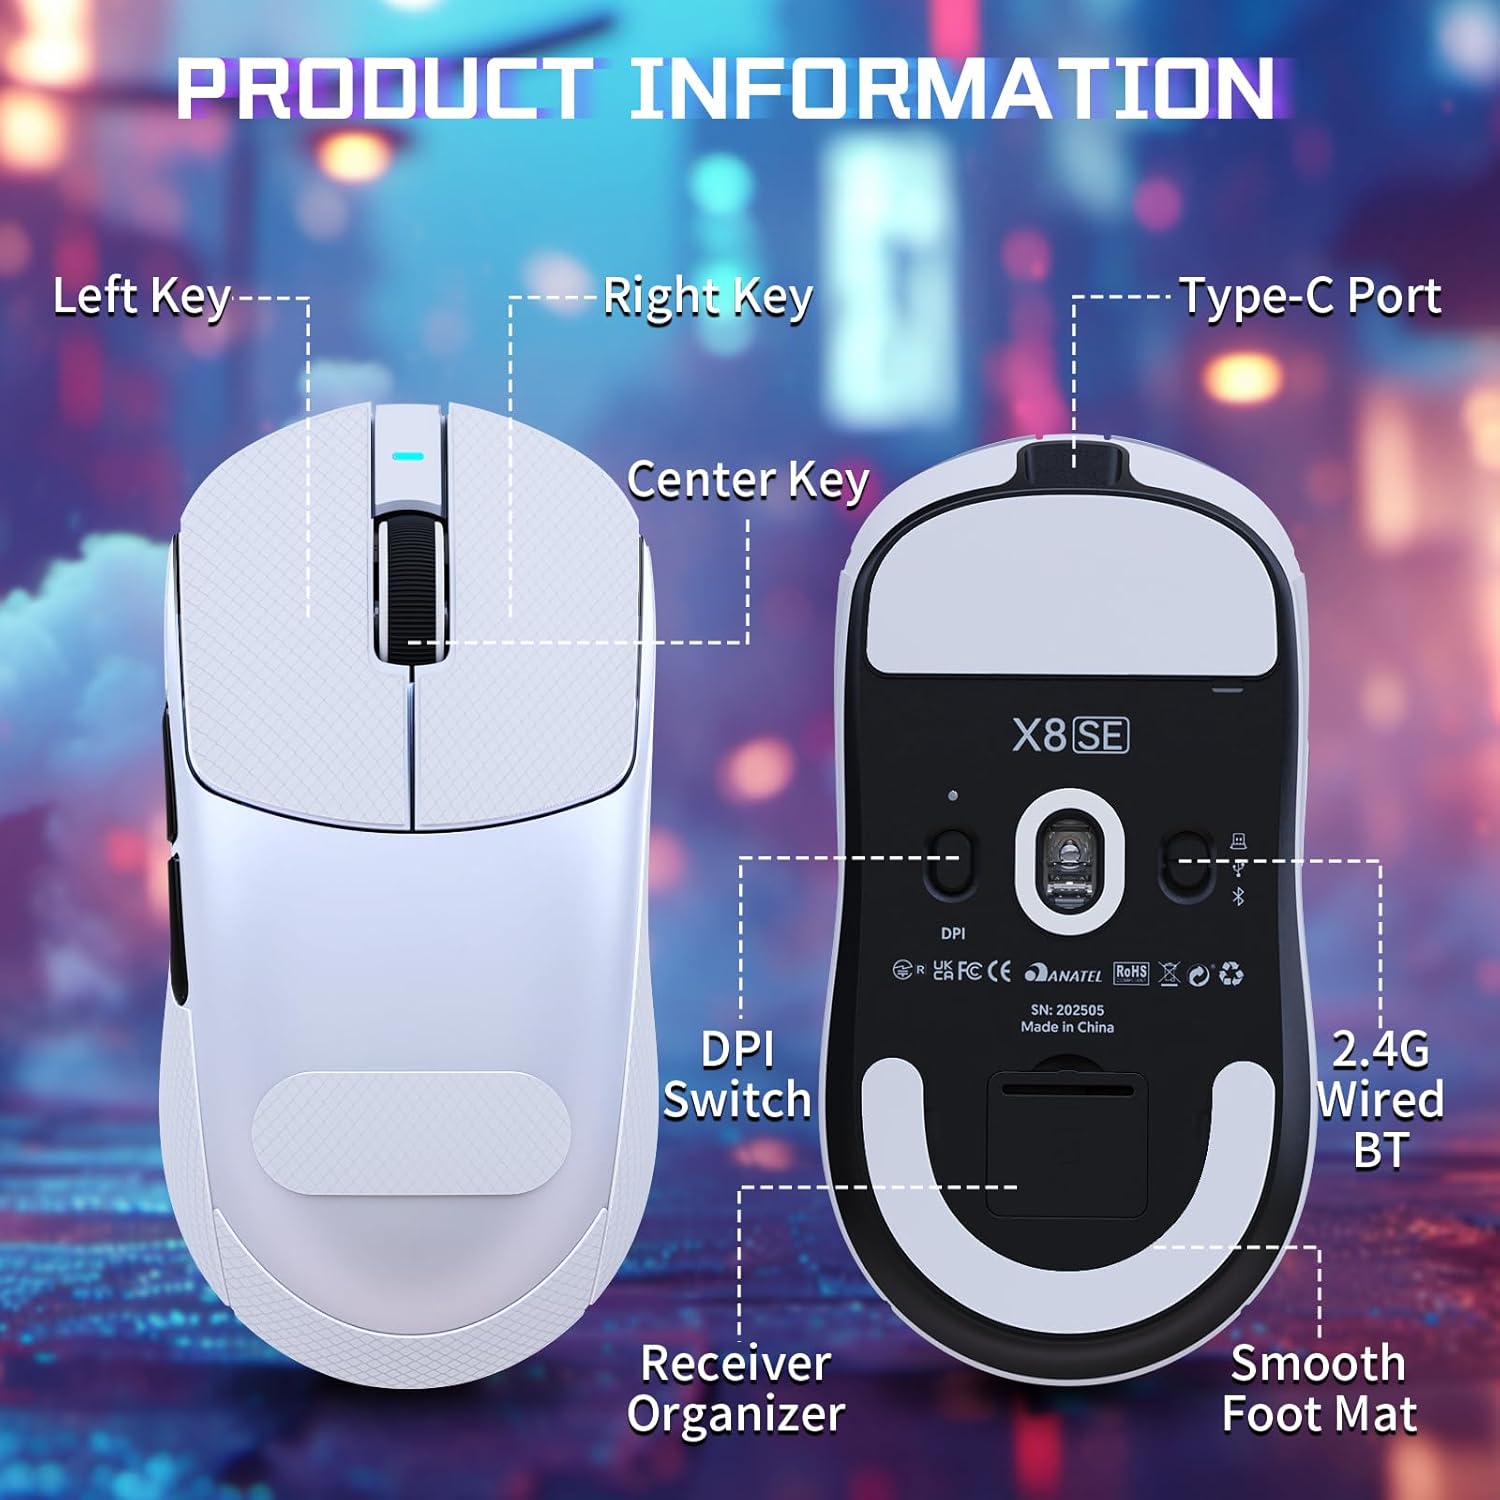
Figure 3: Product information diagram showing Left Key, Right Key, Center Key (scroll wheel), Type-C Port, Front Side Key, Back Side Key, DPI Switch, Receiver Organizer, and Smooth Foot Mat.
- ปุ่มซ้าย: ฟังก์ชั่นคลิกหลัก
- ปุ่มขวา: ฟังก์ชั่นคลิกรอง
- Center Key (Scroll Wheel): เลื่อนขึ้น/ลง คลิกตรงกลาง
- ปุ่มด้านหน้า: Default function (programmable).
- กุญแจด้านหลัง: Default function (programmable).
- DPI Switch (bottom): หมุนเวียนผ่านการตั้งค่า DPI
4.2 การปรับ DPI
The mouse is equipped with a PixArt PAW3311 optical sensor, offering up to 25,000 DPI. You can adjust the DPI sensitivity using the dedicated DPI switch on the bottom of the mouse. There are 6 adjustable DPI levels:
- 800 จุดต่อนิ้ว
- 1600 จุดต่อนิ้ว
- 2400 จุดต่อนิ้ว
- 3200 จุดต่อนิ้ว
- 8000 จุดต่อนิ้ว
- 25000 จุดต่อนิ้ว

Figure 4: Visual representation of adjustable DPI levels (800-25000) and polling rates (125Hz-1000Hz) with corresponding indicator lights.
4.3 การปรับอัตราการโพล
The 2.4G wireless mode supports a 1000Hz polling rate for esports-level responsiveness. Polling rates can be adjusted via the cloud driver software to 125Hz, 250Hz, 500Hz, or 1000Hz.
ไม่เคยปรับแต่ง
Utilize the intelligent cloud driver software to fully customize your mouse settings. This includes:
- Remapping button functions.
- Adjusting DPI levels and sensitivity.
- Setting polling rates.
- Recording and assigning macros.

Figure 5: The cloud driver interface for customizing mouse settings, including button assignments, DPI, and polling rate.
4.5 อายุการใช้งานแบตเตอรี่
The built-in 500mAh battery provides up to 65 hours of continuous use. Battery status can typically be monitored via the driver software or system indicators.

Figure 6: The 500mAh large capacity battery ensures extended usage.
4.6 การออกแบบตามหลักสรีรศาสตร์
Weighing approximately 55g, the X8SE features an optimized symmetrical shape suitable for medium to large hands, promoting comfort and control during long sessions.

Figure 7: Dimensions of the X8SE mouse (125mm length, 63mm width, 39.7mm height) and its ergonomic design for larger hands and symmetrical waist-tapered shape.
5. การบำรุงรักษา
5.1 การทำความสะอาด
ในการทำความสะอาดเมาส์ ให้ใช้ผ้านุ่มและแห้ง สำหรับสิ่งสกปรกฝังแน่น ให้เช็ดเบาๆamp สามารถใช้ผ้าชุบสบู่เหลวอ่อนๆ เช็ดทำความสะอาดได้ โดยระวังอย่าให้ของเหลวเข้าไปในตัวเมาส์ หลีกเลี่ยงสารเคมีรุนแรงหรือวัสดุที่มีฤทธิ์กัดกร่อน
5.2 การดูแลแบตเตอรี่
เพื่อยืดอายุการใช้งานแบตเตอรี่ ควรหลีกเลี่ยงการปล่อยให้แบตเตอรี่เมาส์หมดจนเกลี้ยงบ่อยๆ ชาร์จเมาส์เมื่อไฟแสดงสถานะแบตเตอรี่เหลือน้อย เก็บเมาส์ไว้ในที่แห้งและเย็นเมื่อไม่ได้ใช้งานเป็นเวลานาน
5.3 Griptape Application
If your mouse came with separate griptape, ensure the mouse surface is clean and dry before applying. Carefully peel the backing from the griptape and align it with the designated areas on the mouse for improved grip. Press firmly to secure.
6 การแก้ไขปัญหา
6.1 เมาส์ไม่ตอบสนอง
- ตรวจสอบการเชื่อมต่อ: Ensure the mouse is in the correct mode (2.4G, BT, or Wired) and properly connected. For 2.4G, ensure the receiver is securely plugged in. For Bluetooth, verify pairing in your device's settings.
- ระดับแบตเตอรี่: ชาร์จเมาส์โดยใช้สาย USB-C
- เริ่มต้นใหม่อีกครั้ง: Turn the mouse off and then on again using the switch on the bottom.
- ซอฟต์แวร์ไดรเวอร์: If using the cloud driver, ensure it is running correctly. Sometimes restarting the driver software or running it as an administrator can resolve issues.
- พอร์ต USB: ลองใช้พอร์ต USB อื่นบนคอมพิวเตอร์ของคุณ
6.2 DPI or Polling Rate Not Changing
- สวิตช์ DPI: Ensure you are pressing the DPI switch on the bottom of the mouse firmly to cycle through settings.
- การตั้งค่าซอฟต์แวร์: Verify DPI and polling rate settings within the cloud driver software. Apply any changes made in the software.
6.3 ปัญหาการจับคู่บลูทูธ
- โหมดเมาส์: Confirm the mouse is set to 'BT' mode.
- อุปกรณ์บลูทูธ: Ensure Bluetooth is enabled and discoverable on your computer or device.
- ลืมอุปกรณ์: If previously paired, try 'forgetting' the mouse in your device's Bluetooth settings and re-pairing.
7. ข้อมูลจำเพาะ
| คุณสมบัติ | ข้อมูลจำเพาะ |
|---|---|
| แบบอย่าง | X8SE |
| การเชื่อมต่อ | 2.4GHz ไร้สาย, บลูทูธ, USB-C แบบมีสาย |
| เซ็นเซอร์ | PixArt PAW3311 Optical |
| ดีพีไอ | ปรับได้สูงสุด 25,000 DPI |
| ไอพีเอส | 400 IPS |
| การเร่งความเร็ว | 40จี |
| อัตราการสำรวจความคิดเห็น | 125เฮิรตซ์, 250เฮิรตซ์, 500เฮิรตซ์, 1000เฮิรตซ์ |
| สวิตซ์ | Huano Micro Switches (80 Million Clicks) |
| ตัวเข้ารหัส | ตัวเข้ารหัส TTC |
| แบตเตอรี่ | 500mAh (ใช้งานสูงสุด 65 ชั่วโมง) |
| น้ำหนัก | ประมาณ 55 กรัม (±3 กรัม) |
| ขนาด | ขนาด 125 มม. x 63 มม. x 39.7 มม. (โดยประมาณ) |
| คุณสมบัติพิเศษ | การออกแบบตามหลักสรีรศาสตร์ น้ำหนักเบา ปุ่มตั้งโปรแกรมได้ ชาร์จไฟได้ |
8. วิดีโอผลิตภัณฑ์
วิดีโอ: วิดีโอแสดงผลิตภัณฑ์อย่างเป็นทางการasing the ATTACK SHARK X8 SE 55g Superlight Wireless Gaming Mouse, demonstrating its design and features.
9. การรับประกันและการสนับสนุน
สำหรับข้อมูลการรับประกันและการสนับสนุนทางเทคนิค โปรดดูเอกสารที่แนบมากับผลิตภัณฑ์ของคุณ หรือเยี่ยมชมเว็บไซต์อย่างเป็นทางการของ ATTACK SHARK webไซต์นี้ โปรดเก็บหลักฐานการซื้อไว้เพื่อใช้ยืนยันการรับประกัน