1. บทนำ
Thank you for choosing the OQTIQ QI2 15W Magnetic Wireless Car Charger Mount. This manual provides detailed instructions for the proper installation, operation, and maintenance of your new car charger. Please read this manual thoroughly before use to ensure optimal performance and safety.
2. เนื้อหาบรรจุภัณฑ์
ตรวจสอบว่ารายการทั้งหมดที่ระบุไว้ด้านล่างนี้รวมอยู่ในแพ็คเกจของคุณ:
- เครื่องชาร์จรถยนต์ไร้สายแบบแม่เหล็ก 1 ชิ้น
- 1 x Suction Cup Base
- 1 x คลิประบายอากาศ
- 1 x PD 30W Car Charger Adapter
- 1 x 3M Sticky Dashboard Disc
- 1 x Anti-UV Film for Windshield
- สาย USB-C 1 เส้น
- แหวนโลหะ 1 x
- 1 x คู่มือผู้ใช้ (เอกสารนี้)

รูปที่ 1: สิ่งของในบรรจุภัณฑ์
3. คุณสมบัติของผลิตภัณฑ์
- QI2 15W Fast Wireless Charging: Supports fast 15W wireless charging, compatible with iOS 17.2 and above for iPhone 12-17 series. Ensures efficient power delivery and reduced charging time.
- พัดลมระบายความร้อนในตัว: An intelligent cooling fan actively dissipates heat during fast charging, maintaining consistent performance and preventing phone overheating.
- Super Strong Magnetic Hold: Features 17 powerful N54 magnets, precisely aligned with iPhone MagSafe technology, for a secure and stable device attachment even on bumpy roads.
- ตัวเลือกการติดตั้งแบบคู่: Includes both a suction cup base for dashboard/windshield and an air vent clip for versatile placement. A 3M sticky dashboard disc and anti-UV films are also provided for enhanced stability.
- ปรับได้อย่างเต็มที่ Viewอิงมุม: The arm extends from 4.6” to 6.29” and features a 360° rotatable ball head for optimal positioning and comfortable viewการไอเอ็นจี

Figure 2: QI2 15W Fast Charging

Figure 3: Heat Dissipation Technology with Built-in Cooling Fan

Figure 4: Super Strong N54 Magnetic Hold

Figure 5: Dual Mounting Options (Windshield, Dashboard, Air Vent)
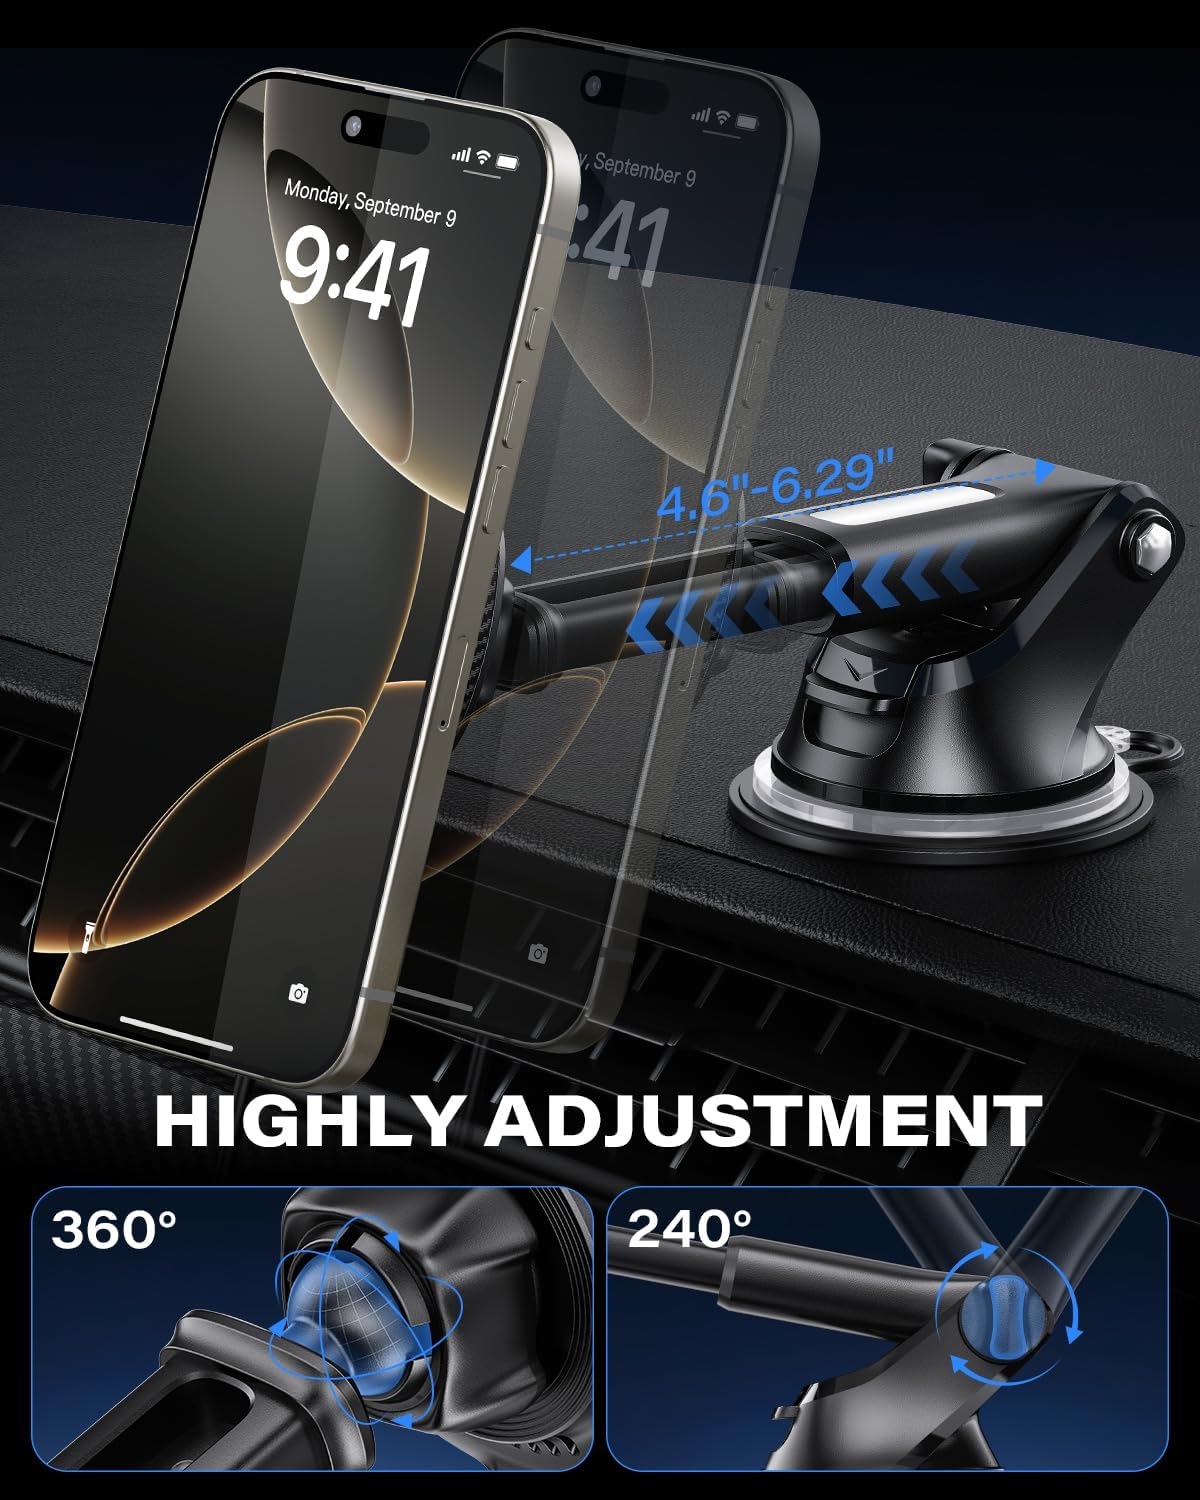
Figure 6: Highly Adjustable Mount
4. การตั้งค่าและการติดตั้ง
Follow these steps to install your OQTIQ Magnetic Wireless Car Charger Mount:
4.1. การเลือกตำแหน่งติดตั้ง
The charger offers two primary mounting options: the air vent or the dashboard/windshield. Consider your vehicle's layout and personal preference for optimal viewการใช้งานและการเข้าถึง
4.2. การติดตั้งช่องระบายอากาศ
- Unscrew the nut on the air vent clip to loosen it.
- Insert the ball joint of the magnetic charging pad into the nut, then tighten the nut to secure the charging pad to the clip.
- Locate a suitable air vent in your vehicle. Ensure the vent blades are sturdy enough to support the weight of the charger and your phone.
- Gently push the air vent clip onto one of the vent blades until it is firmly seated.
- Tighten the screw on the air vent clip to secure it in place.
- Adjust the angle of the magnetic charging pad for optimal viewการไอเอ็นจี
4.3. Suction Cup Installation (Dashboard/Windshield)
- Clean the desired mounting surface (dashboard or windshield) thoroughly with an alcohol wipe and let it dry completely.
- If mounting on the dashboard, apply the 3M sticky dashboard disc to the cleaned surface first. Remove the protective film from the disc and press it firmly for 30 seconds. Allow 24 hours for the adhesive to cure before attaching the suction cup.
- Unscrew the nut on the suction cup base to loosen it.
- Insert the ball joint of the magnetic charging pad into the nut, then tighten the nut to secure the charging pad to the base.
- นำฟิล์มป้องกันออกจากถ้วยดูด
- Press the suction cup firmly onto the prepared surface (dashboard disc or windshield).
- Flip the locking lever on the suction cup base down to create a strong vacuum seal.
- Adjust the arm and the magnetic charging pad to your preferred viewมุมอิง
Note: For windshield mounting, consider using the anti-UV film provided to protect your windshield from potential adhesive residue over time.

Figure 7: Charger Installed on Dashboard
Video 1: Installation demonstration of the OQTIQ Magnetic Wireless Car Charger Mount, showing how to attach it to an air vent and connect a phone for charging.
5. คู่มือการใช้งาน
5.1. กำลังเชื่อมต่อกับพลังงาน
- Connect the provided USB-C cable to the charging port on the magnetic charging pad.
- Insert the other end of the USB-C cable into the PD 30W Car Charger Adapter.
- Plug the PD 30W Car Charger Adapter into your vehicle's 12V power outlet (cigarette lighter socket).
- The charger is now powered and ready for use.
5.2. การชาร์จอุปกรณ์ของคุณ
- Ensure your smartphone is compatible with MagSafe or has a MagSafe-compatible case.
- Align your smartphone with the magnetic charging pad. The magnets will automatically snap your phone into place.
- Once properly aligned, your phone will begin to charge wirelessly. A charging indicator may appear on your phone's screen.
5.3. การปรับแต่ง Viewอิงแองเกิล
The mount features a 360° rotatable ball head and an extendable arm. Loosen the adjustment knob (if present on your specific mount type) to reposition your phone, then tighten it to secure the desired angle.
6. ความเข้ากันได้
This OQTIQ Magnetic Wireless Car Charger Mount is designed for optimal performance with:
- iPhone 12 series or later (including iPhone 17/16/15/14/13/12 series).
- Official MagSafe cases.
- MagSafe-compatible magnetic cases.
ไม่เข้ากันได้กับ:
- iPhone 11 series or earlier.
- Non-MagSafe cases.
- Metal cases or cases with built-in grips, stands, or wallets that interfere with magnetic attachment or wireless charging.

Figure 8: Phone & Case Compatibility Guide
7. การบำรุงรักษา
To ensure the longevity and optimal performance of your OQTIQ car charger, follow these maintenance guidelines:
- การทำความสะอาด: Use a soft, dry cloth to wipe down the charger and mount regularly. Avoid using harsh chemicals or abrasive cleaners, as these can damage the surfaces.
- พื้นผิวแม่เหล็ก: Keep the magnetic charging surface clean and free of debris to ensure a strong and consistent connection with your phone.
- ถ้วยดูด: If the suction cup loses its grip, rinse it with warm water and let it air dry. This can help restore its adhesive properties.
- การดูแลสายเคเบิล: ควรหลีกเลี่ยงการงอหรือบีบสาย USB-C มากเกินไป เพื่อป้องกันความเสียหายภายใน
- พื้นที่จัดเก็บ: เมื่อไม่ได้ใช้งานเป็นเวลานาน ควรเก็บเครื่องชาร์จไว้ในที่แห้งและเย็น หลีกเลี่ยงแสงแดดโดยตรงและอุณหภูมิที่สูงหรือต่ำเกินไป
8 การแก้ไขปัญหา
If you encounter issues with your OQTIQ Magnetic Wireless Car Charger Mount, refer to the following common problems and solutions:
| ปัญหา | สาเหตุที่เป็นไปได้ | สารละลาย |
|---|---|---|
| โทรศัพท์ไม่ชาร์จแบบไร้สาย | Incorrect phone alignment, non-compatible phone/case, power not connected, foreign objects between phone and charger. | Ensure phone is centered on the magnetic pad. Verify phone/case compatibility. Check if the PD 30W adapter is securely plugged into the 12V outlet and the USB-C cable is connected. Remove any metal objects or thick cases. |
| ความเร็วในการชาร์จช้า | Using a non-PD 30W adapter, phone running power-intensive apps, high ambient temperature. | Use the included PD 30W adapter. Close unnecessary background apps. The built-in cooling fan helps, but extreme heat can still affect charging. |
| โทรศัพท์ไม่ได้ยึดแน่นดี | Non-MagSafe phone/case, dirty magnetic surface, mount not properly secured. | Ensure your phone or case is MagSafe compatible. Clean the magnetic surface of the charger and your phone/case. Re-secure the suction cup or air vent clip. |
| Suction cup losing grip. | Dirty surface, air trapped, surface not smooth. | Clean the dashboard/windshield surface and the suction cup. Ensure the locking lever is fully engaged. Use the 3M dashboard disc for textured surfaces. |
9. ข้อมูลจำเพาะ
| คุณสมบัติ | รายละเอียด |
|---|---|
| ยี่ห้อ | OQTIQ |
| หมายเลขรุ่น | WH05-S02-AV2S+ |
| เอาท์พุทชาร์จไร้สาย | 15W (QI2 Certified) |
| อินพุต Voltage | 5 โวลต์ |
| ปริมาณการส่งออกtage | 5 โวลต์ (กระแสตรง) |
| Ampอีเรจ | 3 Amps |
| เทคโนโลยีการเชื่อมต่อ | USB ประเภท C |
| อุปกรณ์ที่รองรับ | Smartphones (iPhone 12-17 series) |
| คุณสมบัติพิเศษ | Cooling Fan, Fast Charging, MagSafe Compatible |
| ประเภทการติดตั้ง | Flex mount (Suction Cup & Air Vent) |
| วัสดุ | อะคริโลไนไตรล์บิวทาไดอีนสไตรีน |
| ส่วนประกอบที่รวมอยู่ | 1.2m USB-C Cable, PD 30W Adaptor |
10. การรับประกันและการสนับสนุน
The OQTIQ Magnetic Wireless Car Charger Mount comes with a รับประกัน 12 เดือน นับจากวันที่ซื้อ การรับประกันนี้ครอบคลุมถึงข้อบกพร่องจากการผลิตและการทำงานผิดปกติภายใต้การใช้งานปกติ
For warranty claims, technical support, or any inquiries, please contact OQTIQ customer service through the retailer where the product was purchased or visit the official OQTIQ webเว็บไซต์สำหรับข้อมูลการติดต่อ
โปรดเก็บหลักฐานการซื้อไว้เพื่อใช้ยืนยันการรับประกัน