การแนะนำ
Thank you for choosing the jindaaudio Professional 7-Channel Audio Mixer. This manual provides detailed instructions for the proper setup, operation, and maintenance of your mixer. Please read this manual thoroughly before using the product to ensure optimal performance and to prevent damage.
This professional audio mixer is designed for a variety of applications including recording, podcasting, live streaming, and DJ performances. It features 7 input channels, Bluetooth connectivity, and USB audio interface capabilities.
สินค้าเกินview
คุณสมบัติหลัก:
- 7-channel input for versatile audio mixing.
- มีระบบบลูทูธในตัวสำหรับการสตรีมเสียงแบบไร้สาย
- USB interface for direct connection to computers for recording and playback.
- ระบบจ่ายไฟ Phantom Power +48V สำหรับไมโครโฟนคอนเดนเซอร์
- Individual channel controls for Gain, High, Mid, Low, and Pan.
- Built-in Delay and Repeat effects.
- Multiple power supply options for flexibility.
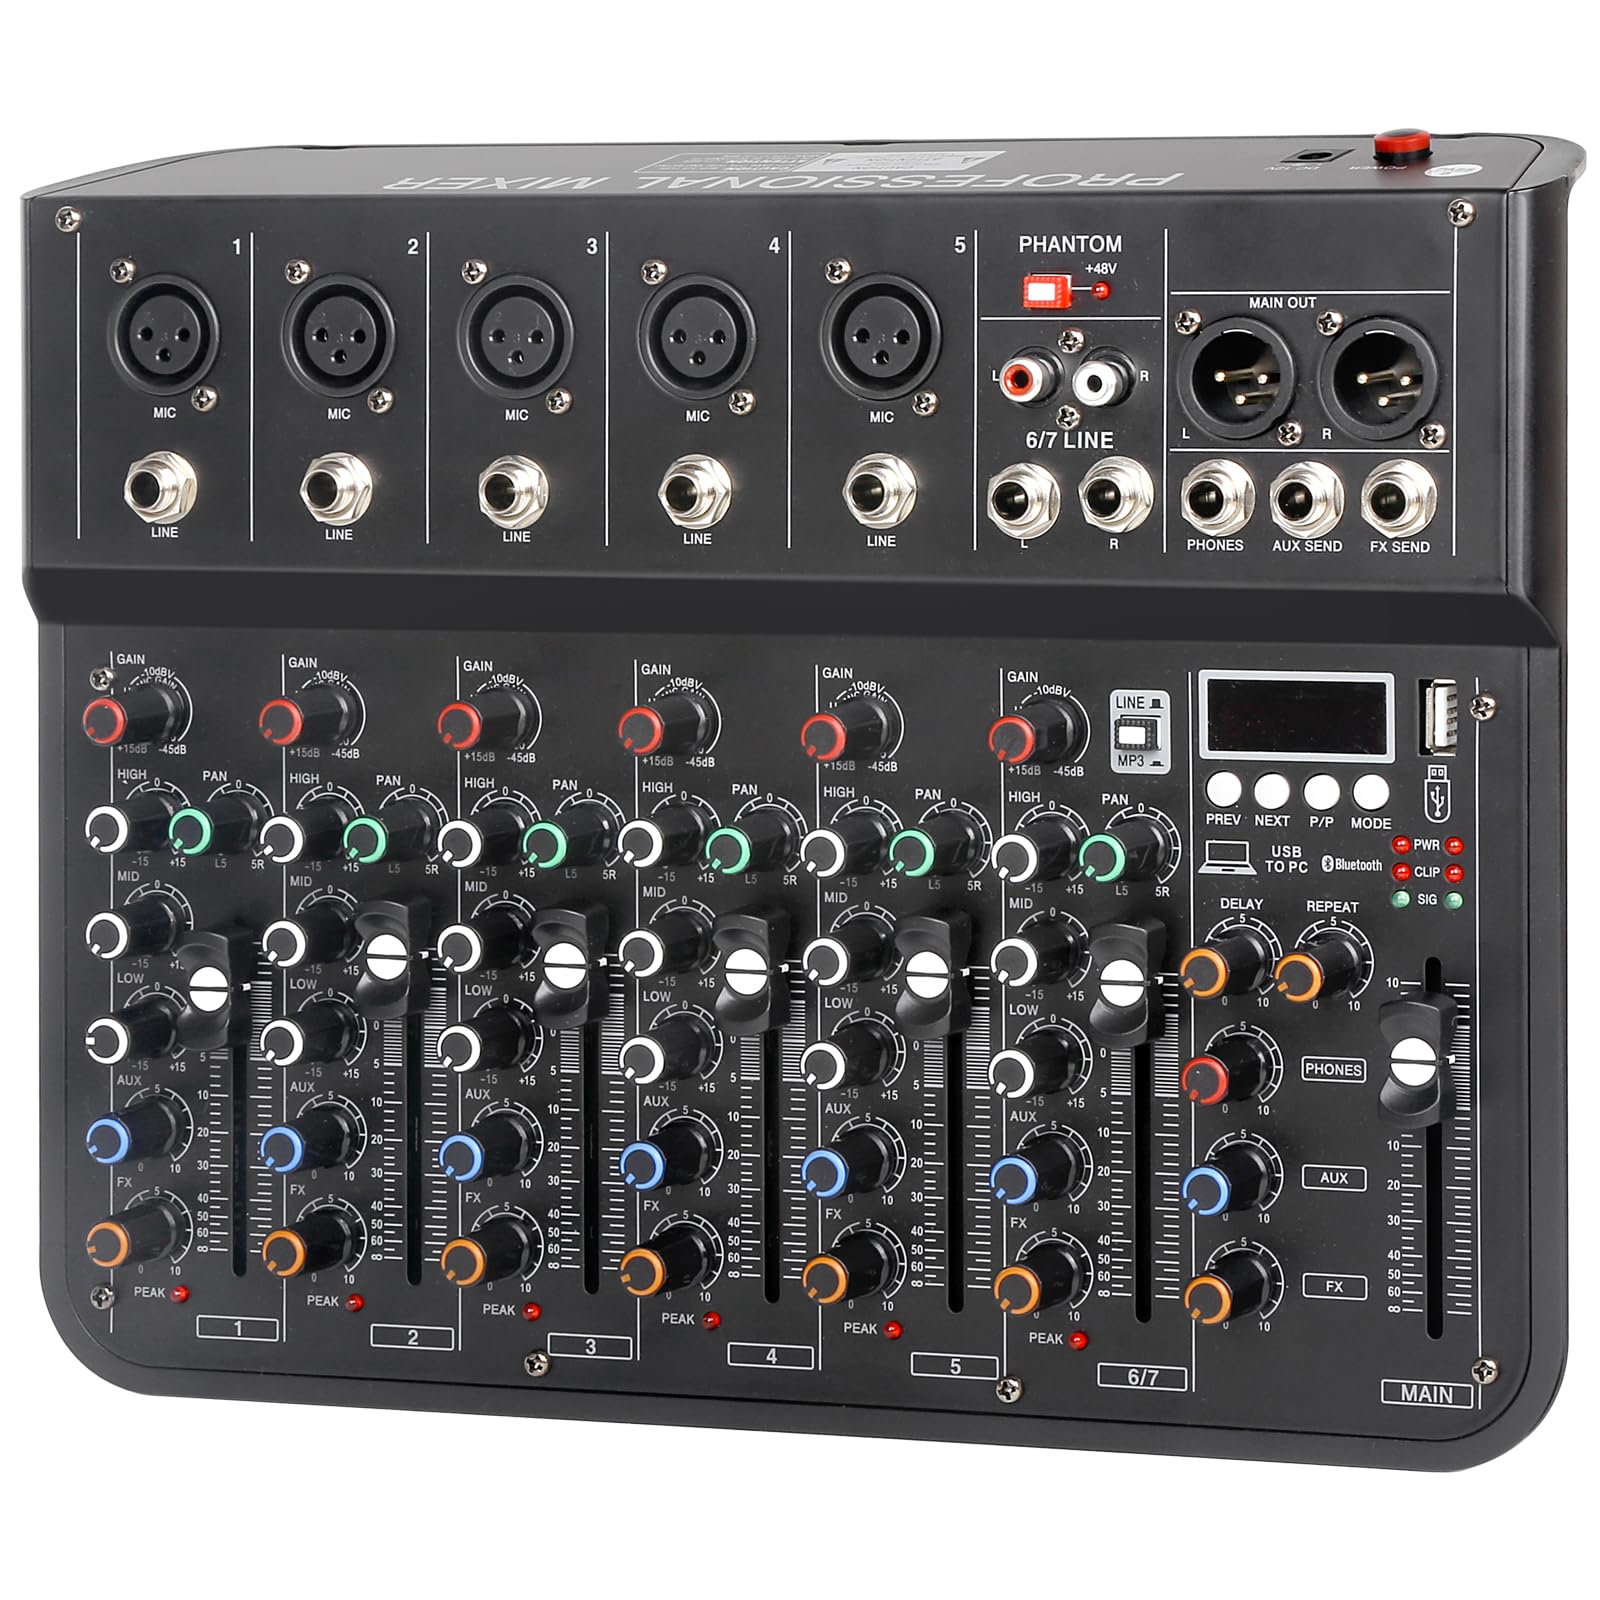
การระบุส่วนประกอบ:
Refer to the image below for a visual guide to the mixer's components and controls.

รูปที่ 1: สูงสุด view of the jindaaudio 7-Channel Audio Mixer. This image displays the microphone/line inputs, main output, headphone jack, USB port, Bluetooth indicator, and various control knobs for gain, equalization (high, mid, low), pan, effects (delay, repeat), and main volume faders.
การตั้งค่า
ตัวเลือกพาวเวอร์ซัพพลาย:
The mixer supports three power supply modes, offering flexibility for various environments.
รูปที่ 2: Three power supply modes. The mixer can be powered via a laptop's USB port, a standard DC 12V power adapter (included), or a portable power bank for mobile use.
- DC 12V Adapter: Connect the provided power adapter to the DC 12V input on the mixer and plug it into a standard wall outlet.
- พลังงาน USB: Connect the mixer to a computer's USB port using a USB cable. This mode is suitable for recording and streaming setups.
- พาวเวอร์แบงค์: For portable use, connect a compatible power bank to the mixer's USB power input.
Ensure the power switch is in the OFF position before connecting or disconnecting any power source.
การเชื่อมต่ออุปกรณ์เสียง:
The mixer is compatible with a wide range of audio equipment.
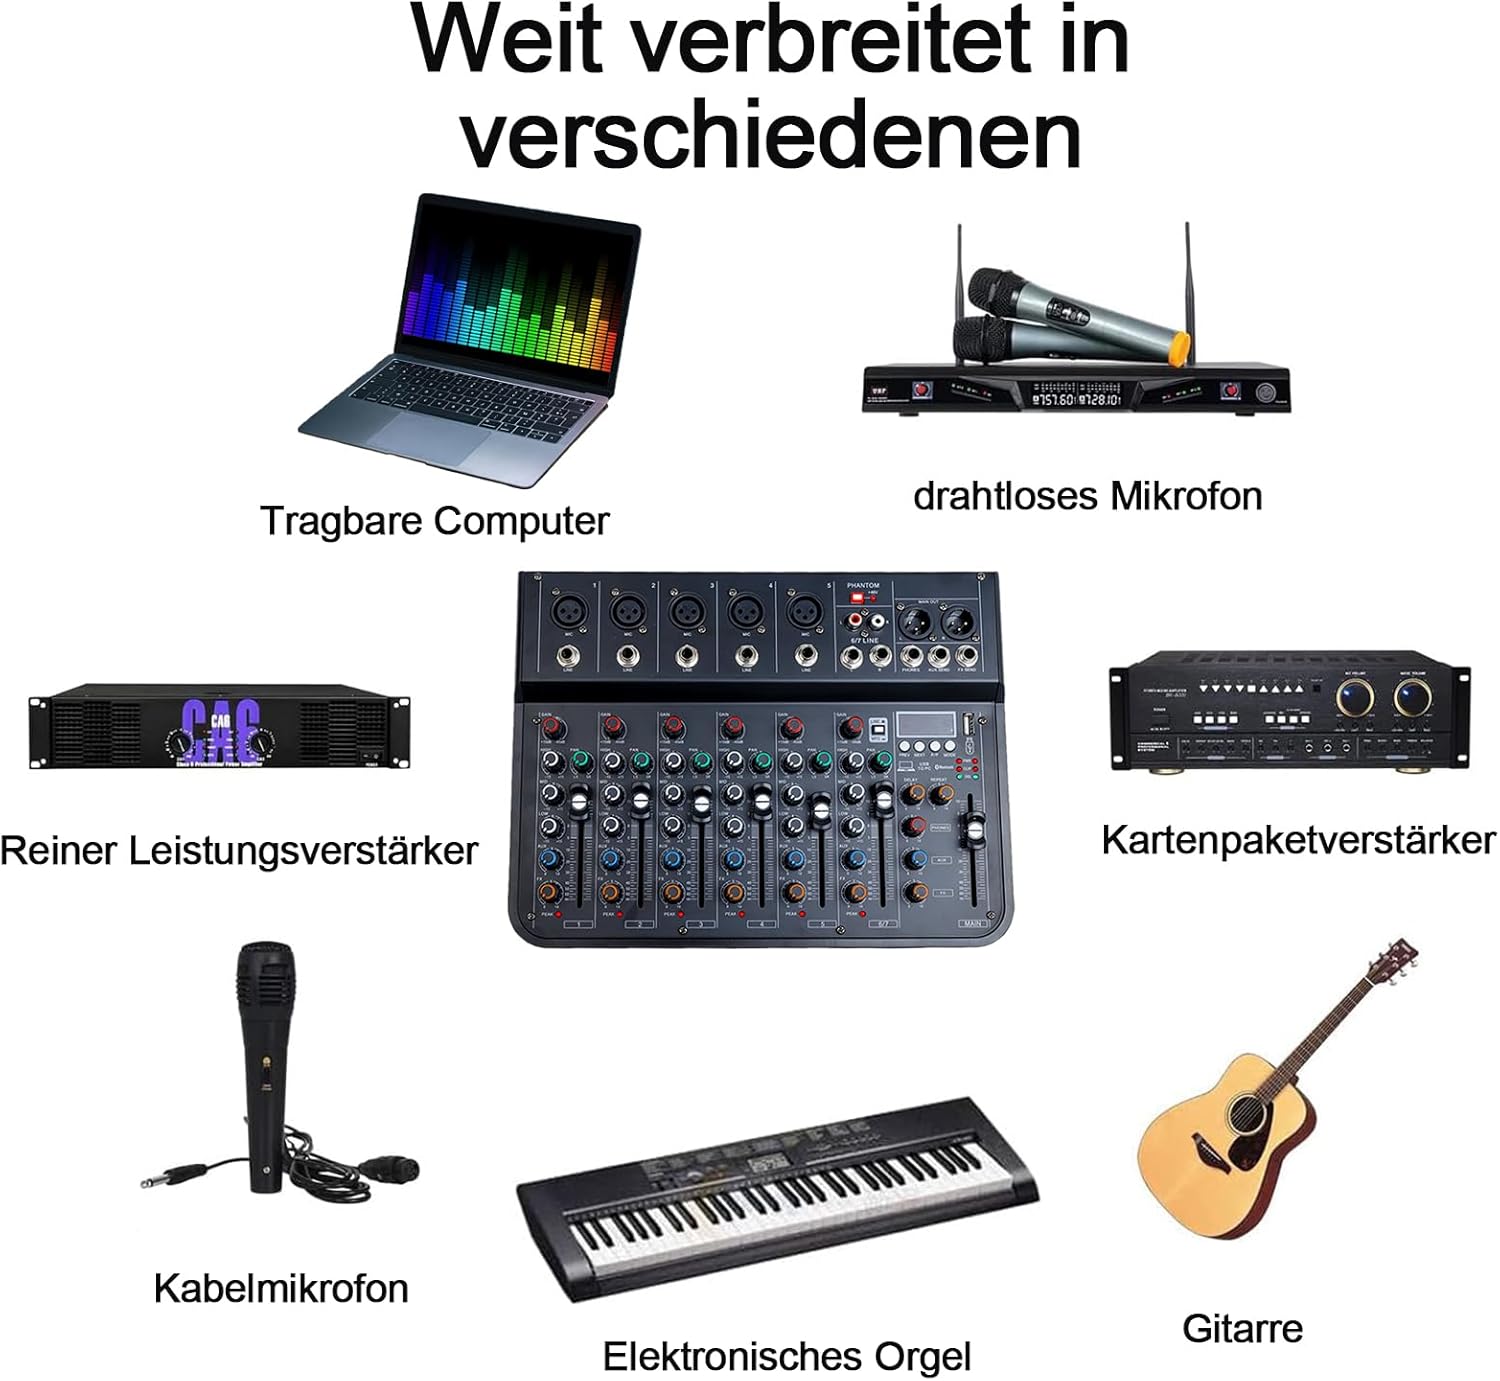
รูปที่ 3: Wide range of connectivity options. The mixer can connect to laptops, wireless microphones, power amplifiers, wired microphones, electronic organs, and guitars.
- ไมโครโฟน: Connect XLR microphones to the MIC inputs (channels 1-5). For condenser microphones, activate the +48V Phantom Power switch.
- อุปกรณ์ระดับสาย: Connect instruments (e.g., electronic organ, guitar) or other line-level audio sources to the LINE inputs (channels 1-5) or the stereo 6/7 LINE input.
- อุปกรณ์ส่งออก: เชื่อมต่อลำโพงหลักของคุณหรือ amplifier to the MAIN OUT (XLR or 1/4" TRS) ports. Connect headphones to the PHONES output.
- ผลกระทบภายนอก: Use the AUX SEND and FX SEND for connecting external effects processors.
คำแนะนำการใช้งาน
การใช้งานพื้นฐาน:
- เปิดเครื่อง: After connecting all devices and power, switch the mixer ON.
- การปรับค่าเกน: For each input channel, adjust the GAIN knob to achieve an optimal input level. Avoid clipping (indicated by the PEAK LED).
- การปรับสมดุล: ใช้ปุ่ม HIGH, MID และ LOW เพื่อปรับความถี่เสียงแหลม เสียงกลาง และเบสสำหรับแต่ละช่องสัญญาณ
- การควบคุมแพน: The PAN knob adjusts the stereo position of the channel's signal.
- ตัวปรับระดับเสียง: Use the channel faders and the MAIN fader to control the overall volume levels.
การเชื่อมต่อบลูทูธ:
The mixer features integrated Bluetooth for wireless audio input.

รูปที่ 4: Integrated Bluetooth for stable wireless transmission. The image highlights the Bluetooth indicator light and a smartphone wirelessly connected to the mixer.
- เปิดใช้งานบลูทูธ: Press the MODE button on the MP3/USB section until "Bluetooth" is selected. The Bluetooth indicator light will flash.
- การจับคู่: On your smartphone or other Bluetooth device, search for available devices and select "jindaaudio Mixer" (or similar name).
- การเชื่อมต่อ: Once paired, the Bluetooth indicator light will become solid. You can now stream audio wirelessly to the mixer.
USB Audio Interface (PC Connection):
Connect the mixer to your computer for recording and playback.

รูปที่ 5: Mixer connected to a computer. This setup allows for digital audio recording and playback through the mixer's USB interface.
- เชื่อมต่อ USB: Use a USB cable to connect the mixer's USB port to your computer.
- การติดตั้งไดร์เวอร์: The mixer is typically plug-and-play and may not require specific drivers. If prompted, follow your operating system's instructions for driver installation.
- การตั้งค่าซอฟต์แวร์: Open your preferred Digital Audio Workstation (DAW) or recording software. Select the mixer as your audio input and output device in the software's audio settings.
- การบันทึก/การเล่น: You can now record audio from the mixer's inputs to your computer or play back audio from your computer through the mixer.
Effects (Delay/Repeat):
The mixer includes built-in delay and repeat effects.
- ปุ่ม DELAY: Adjusts the delay time of the effect.
- ปุ่ม REPEAT: Controls the number of repetitions for the delay effect.
- เฟดเดอร์ FX: ควบคุมระดับโดยรวมของเอฟเฟ็กต์ที่ส่งไปยังมิกซ์หลัก
การซ่อมบำรุง
- การทำความสะอาด: ใช้ผ้าแห้งเนื้อนุ่มเช็ดทำความสะอาดพื้นผิวของเครื่องผสมอาหาร หลีกเลี่ยงการใช้น้ำยาทำความสะอาดหรือวัสดุที่มีฤทธิ์กัดกร่อน
- พื้นที่จัดเก็บ: เก็บเครื่องผสมไว้ในที่แห้งและเย็น หลีกเลี่ยงแสงแดดโดยตรงและอุณหภูมิที่สูงหรือต่ำเกินไป
- การจัดการ: Handle the mixer with care. Avoid dropping or subjecting it to strong impacts.
- การระบายอากาศ : ตรวจสอบให้แน่ใจว่ามีการระบายอากาศที่เหมาะสมรอบๆ เครื่องผสมเพื่อป้องกันความร้อนสูงเกินไป
การแก้ไขปัญหา
| ปัญหา | สาเหตุที่เป็นไปได้ | สารละลาย |
|---|---|---|
| ไม่มีไฟฟ้า | Power cable not connected; power source failure; power switch off. | Check power connections; try a different outlet/USB port; ensure power switch is ON. |
| ไม่มีเสียงออก | Volume faders down; incorrect cable connections; output device issues. | Increase main and channel faders; verify all audio cables are correctly connected; check connected speakers/headphones. |
| บลูทูธไม่จับคู่ | Bluetooth mode not active; device too far; interference. | Ensure mixer is in Bluetooth mode; bring devices closer; restart both devices. |
| คุณภาพเสียงไม่ดี / มีเสียงรบกวน | กำไรที่ไม่ถูกต้องtaging; faulty cables; ground loop; external interference. | Adjust GAIN knobs to avoid clipping; use high-quality cables; check for ground loops; move away from electronic interference. |
| ปัญหาการบันทึก USB | Mixer not selected as audio device in software; incorrect software settings. | Verify mixer is selected as input/output in DAW settings; check sampอัตราและขนาดบัฟเฟอร์ |
ข้อมูลจำเพาะ
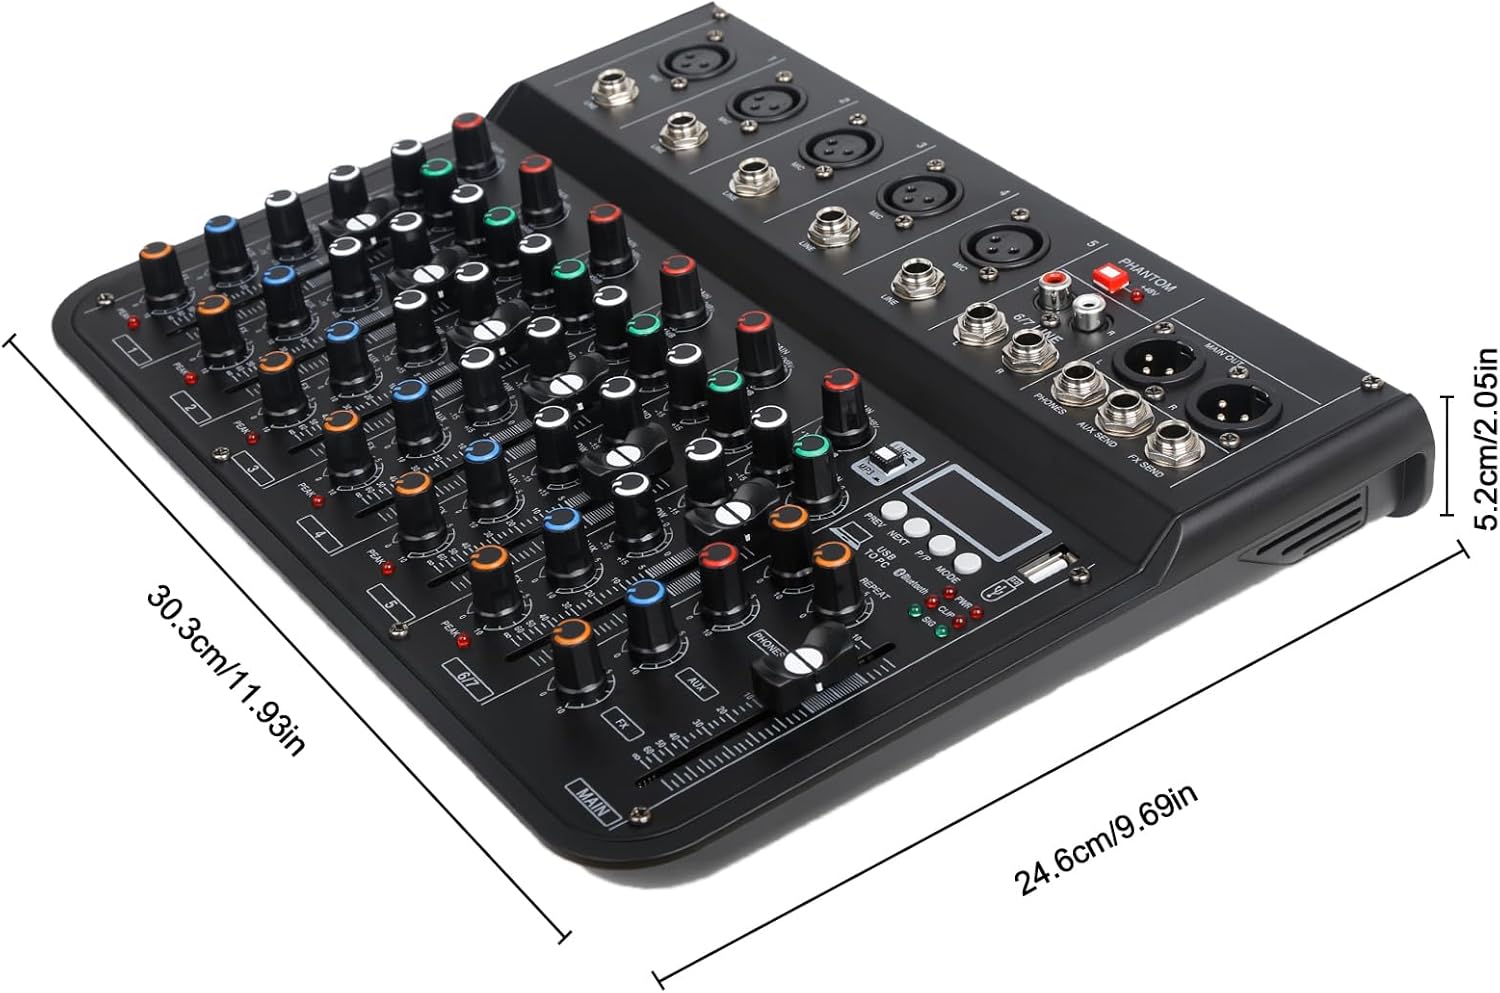
รูปที่ 6: Mixer dimensions. The product measures approximately 30.3 cm in length, 24.6 cm in width, and 5.2 cm in height.
- แบบอย่าง: 7CH F-7
- ยี่ห้อ: jindaaudio
- จำนวนช่องสัญญาณ: 7
- เทคโนโลยีการเชื่อมต่อ: บลูทูธ, ยูเอสบี
- แหล่งพลังงาน: USB, DC 12V Adapter
- ประเภทเอาท์พุต: ยูเอสบี, บลูทูธ
- อินพุตเสียง: 8 channels (including stereo 6/7 line input)
- น้ำหนักสินค้า: ประมาณ 1 กิโลกรัม
- ขนาดแพ็คเกจ: ขนาดประมาณ 35 x 25 x 8 ซม
- ขนาดสินค้า : ขนาดประมาณ 30.3 ซม. x 24.6 ซม. x 5.2 ซม.
การรับประกันและการสนับสนุน
For warranty information and technical support, please refer to the documentation provided with your purchase or contact jindaaudio customer service. Keep your purchase receipt as proof of purchase for warranty claims.
For further assistance, visit the official jindaaudio webไซต์หรือติดต่อตัวแทนจำหน่ายในพื้นที่ของคุณ