
1. บทนำ
This manual provides detailed instructions for the Tenlamp G9 Podcast Equipment Audio Mixer. Please read this manual thoroughly before using the device to ensure proper operation and to maximize its features. The G9 mixer is designed for podcasting, live streaming, short video recording, and other audio content creation, offering a range of audio control and enhancement functions.
2. สินค้าหมดview
The Tenlamp G9 is a versatile audio mixer featuring a 4.5-inch HD screen for real-time audio adjustments. It includes a 3-band EQ, dual reverb, voice changer, and noise reduction capabilities. The device is designed for plug-and-play compatibility with PCs, Macs, and mobile devices.
2.1 คุณสมบัติหลัก
- ปลั๊กแอนด์เพลย์: Quick connection to PC, Mac, or mobile devices without complex setup.
- Visual Audio Mixing: 4.5-inch HD screen displays audio adjustments in real-time.
- การลดเสียงรบกวน: Ensures clear voice output for recordings and live broadcasts.
- การควบคุมที่ครอบคลุม: Individual controls for microphone, music, headphone, main output, 3-band EQ, dual reverb, and pitch.
- การปรับแต่งเสียง: Includes voice changer and auto-tune functions.
2.2 เนื้อหาบรรจุภัณฑ์
- 1x Tenlamp G9 Audio Mixer
- 1x USB A-C Cable
- 1x 3.5mm TRRS Audio Cable
- 1x USB-C OTG Cable
- 1x คู่มือผู้ใช้ (เอกสารนี้)
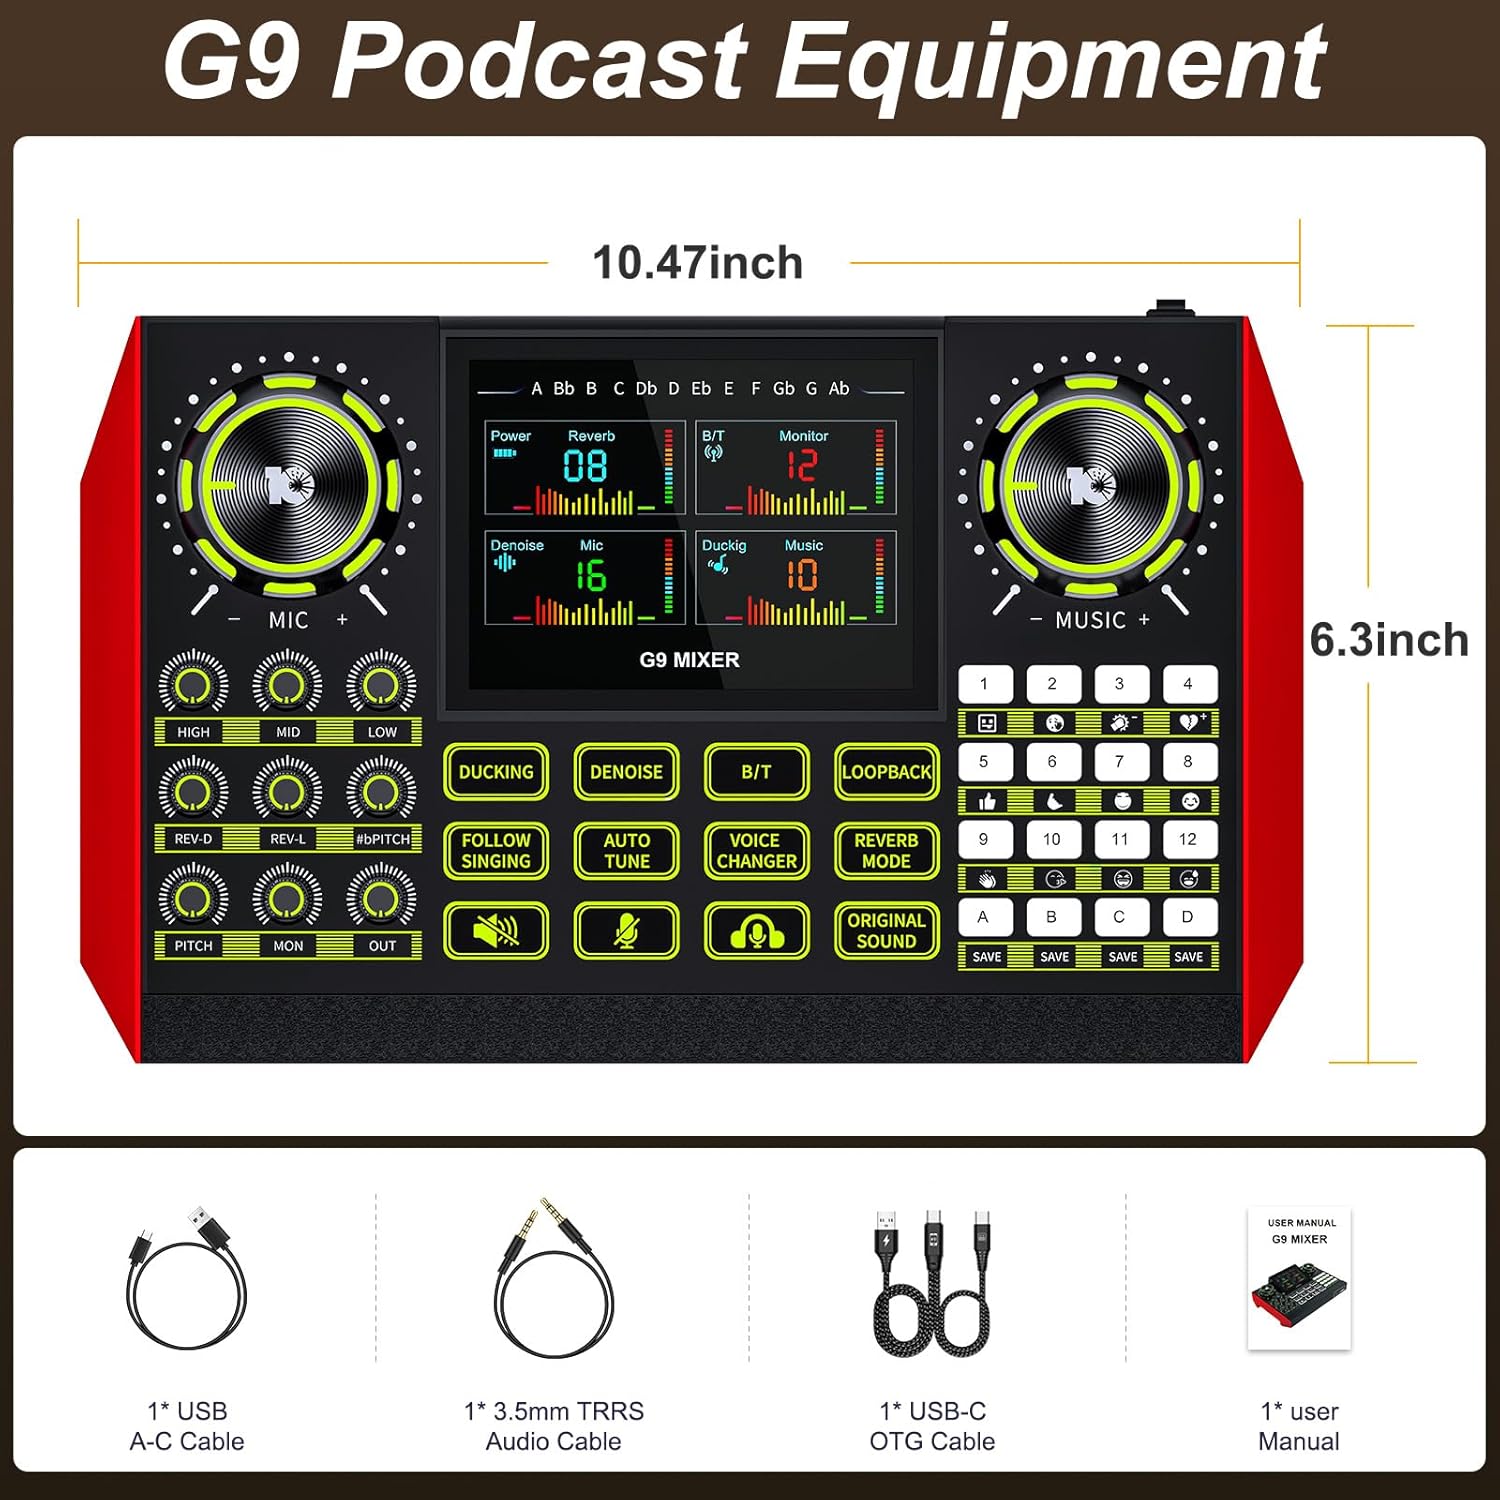
The G9 mixer measures approximately 10.47 inches in width and 6.3 inches in height.
3. การตั้งค่า
The Tenlamp G9 mixer is designed for straightforward setup. Follow these steps to connect your device.
3.1 การเชื่อมต่อกับแหล่งจ่ายไฟ
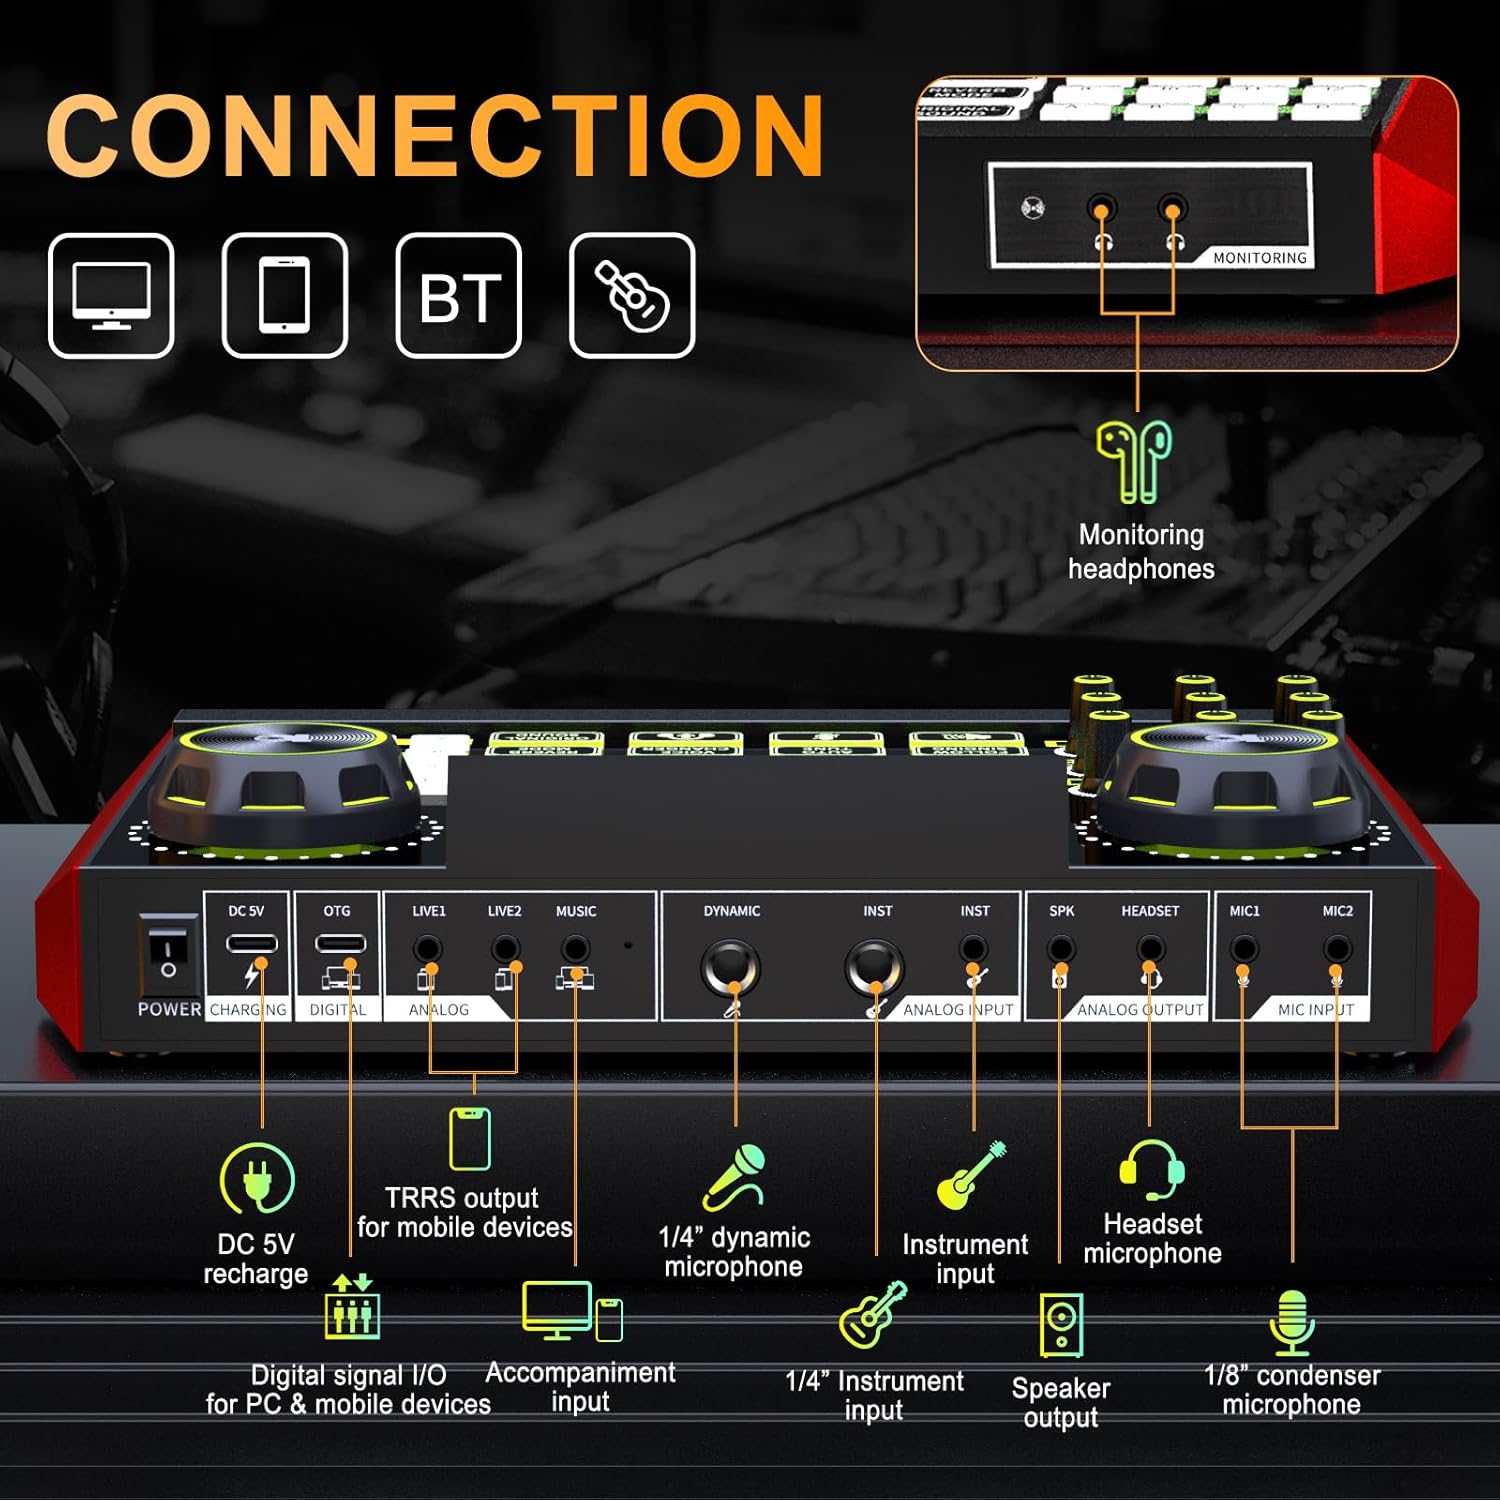
Connect the provided USB A-C cable to the DC 5V port on the mixer and to a power source (e.g., computer USB port, USB wall adapter). The mixer also features a built-in battery for portable use.
3.2 การเชื่อมต่อไมโครโฟนและเครื่องดนตรี
- Microphone Input (MIC1, MIC2): Use 1/8" (3.5mm) condenser microphones.
- Dynamic Microphone Input (DYNAMIC): Use a 1/4" dynamic microphone.
- Instrument Input (INST): Connect instruments via a 1/4" jack.
- ไมโครโฟนชุดหูฟัง: Connect a headset with a microphone to the dedicated headset port.
3.3 Connecting to Devices (PC, Mac, Mobile)
- Digital Signal I/O (DIGITAL): Use the USB-C OTG cable to connect to a PC, Mac, or compatible mobile device for digital audio input and output.
- Analog Input/Output (LIVE1, LIVE2, MUSIC): Use 3.5mm TRRS audio cables for analog connections to mobile devices or other audio sources.
- บลูทูธ (BT): Activate Bluetooth on the mixer and your device to pair wirelessly for music input.
3.4 Monitoring Headphones and Speaker Output
- Monitoring Headphones (MONITORING): Connect headphones to the 3.5mm monitoring jack to hear your mix in real-time.
- Speaker Output (SPK): เชื่อมต่อลำโพงภายนอกเพื่อเล่นเสียง
4. การดำเนินการ
The G9 mixer provides intuitive controls for managing your audio. The 4.5-inch HD screen displays current settings and levels, allowing for precise adjustments.
4.1 เปิด/ปิดเครื่อง
Press and hold the Power button to turn the mixer on or off. The screen will illuminate upon activation.
4.2 การปรับการตั้งค่าไมโครโฟน
Use the dedicated knobs for สูง, กลาง, และ ต่ำ to adjust the 3-band equalizer for your microphone. The เรฟ-ดี และ เรฟ-แอล knobs control the dual reverb depth and length. The ขว้าง knob adjusts the microphone's pitch.

4.3 Music and Output Volume
การ ดนตรี knob controls the input volume of background music. The จันทร์ knob adjusts the monitoring volume for your headphones, and the ออก knob controls the main output volume.
4.4 ฟังก์ชั่นพิเศษ
- การก้มตัว: ลดระดับเสียงเพลงประกอบโดยอัตโนมัติเมื่อคุณพูด
- ลดเสียงรบกวน: Activates the noise reduction feature for clearer vocals.
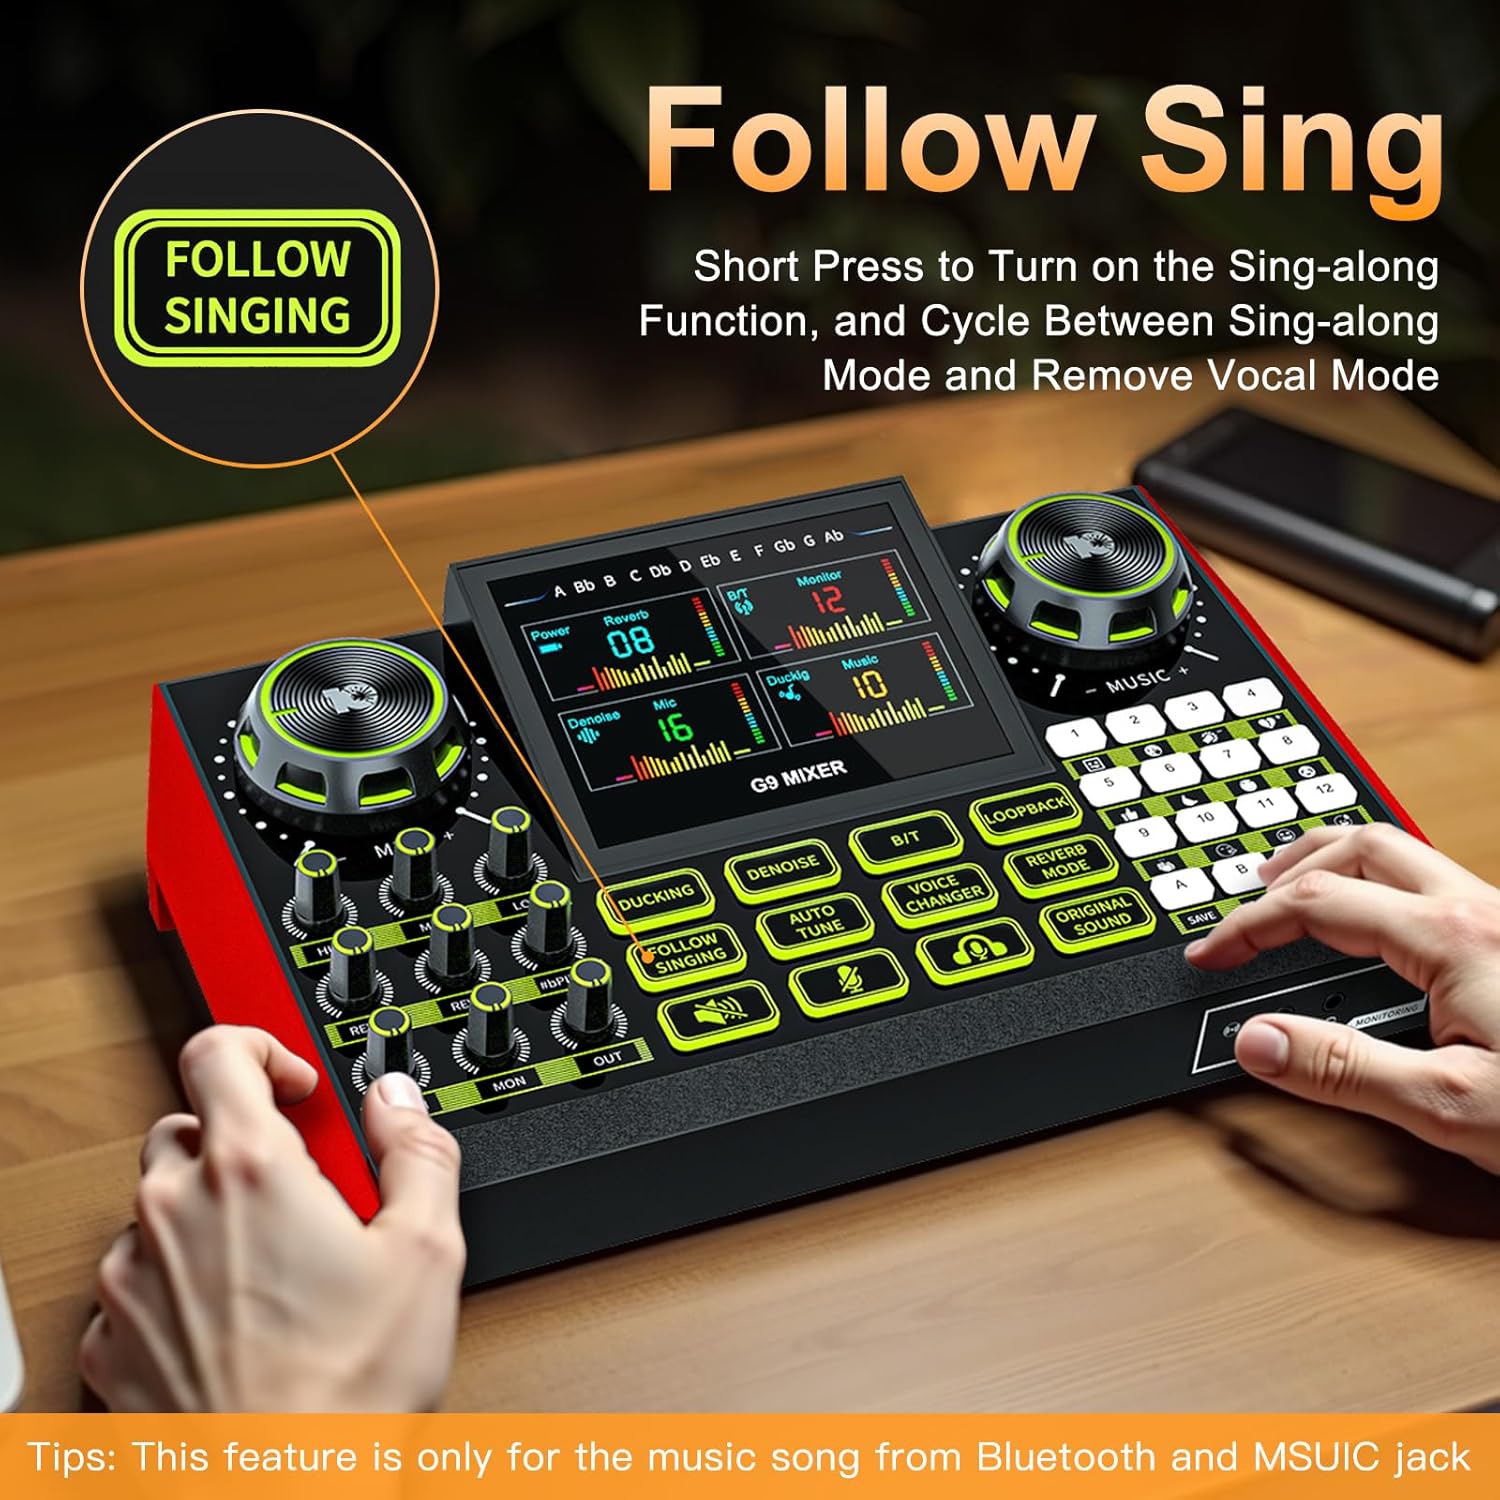
- FOLLOW SINGING: Short press to turn on the sing-along function, which cycles between sing-along mode and vocal removal mode. Note: This feature is primarily for music from Bluetooth and the MUSIC jack.
- ปรับอัตโนมัติ: Engages the auto-tune effect for vocals.
- VOICE CHANGER: Cycles through four different voice changing modes (female voice, uncle voice, baby voice, magic voice).
- ย้อนกลับ: Enables or disables the loopback function, which sends the output audio back to the input for recording or streaming.
- โหมดพัดโบก: ปรับเอฟเฟ็กต์เสียงสะท้อน
- ORIGINAL SOUND: Restores the original sound without effects.

4.5 Customizable Sound Pads
The G9 mixer features four customizable sound pads (A, B, C, D). You can save your favorite voice modes, including current microphone volume, EQ, reverb, pitch, and auto-tune settings, to these pads for quick recall.

5. การบำรุงรักษา
To ensure the longevity and optimal performance of your Tenlamp G9 Audio Mixer, follow these maintenance guidelines:
- การทำความสะอาด: Use a soft, dry cloth to clean the surface of the mixer. Avoid using abrasive cleaners, solvents, or harsh chemicals.
- พื้นที่จัดเก็บ: เก็บเครื่องผสมไว้ในที่แห้งและเย็น หลีกเลี่ยงแสงแดดโดยตรงและอุณหภูมิที่สูงหรือต่ำเกินไป
- การจัดการ: ใช้งานอุปกรณ์ด้วยความระมัดระวัง หลีกเลี่ยงการทำตกหรือกระแทกแรงๆ
- การสัมผัสของเหลว: Keep the mixer away from liquids. Moisture can damage internal components.
6 การแก้ไขปัญหา
If you encounter issues with your Tenlamp G9 Audio Mixer, refer to the following common problems and solutions:
6.1 ไม่มีเสียงออก
- ตรวจสอบการเชื่อมต่อ: Ensure all audio cables (microphone, headphones, speakers, device connections) are securely plugged into the correct ports.
- ระดับเสียง: ตรวจสอบว่า ไมค์, ดนตรี, จันทร์, และ ออก volume knobs are not set to minimum or muted.
- การตั้งค่าอุปกรณ์: On your connected PC, Mac, or mobile device, ensure the G9 mixer is selected as the default audio input and output device.
- พลัง: Confirm the mixer is powered on and has sufficient battery charge or is connected to a power source.
6.2 คุณภาพเสียงไม่ดี / มีเสียงรบกวน
- การลดเสียงรบกวน: เปิดใช้งาน ลดเสียงรบกวน function to reduce background noise.
- ตำแหน่งการวางไมโครโฟน: ตรวจสอบให้แน่ใจว่าวางไมโครโฟนในตำแหน่งที่ถูกต้องและไม่ห่างจากแหล่งกำเนิดเสียงมากเกินไป
- คุณภาพสายเคเบิล: Use high-quality, shielded audio cables to minimize interference.
- ระดับกำไร: Adjust microphone gain to prevent clipping or distortion.
6.3 Voice Changer / Effects Not Working
- การเปิดใช้งานฟังก์ชั่น: Ensure the specific effect button (e.g., เปลี่ยนเสียง, ออโต้จูน) is pressed and active.
- อินพุตไมโครโฟน: Confirm that your microphone is properly connected and receiving input.
6.4 Difficulty with Initial Setup
While the G9 is plug-and-play, some users may find initial setup challenging. Double-check all physical connections and ensure the mixer is recognized by your operating system. Refer to the
Ask a question about this manual
Ask about setup, troubleshooting, compatibility, parts, safety, or missing instructions. Manuals+ will review the question and use this page’s manual context to help answer it.