1. บทนำ
This manual provides essential information for the safe and effective use of your Thsinde TRMS 6000 Auto Ranging Digital Multimeter. Please read it thoroughly before operation and retain it for future reference. This device is designed for measuring AC/DC voltage, AC/DC current, resistance, capacitance, frequency, diode, and continuity, and features Non-Contact Voltagการตรวจจับ e (NCV)

Figure 1: Thsinde TRMS 6000 Digital Multimeter. This image displays the front view of the multimeter, highlighting its large LCD screen and rotary function switch.
2. ข้อมูลด้านความปลอดภัย
คำเตือน: เพื่อหลีกเลี่ยงอันตรายจากไฟฟ้าช็อต ไฟไหม้ หรือการบาดเจ็บ โปรดอ่านข้อมูลด้านความปลอดภัยทั้งหมดก่อนใช้งานผลิตภัณฑ์
- Always ensure the multimeter is in good working condition and that the test leads are not damaged.
- ห้ามใช้เกินปริมาณที่กำหนดtagจ ตามที่ทำเครื่องหมายไว้บนมาตร ระหว่างขั้วต่อหรือระหว่างขั้วต่อใดๆ กับสายดิน
- ใช้ความระมัดระวังเมื่อทำงานกับ voltages สูงกว่า 30V AC RMS, 42V peak หรือ 60V DC ปริมาตรเหล่านี้tagอาจทำให้เกิดอันตรายจากการช็อตได้
- ควรตัดการเชื่อมต่อสายทดสอบออกจากวงจรทุกครั้งก่อนเปลี่ยนฟังก์ชันการทำงาน
- ห้ามใช้มิเตอร์หากฝาปิดแบตเตอรี่ปิดไม่สนิท
- ควรเปลี่ยนแบตเตอรี่ทันทีที่ไฟแสดงสถานะแบตเตอรี่ต่ำปรากฏขึ้น เพื่อให้ได้ค่าการวัดที่แม่นยำ
- ปฏิบัติตามรหัสความปลอดภัยท้องถิ่นและระดับประเทศ
3. เนื้อหาบรรจุภัณฑ์
ตรวจสอบว่ารายการทั้งหมดที่ระบุไว้ด้านล่างนี้รวมอยู่ในแพ็คเกจของคุณ:
- Thsinde TRMS 6000 Digital Multimeter
- แบตเตอรี่ 9V
- คู่มือผู้ใช้ภาษาอังกฤษ (เอกสารฉบับนี้)
- 2 x Test Leads (one red, one black)
- 2 x Alligator Clips (one red, one black)

Figure 2: Multimeter with included test leads and alligator clips. This image shows the multimeter connected to its red and black test leads, which are further connected to red and black alligator clips, illustrating the complete set of accessories.
4. สินค้าหมดview
Familiarize yourself with the components of your digital multimeter:
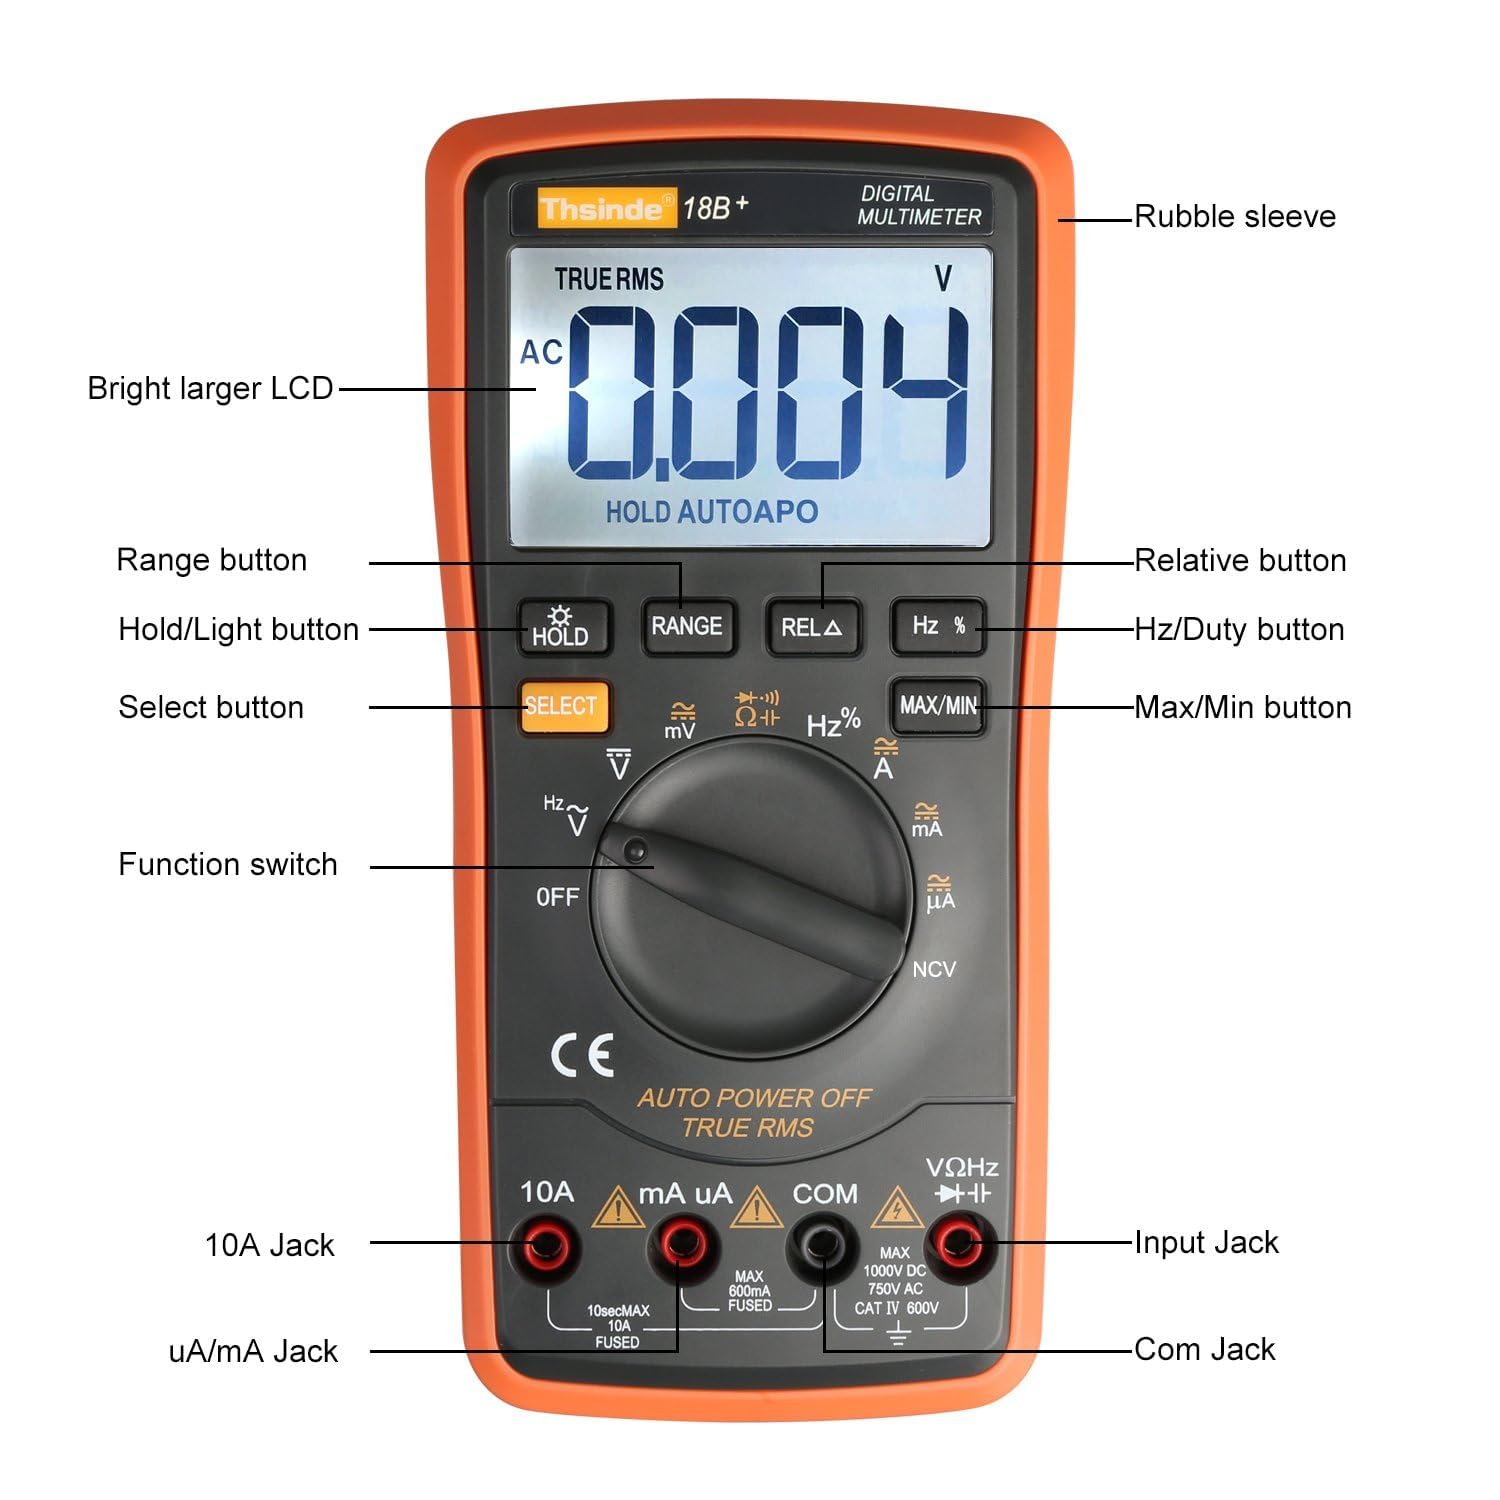
Figure 3: Labeled diagram of the Thsinde TRMS 6000 Multimeter. This image provides a detailed view of the multimeter with labels pointing to its key components, including the LCD, buttons, function switch, and input jacks.
- Rubble sleeve: ชั้นนอกป้องกันasing.
- Bright larger LCD: จอแสดงผลดิจิทัลสำหรับแสดงค่าต่างๆ
- ปุ่มช่วง: Manually selects measurement range (if not in auto-ranging mode).
- Hold/Light button: Freezes the current reading on the display; long press activates/deactivates backlight.
- ปุ่มเลือก: สลับการทำงานระหว่างฟังก์ชันต่างๆ ภายในตำแหน่งสวิตช์หมุนเดียว (เช่น AC/DC, ไดโอด/ความต่อเนื่อง)
- สวิตช์ฟังก์ชั่น: Rotary switch to select the desired measurement function.
- แจ็ค 10A: ขั้วต่ออินพุตสำหรับการวัดกระแสไฟฟ้าสูง (สูงสุด 10A)
- uA/mA Jack: ขั้วต่ออินพุตสำหรับไมโครคอนโทรลเลอร์ampere และ milliampมีการวัดปัจจุบัน
- COM แจ็ค: ขั้วต่ออินพุตทั่วไป (ขั้วลบ) สำหรับการวัดทั้งหมด
- Input Jack (VΩHz): ขั้วอินพุตบวกสำหรับปริมาตรtagการวัดค่าต่างๆ ได้แก่ ความต้านทาน ความถี่ ความจุ ไดโอด และความต่อเนื่อง
- Max/Min button: Displays maximum or minimum recorded values during a measurement session.
- Hz/Duty button: Toggles between frequency and duty cycle measurements.
- Relative button: Stores the current reading as a reference value and displays subsequent readings as a deviation from this reference.
5. การตั้งค่า
5.1 การติดตั้งแบตเตอรี่
The multimeter requires one 9V battery for operation. To install or replace the battery:
- ตรวจสอบให้แน่ใจว่ามัลติมิเตอร์ปิดอยู่
- ค้นหาช่องใส่แบตเตอรี่ที่ด้านหลังของมัลติมิเตอร์
- ใช้ไขควงถอดสกรูที่ยึดฝาครอบแบตเตอรี่ออก
- ถอดฝาครอบแบตเตอรี่ออกอย่างระมัดระวัง
- Connect the 9V battery to the battery clips, observing correct polarity (+ to + and - to -). The positive terminal is typically on the left when viewจากด้านหลัง
- Place the battery into the compartment, ensuring it fits snugly.
- ใส่ฝาครอบแบตเตอรี่และขันให้แน่นด้วยสกรู
5.2 การเชื่อมต่อสายทดสอบ
เชื่อมต่อสายทดสอบสีดำเข้ากับ... เสมอ คอม เชื่อมต่อสายวัดสีแดงเข้ากับช่องเสียบที่เหมาะสมตามประเภทการวัด:
- สำหรับฉบับที่tage, Resistance, Frequency, Capacitance, Diode, and Continuity measurements: Connect the red lead to the VΩเฮิร์ตซ์ แจ็ค.
- สำหรับไมโครampere (µA) or milliampere (mA) current measurements: Connect the red lead to the uA/มิลลิแอมป์ แจ็ค.
- For high current (up to 10A) measurements: Connect the red lead to the 10เอ แจ็ค.
6. คู่มือการใช้งาน
6.1 การทำงานพื้นฐาน
- Turn the function switch to the desired measurement function.
- เชื่อมต่อสายวัดทดสอบเข้ากับวงจรหรือชิ้นส่วนที่ต้องการทดสอบ
- อ่านค่าการวัดบนจอ LCD
- To turn off the multimeter, rotate the function switch to the ปิด ตำแหน่ง.
6.2 การปรับระยะอัตโนมัติ
The TRMS 6000 features auto-ranging, which automatically selects the appropriate measurement range for the input signal. This simplifies operation as you do not need to manually select a range. If manual ranging is desired for specific functions, press the ประเภท ปุ่ม.
6.3 การเก็บข้อมูล
กดปุ่ม ถือ button to freeze the current reading on the display. Press it again to release the hold function and resume live readings.
6.4 แสงพื้นหลัง
กดค้างไว้ HOLD/Light button to activate or deactivate the LCD backlight. This feature is useful for working in dimly lit environments.

Figure 4: Multimeter display with backlight activated in a dark setting. This image demonstrates the clear visibility of the LCD readings even in low-light conditions, thanks to the integrated backlight.
6.5 ปิดเครื่องอัตโนมัติ (APO)
The multimeter will automatically power off after approximately 15 minutes of inactivity to conserve battery life. To disable or re-enable APO, refer to the detailed user manual for specific button combinations during power-on.
7. ฟังก์ชันการวัด
The Thsinde TRMS 6000 offers a variety of measurement functions:

Figure 5: Icons representing various multimeter functions. This image displays a visual guide to the different measurement capabilities of the multimeter, such as Diode test, Frequency, Backlight, True RMS, Electric resistance, Max/Min value, Data hold, LCD display, Range, Auto Power Off, and Select.
7.1 DC ฉบับที่tagการวัดค่า (V DC)
- หมุนสวิตช์ฟังก์ชั่นไปที่ V position. If necessary, press เลือก to choose DC voltage.
- เชื่อมต่อสายทดสอบสีดำเข้ากับ คอม และการทดสอบสีแดงนำไปสู่ VΩเฮิร์ตซ์.
- ต่อสายทดสอบแบบขนานเข้ากับวงจรหรือชิ้นส่วนนั้น
- Range and Accuracy: 600mV, 6V, 60V, 600V ±(0.5%+3); 1000V ±(0.8%+10).
7.2 AC โวลtagการวัด (V AC)
- หมุนสวิตช์ฟังก์ชั่นไปที่ V position. If necessary, press เลือก to choose AC voltage.
- เชื่อมต่อสายทดสอบสีดำเข้ากับ คอม และการทดสอบสีแดงนำไปสู่ VΩเฮิร์ตซ์.
- ต่อสายทดสอบแบบขนานเข้ากับวงจรหรือชิ้นส่วนนั้น
- Range and Accuracy: 6V, 60V, 600V ±(0.8%+5); 750V ±(1.2%+10).
7.3 DC Current Measurement (A DC)
- หมุนสวิตช์ฟังก์ชั่นไปที่ A or มิลลิแอมป์/µA position. If necessary, press เลือก to choose DC current.
- For µA/mA: Connect the black test lead to คอม และการทดสอบสีแดงนำไปสู่ uA/มิลลิแอมป์.
- For 10A: Connect the black test lead to คอม และการทดสอบสีแดงนำไปสู่ 10เอ.
- เชื่อมต่อสายทดสอบแบบอนุกรมกับวงจร
- Range and Accuracy: 600µA, 6000µA ±(0.8%+3); 60mA, 600mA, 10A ±(2%+30).
7.4 AC Current Measurement (A AC)
- หมุนสวิตช์ฟังก์ชั่นไปที่ A or มิลลิแอมป์/µA position. If necessary, press เลือก to choose AC current.
- For µA/mA: Connect the black test lead to คอม และการทดสอบสีแดงนำไปสู่ uA/มิลลิแอมป์.
- For 10A: Connect the black test lead to คอม และการทดสอบสีแดงนำไปสู่ 10เอ.
- เชื่อมต่อสายทดสอบแบบอนุกรมกับวงจร
- Range and Accuracy: 600µA, 6000µA ±(0.8%+10); 60mA, 600mA, 10A ±(2%+30).
7.5 การวัดค่าความต้านทาน (โอห์ม)
- หมุนสวิตช์ฟังก์ชั่นไปที่ Ω ตำแหน่ง.
- เชื่อมต่อสายทดสอบสีดำเข้ากับ คอม และการทดสอบสีแดงนำไปสู่ VΩเฮิร์ตซ์.
- ต่อสายทดสอบเข้ากับชิ้นส่วน ตรวจสอบให้แน่ใจว่าวงจรไม่มีกระแสไฟไหลผ่าน
- Range and Accuracy: 600Ω ±(0.8%+5); 6KΩ, 60KΩ, 600KΩ, 6MΩ ±(0.8%+3); 60MΩ ±(1%+25).
7.6 การวัดค่าความจุ (F)
- หมุนสวิตช์ฟังก์ชั่นไปที่ ความจุ position (often shared with Diode/Continuity, use เลือก).
- เชื่อมต่อสายทดสอบสีดำเข้ากับ คอม และการทดสอบสีแดงนำไปสู่ VΩเฮิร์ตซ์.
- Connect the test leads across the capacitor. Ensure the capacitor is discharged before testing.
- Range and Accuracy: 60nF, 600nF, 6µF, 60µF ±(3.5%+20); 600µF, 6000µF ±(5.0%+10).
7.7 การวัดความถี่ (เฮิร์ตซ์)
- หมุนสวิตช์ฟังก์ชั่นไปที่ Hz position (often shared with voltage, use เลือก).
- เชื่อมต่อสายทดสอบสีดำเข้ากับ คอม และการทดสอบสีแดงนำไปสู่ VΩเฮิร์ตซ์.
- เชื่อมต่อสายทดสอบเข้ากับแหล่งสัญญาณ
- Range and Accuracy: 10Hz to 20MHz ±(0.1%+3).
7.8 การทดสอบไดโอด
- หมุนสวิตช์ฟังก์ชั่นไปที่ ไดโอด position (often shared with Continuity, use เลือก).
- เชื่อมต่อสายทดสอบสีดำเข้ากับ คอม และการทดสอบสีแดงนำไปสู่ VΩเฮิร์ตซ์.
- ต่อสายสีแดงเข้ากับขั้วบวกและสายสีดำเข้ากับขั้วลบของไดโอด แรงดันไฟฟ้าไปข้างหน้าtage drop will be displayed. Reverse the leads; the display should show OL (Open Loop).
7.9 การทดสอบความต่อเนื่อง
- หมุนสวิตช์ฟังก์ชั่นไปที่ ความต่อเนื่อง position (often shared with Diode, use เลือก).
- เชื่อมต่อสายทดสอบสีดำเข้ากับ คอม และการทดสอบสีแดงนำไปสู่ VΩเฮิร์ตซ์.
- Connect the test leads across the circuit or component. If resistance is below approximately 50Ω, the buzzer will sound, indicating continuity.
7.10 ไม่สัมผัส Voltagการตรวจจับ e (NCV)
- หมุนสวิตช์ฟังก์ชั่นไปที่ เอ็นซีวี ตำแหน่ง.
- Move the top end of the multimeter near a conductor.
- ถ้า AC voltage is detected (typically above 700V RMS), the instrument sensor will light up and an audible buzz will be emitted.

Figure 6: Multimeter demonstrating Non-Contact Voltage (NCV) detection. This image shows the multimeter held near a power strip, indicating its ability to detect AC voltage without direct contact, accompanied by an alarm sound icon.
8. การบำรุงรักษา
8.1 การทำความสะอาด
เช็ดเคสด้วยโฆษณาamp cloth and a mild detergent. Do not use abrasives or solvents. Ensure the multimeter is completely dry before use.
8.2 การเปลี่ยนแบตเตอรี่
When the low battery indicator appears on the display, replace the 9V battery as described in Section 5.1. Prompt battery replacement ensures continued accuracy and proper operation.
9 การแก้ไขปัญหา
- ไม่มีจอแสดงผลหรือจอแสดงผลจางๆ: ตรวจสอบการติดตั้งแบตเตอรี่ และเปลี่ยนแบตเตอรี่ 9V หากจำเป็น
- การอ่านค่าที่ไม่ถูกต้อง: Ensure test leads are correctly connected to the appropriate jacks for the selected function. Verify the function switch is set to the correct measurement type. Check battery level.
- "OL" แสดง: This indicates an overload (measurement exceeds the selected range) or an open circuit (no continuity). Adjust the range or check the circuit connection.
- ไม่มีเสียงบี๊บแสดงความต่อเนื่อง: Ensure the function switch is set to continuity mode and the circuit resistance is below the threshold (approx. 50Ω).
10. ข้อมูลจำเพาะ
| คุณสมบัติ | ข้อมูลจำเพาะ |
|---|---|
| แสดง | 6000 counts, Digital LCD with Backlight |
| DC ฉบับที่tagอี เรนจ์ | 600mV, 6V, 60V, 600V, 1000V |
| ฉบับ ACtagอี เรนจ์ | 6 โวลต์ 60 โวลต์ 600 โวลต์ 750 โวลต์ |
| ช่วงกระแสไฟตรง | 600µA, 6000µA, 60mA, 600mA, 10A |
| ช่วงกระแสไฟ AC | 600µA, 6000µA, 60mA, 600mA, 10A |
| ช่วงความต้านทาน | 600Ω, 6KΩ, 60KΩ, 600KΩ, 6MΩ, 60MΩ |
| ช่วงความจุ | 60nF, 600nF, 6µF, 60µF, 600µF, 6000µF |
| ช่วงความถี่ | 10Hz ถึง 20MHz |
| คุณสมบัติพิเศษ | True RMS, Auto Ranging, Data Hold, Auto Power Off, NCV Test, Diode Test, Continuity Test |
| แหล่งพลังงาน | 1 x 9V แบตเตอรี่ |
| ขนาด (กว้าง x ยาว x สูง) | 18.5 ซม. x 9 ซม. x 4.5 ซม. (7.28 นิ้ว x 3.54 นิ้ว x 1.77 นิ้ว) |
| น้ำหนักสินค้า | 1.34 ปอนด์ (ประมาณ 608 กรัม) |
| การป้องกัน | Overload Protection, Short-circuit Protection |

Figure 7: Multimeter with its physical dimensions indicated. This image provides a visual representation of the device's size, showing its length, width, and thickness in both centimeters and inches.
11. การรับประกันและการสนับสนุน
The Thsinde TRMS 6000 Digital Multimeter comes with a รับประกัน 1 ปี from the date of purchase. If you encounter any issues or have questions regarding the product during this period, please contact Thsinde customer support for assistance. Please retain your proof of purchase for warranty claims.