
1. บทนำ
This manual provides detailed instructions for the installation, operation, and maintenance of your UNITOPSCI 9.66 Inch 3 Channel WiFi Mirror Dash Cam. This device is designed to enhance driving safety and provide comprehensive recording capabilities with its front, in-cabin, and rear cameras. Please read this manual thoroughly before using the product to ensure proper functionality and to avoid damage.

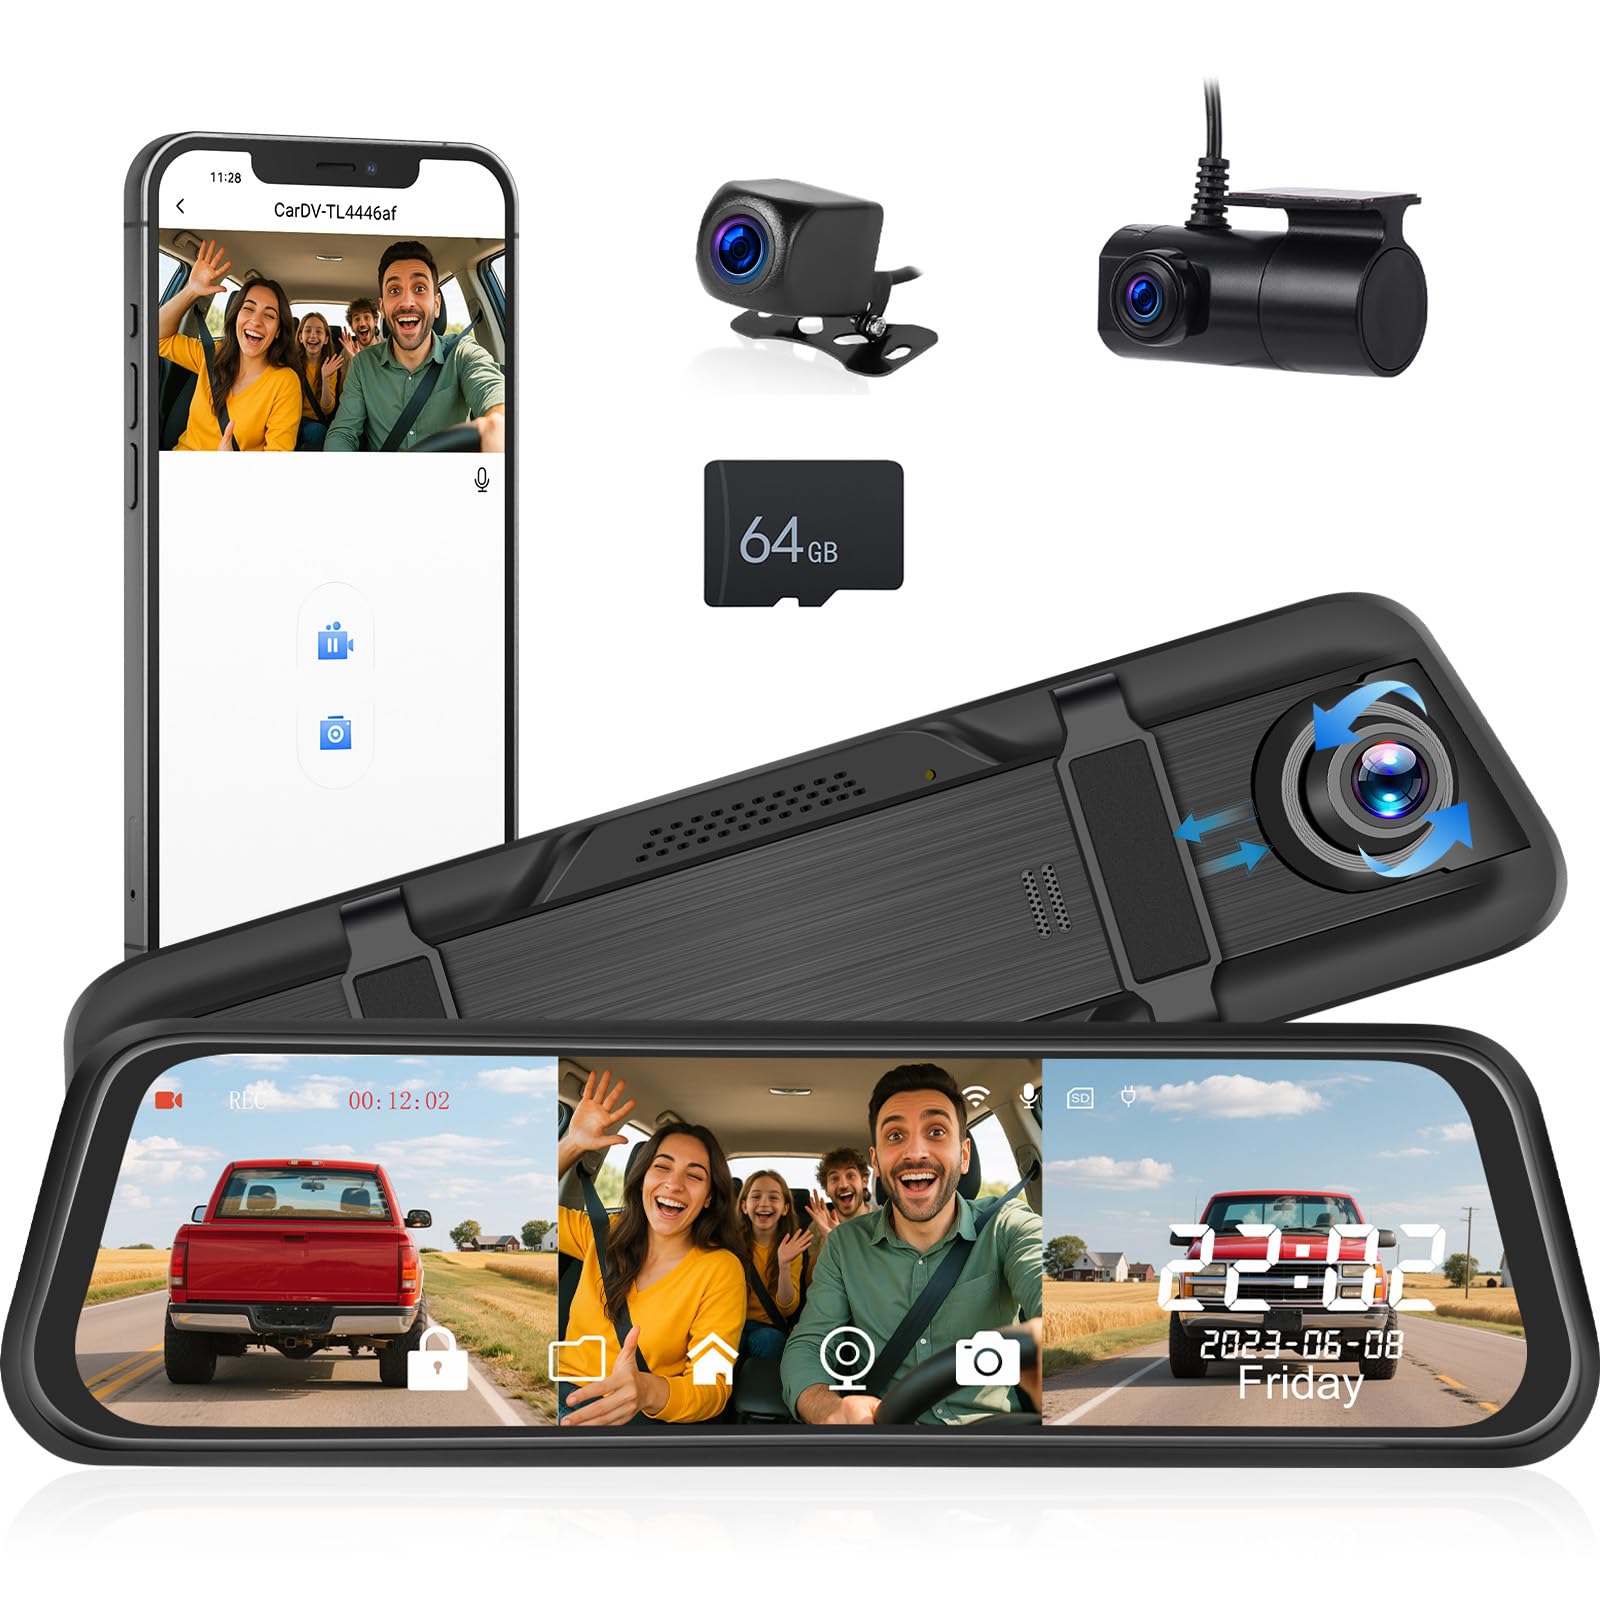
เกินview of the UNITOPSCI 9.66 Inch 3 Channel Mirror Dash Cam with its main features.
2. เนื้อหาบรรจุภัณฑ์
ตรวจสอบว่าสินค้าทั้งหมดที่ระบุไว้ด้านล่างนี้รวมอยู่ในแพ็คเกจของคุณแล้ว หากมีสินค้าใดสูญหายหรือเสียหาย โปรดติดต่อฝ่ายสนับสนุนลูกค้า
- DVR (Mirror Dash Cam) x 1
- สายไฟ x 1
- หลัง view camera x 2 (Note: The product description mentions 3 channels, but the 'Whats in the box' lists 2 rear view cameras. This implies one is for the rear exterior and one for the interior/cabin, or there's a discrepancy. For clarity, we list as provided.)
- Extended line x 1
- คู่มือการใช้งาน x 1
- ผ้าพันแผล x 1
- 64GB TF Card x 1 (Included as per feature bullets)

Visual representation of the package contents and main unit dimensions.
3. สินค้าหมดview
3.1 ส่วนประกอบหลักของตัวเครื่อง
- หน้าจอสัมผัส IPS ขนาด 9.66 นิ้ว: Capacitive display for intuitive control and clear viewการไอเอ็นจี
- กล้องหน้า: Records the road ahead at 1440P resolution.
- In-Cabin Camera: Records the vehicle interior at 720P resolution.
- กล้องหลัง: บันทึกการ view behind the vehicle at 720P resolution.
- พอร์ต USB: สำหรับพลังงานและการถ่ายโอนข้อมูล
- พอร์ต AV-IN: For connecting external cameras.
- ช่องเสียบการ์ด TF: Supports up to 64GB TF card for storage.
- ปุ่มรีเซ็ต: เพื่อคืนค่าการตั้งค่าจากโรงงาน
- วิทยากร: สำหรับเอาต์พุตเสียง
- วงเล็บ: For mounting the mirror dash cam.
ด้านหน้า view of the mirror dash cam.
4. คุณสมบัติหลัก
4.1 Triple Channel Recording
The dash cam records simultaneously from three perspectives: front (1440P), in-cabin (720P), and rear (720P). This provides comprehensive coverage for incidents and situational awareness.

Illustration of the triple channel recording and wide viewมุมการเอียง
4.2 9.66" IPS HD Touch Screen
The large capacitive IPS touch screen offers vibrant colors and details. It allows easy switching between camera views (front, rear, inside) or displaying them simultaneously.

Triple display switching and in-cabin camera functions.
4.3 ระบบมองเห็นกลางคืนขั้นสุดยอด
Equipped with an upgraded sensor and WDR & HDR technology, the dash cam captures clear videos with enhanced details in low light conditions, making license plates and road signs visible.

Night vision capabilities in various low-light scenarios.
4.4 Built-in WiFi & App Control
Connect the dash cam to your smartphone via Wi-Fi using the "Viidure" app (available for iOS and Android). This allows you to view, playback, and manage recordings directly from your device.

Steps for WiFi connection and app control.
4.5 Loop Recording & G-Sensor
การบันทึกแบบวนซ้ำ: ระบบจะเขียนทับไฟล์ foo ที่ปลดล็อกเก่าที่สุดโดยอัตโนมัติtage when the 64GB TF card is full, ensuring continuous recording.
จีเซ็นเซอร์: ตรวจจับแรงกระแทกหรือการชนอย่างกะทันหันและล็อกวิดีโอปัจจุบันโดยอัตโนมัติ file เพื่อป้องกันไม่ให้ข้อมูลถูกเขียนทับ ซึ่งจะเป็นการรักษาหลักฐานสำคัญไว้

Explanation of G-Sensor, Parking Monitor, and Loop Recording.
4.6 ระบบตรวจสอบการจอดรถตลอด 24 ชั่วโมง
With a dedicated hardwire kit (sold separately), the dash cam can continue recording in time-lapse mode after the car is turned off, providing continuous surveillance against theft or vandalism.

Visual of the 24-hour parking monitoring feature.
4.7 ถอยหลัง View การทำงาน
When reversing, the mirror dash cam automatically displays the backup camera image in full screen with adjustable parking assist lines. You can manually adjust the display range up or down for optimal viewการไอเอ็นจี

Automatic display of parking lines when reversing.
5. คู่มือการติดตั้ง
Follow these steps to properly install your dash cam system.
5.1 การติดตั้งกล้องติดกระจกมองหลัง
- ติดตั้งกล้องติดกระจกมองหลังเข้ากับกระจกมองหลังเดิมของคุณview mirror using the provided bandages/straps. Ensure it is firmly attached and does not obstruct your view.
- ปรับเลนส์กล้องหน้าเพื่อถ่ายภาพที่ต้องการ view ของถนนข้างหน้า
5.2 การต่อสายไฟ
- Plug the power cable into the dash cam's USB port.
- Route the power cable along the edge of the windshield and down to your vehicle's 12V power outlet (cigarette lighter socket).
- Plug the power adapter into the 12V power outlet.
5.3 การติดตั้งกล้องด้านหลัง
- ติดตั้งกล้องมองหลังไว้ที่ด้านหลังของรถ โดยปกติจะอยู่เหนือป้ายทะเบียนหรือบนกระจกหลัง ตรวจสอบให้แน่ใจว่ามองเห็นได้ชัดเจน view.
- Connect the rear camera cable to the AV-IN port on the main dash cam unit.
- Route the rear camera cable neatly through the vehicle's interior, tucking it under trim panels to conceal it.
- Connect the red wire of the rear camera cable to your vehicle's reverse light power wire. This enables the automatic display of the reversing view when shifting into reverse.
5.4 Installing the In-Cabin Camera
The in-cabin camera is integrated into the main unit, requiring no separate installation.

Cable routing and installation diagram.
6. คู่มือการใช้งาน
6.1 การเปิด/ปิดเครื่อง
- กล้องติดรถยนต์จะเปิดอัตโนมัติและเริ่มบันทึกเมื่อเปิดกุญแจรถ
- มันจะปิดเครื่องอัตโนมัติเมื่อปิดสวิตช์กุญแจ
- To manually power on/off, press and hold the power button (if available, otherwise rely on ignition).
6.2 การนำทางบนหน้าจอ
Use the touch screen to navigate menus and settings. Swipe left/right to switch between camera views or display modes.
6.3 การปรับการตั้งค่า
Access the settings menu by tapping the gear icon on the screen. Here you can adjust:
- ความละเอียดวิดีโอ: Set recording quality for each camera.
- ระยะเวลาการบันทึกแบบวนซ้ำ: Set segment length (e.g., 1, 3, 5 minutes).
- ความไวของ G-Sensor: Adjust the sensitivity for impact detection.
- การตรวจสอบที่จอดรถ: Enable/disable and configure settings (requires hardwire kit).
- การชดเชยแสง: Adjust brightness levels for optimal recording in varying light conditions.
- วันที่/เวลา: ตั้งวันที่และเวลาให้ถูกต้อง
- ไวไฟ : Enable/disable Wi-Fi and view รายละเอียดเครือข่าย

Adjustable screen settings for lens, field of view, and brightness.

Adjusting exposure compensation for night vision.
7. App Control (Viidure App)
The "Viidure" app allows for convenient control and management of your dash cam via Wi-Fi.
7.1 การดาวน์โหลดแอพ
ค้นหา "Viidure" in your smartphone's app store (Google Play Store for Android, Apple App Store for iOS) and download it.
7.2 การเชื่อมต่อกับ Wi-Fi
- On the dash cam, enable Wi-Fi from the settings menu.
- บนสมาร์ทโฟนของคุณ ให้ไปที่การตั้งค่า Wi-Fi และเชื่อมต่อกับเครือข่าย Wi-Fi ของกล้องติดรถยนต์ (SSID และรหัสผ่านจะแสดงบนหน้าจอของกล้องติดรถยนต์)
- Open the "Viidure" app. It should automatically detect and connect to the dash cam.
7.3 ฟังก์ชั่นแอป
- สด View: สตรีม foo แบบเรียลไทม์tage from the cameras to your phone.
- การเล่นซ้ำ: Review recorded videos stored on the TF card.
- ดาวน์โหลด: Save video clips directly to your smartphone.
- การตั้งค่า: ปรับการตั้งค่ากล้องติดรถยนต์จากระยะไกลได้

Detailed steps for WiFi connection and app control.
8 การแก้ไขปัญหา
หากคุณพบปัญหาเกี่ยวกับกล้องติดรถยนต์ โปรดดูปัญหาและวิธีแก้ไขที่พบบ่อยต่อไปนี้:
| ปัญหา | สาเหตุที่เป็นไปได้ | สารละลาย |
|---|---|---|
| กล้องติดรถยนต์ไม่สามารถเปิดได้ | No power supply; faulty power cable/adapter; loose connection. | Check power cable connection to dash cam and 12V outlet. Ensure vehicle's 12V outlet is functional. Try a different power source if available. |
| การบันทึกหยุดหรือหยุดนิ่ง | TF card full; faulty TF card; low power. | Ensure loop recording is enabled. Format the TF card regularly. Replace the TF card if it's old or damaged. Ensure stable power supply. |
| คุณภาพวิดีโอไม่ดี | เลนส์สกปรก; การตั้งค่าความละเอียดไม่ถูกต้อง; สภาพแสงผิดปกติ | Clean camera lenses with a soft cloth. Check video resolution settings. Adjust exposure compensation in settings. |
| ปัญหาการเชื่อมต่อ Wi-Fi | รหัสผ่าน Wi-Fi ไม่ถูกต้อง; แอปไม่ได้อัปเดต; มีสัญญาณรบกวน | Verify Wi-Fi password. Ensure the "Viidure" app is up to date. Try restarting both the dash cam and your smartphone. |
| กล้องหลังไม่แสดงผล | สายเคเบิลหลวม กล้องมีปัญหา | ตรวจสอบการเชื่อมต่อสายเคเบิลกล้องหลังกับตัวเครื่องหลัก ตรวจสอบให้แน่ใจว่าสายเคเบิลไม่ชำรุดเสียหาย |
| ระบบตรวจสอบการจอดรถไม่ทำงาน | Hardwire kit not installed; feature disabled in settings. | Install a dedicated hardwire kit for 24-hour parking monitoring. Enable the feature in the dash cam settings. |
9. ข้อมูลจำเพาะ
| คุณสมบัติ | รายละเอียด |
|---|---|
| ขนาดสินค้า | 1 x 10.1 x 2.8 นิ้ว |
| น้ำหนักสินค้า | 1.82 ปอนด์ |
| แสดง | หน้าจอสัมผัส IPS ขนาด 9.66 นิ้ว |
| ความละเอียดของกล้องหน้า | 1440P (1920*1080P@25FPS as per feature bullets, 1440P as per other details. Refer to device for exact resolution.) |
| In-Cabin Camera Resolution | 720P (1080*720P@30FPS as per feature bullets) |
| ความละเอียดกล้องหลัง | 720P (1080*720P@30FPS as per feature bullets) |
| ทุ่งแห่ง View | Front: 170 degrees, In-Cabin: 120 degrees, Rear: 150 degrees (approximate, based on product images) |
| พื้นที่จัดเก็บ | Supports TF Card (64GB included) |
| การเชื่อมต่อ | ไร้สาย (Wi-Fi) |
| คุณสมบัติพิเศษ | IPS Touch screen, G-Sensor, Loop Recording, Night Vision, Parking Monitor, App Control |
| ประเภทการติดตั้ง | หลังview ติดกระจก |
| ประเภทบริการยานพาหนะ | รถยนต์,รถบรรทุก |
10. การรับประกันและการสนับสนุน
UNITOPSCI provides customer support and warranty services for its products.
- การทดแทน: Available within 24 months.
- การสนับสนุนด้านเทคนิค: Lifetime after-sales consultation and technical support.
- การส่งคืน: 60-day no-worry return policy.
- เวลาตอบสนอง: ตอบข้อซักถามอย่างรวดเร็วภายใน 16 ชั่วโมง
For support, please contact UNITOPSCI via email at UNITOPSCI@126.com.
